
Related Manuals for Panasonic CW-7585-B


Summary of Contents for Panasonic CW-7585-B
- Page 1 CD-RW DRIVE UNIT CW-7585-B INSTRUCTION MANUAL Please read through these instructions before operating this unit. Interface : ATAPI...
-
Page 2: Table Of Contents
CD-R DRIVE UNIT CW-7585-B INSTRUCTION MANUAL Please read through these instructions before operating this unit. Interface : ATAPI BUSY WRITING COMPACT TABLE OF CONTENTS IMPORTANT SAFETY NOTICE ................iv LASER SAFETY INFORMATION ............... 1 INTRODUCTION ....................2 1. PRECAUTIONS WHEN OPERATING ............3 1.1 PRECAUTIONS WHEN TRANSPORTING .......... -
Page 3: Important Safety Notice
IMPORTANT SAFETY NOTICE NOTICE (1) You may not reproduce or transcribe any part of this publication without permission. (2) We reserve the right to revise this document at any time without notice. (3) If you have any questions about this document, contact your sales representative. SAFETY NOTICE (1) To prevent fire or electric shock, do not expose this appliance to rain or moisture. -
Page 4: Laser Safety Information
LASER SAFETY INFORMATION Class 1 LASER Product This equipment is certified to comply with DHHS Rule 21 CFR Chapter 1,Subchapter J in effect as of date of manufacture. Elsewhere, the drive is certified to conform to the requirements of the International Electrotechnical Commission (IEC) 825 and CENELEC EN60825 for Class 1 laser products. -
Page 5: Introduction
For Finnish VAROITUS! Laitteen käyttäminen muulla kuin tässä käyttöohjeessa mainitulla tavalla saattaa altistaa käyttäjän turvallisuusluokan 1 ylittävälle näkymättömälle lasersäteilylle. For Swedish VARNING! Om apparaten används på annat sätt än i denna bruksanvisning specificerats, kan användaren utsättas för osynlig laserstrålning, som överskrider gränsen för laserklass 1. -
Page 6: Precautions When Operating
CHAPTER 1 PRECAUTIONS WHEN OPERATING 1.1 PRECAUTIONS WHEN TRANSPORTING To avoid damage * Keep the original packing materials for the drive unit. * Before you transport the drive unit, remove the disc from the drive unit and repack the drive unit in its original packing. 1.2 INSTALLATION LOCATION Do not place unit in the following environment. - Page 7 Do not write on the recording / reading side, or paste paper to the surface of the disc. When labelling a disc for identification purposes, write only on the premarked label side using a soft, felt tip marker. Do not store the disc in a place where the temperature is high.
-
Page 8: Parts And Functions
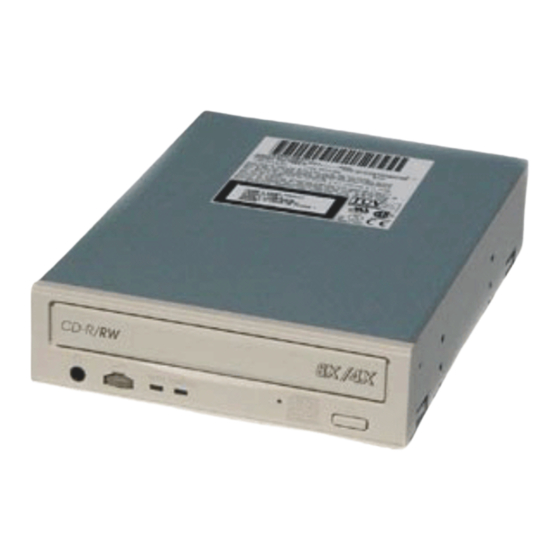
CHAPTER 2 PARTS AND FUNCTIONS 2.1 FRONT VIEW BUSY WRITING COMPACT DISC TRAY Accepts a disc. HEAD PHONE JACK Headphone can be connected using a 3.5mm stereo mini plug. VOLUME Adjusts audio output level of Headphone. BUSY INDICATOR Lights when data is being accessed from the disc, or the drive is playing an audio CD. WRITING INDICATOR Lights when the drive is writing onto the CD-RW or CD-R disc. -
Page 9: Rear View
2.2 REAR VIEW INTERFACE CONNECTOR Connects to host computer’s interface connector. DC (IN) CONNECTOR AUDIO OUT CONNECTOR (Analog) JUMPER PIN Insert the jumper according to the Master / Slave / CSEL drive. (See the figure in the next page.) DIGITAL AUDIO OUT CONNECTOR NOTE: The serial format of digital data (not Audio data) output functions with some model. -
Page 10: Connections
CHAPTER 3 CONNECTIONS 3.1 CONNECTING VIEW Interface Connector DC (IN) Connector Jumper Pin Audio Out Connector DC Power Connector Digital Audio Out Connector Interface Cable Jumper Drive-Select (Master/Slave/CSEL) Cable select (CSEL) Slave Master (default) -
Page 11: Guide To Operation
CHAPTER 4 GUIDE TO OPERATION 4.1 INSTALLATIONS • Starting the drive. Turn on the power supply. Press the eject button. The tray is ejected from the drive. Place the disc in the tray with the disc's label facing up. Press the eject button or press the tray lightly as in the following figure. The tray is retracted automatically. -
Page 12: General Description
CHAPTER 5 GENERAL DESCRIPTION 5.1 FEATURE SUMMARY Embedded ATAPI Interface. Automatic Loading with tray. Horizontal and Vertical Installation. (Vertical : Vertical installation type only, 12 cm Disc only) Audio Playback Capability. MS-DOS CD-ROM Extensions Available. 5 1/4" Half Height Design. Digital data Rewrite and Read capability. -
Page 13: Specification Summary
CHAPTER 6 SPECIFICATION SUMMARY 6.1 PERFORMANCE Disc diameter 12 cm Disc speed (1x mode) *1 200 ~ 540 r/ min (CLV) *4 (32x mode) *2 6322 ~ 7376 r/ min (CAV) *5 Data capacity 656 / 748 MBytes typical (Mode 1/ Mode 2) (74 min. -
Page 14: Audio Performance
6.3 AUDIO PERFORMANCE Number of channels Frequency response 20 Hz ~ 20 kHz, –3 dB ~ +0.5 dB (Line-out) SN Ratio More than 80 dB Distortion Less than 0.1% (1 kHz) Output level 0.6 Vrms (Line-out) 6.4 GENERAL PERFORMANCE Power requirement 2.0 A +12V 2.0 A... -
Page 15: Before Requesting Service
CHAPTER 7 BEFORE REQUESTING SERVICE 7.1 TROUBLESHOOTING (1) There are many kinds of problems caused by misuse. When a problem occurs, check the table below which describes possible problems occurring with your CD-RW drive. (2) If the CD-RW drive is not operating correctly and you cannot restore operation by following the detailed procedures in the table below, do not remove the cover of the units or adjust further. - Page 16 Weight and dimensions shown are approximate. Specifications are subject to change without notice. LMQT00390 Printed in Japan...