Samsung CY-SWR1100 User Manual
Hide thumbs
Also See for CY-SWR1100:
- Product highlights (1 page) ,
- User manual (108 pages) ,
- Quick installation manual (9 pages)
Table of Contents
Advertisement
Quick Links
Advertisement
Table of Contents

Related Manuals for Samsung CY-SWR1100


Summary of Contents for Samsung CY-SWR1100
-
Page 2: Safety Information
afety nformatIon afety arnIngS To reduce the risk of electric shock, do not remove the cover (or back). No user serviceable parts are inside. Refer to qualified service personnel. This symbol indicates “dangerous volt- Caution: To prevent electric shock, This symbol indicates important in- age”... -
Page 3: Table Of Contents
Connect my Samsung TV to the router using OFC......90 Plug & Access Connection Method ...........91 Getting Started ��������������������������������������������4 Connect my Samsung TV to the router using Plug & Access..91 Package Contents ................4 Priority Quality of Service ..............91 System Requirements ................ -
Page 4: Getting Started
ettIng tarted ackage ontentS Check for the supplied accessories below: • Wireless 802.11n Dual Band Router • Power Adapter with extra Power Cable • Ethernet Cable • CD-ROM (with installation software and manuals) • Quick Installation Guide • Stand • Mounting Kit yStem equIrementS Network Requirements:... -
Page 5: About This Product
The Samsung CY-SWR1100 wireless router is packed with a load of features. Most of these features are what is expected from an Internet Wireless router, and then there are the features that are unique to Samsung products. -
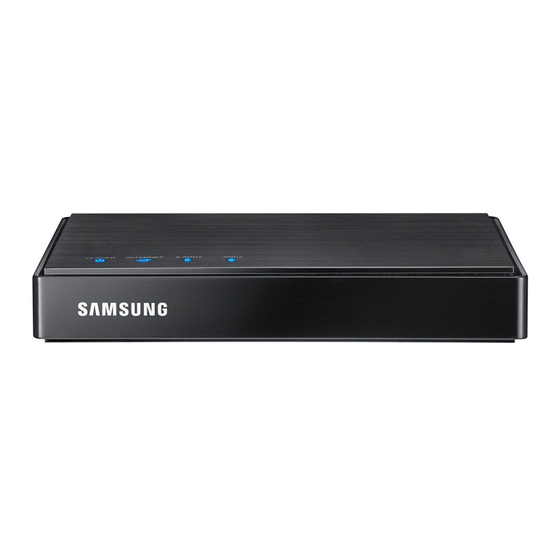
Page 6: Description
eScrIPtIon ront POWER LED A solid blue light indicates a proper connection to the power supply. INTERNET LED A solid blue light indicates the PPP negotiation has successfully completed. 2.4Ghz LED A solid light indicates that the 2.4GHz wireless segment is ready. This LED blinks during wireless data transmission. -
Page 7: Installation
nStallatIon This section will walk you through the installation process. Placement of the router is very important. Do not place the router in an enclosed area such as a closet, cabinet, attic or garage. efore you egIn • Please configure the router with the computer that was last connected directly to your modem. •... -
Page 8: Connect To Another Router
onnect to nother outer If you are connecting the router to another router to use as a wireless access point and/or switch, you will have to do the fol- lowing before connecting the router to your network: • Disable UPnP™ •... -
Page 9: Connecting To The Web Ui
onnectIng to the This section will help you to connect to your router’s Web User Interface (Web UI) for the first time. ’ outer efaultS The router’s default values are as follows: IP Address: 192.168.0.1 Username: admin Password: (blank) onnectIng uSIng the roWSer To connect the router’s Web UI, you’ll need to use your Internet Browser. -
Page 10: Web User Interface
This Web User Interface is divided into categories, found in the top menu, and pages, found in the left menu. The Samsung Wireless router Web UI provides five categories to edit. Setup: In this category the user will be able to configure the basic features for this router to function prop- erly on a network. -
Page 11: Setup Category
etuP ategory In this category the user will be able to configure the basic features for this router to function properly on a network. Features like Internet Connectivity, Local Area Network Connectivity and Wireless Connectivity. Pages that can be configured in the Setup category are as follows: Internet: On this page the user can configure the Internet settings for this router. -
Page 12: Internet - Wizard
4 step configuration process. This wizard will guide you through a step-by-step process to configure your new Samsung router and connect to the Internet. Step 1: In this step the user will be able to re-configure the Login Password for this device. - Page 13 Step 2: Select the appropriate time zone for your location. This information is required to configure the time-based options for the router. The following parameters can be configured: Time Zone: Select the appropriate Time Zone used. This information will be used by the time-based options on this router.
- Page 14 After selecting the Dynamic IP Address Internet connection method, the following page will appear: The following parameters can be configured: MAC Address: Enter the MAC address of the Internet gateway (plugged into the Internet port of this device) here. Clone Button: If the configuration PC also acts as the Internet gateway, then click on the Clone Your PC’s MAC Address button to copy the PC’s MAC address into the space provided.
- Page 15 Configure your Internet Connection: PPTP Connection After selecting the PPTP Internet connection method, the following page will appear: The following parameters can be configured: Address Mode: Here the user can specify whether this Internet connection requires the use of a Dynamic or Static IP address.
- Page 16 After selecting the L2TP Internet connection method, the following page will appear: The following parameters can be configured: Address Mode: Here the user can specify whether this Internet connection requires the use of a Dynamic or Static IP address. L2TP usual requires a Dynamic IP configuration. L2TP IP Address: Enter the L2TP IP address used here.
- Page 17 After selecting the Static IP Address Internet connection method, the following page will appear: The following parameters can be configured: IP Address: Enter the Static IP address provided by the ISP here. Subnet Mask: Enter the Subnet Mask provided by the ISP here. Gateway Address: Enter the Gateway IP address provided by the ISP here.
-
Page 18: Internet - Manual Internet Connection
nternet anual nternet onnectIon On this page the user can configure the Internet Connection settings manually. To access the Manual Internet Connection page, click on the Manual Internet Connection Setup button. On this page there a multiple parameter that can be configured regarding the Internet Connection setup. We’ll discuss them from top to bottom. - Page 19 Internet Connection Type: Static IP Select Static IP from the drop-down menu if all the Internet port’s IP information is provided to you by your ISP. You will need to enter in the IP address, subnet mask, gateway address, and DNS address(es) provided to you by your ISP. Each IP address entered in the fields must be in the appropriate IP form, which are four octets separated by a dot (x.x.x.x).
- Page 20 Internet Connection Type: Dynamic IP (DHCP) Select Dynamic IP (DHCP) from the drop-down menu to obtain IP Address information automatically from your ISP. Select this option if your ISP does not give you any IP numbers to use. This option is commonly used for cable modem services. The following parameters can be configured: Host Name: The Host Name is optional but may be required by some ISPs.
- Page 21 Internet Connection Type: PPPoE (Username / Password) Select PPPoE (Username/Password) from the drop-down menu if your ISP uses a PPPoE connection. Your ISP will provide you with a username and password. This option is typically used for DSL services. Make sure to remove your PPPoE software from your computer.
- Page 22 This page is a continue from the PPPoE Internet Connection Type: Secondary DNS Server: Enter the Secondary DNS IP address used here. This field is normally optional. Only one DNS address is required for a functional Internet connection, but using a second DNS address provides more stability.
- Page 23 Internet Connection Type: PPTP (Username / Password) Select PPTP (Point-to-Point Tunneling Protocol) from the drop-down menu if your ISP uses a PPTP connection. Your ISP will provide you with a username and password. This option is typically used for DSL services. The following parameters can be configured: Address Mode: Here the user can specify whether this Internet connection requires the use of a Dynamic...
- Page 24 This page is a continue from the PPTP Internet Connection Type: MTU: Maximum Transmission Unit - you may need to change the MTU for optimal performance with your specific ISP. 1400 is the default MTU. MAC Address: The default MAC Address is set to the Internet port’s physical interface MAC address on the Broadband Router.
- Page 25 Internet Connection Type: L2TP (Username / Password) Choose L2TP (Layer 2 Tunneling Protocol) if your ISP uses a L2TP connection. Your ISP will provide you with a username and password. This option is typically used for DSL services. The following parameters can be configured: Address Mode: Here the user can specify whether this Internet connection requires the use of a Dynamic or Static IP address.
- Page 26 This page is a continue from the L2TP Internet Connection Type: MTU: Maximum Transmission Unit - you may need to change the MTU for optimal performance with your specific ISP. 1400 is the default MTU. MAC Address: The default MAC Address is set to the Internet port’s physical interface MAC address on the Broadband Router.
-
Page 27: Wireless Settings
IreleSS ettIngS On this page the user can configure the Wireless settings for this device. There are 3 ways to configure Wireless using this router. Firstly, the user can choose to make use for the quick and easy Wireless Connection Wizard. Secondly, the user can choose to make use Wi-Fi Protected Setup. - Page 28 on both 2�4GHz and 5GHz band’ option. Un-selecting this option will allow the user to manually enter a pre-shared key for both individual frequency bands. The key entered must be between 8 and 63 characters long. Remember, this key will be used when wireless clients wants to connect to this device. So please remember this key to prevent future troubleshooting.
- Page 29 Wireless Settings: Wi-Fi Protected Setup Wizard If your Wireless Clients support the WPS connection method, this Wi-Fi Protected Setup Wizard can be used to initiate a wireless connection between this device and Wireless clients with a simple click of the WPS button. The Wi-Fi Protected Setup Wizard is specially designed to assist basic network users with a simple, step-by-step set of instructions to connect wireless clients to this router using the WPS method.
- Page 30 Step 2: After selecting Manual, the following page will appear. On this page to user can view the wireless configuration of this router. The wireless clients should configure their wireless settings to be identical to the settings displayed on this page for a successful connection.
- Page 31 Wireless Settings: Manual Wireless Network Setup The manual wireless network setup option allows user to configure the wireless settings of this device manually. This option is for the more advanced user and includes all parameter that can be configured for wireless connectivity. To initiate the Manual Wireless Network Setup page, click on the Manual Wireless Connection Setup button.
- Page 32 WMM Enable: WMM (Wi-Fi Multimedia) is QoS for your wireless network. Check this box to improve the quality of video and voice applications for your wireless clients. This feature is not available in 802.11n configurations. Enabled Hidden Wireless: Check this box if you do not want the SSID of your wireless network to be broadcasted. If the SSID is hidden, the SSID will not be seen by Site Survey utilities, so your wireless clients will have to know the SSID of your router in order to connect to it.
- Page 33 Wireless Security Mode: WPA/WPA2 Wireless Security (enhanced) Wi-Fi Protected Access (WPA) is the most advanced and up to date wireless encryption method used today. This is the recommended wireless security option. The following parameters can be configured: Cipher Type: Select the appropriate cipher type to use here. Options to choose from are Temporal Key Integrity Protocol (TKIP), Advanced Encryption Standard (AES), and Auto (TKIP/AES).
- Page 34 The next section will allow the user to configure all the parameters regarding the 5GHz frequency band. The following parameters can be configured: Wireless Band: Displays the wireless band being configured. In this option we find that the following parameters will be regarding the 5GHz band. Enable Wireless: Check the box to enable the wireless function.
-
Page 35: Network Settings
etWork ettIngS On this page the user can configure the internal network settings of the router and also able to configure the built-in DHCP server to assign IP addresses to computers on the network. The IP address that is configured here is the IP address that is used to access the Web-based management interface. - Page 36 The following parameters can be configured: Enable DHCP Server: Check this box to enable the DHCP server on your router. Uncheck to disable this func- tion. DHCP IP Address Range: Enter the starting and ending IP addresses for the DHCP server’s IP assignment. DHCP Lease Time: The length of time for the IP address lease.
-
Page 37: Advanced Category
dVanced ategory In this category the user will be able to configure the more advanced features that can be done by this router. Features like Port Forwarding, Firewall settings, Quality of Service settings and more. Pages that can be configured in the Advanced category are as follows: Virtual Server: On this page that user can configure Virtual Server policies related to this router. -
Page 38: Virtual Server
Irtual erVer This router can be configured as a virtual server so that remote users accessing Web or FTP services via the public IP ad- dress can be automatically redirected to local servers in the LAN (Local Area Network). The router’s firewall feature filters out unrecognized packets to protect the LAN network so all computers networked with the router are invisible to the outside world. -
Page 39: Port Forwarding
orWardIng On this page the user will be able to forward a list of ports to an internal IP address. The following section allows the user to configure the port forwarding rules. The following parameters can be configured: Checkbox: Tick the checkbox on the left side to enable the Port Forwarding rule. Name: Enter a name for the rule or select an application from the drop-down menu. -
Page 40: Application Rules
PPlIcatIon uleS Some applications require multiple connections, such as Internet gaming, video conferencing, Internet telephony and others. These applications have difficulties working through NAT (Network Address Translation). Special Applications makes some of these applications work with the router. If you need to run applications that require multiple connections, specify the port nor- mally associated with an application in the “Trigger Port”... -
Page 41: Quality Of Service (Qos)
ualIty of erVIce The QoS Engine option helps improve your network gaming performance by prioritizing applications. By default the QoS Engine settings are disabled and application priority is not classified automatically. Smart QoS improves VoIP voice quality or streaming by ensuring your VoIP or streaming traffic is prioritized over other network traffic, such as FTP or Web. - Page 42 After specifying the QoS framework used, in the QoS setup section, the user can now create individual rules for scenarios that require the use of traffic control and data priority manipulation. The following parameters can be configured: Checkbox: Tick this option to enable the rule specified. Name: Enter a custom name for the rule being created here.
-
Page 43: Network Filter
etWork Ilter The MAC (Media Access Controller) Address filter option is used to control network access based on the MAC Address of the network adapter. A MAC address is a unique ID assigned by the manufacturer of the network adapter. This feature can be configured to ALLOW or DENY network/Internet access. -
Page 44: Access Control
cceSS ontrol The Access Control option allows you to control access in and out of your network. Use this feature as Access Controls to only grant access to approved sites, limit web access based on time or dates, and/or block internet access for applications like P2P utilities or games. - Page 45 Step 2: In the second step, the user can configure the schedule settings for this rule. The following parameters can be configured: Details: Select the appropriate predefined schedule rule to apply to this rule from the drop-down menu. Click on the Prev button to return to the previous window. Click on the Next button to continue to the next window.
- Page 46 Step 4: In the fourth step, the user can select the filtering method used for this rule. The following parameters can be configured: Method: Here the user can select the filtering method used. Options to choose from are ‘Log Web Access Only’, ‘Block All Access’, and ‘Block Some Access’.
-
Page 47: Website Filter
ebSIte Ilter Website Filters are used to allow you to set up a list of Web sites that can be viewed by multiple users through the network. Website Filter is used to allow or deny computers on your network from accessing specific web sites by keywords or specific Domain Names. -
Page 48: Inbound Filter
nbound Ilter The Inbound Filter option is an advanced method of controlling data received from the Internet. With this feature you can configure inbound data filtering rules that control data based on an IP address range. Inbound Filters can be used for limiting access to a server on your network to a system or group of systems. Filter rules can be used with Virtual Server, Port Forwarding, or Remote Administration features. -
Page 49: Firewall Settings
IreWall ettIngS A firewall protects your network from the outside world. The router offers a firewall type functionality. The SPI feature helps prevent cyber attacks. Sometimes you may want a computer exposed to the outside world for certain types of applications. If you choose to expose a computer, you can enable DMZ. -
Page 50: Routing
outIng The Routing option is an advanced method of customizing specific routes of data through your network. In the Static Routing section, the user can configure routing rules used by this router. The maximum amount of rules that can be configured is 32. The following parameters can be configured: Checkbox: To enable a route, check the box that is on the left side of the route. -
Page 51: Advanced Wireless
dVanced IreleSS These options are for users that wish to change the behavior of their 802.11n wireless radio from the standard settings. We do not recommend changing these settings from the factory defaults. Incorrect settings may impact the performance of your wireless radio. - Page 52 In the next section, the user can configure the more advanced wireless settings for the 5GHz frequency band. The following parameters can be configured: Wireless Band: Here the user can view the wireless frequency band being configured. In the case 5GHz. Transmit Power: This option sets the transmit power of the antennas.
-
Page 53: Wi-Fi Protected Setup
rotected etuP Wi-Fi Protected Setup (WPS) System is a simplified method for securing your wireless network during the “Initial setup” as well as the “Add New Device” processes. The Wi-Fi Alliance (WFA) has certified it across different products as well as manu- factures. - Page 54 Click the Connect your Wireless Device button to start Wireless Connection Setup Wizard. This wizard helps you add wireless devices to the wireless network. The wizard will either display the wireless network settings to guide you through manual configuration, prompt you to enter the PIN for the device, or ask you to press the configuration button on the device.
-
Page 55: Advanced Network Settings
dVanced etWork ettIngS This section contains settings which can change the way the router handles certain types of traffic. We recommend that you not change any of these settings unless you are already familiar with them or have been instructed to change them by one of our support personnel. - Page 56 Multicast Streams: This section enables the user to allow Multicast traffic to pass from the Internet to your network more efficiently. The following parameters can be configured: Enable Multicast Streams: Enable this option if you are receiving video on demand type of service from the Internet. The router uses the IGMP protocol to support efficient multicasting transmission of identi- cal content, such as multimedia, from a source to a number of recipients.
-
Page 57: Guest Zone
ueSt On this page, the user will be able to configure the Guest Zone, settings. The guest zone provide a separate network zone for guest to access Internet. In the Guest Zone section below, the user will be able to enable the routing function between guest zones. The following parameters can be configured: Enable Routing: Tick this option to enable routing between guest zones. - Page 58 In the following section, the user will be able to configure the Guest Zone Wireless Network settings used by the 5GHz frequency band. The following parameters can be configured: Enable Guest Zone: Tick this option to enable the Guest Zone feature for the frequency band 5GHz. Use the drop-down menu to schedule the time that the Firewall rule will be enabled.
-
Page 59: Ipv6
On this page the user can configure the mode that the Router will use to access an IPv6 Internet connection. There are several connection types to choose from: Link-local, Static IPv6, DHCPv6, Stateless Auto-Configuration, PPPoE, IPv6 over IPv4 Tunnel and 6to4. If you are unsure of your connection method, please contact your IPv6 ISP. Note: If using the PPPoE option, you will need to ensure that any PPPoE client software on your computers has been removed or disabled. - Page 60 The following parameters can be configured: Enable Auto-Configura- The user can tick this option to enable the auto-configuration feature. tion: Auto-Configuration Type: The user can select the auto-configuration type used here. Options to choose from are Stateless or Stateful (DHCPv6). Router Advertisement This option is only available when the auto-configuration type is set to Stateless.
- Page 61 IPv6 Connection Type: Auto-Configuration (Stateless/DHCPv6) In the following section we’ll discuss the parameters that can be configured when setting up an Auto-Configuration (State- less/DHCPv6) connection. This is a method of connection where the ISP assigns your IPv6 address when your router re- quests one from the ISP’s server.
- Page 62 The following parameters can be configured: Enable Auto-Configura- The user can tick this option to enable the auto-configuration feature. tion: Auto-Configuration Type: The user can select the auto-configuration type used here. Options to choose from are Stateless or Stateful (DHCPv6). Router Advertisement This option is only available when the auto-configuration type is set to Stateless.
- Page 63 IPv6 Connection Type: PPPoE Select this option if your ISP requires you to use a PPPoE (Point to Point Protocol over Ethernet) connection to IPv6 Internet. DSL providers typically use this option. This method of connection requires you to enter a Username and Password (provided by your Internet Service Provider) to gain access to the IPv6 Internet.
- Page 64 Use the section to configure the internal network settings of your router. The LAN IPv6 Link-Local Address is the IPv6 Ad- dress that you use to access the Web-based management interface. If you change the LAN IPv6 Address here, you may need to adjust your PC’s network settings to access the network again.
- Page 65 IPv6 Connection Type: IPv6 in IPv4 Tunnel In section to the user can configure the IPv6 connection to run in IPv4 Tunnel mode. IPv6 over IPv4 tunneling encapsulates IPv6 packets in IPv4 packets so that IPv6 packets can be sent over an IPv4 infrastructure. The following parameters can be configured: My IPv6 Connection is: Select the appropriate IPv6 Connection Type used for this configuration here.
- Page 66 The following parameters can be configured: Auto-Configuration: The user can tick this option to enable the auto-configuration feature. Auto-Configuration Type: The user can select the auto-configuration type used here. Options to choose from are Stateless or Stateful (DHCPv6). Router Advertisement This option is only available when the auto-configuration type is set to Stateless.
- Page 67 IPv6 Connection Type: 6to4 In this section the user can configure the IPv6 6to4 connection settings. 6to4 is an IPv6 address assignment and automatic tunneling technology that used to provide unicast IPv6 connectivity between IPv6 sites and hosts across the IPv4 Internet. The following parameters can be configured: My IPv6 Connection is: Select the appropriate IPv6 Connection Type used for this configuration here.
- Page 68 The following parameters can be configured: Auto-Configuration: The user can tick this option to enable the auto-configuration feature. Auto-Configuration Type: The user can select the auto-configuration type used here. Options to choose from are Stateless or Stateful (DHCPv6). Router Advertisement This option is only available when the auto-configuration type is set to Stateless.
- Page 69 IPv6 Connection Type: 6rd In this section the user can configure the IPv6 6rd connection settings. The following parameters can be configured: My IPv6 Connection is: Select the appropriate IPv6 Connection Type used for this configuration here. The following parameters can be configured: 6rd IPv6 Prefix: Enter the 6rd IPv6 address and prefix value used here.
- Page 70 The following parameters can be configured: Auto-Configuration: The user can tick this option to enable the auto-configuration feature. Auto-Configuration Type: The user can select the auto-configuration type used here. Options to choose from are Stateless or Stateful (DHCPv6). Router Advertisement This option is only available when the auto-configuration type is set to Stateless.
- Page 71 IPv6 Connection Type: Link-Local Only The Link-local address is used by nodes and routers when communicating with neighboring nodes on the same link. This mode enables IPv6-capable devices to communicate with each other on the LAN side. The following parameters can be configured: My IPv6 Connection is: Select the appropriate IPv6 Connection Type used for this configuration here.
-
Page 72: Ipv6 Firewall
IreWall On this page the user can configure the IPv6 firewall settings. The firewall settings section is an advance feature that is used to allow or deny traffic from passing through the device. It works in the same way as IP Filters with additional settings. You can create more detailed rules for the device. -
Page 73: Tools Category
oolS ategory In this category the user will be able to configure features that are related to the router itself. Features like the time settings, login accounts, firmware update and more. Pages that can be configured in the Tools category are as follows: Administration: On this page the user can configure a new password as well as remote administration settings for this device. -
Page 74: Admin
dmIn This page will allow you to change the Administrator password and configure the authentication settings. This window also allows you to enable Remote Management, via the Internet. In the Admin Password section, the user can change the login password used for this device. The following parameters can be configured: Password: Enter the new login password used here. -
Page 75: Time
The Time window allows you to configure, update, and maintain the correct time on the internal system clock. From this sec- tion you can set the time zone that you are in and set the Time Server. Daylight Saving can also be configured to automatically adjust the time when needed. -
Page 76: Syslog
ySlog The Syslog options allow you to send log information to a System Log Server. The following parameters can be configured: Enable Logging: Tick this option to enable the Syslog feature. Syslog Server IP Address: Enter the Syslog Server IP address used here. Click on the Save Settings button to accept the changes made. -
Page 77: Email Settings
maIl ettIngS The Email feature can be used to send the system log files and router alert messages to your email address. The following parameters can be configured: From Email Address: This email address will appear as the sender when you receive a log file or firmware upgrade notification via email. -
Page 78: System
yStem This section allows you to manage the router’s configuration settings, reboot the router, and restore the router to the factory default settings. Restoring the unit to the factory default settings will erase all settings, including any rules that you’ve created. The following parameters can be configured: Save Settings To Local Use this option to save the current router configuration settings to a file on the hard disk... -
Page 79: Firmware
IrmWare Use the Firmware window to upgrade the firmware of the Router and install language packs. If you plan to install new firmware, make sure the firmware you want to use is on the local hard drive of the computer. If you want to install a new language pack, make sure that you have the language pack available. -
Page 80: Dynamic Dns
ynamIc The DDNS feature allows you to host a server (Web, FTP, Game Server, etc…) using a domain name that you have purchased (www.whateveryournameis.com) with your dynamically assigned IP address. Most broadband Internet Service Providers assign dynamic (changing) IP addresses. Using a DDNS service provider, your friends can enter in your domain name to connect to your server no matter what your IP address is. -
Page 81: System Check
yStem heck This useful diagnostic utility can be used to check if a computer is on the Internet. It sends ping packets and listens for replies from the specific host. In the Ping Test section the user can test the Internet connectivity by entering in a host name or the IP address that you want to ping (Packet Internet Groper) and click on the Ping button. -
Page 82: Schedules
cheduleS Schedules can be created for use with enforcing rules. For example, if you want to restrict web access to Mon-Fri from 3pm to 8pm, you could create a schedule selecting Mon, Tue, Wed, Thu, and Fri and enter a Start Time of 3pm and End Time of 8pm. -
Page 83: Status Category
tatuS ategory In this category the user will be able to view information regarding the configuration and functionality of this device. Displays like WAN, LAN and Wireless configurations, System, Firewall and Router logs, and more. Pages that can be configured in the Status category are as follows: Device Information: This page displays the current information for the router. -
Page 84: Device Info
eVIce This page displays the current information for the router. It will display the LAN, WAN (Internet), and Wireless information. If your Internet connection is set up for a Dynamic IP address then a Release button and a Renew button will be displayed. Use Release to disconnect from your ISP and use Renew to connect to your ISP. - Page 85 In the Wireless LAN2 section, information about the 5GHz Wireless Local Area Network configuration is being displayed. amSung ireleSS outer anual...
-
Page 86: Logs
The router automatically logs (records) events of possible interest in it’s internal memory. If there isn’t enough internal memo- ry for all events, logs of older events are deleted but logs of the latest events are retained. The Logs option allows you to view the router logs. -
Page 87: Statistics
tatIStIcS The screen below displays the Traffic Statistics. Here you can view the amount of packets that pass through the router on both the WAN, LAN ports and both the 802.11n/g (2.4GHz) and 802.11n/a (5GHz) wireless bands. The traffic counter will reset if the device is rebooted. -
Page 88: Wireless
IreleSS The wireless client table displays a list of current connected wireless clients. This table also displays the connection time and MAC address of the connected wireless clients. In the Number of Wireless Clients - 2�4GHz Band section a list of 2.4GHz active wireless clients will be displayed. In the Number of Wireless Clients - 5GHz Band section a list of 5GHz active wireless clients will be displayed. -
Page 89: Support Category
uPPort ategory In this category the user will have access to a portal of information regarding each and every page that exists on this device. This information gives the basic description of parameter and uses for the pages. amSung ireleSS outer anual... -
Page 90: Knowledge Base
The CY-SWR1100 supports a unique feature called the One Foot Connection method. This feature allows a user to configure their Samsung TV to connect to this router in a very unique and easy way. For this feature to work, the Samsung TV must also support the OFC feature. -
Page 91: Plug & Access Connection Method
Samsung TV to connect to this router, wirelessly, using a Flash Memory Stick to transfer the wireless set- tings, used on the router, to the Samsung TV. This feature will only work between Samsung devices that support the Plug &... -
Page 92: Wireless Basics
IreleSS aSIcS Wireless products are based on industry standards to provide easy-to-use and compatible high-speed wireless connectivity within your home, business or public access wireless networks. Strictly adhering to the IEEE standard, the wireless family of products will allow you to securely access the data you want, when and where you want it. You will be able to enjoy the freedom that wireless networking delivers. - Page 93 Small Office and Home Office • Stay on top of everything at home as you would at office • Remotely access your office network from home • Share Internet connection and printer with multiple computers • No need to dedicate office space Where is wireless used? Wireless technology is expanding everywhere not just at home or office.
-
Page 94: Wireless Modes
IreleSS odeS There are basically two modes of networking: • Infrastructure – All wireless clients will connect to an access point or wireless router. • Ad-Hoc – Directly connecting to another computer, for peer-to-peer communication, using wireless network adapters on each computer, such as two or more wireless network Cardbus adapters. -
Page 95: Networking Basics
etWorkIng aSIcS Check your IP address After you install your new network or wireless adapter, by default, the TCP/IP settings should be set to obtain an IP address from a DHCP server (i.e. wireless router) automatically. To verify your IP address, please follow the steps below. Click on Start >... -
Page 96: Connect To A Wireless Network
onnect to a IreleSS etWork ® SIng IndoWS It is recommended to enable wireless security (WPA/WPA2) on your wireless router or access point before configuring your wireless adapter. If you are joining an existing network, you will need to know the security key or passphrase being used. 1. -
Page 97: Configuration Wps
onfIguratIon The WPS feature of the router can be configured using Windows 7. Carry out the following steps to use Windows 7 to ® ® configure the WPS feature of the router: 1. Click the Start button and select Computer from the Start menu. - Page 98 4. Input the WPS PIN number and click Next. 5. Type a name to identify the network. 6. To configure advanced settings, click on the drop-down icon. Click Next to continue. amSung ireleSS outer anual...
- Page 99 7. The following window appears while the Router is being configured. Wait for the configuration to complete. 8. The following window informs you that WPS on the CY- SWR1100 has been setup successfully. Make a note of the security key as you may need to provide this security key if adding an older wireless device to the network in the future.
-
Page 100: Using Windows Vista
® SIng IndoWS ISta Windows Vista users may use the built-in wireless utility. If you are using another company’s utility or Windows 2000, ® ® please refer to the user manual of your wireless adapter for help with connecting to a wireless network. Most utilities will have a “site survey”... -
Page 101: Using Windows ® Xp
® SIng IndoWS Windows® XP users may use the built-in wireless utility (Zero Configuration Utility). The following instructions are for Service Pack 2 users. If you are using another company’s utility or Windows® 2000, please refer to the user manual of your wireless adapter for help with connecting to a wireless network. -
Page 102: Troubleshooting
roubleShootIng This chapter provides solutions to problems that can occur during the installation and operation of the router. Read the fol- lowing descriptions if you are having problems. The examples below are illustrated in Windows XP. If you have a different ®... - Page 103 Why can’t I connect to certain sites or send and receive emails when connecting through my router? If you are having a problem sending or receiving email, or connecting to secure sites such as eBay, banking sites, and Hot- mail, we suggest lowering the MTU in increments of ten (Ex. 1492, 1482, 1472, etc). To find the proper MTU Size, you’ll have to do a special ping of the destination you’re trying to go to.
-
Page 104: Technical Specifications
ECHNICAL PECIFICATIONS Hardware Specifications RF Output Power: • WAN Interface: • 1 x 10/100/1000Mbps WAN - Auto MDI/MDIX Modulation: • OFDM(BPSK, QPSK, 16QAM, 64QAM), DSSS(BPSK, DQPSK, CCK) LAN Interface: • 4 x 10/100/1000Mbps PC Port - Auto MDI/MDIX Wireless Security: •... - Page 105 Federal Communication Commission Interference Statement This equipment has been tested and found to comply with the limits for a Class B digital device, pursuant to Part 15 of the FCC Rules. These limits are designed to provide reasonable protection against harmful interference in a residential installation. This equipment generates, uses and can radiate radio frequency energy and, if not installed and used in accordance with the instructions, may cause harmful interference to radio communications.
- Page 106 Industry Canada Statement This device complies with RSS-210 of the Industry Canada Rules. Operation is subject to the following two conditions: 1) this device may not cause interference and 2) this device must accept any interference, including interference that may cause undesired operation of the device Caution: (i) the device for the band 5150-5250 MHz is only for indoor usage to reduce potential for harmful...
- Page 107 Déclaration d'exposition aux radiations: Le produit est conforme aux limites d'exposition pour les appareils portables RF pour les Etats-Unis et le Canada établies pour un environnement non contrôlé. Le produit est sûr pour un fonctionnement tel que décrit dans ce manuel. La réduction aux expositions RF peut être augmentée si l'appareil peut être conservé...
- Page 108 以下警語適用台灣地區 經型式認證合格之低功率射頻電機,非經許可,公司、商號或使用者均不得擅自變更頻率、加大功率或 變更原設計之特性及功能。 低功率射頻電機之使用不得影響飛航安全及干擾合法通信;經發現有干擾現象時,應立即停用,並改善 至無干擾時方得繼續使用。前項合法通信,指依電信法規定作業之無線電通信。低功率射頻電機須忍受 合法通信或工業、科學及醫療用電波輻射性電機設備之干擾。 在5.25-5.35秭赫(GHz)頻帶內操作之無線資訊傳輸設備,限於室內使用。...