Table of Contents
Advertisement
U
U
W
a
t
e
W
a
t
e
© Excell Precision Limited 2016. All rights reserved Worldwide.
The information contained herein is the property of Excell Precision Limited and
is supplied without liability for errors or omissions. No part may be reproduced or
used except as authorised by contract or other written permission. The copyright
and the foregoing restriction on reproduction and use extend to all media in
which the information may be embodied.
s
e
r
M
s
e
r
M
r
p
r
o
o
r
p
r
o
o
QW/GW
a
n
u
a
a
n
u
a
f
I
n
d
i
f
I
n
d
i
l
l
c
a
t
o
r
c
a
t
o
r
Advertisement
Table of Contents

Summary of Contents for Excell QW
- Page 1 QW/GW © Excell Precision Limited 2016. All rights reserved Worldwide. The information contained herein is the property of Excell Precision Limited and is supplied without liability for errors or omissions. No part may be reproduced or used except as authorised by contract or other written permission. The copyright and the foregoing restriction on reproduction and use extend to all media in which the information may be embodied.
-
Page 2: Table Of Contents
EXCELL PRECISION CO., LTD Table of Contents Special Notice ..........................3 Before Using the Scale........................4 Chapter 1 Introduction ........................6 1-1 Product Features ........................6 1-2 Specifications ........................6 1-3 Product Appearance ......................6 1-4 Display Description ......................8 1-5 Power Supply ........................ - Page 3 EXCELL PRECISION CO., LTD 2-2-12 RS485 ID Input (Option) ............... 36 2-2-13 Line Feed Input ................36 Chapter 3 Wireless Connection Instruction (Option) ............... 37 Appendix 1 ASCII Code Table ....................47 Appendix 2 7-Segment Display Characters ................48 Appendix 3 Wiring Instructions ....................49...
-
Page 4: Special Notice
After installing the load cell, power cord hookup or replacing a new rechargeable battery, the housing must be screwed by the assigned order as shown below. Screw lightly first, then screw them tight using a 6 kgf-cm (GW) or 12 kgf-cm (QW) torsion. P.s. Please use a torsion-adjustable screw driver. -
Page 5: Before Using The Scale
EXCELL PRECISION CO., LTD Thank you for purchasing EXCELL WEIGHING INDICATOR, to help use the product properly, operate smoothly, and extend its life cycle, please read this manual caref ully. Before Using the Scale In order to use this scale correctly, we suggest that you read this manual carefully. - Page 6 EXCELL PRECISION CO., LTD Due to the storage battery adopt the advanced free -maintaining technique, customers need not to replenish electrolyte. The scale should be recharged every 3 months to prevent failure of the internal rechargeable battery. 1. The battery should be charged for 8~10 hours.
-
Page 7: Chapter 1 Introduction
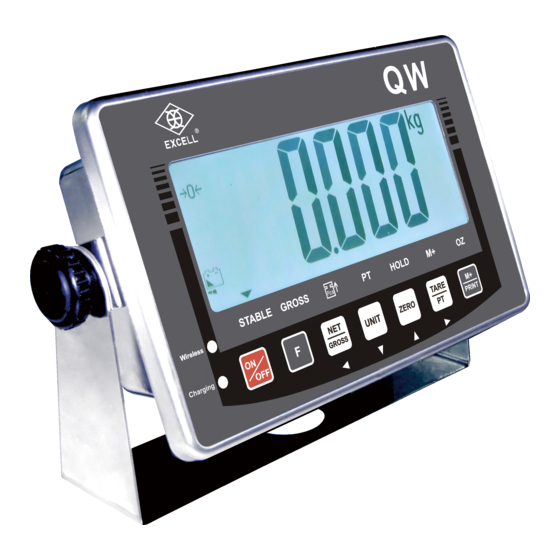
Extra-large and wide LCD display (175 x 70mm) 6 digits with 55mm height COOL WHITE LED backlight QW with 304 stainless steel housing while GW with plastic ABS housing. Sealed to IP68, Waterproof, mist-proof and dustproof (Only use cables of 3mm~5mm diameter to ensure correct sealing of the cable glands) ... - Page 8 EXCELL PRECISION CO., LTD [Standard] [Option] Load Cell Load Cell RS-232 Power RS-232 Pressure relieve valve or RS-485 Foot switch or RS-485 Power 90mm 238mm [Standard] [Option] Foot switch RS-232 RS-485 Load Cell Power Power 02005159 ZSME300000350...
-
Page 9: Display Description
EXCELL PRECISION CO., LTD 1-4 Display Description : Low Power indication : Upper limit : Value between HI and LO 1 : (STABLE) stable indication : Lower limit 2 : (GROSS) gross weight indication : Unit “kilogram” 3 : ( ) unit weight insufficient indication : Unit “pound”... -
Page 10: Keypad Function
EXCELL PRECISION CO., LTD 1-6 Keypad Function ON|OFF KEY Press the key to switch the indicator on or off. ON|OFF ZERO KEY key acts as the zero balance function. If the weighing value is within t he range ZERO of zero balance, it can be re-zeroed and tare cancelled. - Page 11 EXCELL PRECISION CO., LTD To clear totalization data, press M+ key to let display shows up totalization numbers, then press the key again, to clear totalization data. RS232 will print out M+|PRINT totalization numbers, total weight, etc. P.s. Weight must return to net zero if to perform clear function.
-
Page 12: Self-Test Mode
EXCELL PRECISION CO., LTD 1-7 Self-Test Mode When power is off, hold key and press key, Wait till display shows NET|GROSS ON|OFF to enter “Self-Test Mode” Press UNIT Press Press ZERO UNIT Press Press ZERO UNIT Press Press ZERO UNIT... -
Page 13: Error Messages
EXCELL PRECISION CO., LTD 1-8 Error Messages The EEPROM is not working correctly. The EEPROM is not set yet, or the circuit on PCB is broken. Zero is higher than the zero range when switching the indicator on. -
Page 14: Chapter 2 Configurations
EXCELL PRECISION CO., LTD Chapter 2 Configurations Configuration Workflow In the weighing mode, press key and keys at the same time to enter NET|GROSS ZERO the configuration mode.The LCD shows Overall workflow of the Advanced Function setting mode: Press UNIT... -
Page 15: General Function Setting
EXCELL PRECISION CO., LTD 2-1 General Function Setting Workflow of the General Function setting: Press TA RE|PT key in the parameter “00 ~ 13” ZERO key Upward key (0~9 digit entry) Key in “00” and press UNIT key Downward key (0~9 digit entry) -
Page 16: Auto Backlight Function Setting
EXCELL PRECISION CO., LTD 2-1-1 Auto Backlight Function Setting Select in the general function setting mode to change the backlight function setting. Press TARE |PT LCD displays the last status Default setting = off key to ZERO UNIT select function “on” or “off On ... -
Page 17: Auto Power-Off Timer Setting
EXCELL PRECISION CO., LTD 2-1-2 Auto Power-off Timer Setting Select in the general function setting mode to change the automatic power-off timer setting. Press TARE|PT LCD displays the last status Default setting = 0 (No auto power-off) key to ZERO... -
Page 18: Hi/Lo/Ok Settings
EXCELL PRECISION CO., LTD 2-1-3 HI/LO/OK Settings Select in the general function setting mode to set the HI/LO/OK function. When the high limit and low limit are both set as “0”, the Hi/Lo/OK function is disabled. Press TARE|PT LCD displays the last status... -
Page 19: Hold Function Settings
EXCELL PRECISION CO., LTD 2-1-4 Hold Function Settings For OIML or NTEP approval models, setting cannot be changed, and hold=0 Hold function setting LCD displays the last parameter setting Hold function setting Press TARE|PT keys to key in the... - Page 20 EXCELL PRECISION CO., LTD Hold Function Setting (Animal scale) Hold function setting LCD displays the last parameter setting Press TARE|PT Hold function setting key to ZERO UNIT keys to key in 4 and ZERO UNIT key in the parameters pPress...
- Page 21 EXCELL PRECISION CO., LTD Hold Function Setting (Animal scale) Press Hold function setting TARE|PT LCD displays the last parameter setting key to ZERO UNIT Hold function setting key in the parameters keys to key in 5 ZERO UNIT Release Hold range setting...
-
Page 22: Auto Unit Weight Averaging Setting
EXCELL PRECISION CO., LTD 2-1-5 Auto Unit Weight Averaging Setting Auto unit weight averaging setting LCD displays the last parameter setting Press Auto unit weight averaging setting TARE|PT keys to key in the ZERO UNIT parameters Default setting = 0 0 ... -
Page 23: F Key Function Settings
EXCELL PRECISION CO., LTD 2-1-7 F Key Function Settings F key function represents “MC” function Display shows parameter from Press TARE|PT the previous setup F key function represents “HR” function ZERO UNIT To select parameter F key function represents tare or pre-tare value ZERO key ... -
Page 24: Rs232 Serial Interface Settings
EXCELL PRECISION CO., LTD 2-2 RS232 Serial Interface Settings Press TARE|PT Key in the parameter 00 ~ 08 ZERO key Upward key (0~9 digit entry) Key in the parameter UNIT key Downward key (0~9 digit entry) “00”, then press TARE|PT key ... -
Page 25: Baud Rate Settings
EXCELL PRECISION CO., LTD 2-2-1 Baud Rate Settings Select in the RS232 serial interface setting mode to set the Baud Rate. Press TARE|PT Baud rate setting LCD displays the last value Default value: 9600 (bits/sec) key to ZERO UNIT... -
Page 26: Communication Protocol Settings
EXCELL PRECISION CO., LTD 2-2-2 Communication Protocol Settings Select in the RS232 serial interface setting mode to set the Communication Protocol. Press TARE|PT Communication protocol setting LCD shows the last setting value. Default setting: key to ZERO UNIT select the protocol setting... -
Page 27: Output Format Settings
EXCELL PRECISION CO., LTD 2-2-3 Output Format Settings Select in the RS232 serial interface setting mode to set the Output Format. RS232 output format setting LCD shows the last setting. Default setting: Press TARE|PT RS232 output format setting keys to select the... - Page 28 EXCELL PRECISION CO., LTD Note1: Ticket No. Date year/month/day & day/month/year (choose 1 out of 2 date formats) Time Total Net (This line will only print when data is erased, showing net weight total of every count) Note2: Ticket No.
- Page 29 EXCELL PRECISION CO., LTD For example: tare 0.2kg, net weight 1key, press M+ FR”IRWT3000” 1,200 0,200 1,000 1,000 30/05/00 00:54:12 001,000000,200001,000000001 P1,1 Note5: If it is not Brazil version, it only can print under continuous transmition. If it is Brazil version, under decimal units mode, , it can print out.
-
Page 30: Continuous Transmission Settings
EXCELL PRECISION CO., LTD 2-2-4 Continuous Transmission Settings Select in the RS232 serial interface setting mode to set the Continuous Transmission status. Press TARE|PT Transmission setting LCD shows the last setting Default setting: keys to ZERO UNIT select the transmission... -
Page 31: Selection Of The Continuous Transmission Rate
EXCELL PRECISION CO., LTD 2-2-5 Selection of the Continuous Transmission Rate Select in the RS232 serial interface setting mode to set the Continuous Transmission Rate. Press TARE|PT Continuous transmission rate setting The LCD shows the last setting. Default setting:... -
Page 32: Auto Transmission At Zero
EXCELL PRECISION CO., LTD 2-2-6 Auto Transmission at Zero Select in the RS232 serial interface setting mode to set the Auto Transmission at Zero. Press TARE|PT Auto transmission at zero LCD shows the last setting Default setting: keys to... -
Page 33: Reset Auto Transmission
EXCELL PRECISION CO., LTD 2-2-7 Reset Auto Transmission Select in the RS232 serial interface setting mode to Reset Auto Transmission. Press TARE|PT Resetting auto transmission The LCD shows the last setting Default setting: keys to ZERO UNIT key in the desired... -
Page 34: Output Condition Settings
EXCELL PRECISION CO., LTD 2-2-8 Output Condition Settings Select in the RS232 serial interface setting mode to Reset of Auto Transmission. Press TARE|PT Output condition settings The LCD shows the last setting. Default setting: keys to ZERO UNIT select the desired setting... -
Page 35: Rs232 6/7 Digits Setting
EXCELL PRECISION CO., LTD 2-2-9 RS232 6/7 Digits Setting Select in the RS232 serial interface setting mode to Reset of Auto Transmission. Press TARE|PT Output Condition Restriction Settings Display shows the previous setup Factory Default is (6 places) keys to... -
Page 36: Rtc Adjustment
EXCELL PRECISION CO., LTD 2-2-10 RTC Adjustment Select in the RS232 serial interface setting mode to reset of Auto Transmission. Enter the date in YY/MM/DD Use upward and downward key to select, and use key to confirm TARE|PT Press TARE|PT... -
Page 37: Rs485 Id Input (Option)
EXCELL PRECISION CO., LTD 2-2-12 RS485 ID Input (Option) Select in the RS232 serial interface setting mode to reset of Auto Transmission. Display shows the previous setup Use upward and downward key to select, and use key to confirm Press... -
Page 38: Chapter 3 Wireless Connection Instruction (Option)
EXCELL PRECISION CO., LTD Chapter 3 Wireless Connection Instruction (Option) For Wireless models, please set Baud rate as 9600 (bits/sec) and Communication protocol as n 8 1. Step 1: Connect to your device 1. Enable Wireless on your computer. Right-click on the icon of the bottom-right corner on taskbar, highlight “New Connection”... - Page 39 EXCELL PRECISION CO., LTD 3. If the device is ready, the device names Device-C1 or C2 will be found. Double-click on Device-C1 or Device-C2. 4. Circle “Let me choose my own passkey”, input the passkey “111111” and click “Next > ” button...
- Page 40 EXCELL PRECISION CO., LTD 5. Device is added so far. Please disconnect COM port and click “Finish.” Step 2: Connection test To test the connection, use HyperTerminal recommended in Windows XP 1. go “START” → “All programs” → “Accessories“→ “Communications“→...
- Page 41 EXCELL PRECISION CO., LTD 2. Key in a name and select icon, then press “OK.” 3. After select the COM port referred by step 1 point 5 and click “OK.” 02005159 ZSME300000350...
- Page 42 EXCELL PRECISION CO., LTD 4. Click “File” → “Properties” 5. Select “settings” from the menu, and click “ASCII setup” on the bottom of the box. 02005159 ZSME300000350...
- Page 43 EXCELL PRECISION CO., LTD 6. Check “Send line ends with line feeds” and “Echo typed characters locally” and click “OK”. 7. Key in commands such RW, MZ, and RG in the main screen to test... 02005159 ZSME300000350...
- Page 44 EXCELL PRECISION CO., LTD Command Mode On RS485 command mode, the format is as following, 1. If RS485’s ID setting is 0(RS1 12), and the command is the same as regular RS232. 2. A. If RS485’s ID setting is not 0(assume 99),”@ID” has to be added in front of every command.
- Page 45 EXCELL PRECISION CO., LTD Read weight comparison setting value RS : Groups(00 ~ 09) : Setting Items Show “HI” presetting value Show “LO” presetting value Note : (Group) is various depended on different models 00 The first group 01 The second group 02 ...
- Page 46 EXCELL PRECISION CO., LTD Output data format 1. 7 places (first decimal place not included) Weight format Gross 7 SP SP o Tare 6 SP SP k CR LF Plus OL + SP SP SP SP SP SP SP SP SP SP SP SP...
- Page 47 EXCELL PRECISION CO., LTD Serial Data Transfer/Receive Format n , 8 , 1 8-bit data STOP e , 7 , 1 7-bit data P STOP o , 7 , 1 7-bit data P STOP Note: : Start bit STOP: Stop bit...
-
Page 48: Appendix 1 Ascii Code Table
EXCELL PRECISION CO., LTD Appendix 1 ASCII Code Table ASC II ASC II ASC II Symbol Symbol Symbol Code Code Code 02005159 ZSME300000350... -
Page 49: Appendix 2 7-Segment Display Characters
EXCELL PRECISION CO., LTD Appendix 2 7-Segment Display Characters Digit 7 segment letter Alphabet 7 segment letter Alphabet 7 segment letter 02005159 ZSME300000350... -
Page 50: Appendix 3 Wiring Instructions
EXCELL PRECISION CO., LTD Appendix 3 Wiring Instructions Load cell wiring method (1) As shown below, when a load cell is connected with a 4PIN cable, SEN+ and SEN- can be unconnected. J11 and J12 on PCB must be tin-soldered in short circuit. - Page 51 EXCELL PRECISION CO., LTD RS232 wiring instruction To connect RS232, please open the housing, RS232’s PIN connectors locate on the bottom-right corner of the main board. The most common connection method is using 9PIN and 25PIN, as shown below: Function...