
Related Manuals for Curtis RCD877


Summary of Contents for Curtis RCD877
- Page 1 STEREO MICRO SYSTEM WITH VERTICAL CD PLAYER AND REMOTE CONTROL MODEL RCD877 OPERATION MANUAL...
- Page 2 UK-1...
- Page 3 UK-2...
-
Page 4: Volume Control
P R E C A U T I O N S " General ! Please ensure that the equipment is positioned in a well. ventilated area and ensure that there is at least 10cm of free space along the sides, top and back of the equipment. -
Page 5: Names Of Controls And Indicators
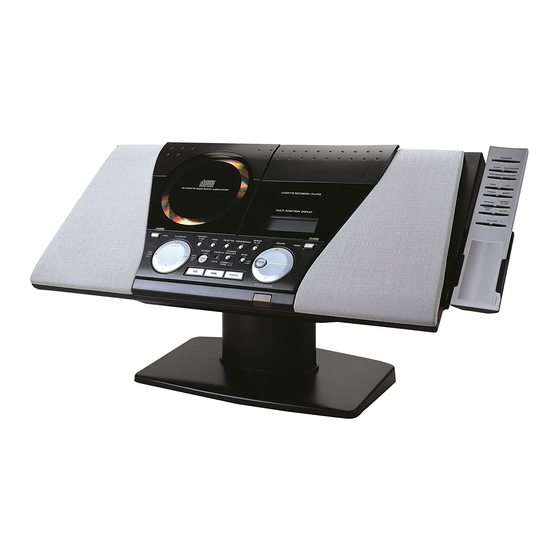
NAMES OF CONTROLS AND INDICATORS " Front Panel SPEAKER HEADPHONES JACK CD DOOR CASSETTE DOOR LCD DISPLAY WINDOW CD DOOR OPEN BUTTON CASSETE DOOR OPEN BUTTON CD PLAY/PAUSE BUTTON TUNING/SKIP DOWN BUTTON 10. CD STOP BUTTON 11. TUNING/SKIP UP BUTTON 12. - Page 6 NAMES OF CONTROLS AND INDICATORS " Front Panel SPEAKER HEADPHONES JACK CD DOOR CASSETTE DOOR LCD DISPLAY WINDOW CD DOOR OPEN BUTTON CASSETE DOOR OPEN BUTTON CD PLAY/PAUSE BUTTON TUNING/SKIP DOWN BUTTON 10. CD STOP BUTTON 11. TUNING/SKIP UP BUTTON 12.
-
Page 7: Rear Panel
(Continued) (Continued) " Rear Panel LINE OUT JACK MOUNTING HOLE FM ANTENNA AC CORD RESET " FM Antenna FM antenna wire for better FM reception. " Reset If an unusual conditions occurs in the display window or key button. Press the reset button on the back cabinet of the unit. -
Page 8: Preparation For Use
PREPARATION FOR USE " Putting the batteries into the Remote Control Unit Press down of the compartment cover, and slide the cover off open the compartment. Place the two accessory (UM3), (AA), (R6) batteries in the remote control according to the polarity markings (“+” and “--”) inside the compartment and on the batteries. -
Page 9: Radio Operation
RADIO OPERATION Press the TUNER & BAND button to selet the Radio operation. " " " " " Listen to radio 1. Press TUNER button to select waveband range will appear on the display. 2. Select the desired waveband range with the BAND button. -
Page 10: Protecting Recordings
(Continous) " Listen the Music by using headphone A 3.5mm headphone socket is provided on the unit. You can use the headphone by inserting the headphone jack to the socket. " Auto Stop When the tape reaches the end in play or record, the built- in Auto Stop system functions to release the depressed play, record keys. -
Page 11: Clock Setting
COMPACT DISC 1. Always use a compact discs bearing the mark as shown. 2. Notes on handling discs. Removing the disc from its storage case and loading it. Do not touch the reflective recorded surface. Do not stick paper or write anything on the surface. Do not bend the disc. -
Page 12: Cd Display Window
CD DISPLAY WINDOW X-BASS Press Bass button, Bass sound is effect. CD DISPLAY WINDOW A. TRACK NUMBER INDICATOR B. BAND INDICATOR C. TRACK/TIME INDICATOR D. SKIP UP/DOWN INDICATOR E. TRACK CALENDER INDICATOR F. CD PLAYBACK INDICATOR SPECIFICATION POWER SUPPLY : AC 120V 60Hz OUTPUT POWER : 3 WATTS RMS x 2 UNIT DIMENSION...