Table of Contents
Advertisement
Quick Links
1 0-INCH ADVANCED NAVI STATION
X110
8-INCH ADVANCED NAVI STATION
X108U
7-INCH ADVANCED NAVI STATION
INE-W967HD
QUICK REFERENCE GUIDE
GUIDE DE REFERENCE RAPIDE
GUfA DE REFERENCIA RAPIDA
Please register your product at www.alpine-usa.com/registration for a chance to win
prizes.
Enregistrez-vous sur www.alpine-usa.com/registration et tentez de rem porter des prix.
Registre su producto en Ia direcci6n www.alpine-usa.com/registration para optar a
excelentes premios.
II
II
II
Advertisement
Chapters
Table of Contents

Summary of Contents for Alpine X110
- Page 26 • MODE D’EMPLOI Veuillez lire avant d’utiliser cet appareil. Thank you for purchasing this Alpine product. Please take a moment to protect your purchase by registering your product now at the following address: www.alpine-usa.com/registration. You will be informed of product and software updates (if applicable), special promotions, news about Alpine, and entered for a chance to win prizes.
- Page 27 For X108U/INE-W967HD For X110...
- Page 28 Navigation icons) ......... 25 WARNING Changing the Layout ........26 Deleting Items ..........26 Points to Observe for Safe Usage ......8 Applying Alpine TuneIt App WARNING ............9 CAUTION ............. 10 Adjusting the sound via the Smartphone ..27 NOTICE ............10 Facebook Notification Function .......
- Page 29 Setting the Menu Language ......41 Setting the HDMI Selector On/Off ....50 Format settings ..........41 Setting the External Accessory Control ..50 About X110/X108U/INE-W967HD ..... 41 Smartphone Apps Setup ........50 Setting Demo mode to Off/On ...... 41 Radio/HD Radio™/ RBDS Vehicle Setup ............
- Page 30 Repeat Play ............55 Using Jump Memory and Jump Recall Random Play ............56 function ............. 68 Searching for a Desired Song ......56 HDMI Device (X110 only) iPod/iPhone (Optional) About HDMI selector (Optional) ....69 Playback ..............58 DVD Player Operation Searching for a Music File ........
- Page 31 Product Software Update ........99 Device ............86 Cautions about Discs (X110 only) ....99 Auxiliary Device (X108U/INE-W967HD Discs Playable on This Unit (X110 only) ..100 only) (Optional) About the Supported Formats ......101 Operating Auxiliary Devices (Optional) ..87 About MP3/WMA/AAC/FLAC ....
-
Page 32: Specifications
If this Message Appears ........106 Specifications ............. 109 END USER LICENSE AGREEMENT (HERE) ............111 LIMITED WARRANTY... -
Page 33: Operating Instructions
• This product may be used in conjunction with the Alpine KAC-001 • Make certain that the volume level of the navigation system is set External Accessory Control module, which works with various to a level which still allows you to hear outside traffic and accessory products manufactured by third parties. -
Page 34: Warning
USE ONLY IN CARS WITH A 12 VOLT NEGATIVE GROUND. WARNING (Check with your dealer if you are not sure.) Failure to do so may result in fire, etc. • Operation of the system while driving is dangerous. Users should stop vehicle before operating the software. KEEP SMALL OBJECTS SUCH AS SCREWS OUT OF THE REACH OF •... -
Page 35: Caution
(+113°F) and 0°C (+32°F) before turning your unit on. Maintenance If you have problems, do not attempt to repair the unit yourself. Return it to your Alpine dealer or the nearest Alpine Service Station for servicing. Protecting the USB connector •... - Page 36 XM Radio Inc. All rights reserved. • BlackBerry®, RIM®, Research In Motion® and related trademarks, Alpine accepts no responsibility for lost data, etc., even if data, etc., is names and logos are the property of Research In Motion Limited lost while using this product.
-
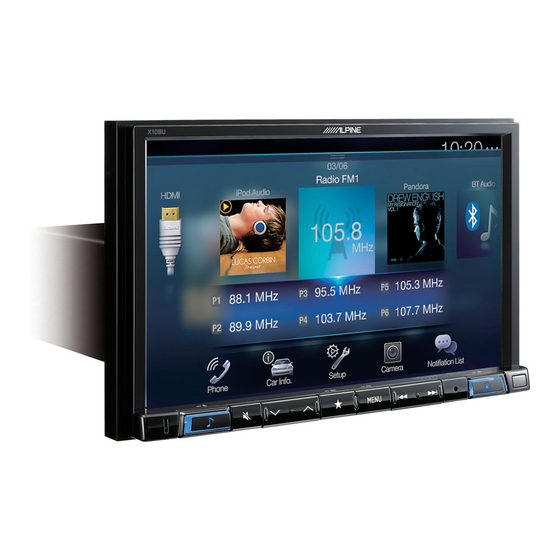
Page 37: Features
Features The screen design used in the Owner’s Manual may differ from the actual screen. Favorite Function Frequently used functions such as the Audio source or Navigation are easily recalled. Register them to the Favorite screen. For details, see “Favorite Function”... -
Page 38: Switching The Audio Sources Screen To A Dedicated Screen
Switching the Audio Sources Screen to a Dedicated Screen You can switch the Audio Sources screen to a dedicated screen by touching the icon on one of the four edges of the screen, or by swiping vertically or horizontally. For details on how to swipe the screen, see “Touch Screen Operation” (page 17). Shortcut Setup Screen (page 19) Dual Screen (page 14) You can set the Sound Setup or Rear Seat Entertainment... -
Page 39: About Dual Screen
* Touch [ ], or swipe to the left to switch to the Navigation menu screen. For details of navigation operations, refer to “Navigation System OM” in the website at http://www.alpine-usa.com. Dual Screen Display Position You can switch the left/right positions of the Audio/Visual screen and Navigation screen. -
Page 40: Getting Started
(Eject) button (X110 only) Ejects a disc. Controllable with Remote Control This unit can be controlled with an optional Alpine remote control. For details, consult your Alpine dealer. Point the optional remote control transmitter at the remote control sensor. Microphone Used for Hands-free or Voice Control modes. -
Page 41: Turning Power On Or Off
For X110 RESET switch Turning the System On With the Alpine system, when the ignition key is turned to ACC or ON, the opening screen will be automatically displayed. When the system is used for the first time, the language selection menu is displayed. -
Page 42: Touch Screen Operation
Touch Screen Operation Switching Sources You can operate the system by using the touch panel on the screen. Press the (AUDIO) button to change the source. • Be sure to touch the onscreen button lightly with the pad of your finger Switching sources using the (AUDIO) button to avoid scratching the display. -
Page 43: Operating The Function Button On The Audio/Video Main Screen
Operating the Function Button on the Audio/ About Basic Operation for List Screen Video Main Screen Basic operations on the Setup list screen and the Search list screen. How to display on the list screen differs depending on the selected item. Using the Function button on the Audio/Visual main screen. -
Page 44: About The Shortcut Setup Screen
Sound Setup Function About the Shortcut Setup Screen Tone Adjustment mode Displaying the Sound Setup screen, or the Shortcut Setup screen of the Rear Seat Entertainment System screen. Touch [ ] or swipe downward in the Audio source screen. BASS ENGINE SQ mode The Sound Setup screen or the Rear Seat Entertainment System Setup Screen is displayed. -
Page 45: Rear Seat Entertainment Function
Adjusting Bass Level/Treble Level Rear Seat Entertainment Function Bass Level and Treble Level can be set for each front seat and for each rear seat by touching [Front] or [Rear]. The Rear Seat Entertainment function independently routes different sources to the front and the rear side of the car. For example, while Setting item: listening to the radio or other audio sources in the front, HDMI can be Bass / Treble... -
Page 46: About The Menu Screen
Notification button* About the Menu Screen Use to display the Facebook Notification List on the connected smartphone via this unit. (page 28) • When there is no Notification, “No Notifications. ” will be In the menu screen, you can select the audio source and perform various displayed. -
Page 47: About The Indicator Display
You can switch between the 12 hour display and 24 hour display options. For details of navigation operations, refer to “Navigation System OM” in the website at http://www.alpine-usa.com. Bluetooth devices Name* * When you connect two Hands-Free Phones, the information of the... -
Page 48: How To Input Characters And Numbers (Keypad)
How to Input Characters and Numbers (Keypad) The displayed screens and procedures may vary slightly depending on the function used, but the basic input method is the same. Input screen area. Cursor position alteration switch Cancel Keypad mode finishes. (Delete) Returns to the previous character and erases it. -
Page 49: Favorite Function
Favorite Function Editing the Favorite Screen You cannot edit the Favorites screen while driving. Using the Favorite Function Your vehicle must be parked with the ignition key in the ACC or ON position. For details, see “To display the Setup Menu screen” in “Setup Operation”... -
Page 50: Changing Item Names
Touch the icon you want to change from the icon list. Displays the selected Place Categories list. • For details of navigation operations, refer to “Navigation System OM” in the website at http://www.alpine-usa.com. Phone (Shortcut Dialing)* You can register the user’s shortcut dialing stored in the Phone Book. -
Page 51: Changing The Layout
Changing the Layout Drag and drop the item to the desired location. The item location is changed. • When you move to other pages, switch pages, or when you make a new page and move to another, drag to the end of the screen, and lift your finger after the page changes. -
Page 52: Applying Alpine Tuneit App
Notifications button deleted or terminated without notice. Touch to switch to Notifications List screen. • Some Alpine TuneIt App functions may not be available if the Close button Smartphone is not in a service area or receives no signal. Close the notification screen. - Page 53 Displaying Facebook Screen During Notification incoming or Notification List screen, you can switch to Facebook screen. Facebook screen example Message content Poster’s photo Close button: Close the Facebook screen. Touch the poster’s picture and name to switch to the Facebook screen. The detailed information of Notification is displayed.
-
Page 54: Setup
Setting items: Wireless: See “Wireless (Bluetooth) Setup” (page 30). As the X110 is for specialized vehicles, its initial settings General: See “General Setup” (page 32). differ from the values shown in this manual. Source: See “Source Setup” (page 42). -
Page 55: Wireless (Bluetooth) Setup
Wireless (Bluetooth) Setup Bluetooth Setup [Wireless] is selected on the Setup main screen in step 3. See “Setup [Bluetooth] is selected on the Wireless Setup Menu screen in step 1. See Operation” (page 29). “Wireless (Bluetooth) Setup” (page 30). You can register and set up Bluetooth compatible devices. Wireless Setup Menu screen Setting item: <Setting items>... -
Page 56: Hands-Free Device Primary/Secondary Setting
Touch [ ] (Audio), [ ] (Hands-free) or [ ] (Both) Hands-free Device Primary/Secondary Setting of the device you want to connect from the list. Make sure the “Bluetooth” setting is “On” ( ). See “Bluetooth Setup” Audio: Sets for use as an Audio device. (page 30). -
Page 57: Changing The Character Code Of The Phone Book
Enter the passcode that you entered in step 2 again, and General Setup then touch [OK]. [General] is selected on the setup main screen in step 3. See “Setup Changing the Character Code of the Phone Operation” (page 29). Book General Setup Menu screen You can select the character code that is used when transferring the phone book or history from a mobile phone. -
Page 58: Sound Setup
*2 You can also make the setting in the Bal./Fad. screen. Fad./Bal. screen For details on how to adjust, see “Setting the Balance/Fader/Rear Speaker/Subwoofer” (page 33). *3 This setting is only available when “Subwoofer” is set to “On” ( *4 When the Defeat setting is “On, ” you cannot perform the set up. *5 When the Sound Setup of the Shortcut Setup is selected to ”BASS ENGINE SQ, ”... -
Page 59: Setting The Media Xpander (Mx Hd)
Setting the Media Xpander (MX HD) Equalizer Presets Media Xpander (MX HD) makes vocals or instruments sound distinct 10 typical equalizer settings are preset at the factory for a variety of regardless of the music source. The HD-Radio (FM)/SiriusXM, USB musical source material. -
Page 60: Adjusting The Crossover Settings (X-Over)
Adjusting the Frequency Adjusting the Crossover Settings (X-Over) Touch [ ] or [ ] of “Frequency” to adjust the frequency of the selected band. Before performing the following procedures, see “About the Crossover” (page 37). Adjustable frequency bands: 20 Hz to 20 kHz (in 1/3 octave steps) Setting item: Band1: 20 Hz~100 Hz (63 Hz) -
Page 61: Adjusting The Time Correction (Tcr)
Adjusting the Time Correction (TCR) Setting the Volume for Each Source Before performing the following procedures, see “About Time Setting item: Source Volume Setup Radio / SiriusXM / Compressed Media* Correction” (page 38). 2, 3 3, 4 iPod Music / iPod Video or AUX* / HDMI* / Bluetooth Audio / Setting item:... -
Page 62: Setting Audio Mute On/Off While Backing Up
Adjusting to a frequency range outside that recommended may cause damage to the speakers. For the recommended crossover frequencies of Alpine speakers, refer to the respective Owner’s Manual. We are not responsible for damage or malfunction of speakers caused by... -
Page 63: About Time Correction
Example 2. Listening Position: All Seats About Time Correction Adjust the time correction level of each speaker to almost the same level. The distance between the listener and the speakers in a car vary widely due to the complex speaker placement. This difference in the distances Sit in the listening position (driver’s seat, etc.) and from the speakers to the listener creates a shift in the sounds image and measure the distance (in meters) between your head and... -
Page 64: Picture Quality Setup
Adjusting Brightness Picture Quality Setup Setting item: [Picture Quality] is selected on the General Setup Menu screen in step Brightness Setting content: 1. See “General Setup” (page 32). -15 to +15 (Initial setting: 0) You can set up items related to an image. You can adjust the brightness between MIN (-15) and MAX (+15). -
Page 65: Display/Key Setup
Adjusting the Minimum Level of Backlight Display/Key Setup You can adjust the brightness of the backlight. This function could be used, for instance, to change the screen brightness while traveling at [Display/Key] is selected on the General Setup Menu screen in step 2. night. -
Page 66: General Setup
Name, and to initialize various settings. Displaying the Product Information You can view the version information of this product. Make note of this information and refer to it whenever you contact Alpine Tech Support or an Alpine-authorized dealer. Setting contents:... -
Page 67: Source Setup
Source Setup Radio Setup [Source] is selected on the Setup main screen in step 3. See “Setup [Radio] is selected on the Source Setup Menu screen in step 1. See Operation” (page 29). “Source Setup” (page 42). Source Setup Menu screen Setting the TUNER (FM) Tone Quality (Tuner Condition) <Setting items>... -
Page 68: Setting The Alert Individually For An Artist/Song/Favorite Team
Setting the Alert individually for an Artist/ Setting the Favorite Sports Team Alerts Song/Favorite Team This menu option allows you to select your favorite teams, organized by leagues, so that you will be alerted later when your favorite teams are This menu option allows you to enable the Artist/Song/Team alert for playing on other channels. -
Page 69: Signal Strength Information
Touch the numeric keypad to input a 4-digit passcode. AUX Setup (X108U/INE-W967HD only) The initial default 4-digit passcode is set to 0000. After entering the digit, it is displayed as “*” (asterisk). • Touch [ ] to delete an entered number. [AUX] is selected on the Source Setup Menu screen in step 1. -
Page 70: Setting The Auxiliary (Aux) Name
*4 You can select this item only when Camera Select is “Rear. ” Setting contents. For details on setting the HDMI selector, see “Setting *5 Set this setting after closing the Alpine TuneIt App. the HDMI Selector On/Off ” (page 50). -
Page 71: Camera Setup
Multi View compatible Front Camera/Rear Camera Camera Setup Touch [Back], [Panorama], [Corner], or [Top]. The view will change to the selected view. [Camera] is selected on the System Setup Menu screen in step 1. See • [Back] will not appear for the Front camera. “System Setup”... -
Page 72: Camera Interrupt Setting (Power Off Mode) (Rear Camera Only)
Front Camera screen example When Hitch Guide is set to On <Side Camera> Side Camera screen example Touch [Link]. The 2 vertical guides of the currently-selected guide link together, allowing them to be adjusted simultaneously. Touch [ ], [ ], [ ] or [ ] to adjust the position of the guide. -
Page 73: Setting Multi Camera To On/Off
Camera button on the Setting the Default Vehicle Screen Menu screen or press the (CAMERA) button (X110 only). Press and hold the (Favorite) button for at least 2 seconds or touch Setting item:... -
Page 74: Rear Seat Entertainment Setup
Remote Sensor Setting Rear Seat Entertainment Setup Make sure the Rear Seat Entertainment is set to “On” ( ). See “Rear [Rear Seat Entertainment] is selected on the System Setup Menu screen Seat Entertainment Setup” (page 49). in step 1. See “System Setup” (page 45). For remote control operation, the remote sensor of the external device (Rear monitor, etc.) can be switched, as you prefer. -
Page 75: Setting The Additional Aux Box
SNS. External Accessory Ctrl Setting contents: • Set this setting after closing the Alpine TuneIt App. Off (Initial setting) / On • For this function to work properly, specific applications must be • When set to “On, ” the [ ] (Ext Acc Ctrl) icon is displayed on the installed on your Smartphone before connection. -
Page 76: Radio/Hd Radio™/ Rbds
Info area Radio/HD Radio™/ RBDS Station Info. mode: Program Type /Frequency and PS Name/Artist Name/Song RBDS Name/Album Name Radio Text mode: Frequency/ Radio Text The unit can receive HD Radio signals based on digital radio broadcast • For details on switching the display of the Radio text, see standards, in addition to analog radio broadcasts using RBDS. -
Page 77: Radio Basic Operation
Radio Basic Operation Presetting Stations Manually Tune in a desired radio station you wish to store in the Listening to the Radio preset memory by manual or automatic seek tuning. Touch the Preset number you want to store, for at least 2 Press the (AUDIO) button to select radio mode. -
Page 78: Inputting Frequency Directly And Receiving The Radio Station
Inputting Frequency Directly and Receiving the Selecting the Receivable Program Type (RBDS Radio Station FM Radio mode only) You can input a frequency of the same band directly and receive the You can select and receive the currently receivable stations in the radio station. -
Page 79: Using Ballgame Mode
Using Ballgame Mode In live broadcast, such as sportscasts, etc., a time lag occurs between digital sound and analog sound. Therefore, when live broadcasts are received, a time lag between the real broadcast may occur and the unit can change to analog broadcasting automatically. Touch [ ] (Live) to switch On/Off. -
Page 80: Usb Flash Drive (Optional)
USB Flash drive Playback (Optional) Press the (AUDIO) button to select USB mode. The display shows the USB mode screen. • You can select and change the source in the Menu screen (page 21) You can play back music files (MP3/WMA/AAC/FLAC) stored in a USB or Favorite screen (page 24). -
Page 81: Random Play
Random Play Touch [ The Random Play mode select pop up screen is displayed. • The [ ] button displays the currently selected mode. Select your desired Random Play mode. All songs in the USB flash drive are played back in random sequence. -
Page 82: Ipod/Iphone (Optional)
Device” setting of both “Hands-free” and “Bluetooth Audio” to the unit’s USB port and change the Audio source from Bluetooth Audio, set “Alpine TuneIt App” to “USB (iPhone)” or “Off. ” For more details, see iPod/iPhone main screen example “Registering the Bluetooth Device” (page 30) and “Smartphone Apps Setup”... -
Page 83: Playback
Artist title/Release Date* To pause playback, touch [ / ]. Song title/Episode title* • If a song is playing on the iPod/iPhone before it is connected to the unit, Album title/Podcast title* it will continue playing when it is connected. Total time for playing •... -
Page 84: Full Search Mode
For example: Searching by Movie Full Search Mode The following example explains how a Movie search is performed. Another search mode can be used for the same operation, although the hierarchy For example: Searching by Artist name differs. The following example explains how an Artists search is performed. Another search mode can be used for the same operation, although the Touch the [Video] icon in the Full Search mode screen. -
Page 85: Repeat Play
Cinema mode Repeat Play Touch [ ] to repeatedly play back the currently track. The tracks (files) will be played repeatedly. Touch [ ] again to deactivate Repeat play. Track Repeat Track Repeat Random Play (Shuffle) In Cinema mode, the monitor displays a normal picture by stretching out the picture horizontally and vertically. -
Page 86: Pandora® Internet Radio (Optional)
Device” setting of both “Hands-free” and “Bluetooth Audio” to the unit’s USB port and change the Audio source from Bluetooth Audio, set Listening to Pandora® “Alpine TuneIt App” to “USB (iPhone)” or “Off. ” For more details, see “Registering the Bluetooth Device” (page 30) and “Smartphone Apps Setup” (page 50). -
Page 87: Thumbs" Feedback
“Thumbs” Feedback Creating a New Station You can personalize your stations with “Thumbs Up” or “Thumbs Basing on the currently playing song or artist, a personalized Pandora Down” feedback, which the system takes into account for future music station can be created. The new station will play more music like it. selections. -
Page 88: Connecting A Bluetooth Device (Bluetooth Pandora® Only)
Connecting a Bluetooth Device (Bluetooth Pandora® Only) Registering a Bluetooth device in the unit enables automatic connection. If it does not connect automatically, run through the connection procedure again. Touch [ ] (Settings). The Device Setting select pop up screen is displayed. Touch [Reconnect]. -
Page 89: Siriusxm Satellite Radio Operation (Optional)
< During Replay mode> SiriusXM Satellite Radio Operation Signal Indicator Indicates the signal strength of SiriusXM. Info area (Optional) Station Info. Mode*: Channel No/Long Channel Name/Category Name Song Info.Mode: SiriusXM Tuner operation: Artist Name/Song Name/Album Name When an optional SiriusXM Tuner is connected to this unit, the Album Art following operations may be performed. -
Page 90: Receiving Channels With The Siriusxm Tuner
Receiving Channels with the SiriusXM Tuner Changing the Display Text information, such as the channel name, artist name/feature, and About SiriusXM Satellite Radio song/program title, is available with SiriusXM or channel. The unit can Everything worth listening to is on SiriusXM, getting over 130 channels, display this text information as explained below. -
Page 91: Tune Start Function
• During Tune Scan mode, the artist and song name will be displayed. Tune Start Function • The SiriusXM Tune scans through the songs from the preset music channels on the current band only, scanning from oldest to newest. • The number of Preset channels and the play times that can perform Use Tune Start to play music content from its beginning on programmed Tune Scan differ depending on the SiriusXM Tuner box. -
Page 92: Selecting The Channel Directly
Searching by Featured Favorites Receiving and Tuning to an Alert Touch [Featured]*. The Category that SiriusXM recommends will be displayed in a Whenever a stored sports team, artist, or song is playing on another list. channel, an interruption Alert appears on the unit display. To tune to the * Displayed only when the SiriusXM Tuner-SXV200 is connected. -
Page 93: Parental Lock Function
Touch [ ] to exit Instant Replay and listen to live content. • To fast reverse, touch and hold [ ] and to fast forward, touch and hold [ • Touching [ ] or [ ] will move a track up/down. •... -
Page 94: Hdmi Device (X110 Only)
If you connect an HDMI selector, you can connect one HDMI device for • If the disc cannot be ejected by pressing [ ] (Eject), press and hold X110 and up to 2 HDMI devices including the optional DVE-5300 ] (Eject) again for at least 3 seconds. (DVD Player) for X108U/INE-W967HD. -
Page 95: System Setup
Delaying Image Output System Setup Use this function when an external audio processor is connected. Depending on the connected audio processor, the audio and image Switching the Bar Color currently played back may not be output at the same time. In this case, Select the colors (8) used for highlighting items in the System Setup you can output an image delayed by 0.1 second by setting to On. -
Page 96: Cd Contents Setup
• Languages set upon shipment from the factory: Digital audio output Audio language : Auto Audio recording Optical digital Disc Subtitle language : Auto format Digital audio output Digital audio Menu language : Auto output (when a digital output (HDMI setting audio processor is output) -
Page 97: Cd/Mp3/Wma/Aac/Wav
Fast forward : CD/MP3/WMA/AAC/WAV Touch and hold [ • The buttons provide the same functions above. MP3/WMA/AAC main screen example To pause playback, touch [ / ]. Info mode • The unit can play back MP3/WMA/AAC/WAV files saved to CD or DVD. -
Page 98: Mix (Random Play)
MIX (Random Play) Touch [ ] during playback. DVD Video main screen example The tracks (files) on the disc will be played back in a random sequence. The MIX mode switches every time [ ] is touched. MP3/WMA/AAC: MIX Folder* MIX Disc* MIX Folder* *1 Only files in a folder are played back in random sequence. -
Page 99: Playing A Disc
Info mode Playing a Disc WARNING It is dangerous for the driver to watch the DVD while driving the vehicle. The driver may be distracted from looking ahead and an accident could occur. Install the unit correctly so that the driver cannot watch DVD unless the vehicle is stopped and the emergency brake is applied. -
Page 100: If A Menu Screen Appears
If a Menu Screen Appears Numeric Keypad Input Operations On DVD mode, menu screens may appear automatically. If this Touch [key] again in the menu operation mode. happens, perform the operation described below to start playback. The numeric keypad input mode screen appears Direct Menu Operations Touch a desired number. -
Page 101: Stopping Playback
Stopping Playback Forward/Reverse frame-by-frame Playback Touch [ ] during playback. “ ” indicator is displayed, and playback stops. In the pause mode, touch [ ] or [ • Playback starts from the beginning when [ / ] is touched while The picture advances by one frame each time the button is playback is stopped. -
Page 102: Searching By Title Number
Searching by Title Number Switching the Audio Tracks Use this function to easily find positions on the DVD using the DVD’s DVDs with multiple audio tracks or languages allow switching the titles. Perform operations while playback is stopped. sound during playback. Touch [ ] (Audio). -
Page 103: Hdmi Operation
(DVD). • Not all devices with an HDMI output interface can be recognized by this unit. • Use only the Alpine Special HDMI connection cable. Press the (AUDIO) button to select HDMI mode. The display shows the HDMI mode screen. -
Page 104: Bluetooth Operation
Bluetooth compatible device to this unit. The device mobile device or personal computer over short distances. This enables a name of this unit is “ALPINE NAVI” and the initial number of the hands-free call or data transmission between Bluetooth compatible passcode is “0000. -
Page 105: Answering A Call
Answering a Call Call Waiting Function Incoming calls are announced by the received call ring tone and a If a call comes in from another phone during a call, a notice is displayed displayed message (PHONE No., etc.). on the screen. This function can only be used if the connected mobile phone has a call waiting function service included. -
Page 106: Calling
Second incoming call during a conversation in the Phone Touch the Short Cut icon. Operation screen A contact’s name, phone number, and a confirmation message of the phone number are displayed. • The display or operation may differ depending on the connected mobile phone or the caller’s mobile phone. -
Page 107: Using Voice Recognition Function
Entering a Phone Number to Make a Call Speak into the microphone supplied with this unit. • If no speech is detected, the unit may pause depending on version Touch [ ] (Keypad). of the connected iPhone. In that case, touch the microphone icon ] in the center of the Voice Control mode screen. -
Page 108: Operations During A Conversation
Adjusting the volume Phone Book Function Adjust the speaker/microphone volume in Voice Dial mode. Perform the same procedure to adjust the speaker/microphone volume of hands- free phone. Phone Book screen example Touch [ ] or [ ]. Adjust the speaker and microphone volumes. Stopping input to the microphone If the surrounding sound (road noise, etc.) is loud, you may wish to cut input to the microphone for 3 seconds. -
Page 109: Deleting The Phone Book Entries
Deleting the Phone Book Entries Bluetooth Audio Deleting One Entry from the Phone Book If a Bluetooth compatible mobile phone, portable player, etc. is connected by wireless, you can play back a song (operation is Touch [ ] (Edit). controllable from the unit). Touch the checkbox [ ] of the contact name (or phone •... -
Page 110: Playback
• To play back audio, a mobile phone or a portable player conforming to Random Play A2DP (Advanced Audio Distribution Profile) or AVRCP (Audio/Video Remote Control Profile) is required. Not all functions work with all devices. Available for AVRCP Ver. 1.3, 1.4 and 1.5 only. •... -
Page 111: Connecting A Bluetooth Device
Connecting a Bluetooth Device Registering a Bluetooth device in the unit enables automatic connection. If it does not connect automatically, run through the connection procedure again. Touch [ ] (Settings). The Device Setting select pop up screen is displayed. Touch [Reconnect]. Bluetooth connection will start. -
Page 112: Auxiliary Device (X108U/Ine-W967Hd Only) (Optional)
Operating an AUX, AUX DVD, GAME or USB Auxiliary Device Player (X108U/INE-W967HD Example for AUX, AUX DVD, GAME, USB Player mode display only) (Optional) Operating Auxiliary Devices (Optional) To operate devices connected to the AUX terminals of the unit, follow the procedure described below. -
Page 113: Operating An External Dvd Changer
] (Top Menu) External DVD changer screen example Calls up the Top Menu screen. ] (Menu) Calls up the Menu screen. ] (Menu Control)* Calls up the menu operation mode. ] (Folder Down) Switches the program/playlist/folder down. ] (Folder Up) Switches the program/playlist/folder up. -
Page 114: Operating A Tv
Operating a TV Menu operation mode screen example [ ], [ Switches the Channel number / Preset channel down. [ ], [ Switches the Channel number / Preset channel up. ] (Band) Switches the band. ] (Tune) (Channel or Preset or Manual) Switches amongst Channel mode, Preset mode, and Manual mode. -
Page 115: Camera Operation (Optional)
(page 46). • You can also switch the Camera view by Pressing (CAMERA) button. (X110 only) When using the optional Multi Camera Interface module, you can connect up to 3 cameras: Front Camera, Rear Camera, and Side Camera. Displaying the rear view video while the car is When connecting the optional Multi Camera Interface module, you need to set each camera to On/Off in “Setting Multi Camera to On/Off ”... -
Page 116: Adjusting The Caution Display Location
Touch [Guide Off] or [Hitch Guide Off] on the Rear • The camera has a limited range of vision. Objects at extreme angles to the camera (e.g. under the bumper or at opposite ends of the bumper) camera display screen. may not be in the its field-of-vision. -
Page 117: Front Camera Operation
[Rear] or [Side] in the Rear Camera image to switch the Camera image. • You can also switch the Camera view by Pressing (CAMERA) button. (X110 only) Switching the Image Pattern for the Front Camera If the camera has a view switch function, the Direct Change switch is... -
Page 118: About The Adjustment Of Guide Display On/Off Setting And Adjustment Of Caution Display Location
(page 48) to “Side”. If you connect a Rear Camera and Front Camera at the same time, touch [Rear] or [Front] in the Rear Camera image to switch the Camera image. • You can also switch the Camera view by Pressing (CAMERA) button. (X110 only) -
Page 119: Idatalink Operation
Adjust or confirm the item/information accordingly. iDataLink Operation • Operable functions and displays may differ depending on the vehicle. iDataLink Function Screen example When the unit is connected to the car’s iDataLink module, you can transfer and receive data between the car and the unit to check the car’s Climate screen example status, or to make various operations from the unit. -
Page 120: About Parking Sensor Screen
Vehicle Information screen example Parking Sensor Camera interlock screen example (Rear camera) You can check for open doors, check the tire pressure, the battery life, You can check for obstacles through an interlocked camera image by etc. for the vehicle. connecting a Front or Rear Camera. -
Page 121: External Accessory Control Operation
When changing the name: External Accessory Control Operation Touch the icon name, then input characters into Edit Name (Keypad). You can also select a basic name from the [Template] of the Keypad. For details on how to input characters using the You can set the headlights to ON/OFF or adjust the air suspension from keypad, see “How to Input Characters and Numbers (Keypad)”... -
Page 122: About Remote Control Operation
Battery type: CR2025 battery or equivalent. Control Operation Opening the battery case Slide out the battery cover while firmly pressing in the direction (X110 only) of the arrow. Replacing the battery Put the battery in the case with the (+) indication upward as shown in the illustration. -
Page 123: Operating The Dvd Player
DVD/Video CD mode: Operating the DVD Player • Move to the desired position on the disc. • During playback, press and hold for more than 1 second to reverse the disc at double speed. Hold for more than 5 seconds to reverse the disc at 8 times the normal speed. Hold for more than 10 seconds to reverse the disc at 32 times the normal speed. -
Page 124: Information
The software installed in the product contains open-source software. of the disc with a ballpoint pen or other such instrument, then See the following Alpine website for details on the open source software. insert the disc again. http://www.alpine.com/e/oss/download... -
Page 125: Discs Playable On This Unit (X110 Only)
We recommend on the disc to find the scene you want to watch and view various not using these accessories on discs played in Alpine DVD players. types of information in dialog style. Using compact discs (CD/CD-R/CD-RW) If you use unspecified compact discs, correct performance cannot be guaranteed. -
Page 126: About The Supported Formats
What is MP3? On handling compact discs (CD/CD-R/CD-RW) MP3, whose official name is “MPEG Audio Layer 3,” is a compression standard prescribed by the ISO, the International Standardisation • Do not touch the surface. Organisation and MPEG which is a joint activity institution of the IEC. •... -
Page 127: About Wav (Disc)
ID3 tags/WMA tags Terminology This device supports ID3 tag v1.0, v1.1, v2.2, v2.3, v2.4, and WMA tag Bit rate Ver.1.x. If tag data is in an MP3/WMA/AAC file, this device can display This is the “sound” compression rate specified for encoding. The higher the title (track title), artist name, and album name ID3 tag/WMA tag the bit rate, the higher the sound quality, but also the larger the files. -
Page 128: About Dvds
About DVDs Music CDs and DVDs have grooves (tracks) in which the digital data is recorded. The data is represented as microscopic pits recorded into the track – these pits are read by a laser beam to play the disc. On DVDs, the density of the tracks and pits is twice that of CDs, so DVDs can contain more data in less space. -
Page 129: List Of Language Codes
List of Language Codes (For details, see page 70.) -
Page 130: In Case Of Difficulty
- Set the Audio Out of the DVD Player to “LPCM. ” • The Parking Brake Lead is not connected. • The Parking Brake is not engaged. Disc (X110 only) - Connect the Parking Brake Lead, then engage the Parking Disc playback sound is wavering. - Page 131 . After the error indication disappears, insert the disc again. If the above-mentioned solution does not solve the USB Hub is not supported. problem, consult your nearest Alpine dealer. • A USB flash drive with a hub is connected. MP3/WMA/AAC is not played back.
- Page 132 Bluetooth Check Antenna • The SiriusXM Satellite Radio antenna or cable is either damaged Please connect a Bluetooth audio device. or not connected correctly to the SiriusXM Tuner. • The Bluetooth audio device was not connected correctly. - Check that the SiriusXM antenna cable is connected to the - Check the settings for the unit and the Bluetooth audio device SiriusXM Tuner and check that the antenna cable is not kinked and reconnect.
- Page 133 - Drive the vehicle in an area of good GPS reception to allow the and eject the disc. unit to recalibrate itself. Move to a location where strong GPS If the disc still does not eject, consult your Alpine dealer. reception is possible. 2) When the error indication remains after ejecting, press again.
- Page 134 Output Power -2 dBm Ave. (Power class 2) MONITOR SECTION Profile HFP (Hands-Free Profile) OPP (Object Push Profile) Screen Size 10” (X110) PBAP (Phone Book Access Profile) 8” (X108U) A2DP (Advanced Audio 7” (INE-W967HD) Distribution Profile) LCD Type Transparent type TN LCD...
- Page 135 NOSE/CHASSIS SIZE For X110 X110 is sized exclusively for a certain car model. CD/DVD SECTION X108U Frequency Response CD: 5 – 20,000 Hz (± 1 dB) 178 mm (7-1/8”) Wow & Flutter (% WRMS) Below measurable limits Total Harmonic Distortion 0.02 % (at 1 kHz)
- Page 136 System. The right to use the System shall expire either when the user destroys this software, or when any of the terms for use is violated and Alpine, Space Machine and/or HERE exercise the option to revoke the license to use this software.
- Page 137 ALPINE ELECTRONICS OF AMERICA, INC. (“Alpine”), is dedicated to quality craftsmanship and is pleased to offer this Warranty. We suggest that you read it thoroughly. Should you have any questions, please contact your Dealer or contact Alpine at one of the telephone numbers listed below.
- Page 138 N’oubliez pas de consacrer un moment à la protection de votre achat en enregistrant votre produit dès maintenant à l’adresse suivante : www.alpine-usa.com/registration. Recuerde que con solo unos pocos pasos podrá proteger su producto, registrándolo a través de la siguiente...
- Page 139 Before you use this product, be sure to carefully read this installation manual and the separate user's manual so that you can use the product correctly. Alpine Electronics bears no responsibility for problems that arise as a result of failure to follow the instructions in the manuals.
- Page 140 Chevrolet/GMC FULL SIZE TRUCK 2/17 Types of Precautions Indicates actions that are forbidden Indicates actions that are (must not be performed) mandatory (must be performed) Forbidden Mandatory Indicates that disassembly is Marks content that should receive forbidden. your full attention. Forbidden Warning Do not disassemble or modify the product.
- Page 141 Chevrolet/GMC FULL SIZE TRUCK 3/17 When making a hole in the vehicle body, be careful to avoid damaging pipes, the fuel tank, electrical wiring, and the like. This kind of damage could lead to an accident or fire. When installing and grounding the product, do not use any of the bolts or nuts of the steering wheel, brakes, fuel tank, or the like.
- Page 142 Chevrolet/GMC FULL SIZE TRUCK 4/17 Tools Required Panel Removing Tool Pliers T15 Torx Screwdriver #2 Phillips Screwdriver 7mm Screwdriver Wire Cutters 10mm Socket Extension Ratchet...
- Page 143 Chevrolet/GMC FULL SIZE TRUCK 5/17 Accessory List Source Unit Box Parts (X110-G) Display Monitor X110-G Source Unit HDMI Cable Bracket 8mm x 8 Screws GPS Antenna USB Extension Cable Pre Out Harness Direct Camera Adapter Display Cable DVD Player Box Parts (DVE-5300X)
- Page 144 Chevrolet/GMC FULL SIZE TRUCK 6/17 Installation Kit Parts (G-KTX110-GM1/GM2) Radio Dash Bezel Key Harness Display Mounting Brackets Vent Covers DVD Player Mounting Brackets Source Unit Mounting Brackets iDatalink Maestro Box Parts (ALP-MRR V2.0/ALP-HRN-GM3) Main Harness Antenna Adapter Factory Camera Harness SAT Radio Antenna Adapter Maestro USB Update Cable iDatalink Maestro Module...
- Page 145 Chevrolet/GMC FULL SIZE TRUCK 7/17 Programming the iDatalink ® Maestro Module INSTALL THE WEBLINK PLUG-IN CONNECT YOUR MAESTRO MODULE Go to: Use the included USB cable to connect your Maestro module to your idatalinkmaestro.com/plugin and follow the installation steps. Review the System Requirements before installing. LOG INTO WEBLINK Go to: idatalinkmaestro.com/login.
- Page 146 Chevrolet/GMC FULL SIZE TRUCK 8/17 Factory Radio Removal Procedure Disconnect the ground wire from the negative Disconnect and remove the radio tuner by lifting terminal of the battery. the center tab. Use a pair of pliers to remove the FM and SXM antenna connectors. Remove the CD player by extracting (2) 7mm factory screws.
- Page 147 Chevrolet/GMC FULL SIZE TRUCK 9/17 Factory Radio Removal Procedure Unsnap the steering wheel lever and remove the For trucks equipped with OEM camera, disconnect lower cover from the steering wheel column. the Gray 12-pin connector from the HMI box and connect it to the OEM Camera adapter.
- Page 148 Chevrolet/GMC FULL SIZE TRUCK 10/17 X110-G Wiring Diagram To Vehicle Connectors Power/Speaker OEM Camera Adapter OEM Audio To OBDII Connector 16-pin Green Connector Climate Control 20-pin Gray Connector 12-pin Gray Connector Steering Wheel T-Harness To Climate 10-pin Gray Controller Connector...
- Page 149 Chevrolet/GMC FULL SIZE TRUCK 11/17 BRKT MONITOR UPR 10GM DISPLAY MONITOR HARD KEY BUTTONS CLIMATE CONTROLLER DVE-5300X DVD PLAYER KCX-630HD (Optional) HDMI Selector Interface POWER USB POWER HDMI OUT HDMI IN 1 HDMI IN 2 Remote In Opt. Out HDMI Out Cut loop when connecting HDMI interface box.
- Page 150 Right side vent. SXM tuner location (SXM Tuner sold separately) Note: Always mount SXM SXM Tuner tuner away from the X110-G and GPS antenna cable. Route the cable along the right side vent to reduce interference. Route the GPS antenna cable down...
- Page 151 Attach the factory HVAC controller by clipping it to Mount the display monitor to the restyle panel using the X110-G Restyle bezel. (4) 8mm screws. Attached the top and bottom brackets to the X110-G display using the provide 8mm screws. Exploded-View Diagram OEM Climate Controller...
- Page 152 DVD player to the X110-G. radio location. SW T-Harness OBDII Connector Slide the X110-G radio tuner into the factory tuner Mount the DVD player it using (2) 7mm factory location and connect it to the main harness. screws.
- Page 153 Chevrolet/GMC FULL SIZE TRUCK 15/17 Installation Instructions Connect the X110-G to the main harness and Attach the side vent covers. antenna connections. MENU Connect the battery terminal and begin the X110-G Connect the X110-G display and snap into place. setup.
- Page 154 16/17 Set Up Guide Turn the vehicle’s Ignition switch to ACC. Turn ON the X110-SLV by pressing any key. Select the user language and press OK. Press and release the parking brake twice. If a camera is present, turn it ON in the system menu.
- Page 155 Chevrolet/GMC FULL SIZE TRUCK 17/17 Troubleshooting Guide Symptom Possible Cause Remedy iDatalink website says Serial number may not be in Call ADS at 1-866-427-2999 and verify. serial number is invalid. iDatalink database. Headunit will not turn on. Incorrect serial number was Flash Maestro with correct serial used when flashing maestro.
- Page 156 User Manual Alpine Navigation System Navigation software for the Alpine Navigation System English March 2015, ver. 1.0...
- Page 157 Table of contents 1 Warnings and safety information .................... 5 2 Getting started ........................... 6 2.1 Initial set-up............................6 2.2 Screen controls ........................... 8 2.2.1 Using the buttons and other controls ......................8 2.2.2 Using the cursor ............................9 2.2.3 Using the keyboard ............................. 9 2.2.4 Using touch gestures ..........................
- Page 158 3.1.4 Selecting a Saved Location ........................38 3.1.5 Selecting a History item ..........................39 3.1.6 Entering coordinates ..........................40 3.1.7 Selecting a location on the map ........................ 41 3.1.8 Planning a Multipoint Route ........................42 3.2 Checking Route Information and Alternatives ................. 43 3.3 Checking Traffic Events........................
- Page 159 4.1.9.4 Hints upon detour ............................... 65 4.2 Information menu ..........................66 4.2.1 Where Am I .............................. 67 4.2.2 Trip Monitor ............................. 68 4.3 Setup menu............................68 4.3.1 Route preferences ............................70 4.3.1.1 Vehicle profile ..............................70 4.3.1.2 Route Planning Method types ..........................72 4.3.1.3 Navigation Mode ..............................
-
Page 160: Warnings And Safety Information
1 Warnings and safety information The navigation system helps you find your way to your destination with the built-in GPS receiver. Alpine Navigation System does not transmit your GPS position; others cannot track you. It is important to look at the display only when it is safe to do so. If you are the driver of the vehicle, we recommend that you plan and review your route before you start your journey. -
Page 161: Getting Started
2 Getting started Alpine Navigation System is optimized for in-car use. You can use it easily by tapping the screen buttons and the map with your fingertips. Easy map updates Update your maps regularly as road networks are continuously evolving all over the world. About 15% of the roads are changed each year, new ones are built, directions are altered, new speed limits are set, and many other changes are made. - Page 162 Read the end-user license agreement, and tap if you agree with the terms of use. The Configuration Wizard starts. Tap to continue. Select the language and speaker used for voice guidance messages. Later you can change it in Regional settings (page 73). Tap to continue.
-
Page 163: Screen Controls
The initial set-up is now complete, tap A warning appears to draw your attention to the hazards of operating, entering data into or obtaining data from the Alpine Navigation System during driving or transportsation. After reading it carefully, tap to enter the navigation view. -
Page 164: Using The Cursor
Alpine Navigation System saves your selections and applies the new settings without confirmation as soon as you use the controls. 2.2.2 Using the cursor You can select a map location by tapping the map during navigation. When a map location is selected, the cursor ( ) appears at the selected point on the map. -
Page 165: Using Touch Gestures
Finalizing the keyboard entry Hiding the keyboard 2.2.4 Using touch gestures You usually need to tap the screen only once. However, some useful features can be accessed with other gestures. See the table below. Action Function Tapping and Tap and keep pressing the following buttons to reach extra functions: holding the screen ... -
Page 166: Manipulating The Map
Zooming in and Change how much of the map is displayed on the screen. Alpine Navigation System uses maps that let you examine the locations at various zoom levels, always with optimized content. It always displays street names and other text with the same font size, never upside-down, and you only see the streets and objects that you need. - Page 167 Changing 2D, Switch between the 3D perspective, 2D Heading up, and 2D 3D, or 2D North North up map view modes. In Heading up mode the map is up views rotated so its top always points in the current driving direction. This is the default orientation in 3D map view mode.
-
Page 168: Navigation View
2.3 Navigation view The navigation view is the main screen of Alpine Navigation System that shows the planned route on a map. Alpine Navigation System works with digital maps which are not simply the computerized versions of traditional paper maps. Similarly to paper road maps, the 2D mode of digital maps shows you streets and roads. - Page 169 Traffic It shows traffic-related information. See page 44. Zoom You can change how much of the map is displayed on the screen. Alpine Navigation System uses maps that let you zoom in and out on the map. See Page Lane On multi-lane roads, it shows the lanes ahead and their directions.
-
Page 170: Streets And Roads
When entering a tunnel, the map is replaced with a generic tunnel image. See page 19. 2.3.1 Streets and roads Alpine Navigation System shows the streets similarly to paper road maps. Their width and colors correspond to their importance; you can easily tell a freeway from a small street. -
Page 171: Gps Position Markers
2.3.2 GPS position markers When your GPS position is available, Alpine Navigation System marks your current position. By default, this marker is a blue arrow. The dot near the arrow shows the GPS position as perceived by the GPS receiver. -
Page 172: Turn Preview And Next Street
2.3.4 Turn preview and next street When navigating a route, the top section of the Navigation view shows information about the next route event (maneuver) and the next street or the next town. There is a field in the top left corner displaying the next maneuver. Both the type of the maneuver (turn, traffic circle, exiting freeway, and so on) and its distance from the current position are displayed. -
Page 173: Lane Information And Signposts
When navigating on multi-lane roads, it is important to take the appropriate lane in order to follow the planned route. If lane information is available in the map data, Alpine Navigation System displays the lanes and their directions using small arrows at the bottom of the map. Highlighted arrows represent the lanes and the direction you need to take. -
Page 174: Junction View
2.3.7 Junction view If you are approaching a freeway exit or a complex intersection and the needed information exists, the map is replaced with a 3D view of the junction. The lanes you need to take are displayed with arrows. At the top of the screen, road signs show you additional information. -
Page 175: Freeway Services
Type Description 3D terrain Alpine Navigation System displays 3D hills and mountains in the Navigation view, and illustrates them by coloring and shading on the 2D map. Elevated roads Elevated roads are complex intersections and vertically isolated roads (such as overpasses or bridges) displayed in 3D. -
Page 176: Traffic Events
2.3.11 Traffic events Road segments affected by traffic events are displayed in a different color on the map. The following icons may appear at the top right corner of the screen: Button Description It is displayed when traffic events are not received. It is displayed when traffic events are received but they do not affect the planned route. - Page 177 You can see the following menu options when you are navigating without a planned route: Button Function Select your destination by entering an address or its coordinate, or by selecting a Place, a Saved Location, or a Saved Route. You can also look up your recent destinations from the History.
- Page 178 The More button appears on the screen to display additional features. Tap it to open the list of additional features on certain screens. Tap the Back button to return to the previous screen. You can also press and hold this button to quickly return to the Navigation view from any other screen.
-
Page 179: Using The Navigation
3 Using the navigation By default, Alpine Navigation System calculates routes using the road network of the maps provided with the product. You can select the destination and start navigating to it right away (normal navigation) if you need a route for immediate navigation. - Page 180 . You can see the input field at the top of the screen. Right next to it you can see the search area, the town around which the search is carried out. The default search area is the area where you are located. For a local search, skip the next step. (optional) To search in a different area, tap the input field with the search area, and start entering the name of the new search area on the keyboard.
- Page 181 to see the list of recent destinations with a matching name or address. to see the list of your saved locations with a matching name. to see the list of matching addresses. to see the list of matching Place category names. Scroll the list and select one of the categories.
-
Page 182: Selecting An Address
Press the navigation hardkey button to access the Navigation menu. Select the country by performing the following steps: By default, the Alpine Navigation System proposes the country where you are or in case there is no valid GPS position, the country of the last known position. If needed, tap Start entering the first few letters of the country. - Page 183 To open the list, tap , and select the town or ZIP code. Enter the street name and the house number or crossing street by performing the following steps: Start entering the street name on the keyboard. The names that match the string appear in a list.
-
Page 184: Selecting A Town Center
3.1.2.2 Selecting a town center The town center is not the geometric center of the town but an arbitrary point the map creators have chosen. In towns and villages, it is usually the most important intersection and in larger towns, it is one of the important intersections. -
Page 185: Selecting An Intersection In A Town
Instead of entering the house number, tap . The midpoint of the street is selected as the destination. 3.1.2.4 Selecting an intersection in a town To navigate to an intersection, perform the following steps: Press the navigation hardkey button to access the Navigation menu. Go to and select the country and town as described earlier. -
Page 186: Selecting A Place Of Interest
to open the numeric keypad and start entering the ZIP code. to open the list of results. Select the ZIP code from the list. Continue the search as described previously (page 27). 3.1.3 Selecting a Place of Interest You can search for Places of Interest (Places) in the menu. -
Page 187: Using Quick Search Categories
3.1.3.1 Using Quick search categories The Quick search feature helps you quickly find the most frequently selected types of Places. Perform the following steps: Press the navigation hardkey button to access the Navigation menu. The following Quick search categories appear: ... -
Page 188: Searching By Category
. To filter the list of results by providers, tap and then the provider logo on the right side of the screen. (optional) If needed, tap to further filter the list of results. Browse the list and tap one of the list items. The route is calculated and the map appears showing the entire route, where you can check route information and route alternatives. - Page 189 to search for a place within a selected town. (The result list is ordered by the distance from the center of the selected town.) (optional) If you have selected , select the town to search in. Select one of the main Place categories (for example, Accommodation), then browse the subcategories (for example, Hotel or Motel) to find your destination.
-
Page 190: Searching By Name
to reorder the list. To filter the list of results by providers, tap and then the provider logo on the right side of the screen. Browse the list and tap one of the list items. A full screen map appears with the selected point in the middle. - Page 191 (optional) If you have selected , select the town to search in. You can search for the name of a Place in all categories by performing the following steps: . Using the keyboard, start entering the name of the Place or browse in the categories.
-
Page 192: Finding Help Nearby
3.1.3.4 Finding help nearby To quickly search for nearby assistance, perform the following steps: Press the navigation hardkey button to access the Navigation menu. Places in the following pre-set search categories can be searched for around the current position (or around the last known position if the current position is not available): ... -
Page 193: Selecting A Saved Location
3.1.4 Selecting a Saved Location To select a location that you have already saved (page 53), perform the following steps: Press the navigation hardkey button to access the Navigation menu. The list of Saved Locations is displayed. It contains two pre-set categories: Home and Work. Tap the location that you want to set as your destination. -
Page 194: Selecting A History Item
3.1.5 Selecting a History item The destinations that you have used earlier appear in the History list. Smart History offers these locations from your previous destinations, using parameters like the current time of day, the day of week, and the current location. -
Page 195: Entering Coordinates
3.1.6 Entering coordinates To select a destination by entering its coordinates, perform the following steps: Press the navigation hardkey button to access the Navigation menu. You can enter the latitude and longitude values in any of the following formats: decimal degrees, degrees and decimal minutes, or degrees, minutes and decimal seconds. -
Page 196: Selecting A Location On The Map
3.1.7 Selecting a location on the map To select a map location, perform the following steps: Locate your destination on the map. Move and scale the map as necessary. Tap the location that you want to select as your destination. The cursor ( ) appears there. -
Page 197: Planning A Multipoint Route
3.1.8 Planning a Multipoint Route To build your route destination-by-destination, perform the following steps: Press the navigation hardkey button to access the Navigation menu. There is only one line in the list of route points, the starting point of the route, which is normally the current GPS position. -
Page 198: Checking Route Information And Alternatives
(optional) Tap to optimize the whole route or the order of waypoints. You can also delete all the destinations. When you have added all the route points, tap and the planned route is automatically calculated. 3.2 Checking Route Information and Alternatives To get a map overview of the planned route and check different parameters of the planned route, perform the following steps: Press the navigation hardkey button to access the Navigation menu. -
Page 199: Checking Traffic Events
to list route alternatives and select the most suitable route for you. on the Route Summary screen to carry out additional actions, for example edit your route preferences or display the itinerary. 3.3 Checking Traffic Events Offline statistical traffic information (historical speed information or traffic patterns) can be taken into account in the route calculation based on the time of day and the day of week if suitable data can be found on the device. - Page 200 If there is at least one significant event on the planned route, a description is displayed about the next event. Tap to see the list of all events. Tap any of the list items to see its details and to display the affected road segment in its full length on the map.
-
Page 201: Editing The Route
to display historical traffic information. A 2D map is displayed with road segments colored by the likely density of the traffic in the given period. The information relevant for the current period is shown when you open the screen. If necessary, you can browse the map for a better view of certain road segments. -
Page 202: Setting A New Starting Point
3.4.1 Setting a new starting point For normal navigation, all routes are calculated from the current position. You can pause navigation to check future routes, simulate them or see their length in time and distance. Then you can set the starting point of the route to a location other than the current GPS position. -
Page 203: Adding An Additional Destination
to continue. The map returns with a transparent position marker (showing that there is no GPS reception). If a planned route already exists, it is now recalculated starting from the selected location. To return to normal navigation, tap 3.4.2 Adding an additional destination If you already have a planned route and you select a new destination as described in the above sections, the route to the previous destination is deleted and a new route is calculated. -
Page 204: Modifying The List Of Destinations
3.4.3 Modifying the list of destinations To edit your route, perform the following steps: Press the navigation hardkey button to access the Navigation menu. In the Navigation menu, tap You have the following options on this screen: to delete all the destinations, or optimize the waypoints or the route. -
Page 205: Deleting The Planned Route
Type in a name and tap The route is saved and it is available in in the Navigation menu. By selecting a previously saved route, Alpine Navigation System recalculates the route using the saved destination and/or the waypoints. 3.4.5 Deleting the planned route You have the following two options to delete the navigated route: ... -
Page 206: Selecting A Route Alternative When Planning The Route
Select one of the route alternatives and tap to return to the previous screen. Alpine Navigation System recalculates the route. Tap to start your journey. The orange line now shows the new planned route. -
Page 207: Selecting A Route Alternative For An Existing Route
Select one of the route alternatives and tap to return to the previous screen. Alpine Navigation System replaces the original route. Tap to start your journey. The orange line now shows the new planned route. -
Page 208: Saving A Location
3.5 Saving a location To add any location to the saved locations (the list of frequently used destinations), perform the following steps: Select a destination as described before. It can be an address, a Place, any location on the map, a previously used destination from History, and so on. -
Page 209: Editing A Saved Location
3.5.1 Editing a Saved Location To edit a location that you have already added as a Saved Location, perform the following steps: Press the navigation hardkey button, and tap The list of Saved Locations is displayed. Tap the location you want to edit, tap and enter the name of the location on the keyboard, then tap In Saved Locations, Home and Work cannot be renamed. - Page 210 The warning for road safety cameras is disabled when you are in a country where road safety camera warning is prohibited. However, you must make sure that using this feature is Note! legal in the country where you intend to use it. Return to the Navigation view, and select the Alert Point.
-
Page 211: Running A Simulation
3.7 Running a Simulation To run a simulated navigation that demonstrates the planned route, perform the following steps: Press the navigation hardkey button to access the Navigation menu. In the Navigation menu, tap . The simulation starts from the starting point of the route and leads you through the whole planned route using a realistic speed. -
Page 212: Off-Road Navigation
3.8 Off-road navigation When first started, Alpine Navigation System calculates routes using the road network of the maps provided with the product. If you want to disregard roads during navigation, you can switch to off-road mode, for example when driving in a desert. -
Page 213: Navigating In Off-Road Mode
Download and install the Toolbox PC tool on your PC. Go to the alpine.naviextras.com website. If you do not have a user account yet, create one. Click Download PC tool on the right side of the page to access the download page. - Page 214 Use the Toolbox PC tool to download updates and to purchase additional extras at your convenience. For instructions on using the Toolbox, see the Toolbox How-to Guides at alpine.naviextras.com/shop/portal/support. Once the download is complete, remove the USB storage device from the PC.
-
Page 215: Reference Guide
There is a special proximity warning for road safety cameras (like speed or red light cameras) and other proximity Alert Points (like schools or railroad crossings). These Alert Points are not part of Alpine Navigation System. You can download Alert points from alpine.naviextras.com or you can upload points in a specific text file if needed. -
Page 216: Route Calculation And Recalculation
As a result, Alpine Navigation System may suggest a different route during the weekday rush hours, especially in major cities with frequent traffic jams. See page 62. -
Page 217: Speed Limit Warning
The maximum speed set in the vehicle profile (page 70) is also used for this warning. Alpine Navigation System alerts you if you exceed the pre-set value even if the legal speed limit is higher. -
Page 218: Intelligent Navigation
The following sections describe these features. 4.1.9.1 Congestion detour on highways Alpine Navigation System may offer a detour when you slow down on a highway due to a traffic jam. The Potential congestion detour window appears and shows the length and duration of the detour. -
Page 219: Real-Time Alternative Routes
You can accept the recommended detour by tapping 4.1.9.2 Real-time alternative routes Alpine Navigation System may offer an alternative route on normal roads in case of a traffic jam. The possible alternative route window appears and shows the length and duration of the detour. -
Page 220: Parking Around Destination
4.1.9.3 Parking around destination If you leave the planned route by exiting a freeway, Alpine Navigation System tries to guess the reason for making a detour. By tapping , you can open a top-down map with the recommended parking Places around the destination. By tapping the arrows on the sides, you can switch between the recommended parking facilities. -
Page 221: Information Menu
Shows the GPS Information screen with satellite position and signal strength information. Shows the version of Alpine Navigation System, licenses, content, demo routes, credits, statistics, and the SWID. -
Page 222: Where Am I
4.2.1 Where Am I This screen contains information about the current position (or about the last known position if GPS reception is not available). You can access it the following two ways: By going to the Navigation menu and tapping ... -
Page 223: Trip Monitor
4.3 Setup menu You can configure the navigation settings, and modify the behavior of Alpine Navigation System, by pressing the navigation hardkey button, and tapping Tap the arrows to view the content of other pages. - Page 224 The Setup menu provides the following options: Button Function Select the type of vehicle you are driving, the road types used in route planning, and the route planning method. Adjust the different sound volumes. Enable and set up warnings for speed limit, Alert Points (such as speed cameras), and road signs.
-
Page 225: Route Preferences
4.3.1 Route preferences The following settings determine how routes are calculated: Button Function Set the type of vehicle you want to use to navigate the route. Based on this setting, some of the road types can be excluded from the route, or some of the restrictions may not be taken into account in route calculation. - Page 226 Maneuver restrictions and one-way streets are taken into account when planning a route. Roads are used only if access for taxis is allowed. Private roads, resident-only roads and walkways are excluded from routes. Maneuver restrictions and one-way streets are taken into account when planning a route.
-
Page 227: Route Planning Method Types
Results in a route with fewer turns and no difficult maneuvers. With this option, you can make Alpine Navigation System take, for example, the freeway instead of a series of smaller roads or streets. -
Page 228: Sound
Per-use toll roads are pay roads where there is a per-use charge in the routes by default. If you disable toll roads, Alpine Navigation System plans the best toll-free route. Alpine Navigation System includes ferries in a planned route by default. However, a map does not necessarily contain information about the accessibility of temporary ferries. - Page 229 You have the following options for each sound type: Button Function Volume slider Adjust the volume of the related sound. Mute the related sound. The slider becomes inactive. Tap again to re-enable it. Button Function Disable verbal instructions. This function is enabled by default. Choose from the following options: ...
-
Page 230: Warnings
You can enable and modify the following settings: Button Description Alpine Navigation System is able to warn you if you exceed the current speed limit. This information may not be available in your region, or may not be fully correct for all roads on the map. -
Page 231: Navigation View
Tap it to receive a warning when approaching a road safety camera or other Alert Points like school zones or railroad crossings. You must make sure that using this feature is legal in the country where you intend to use it. You can set the warning type for the different Alert Point categories (alert types) individually. - Page 232 You can modify the following settings: Button Function Adjust the basic zoom and tilt levels to your needs. Three levels are available. Switch between daytime and night color modes or let the software switch between the two modes automatically a few minutes before sunrise and a few minutes after sunset.
-
Page 233: Regional
A top-down overview of the tunnel and the remaining distance are also displayed. In certain situations, Alpine Navigation System offers a detour when there is a traffic jam on a highway. See page 63. -
Page 234: Display
TTS Voice with a microphone icon: Besides the above-mentioned profiles, it can also be used for voice recognition. You can set the measurement units and time/date format to be used. Alpine Navigation System may not support all the listed units in some voice guidance languages. -
Page 235: Traffic
(not counting the traffic jam). If you set the Offer detour feature to 10 minutes, Alpine Navigation System recalculates the route because it saves 15 minutes, which is more than the 10 minutes you set. If you set it to 20 minutes, the original route is kept because the detour would save you only 15 minutes. -
Page 236: Trip Monitor
This is not a button. This line shows the current size of the trip database, the sum of all trip and track logs saved. 4.3.9 User Profiles If more drivers use Alpine Navigation Systemfor navigating, their settings can be remembered by using one of the user profiles. You can create a new profile by tapping enter a name, and select a car model. -
Page 237: End-User License Agreement
5 End-user license agreement 0. Definitions The following terms shall have the meaning defined hereunder in this agreement when used with capital letters. The text of this agreement may also contain further defined terms. “Agreement” means this End User Licence Agreement (EULA) containing the terms and conditions of use of the Software, Databases and Services by You as the end user. - Page 238 term is defined at 48 C.F.R (“FAR”) 2.101 and that all use of the Navigation Product is subject to this Agreement. 3 Applicable law and venue 3.1 This Agreement will be governed by the laws of the country where the Licensor has its statutory seat or in the absence of such incorporation where it has its central administration (“country of residence”) without regard to such country’s choice of law provisions.
- Page 239 5.2 Intellectual property rights of Licensor, the Software Owner or other rightholders extend to the whole Navigation Product and to its parts separately as well. 5.3 The owner(s) of the copyrights of the Database(s) is (are) the Licensor, or natural person(s) or corporate business entity(ies) (referred to as: “Database Owner”) who supply them.
- Page 240 store, to transfer or to distribute these data or contents or to disclose them in full or in part to the public in any format or to download them from the Navigation Product. 8. No warranty, limitation of liability 8.1 The Licensor hereby informs the User that although the greatest care was taken in producing the Navigation Product, given the nature of the Navigation Product and its technical limitations, the Licensor and its suppliers do not provide a warranty for the Navigation Product being completely error-free, and they are not bound by any obligation whereby the Navigation Product obtained by the User should be...
- Page 241 Safety (e.g. speed) cameras are provided for informational purposes only and may not be used to encourage, facilitate or support the violation of any laws. Furthermore some countries prohibit the display or use of such features. Compliance with country specific laws and any usage or reliance on the information by user shall be at the User's own risk and sole responsibility.
- Page 242 10.4 Licensor hereby informs the User, that if it accesses the Internet through mobile data service while abroad or otherwise roaming another mobile network the transmission of such data may result in special roaming charges. To avoid such charges it is the responsibility of the User to disable mobile data services while roaming or to turn off the data collection functions of the Navigation Product.
- Page 243 11.7. Community Services. Some Connected Services may be based on data and information uploaded by participating individuals (Users or other persons) or a Database created and maintained by a group of such individuals. Such data may not come from a trusted source and may also be intentionally false or misleading, as Licensor or Software Owner does not have any means to control or verify the credibility or accuracy of such data or the individuals providing the data.
-
Page 244: Copyright Note
The product and the information contained herein are subject to change without prior notification. This manual may not, in whole or in part, be reproduced or transmitted in any form either electronically or mechanically, including photocopying and recording, without the express written consent of Alpine Electronics, Inc.