Table of Contents
Advertisement
Available languages
Available languages
Advertisement
Chapters
Table of Contents

Related Manuals for Audiovox VME 9122 TS


Summary of Contents for Audiovox VME 9122 TS
- Page 1 VME 9122 TS...
-
Page 3: Table Of Contents
Danke, dass Sie sich für ein Produkt von Audiovox entschieden haben. Wir hoffen, Ihnen die Funktion des Geräts mit den in dieser Bedienungsanleitung beschriebenen Anweisungen einfach und verständlich erklären zu können. Bitte nehmen Sie sich einige Minuten Zeit um sich mit der Bedienungsanleitung zubefassen. Dies erleichtert Ihnen dann später die Bedienung des Gerätes. -
Page 4: Vorbereitung
Wir gratulieren Ihnen zu dem Kauf des mobilen Audiovox VME 9122 TS-Multimedia-Receivers. Sie sollten diese Anleitung vollständig lesen, bevor Sie mit der Montage des Geräts beginnen. Wir empfehlen, die Montage des Audiovox VME 9122 TS-Receivers von einem zuverlässigen Fachhändler vornehmen zu lassen. -
Page 5: Optionale Geräte
Dies zeigt an, dass die Funktion nicht zur Verfügung steht. • Rückfahrkamera An den VME 9122 TS kann eine Rückfahrkamera angeschlossen werden. Bevor Sie auf die Kamerafunktionen zugrei- fen können, müssen Sie eine Rückfahr-Videokamera kaufen und installieren. Nach dem Anschließen der Rückfahrkamera und bei deren ordnungsgemäßer Funktion wird der CAMERA-Modus aktiviert. -
Page 6: Achtung
Kurzschluss zu vermeiden. HINWEIS: Wenn der VME 9122 TS-Receiver in ein Fahrzeug eingebaut werden soll, das mit einem Navigationssystem ausge- stattet ist, lösen Sie das Batteriekabel nicht. Anderenfalls gehen die im Speicher des Navigationssystems abgelegten Daten unter Umständen verloren. In diesem Fall sollten Sie bei der Montage allerdings besonders vorsichtig sein, um einen Kurzschluss zu vermeiden. -
Page 7: Schaltbild
Schaltbild... -
Page 8: Media Link
Medialink-Schaltbild... -
Page 9: Montage
Achten Sie beim Austauschen von Sicherungen darauf, dass Sie die richtige Sicherung mit der erforderlichen Amperezahl verwenden, um eine Beschädigung des Radios zu vermeiden. Für den VME 9122 TS-Receiver muss eine ATM/MIN-Flachsicherung mit 20 Ampere verwendet werden. Diese befindet sich im schwarzen Filterkasten und ist mit... - Page 10 Abschließen der Montage Nachdem Sie alle Kabel angeschlossen haben, schalten Sie das Gerät ein, um sicherzustellen, dass es betriebsbereit ist. Beachten Sie dabei, dass die Zündung eingeschaltet sein muss. Kann das Gerät nicht eingeschaltet werden, über- prüfen Sie die Verkabelung, bis Sie den Fehler gefunden haben. Sobald das Gerät betriebsbereit ist, schalten Sie die Zündung aus und montieren das Chassis.
-
Page 11: Diebstahlsicherung
WICHTIG! DIEBSTAHLSICHERUNG Der VME 9122 TS-Receiver ist mit einer Diebstahlsicherung ausgestattet, die vom Benutzer beim ersten Einschalten die Eingabe eines Kennworts erfordert. Das stan- dardmäßige Kennwort lautet „012345“ (6 Stellen). Um das Kennwort für die Diebstahlsicherung und den Zugriff auf das Menü RATING zu ändern, gehen Sie fol- gendermaßen vor:... -
Page 12: Bedienelemente Und Anzeigen
Drücken Sie die Taste MUTE, um den Receiver stumm zu schalten. Drücken Sie die Taste erneut, um die Wiedergabe mit der zuvor eingestellten Lautstärke fortzusetzen. HINWEIS: Der VME 9122 TS-Receiver ist mit einer Softmute-Funktion ausgestattet. Diese Funktion ermöglicht das langsame Anheben oder Absenken der Lautstärke nach dem Aktivieren bzw. Deaktivieren der MUTE-Funktion. - Page 13 11. (Joystick unten) DVD/Disc-Modus: Drücken Sie einmal auf diese Taste, um einen langsamen Vor-/Rücklauf zu starten. TUNER-Modus: Drücken Sie auf diese Taste, um die Frequenz schrittweise zu reduzieren. MENU-Modus: Drücken Sie einmal auf diese Taste, um den Cursor nach unten zu bewegen. Tilt Mode: Stufenweise Einstellung des Monitorwinkels durch Einzelbetätigung.
-
Page 14: Fernbedienung
FERNBEDIENUNG Die Fernbedienung des VME 9122 TS-Receivers dient zum Steuern des vorderen und hinteren Bereichs. Um zwischen vorderem und hinterem Bereich zu wechseln, betätigen Sie den Schalter F/R (32) auf der rechten Seite der Fernbedienung. HINWEIS: Die Fernbedienung Ihres Geräts stimmt unter Umständen nicht genau mit dem hier abgebildeten Modell... -
Page 17: Verwenden Des Tft-Monitors
VERWENDEN DES TFT-MONITORS Aus- und Einfahren des TFT-Monitors Ausfahren des TFT-Monitors Drücken Sie auf der Gerätevorderseite auf die Taste OPEN (1) oder auf der Fernbedienung auf die Taste (25), um den Mechanismus zum Ausfahren des Monitors in die Wiedergabeposition zu aktivieren. Einfahren des TFT-Monitors Drücken Sie auf der Gerätevorderseite auf die Taste OPEN (1) oder auf der Fernbedienung auf die Taste (25), um... - Page 18 Bildformat Drücken Sie die Taste WIDE (28) auf der Fernbedienung oder auf dem Monitor (22), um das Bildformat folgenderma- ßen einzustellen (nur aktiv bei Videoquelle): CINEMA Der Bildschirm wird über die gesamte Breite auf das 16:9-Format ausgedehnt. Die Ausdehnung ist über den gesamten Bildschirm gleich. NORMAL Bei der herkömmlichen Darstellung im 4:3-Format ist am rechten und linken Bildschirmrand ein freier Streifen zu sehen.
-
Page 19: Bedienungsanleitung
BEDIENUNGSANWEISUNGEN Ein-/Ausschalten Drücken Sie die Taste /SRC (6) am Gerät (oder die Taste / POWER (4) auf der Fernbedienung), um das Gerät einzuschalten. Die Tasten auf der Gerätevorderseite leuchten auf, und der Status des aktuellen Modus wird im LCD- Display (7) angezeigt. Sie können das Gerät auch einschalten, indem Sie auf die Taste OPEN (1) drücken, um den TFT-Monitor auszufahren. - Page 20 Stummschaltung bei Anrufen und Navigationsansagen Wenn das MUTE-Kabel angeschlossen ist wird der Ton stumm geschaltet, wenn ein Anruf auf dem im Fahrzeug instal- lierten Telefon eingeht oder Ansagen durch das Navigationssystem erfolgen. Auswählen der Wiedergabequelle Drücken Sie auf der Bedienkonsole die Taste SRC (6) oder die entsprechende Taste auf der Fernbedienung (8), um in der nachfolgend angegeben Reihenfolge zwischen den verfügbaren Wiedergabequellen zu wechseln: RADIO, DVB-T, DISC, NAV, BT, iPod, SD, USB, AUX und CAMERA.
-
Page 21: Betrieb Mehrerer Bereiche
Zurücksetzen fortgesetzt. BETRIEB MEHRERER BEREICHE (Dual Zone) Mit dem VME 9122 TS-Receiver können unterschiedliche Quellen unabhängig voneinander gleichzeitig wiedergegeben werden. So kann beispielsweise auf dem vorderen Monitor ein Videospiel angezeigt werden, während die Passagiere im Fond auf dem hinteren Monitor einen DVD-Film ansehen können. -
Page 22: Setup-Menü
Funktionen für den hinteren Bereich steuern. Sie können jedoch auch die Fernbedienung verwenden. Die Fernbedienung des VME 9122 TS-Receivers dient zum Steuern des vorderen und hinteren Bereichs. Um zwischen vor- derem und hinterem Bereich zu wechseln, bewegen Sie den Schalter F/R (32) auf der rechten Seite der Fernbedienung. - Page 23 Einstellen einer Option 1. Verwenden Sie den Touchscreen, oder drücken Sie die Tasten oder des Joysticks, um die einzustellende Option auszuwählen. 2. Wechseln Sie mit Hilfe des Touchscreens oder durch Drücken der Joystick-Taste ENTER in das Optionsfeld der ein- zustellenden Option. In einer weiteren Spalte wird ein Untermenü angezeigt, in dem die ausgewählte Option blau dar- gestellt ist.
- Page 24 • Einstellen der Subwooferphase: Berühren Sie das Symbol SUB.W, um auf die Steuerungen für die Subwoofer- Polarität zuzugreifen und die Polarität des Subwoofer-Signals von 0° auf 180° umzukehren. Das Umkehren der Polarität kann die Bassreaktion im Verhältnis zur Lautsprecherkonfiguration verbessern. •...
- Page 25 Einstellungen Optionen Funktionen ------ Password Geben Sie das sechsstellige Standardkennwort ein (012345). Rating 1. Kid Safe Wählen Sie die geeignete 2. G Altersbeschränkung für die Zuschauergruppe (Kinder) aus. 3. PG 4. PG-13 Sie können höhere 5. PG-R Alterbeschränkungen durch 6. R die Eingabe Ihres 7.
- Page 26 Einstellung Optione Funktion Camera In Normal Mirror Kehrt die Kamerabilder um, als würden Sie in einen Rückspiegel schauen. TFT Auto Auto Der TFT-Monitor fährt beim Einschalten des Geräts Open automatisch aus. Manual Wenn die Zündung ausgeschaltet ist, wird der TFT-Monitor NICHT eingefahren, wenn er sich zuvor in ausgefahrener Position befand.
-
Page 27: Bedienung Des Radios
BEDIENUNG DES RADIOS 1. Anzeige des aktuell ausgewählten Radiobands 2. Anzeige der Radiofrequenz / des Sendernamens 3. Uhrzeit 4. Anzeige für Sendebetrieb in Stereo 5. Anzeige für starkes Signal lokal empfangbarer Sender 6. Gespeicherte Radiosender: Touchpunkt zum Aufrufen gespeicherter Sender 7. - Page 28 Umstellen auf Radioquelle • Berühren Sie die obere linke Ecke des Bildschirms (den RADIO-Kreis), um das SOURCE MENU anzuzeigen. Berühren Sie RADIO. • Drücken Sie auf der Gerätevorderseite die Taste SRC (6) oder die entsprechende Taste auf der Fernbedienung (8), um auf die Quelle AM/FM (UKW/MW) oder RADIO umzuschalten.
- Page 29 Aufrufen und Speichern von Sendern mit der Festsenderfunktion und der automatischen Speicherfunktion (AS): Aufrufen eines Senders 1. Wählen Sie ggf. ein Band aus. 2. Berühren Sie eine der Speichertasten (P1 – P6) auf dem Bildschirm, um den gewünschten gespeicherten Sender aufzurufen.
-
Page 30: Dvb-T-Betrieb
An den VME Monceiver über den BUS-Anschluss angeschlossener DVB-T 999 und Steuern des Geräts über den Touchscreen des zentralen VME-Geräts Einstellungen über den Setup-Bildschirm Verwendung der angezeigten Tasten Um die Quelle zu ändern, verwenden Sie die Taste SRC/Wide NAV auf der Vorderseite des zentralen VME-Geräts oder die entsprechen- de Taste auf der Fernbedienung. -
Page 31: Dvd/Vcd Video-Betrieb
DVD/VCD VIDEO-BETRIEB HINWEIS: Bei ordnungsgemäßer Montage ist auf dem TFT-Hauptmonitor nur dann ein DVD-Film zu sehen, wenn die Handbremse gezogen wurde. Wenn Sie versuchen, während der Fahrt eine DVD wiederzugeben, wird auf dem TFT- Monitor die Meldung PARKING vor einem blauen Hintergrund angezeigt. Der Betrieb der Rückfahrkamera, sofern ange- schlossen, ist jedoch während der Fahrt möglich. - Page 32 Anhalten der Wiedergabe Berühren Sie die Stopptaste (||) auf dem Bildschirm, oder drücken Sie auf der Fernbedienung auf die Taste >/||, um die Wiedergabe anzuhalten. Drücken Sie die Taste > auf dem Bildschirm, um die Wiedergabe fortzusetzen. Schnelle Wiedergabe vorwärts Drücken Sie die Taste /\ auf dem Joystick oder die Taste >>...
- Page 33 Öffnen des DVD-Menüs Drücken Sie auf der Fernbedienung auf die Taste MENU (1), um das DVD-Hauptmenü aufzurufen. Verwenden Sie den Joystick, um einen Titel aus dem Menü auszuwählen, oder berühren Sie den Titel auf dem Bildschirm. Drücken Sie auf der Fernbedienung auf die Taste TITLE (2), oder berühren Sie den Titel auf dem Bildschirm, um einen anderen Titel für die Wiedergabe auszuwählen.
- Page 34 PBC-Wiedergabesteuerung (Play Back Control) (Nur im Video-CD-Modus) Auf einer Video-CD mit PBC-Funktion bietet die PBC-Wiedergabesteuerung zusätzliche Möglichkeiten der Steuerung bei der Wiedergabe einer Video-CD. Drücken Sie auf der Fernbedienung auf die Taste MENU (1), um die PBC- Wiedergabesteuerung zu aktivieren oder zu deaktivieren. Ist die PBC-Wiedergabesteuerung aktiviert, wird die Wiedergabe mit dem ersten Track aus der Wiedergabeliste gestartet.
-
Page 35: Dvd/Cd Audio-Betrieb
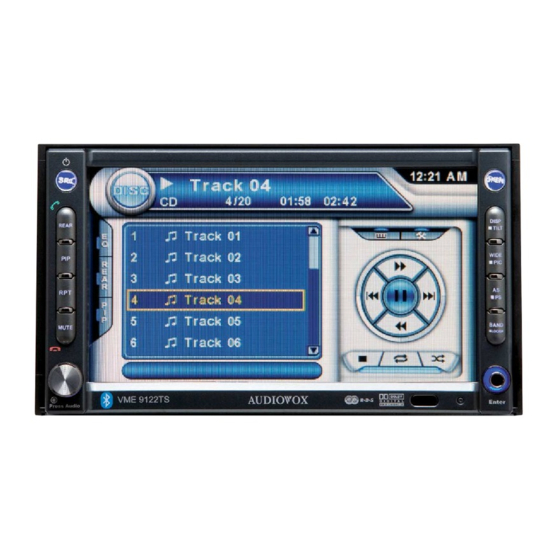
Die Anweisungen für die Steuerung des TFT-Monitors und zum Einlegen/Auswerfen von Medien sind für DVDs und CDs gleich. Informationen zu diesen Themen finden Sie im Abschnitt zum DVD/Video-CD-Betrieb. Der VME 9122 TS-Receiver kann Musik oder Audio-Dateien von folgenden Diskmedien wiedergeben: • CD-DA • CD-R/RW •... - Page 36 sowie die Track-Nummer und die Wiedergabezeit auf dem Bildschirm angezeigt. Benutzeroberfläche des CD-Players Im Folgenden sind die Bildschirmanzeigen und die Touchpunkte für die CD-Wiedergabe aufgeführt. 1. Aktueller Track und Gesamtanzahl der Tracks auf der Disk 2. Verstrichene Wiedergabezeit/Länge des Tracks 3.
-
Page 37: Mp3/Wma/Ipod-Betrieb
Zufallswiedergabe zu deaktivieren. HINWEIS: CD-R- und CD-RW-Disks werden nur wiedergegeben, wenn sie abgeschlossen sind. Schneller Vorlauf Drücken Sie die Taste /\ auf dem Joystick, oder berühren Sie die Taste auf dem Bildschirm, um den schnellen Vorlauf zu starten. Halten Sie die Taste gedrückt und lassen Sie sie anschließend los, um die Geschwindigkeit in 2-fach, 4-fach, 6-fach und 8-fach zu ändern. - Page 38 Der VME 9122 TS-Player erkennt nur drei Ordnerebenen und zeigt keine Ordner an, die nur andere Ordner enthalten. Im obigen Beispiel zeigt das Gerät die Ordner 3, 4, 6 und 8 aber nicht die Ordner 2 und 7 an, da diese keine Tracks enthalten.
- Page 39 MP3-Benutzeroberfläche Im Folgenden sind die Bildschirmanzeigen und die Touchpunkte für die MP3-Wiedergabe aufgeführt. 1. Aktueller Track und Gesamtanzahl der Tracks im Stammordner der Disk 2. Verstrichene Wiedergabezeit/Länge des Tracks 3. Aktuelle Uhrzeit 4. Tracktitel 5. ID3-Informationen 6. II : Touchpunkt zum Starten/Anhalten der Disk-Wiedergabe : Touchpunkt zum Stoppen der Disk-Wiedergabe 8.
- Page 40 Steuern der MP3/WMA-Disk-Wiedergabe Wiedergeben von MP3/WMA-Dateien Nach dem Einlegen einer MP3/WMA-Disk werden die Dateien in der Reihenfolge wiedergegeben, in der sie im Stammverzeichnis abgelegt wurden. HINWEIS: Verwenden Sie beim Brennen von MP3/WMA-Dateien auf eine DVD-Disk die 2X- oder 4X-Schreibfunktion, sofern verfügbar. Diese langsamere Schreibgeschwindigkeit hilft, Pufferfehler zu vermeiden, und sie verbessert die Zuverlässigkeit beim Lesen der Disk.
- Page 41 iPod-BETRIEB iPod-Benutzeroberfläche In der unten stehenden Abbildung sind die Bildschirmanzeigen und die Touchpunkte für die iPod-Wiedergabe darge- stellt. 1. Verstrichene Spieldauer 2. Aktueller Track und Gesamtzahl der Dateien 3. Aktuelle Uhrzeit 4. Medientitel/Menüinformationen 5. ID3-Informationen 6. Eingabe 7. Touchpunkt für Zugriff auf Fotos >>|: Touchpunkt zum Wechseln zum nächsten Track |<<: Touchpunkt zum Wechseln zum vorherigen Track 10.
- Page 42 Bildschirm oder drücken auf der Fernbedienung auf die Taste >> (14) oder auf dem iPod auf die Taste MENU. HINWEIS: Um das Video vom iPod auf den Bildschirm des VME 9122 TS zu übertragen, müssen über das iPod-Menü für Videoeinstellungen folgende Optionen ausgewählt werden: TV Out = Ein, TV Signal = PAL, Widescreen = Ein.
- Page 43 Direkte Track-/Dateieingabe Um einen Track bzw. eine Datei direkt auszuwählen, berühren Sie die Taste auf dem Bildschirm, um das Menü für die Direkteingabe anzuzeigen. Geben Sie den gewünschten Track bzw. die Datei mit Hilfe des angezeigten Nummernblocks ein. Drücken Sie ENTER, um den eingegebenen Track bzw.
-
Page 44: Bluetooth-Betrieb
BLUETOOTH-BETRIEB Bevor Sie die Bluetooth-Funktionen des VME 9122 TS-Receivers verwenden, überprüfen Sie, ob Ihr Mobiltelefon Bluetooth-Funktionen unterstützt (Headset- oder Freisprechprofile oder beides). Beachten Sie die folgenden Richtlinien, um eine ordnungsgemäße Funktion sicherzustellen. • Bevor Sie Bluetooth-Funktionen verwenden können, müssen Sie eine Verbindung zwischen Ihrem Mobiltelefon und dem VME 9122 TS-Receiver herstellen (siehe „Herstellen einer Verbindung zwischen Ihrem Mobiltelefon und dem... - Page 45 Feld für den Verbindungscode des Bluetooth-SETUP-Menüs eingeben. Der Standardverbindungscode vieler Telefone lautet 0000. Siehe „Optionen des Untermenüs BLUETOOTH“ auf Seite 24. 3. Wählen Sie in der Verbindungsliste des Mobiltelefons „VME 9122 TS“ aus. • Verläuft der Verbindungsaufbau erfolgreich, wird auf dem TFT-Monitor die Modellnummer oder der Name des verbun- denen Mobiltelefons angezeigt (entsprechend der Einstellung im Bluetooth-Setup-Menü...
- Page 46 Wiederherstellen der Verbindung Nach dem ersten Herstellen einer Verbindung können Sie die Verbindungstaste berühren, um die Verbindung erneut herzustellen.** * Dies ist eine Funktion des Mobiltelefons oder PDAs ** Aktivieren durch Doppelklick HINWEIS: Sie können die Verbindung zu einem Telefon nur über die Tasten der Telefon-Benutzeroberfläche auf dem Bildschirm herstellen.
- Page 47 3. Berühren Sie den Bereich rechts neben der Anzeige AUTO ANSWER, um die Funktion zu aktivieren. Automatische Verbindungsherstellung Die Option AUTO CONNECT dient zum automatischen Herstellen einer Verbindung zwischen dem VME 9122 TS- Receiver und Ihrem zuvor verbundenen Bluetooth-Gerät, wenn sich dieses in Reichweite befindet. Ist die Option CON- NECT auf MANUAL eingestellt, müssen Sie die Taste zweimal drücken, um die Verbindung zu Ihrem Telefon wieder-...
-
Page 48: Fehlerbehebung
FEHLERBEHEBUNG Problem Ursache Lösung ALLGEMEINES Das Gerät lässt sich nicht Die Sicherung für das Radio ist durchgebrannt Setzen Sie eine neue Sicherung des richtigen einschalten Typs und mit der richtigen Amperezahl ein Die Sicherung für die Autobatterie ist Setzen Sie eine neue Sicherung des richtigen durchgebrannt Typs und mit der richtigen Amperezahl ein Unzulässiger Bedienvorgang... - Page 49 RADIO Schwache Empfangssignale bei Die Autoantenne ist nicht vollständig Überprüfen Sie den Antennenanschluss der Sendersuche ausgefahren Die Autoantenne ist nicht korrekt Überprüfen Sie den Antennenanschluss angeschlossen Die Funktion LOCAL ist aktiviert Deaktivieren Sie die Funktion LOCAL Die Disk wird nicht wiedergegeben Die Disk ist verbogen oder verkratzt Verwenden Sie eine Disk in einwandfreiem Zustand Die Disk ist verschmutzt oder feucht...
-
Page 50: Pflege Und Wartung
Angezeigte Meldung Ursache Lösung Loading Die Disk wird gelesen No Disc Die Disk ist verschmutzt Reinigen Sie die Disk mit einem weichen Tuch Die Disk wurde falsch herum eingelegt Legen Sie die Disk richtig herum ein Es befindet sich keine Disk im Fach Legen Sie eine Disk ein Bad Disc Die Disk ist verschmutzt... -
Page 51: Technische Daten
TECHNISCHE DATEN DVD/CD-Player Kompatible Disk-Medien: DVD + R / RW (Single und Dual Layer) und CD-R / RW Kompatible Medienformate: CD-DA, MP3, WMA, VCD, SVCD, AVI, MPEG1 / 2, XviD, DivX und Kodak-Picture CD (JPEG). Rauschabstand: >95 dBA Dynamikbereich: >95 dB Frequenzgang: 20 Hz bis 20 kHz, -3 dB Kanalabstand:... - Page 52 VME 9122 TS...
- Page 53 Thank you for choosing a Audiovox product. We hope you will find the instructions in this owner’s manual clear and easy to follow. If you take a few minutes to look through it, you’ll learn how to use all the features of your new Audiovox VME 9122 TS Mobile Multimedia Receiver for maximum enjoyment.
-
Page 54: Preparation
Congratulations on your purchase of the Audiovox VME 9122 TS Mobile Multimedia Receiver. It’s a good idea to read all of the instructions before beginning the installation. We recommend having your Audiovox VME 9122 TS installed by a reputable installation shop. -
Page 55: Optional Equipment
• Rear Camera The VME 9122 TS is "camera ready." Before accessing any camera features, you must purchase and install a rear video camera. Once the rear camera is connected and operating properly, the CAMERA source mode will become active. -
Page 56: Warning
NOTE: If the VME 9122 TS is to be installed in a car equipped with an on-board drive or navigation computer, do not discon- nect the battery cable. If the cable is disconnected, the computer memory may be lost. Under these conditions, use extra caution during installation to avoid causing a short circuit. -
Page 57: Wiring Diagram
Wiring Diagram... -
Page 58: Medialink
Medialink... -
Page 59: Installation
NOTE: When replacing a fuse, be sure to use correct type and amperage to avoid damaging the radio. The VME 9122 TS uses one 20 amp mini-ATM fuse, located in the black filter box in-line with the main wire harness. - Page 60 lock it into place NOTE: For proper operation of the CD/DVD player, the chassis must be mounted within 20° of horizontal. Make sure the unit is mounted within this limitation. 4. Attach one end of the perforated support strap (supplied) to the screw stud on the rear of the chassis using the hex nut provided.
-
Page 61: Anti-Theft Feature
Important! ANTI-THEFT FEATURE The VME 9122 TS is equipped with an anti-theft feature requiring the user to enter a password upon initial power on. The default user password is 012345 (6 digits). To change the anti-theft and RATINGS protection password, perform the following steps: 1. -
Page 62: Controls And Indicators
7. TFT Monitor 8. MUTE Press to silence the receiver. Press again to resume previous volume level. NOTE: The VME 9122 TS features Softmute, which will allow the volume to increase or decrease gradually when the MUTE function is activated or deactivated. - Page 63 9. IR Remote Control Receiver 10. (left joystick) DVD/Disc Mode: Press once to play back the previous chapter/track. TUNER Mode: Press once to auto-search for the previous available radio station. MENU Mode: Press once to move the cursor to the left. 11.
-
Page 64: Remote Control
REMOTE CONTROL The VME 9122 TS Remote controls both the front and rear zones. To switch from front to rear zone, move the F/R switch (32) located on the right side of the controller. NOTE: Your remote control may differ slightly from the one pictured here. The above diagram is for illustrative purpo-... -
Page 67: Using The Tft Monitor
USING THE TFT MONITOR Open/Close TFT Monitor Open TFT Monitor Press the OPEN button (1) on the front panel or press the ( ) button (25) on the remote control to activate the mecha nism that moves the display panel into the viewing position. Close TFT Monitor Press the OPEN button (1) on the front panel or press the ( ) button (25) on the remote control to load the display... - Page 68 Aspect Ratio Press the WIDE button (28) on the remote control or WIDE button (22) on the monitor to adjust the aspect ratio as fol- lows (only active with video source): CINEMA The entire screen is extended horizontally to the aspect ratio of 16 to 9. The extension ratio is the same at any point.
-
Page 69: Operating Instructions
OPERATING INSTRUCTIONS Power On / Off Press the /SRC button (6) on the unit (or the / POWER button (4) on the remote control) to turn the unit on. The buttons on the front of the unit light up and the current mode status appears in the TFT(7). You can also turn on the unit by pressing the OPEN button (1) and opening the TFT screen. - Page 70 Playing Source Selection Press the SRC button on the front panel (6) or remote control (8) to change between available playing sources in the following order: RADIO, DVB-T, DISC, NAV, BT, iPod, SD, USB, AUX and CAMERA. The playing mode is displayed on the TFT and LCD screens.
-
Page 71: Multi-Zone Operation
NOTE: If the unit is reset while a DVD is playing, the DVD resumes play once the reset is complete. MULTI-ZONE OPERATION Independent sources can be played simultaneously on the VME 9122 TS. For example, a video game console can be seen on the front screen while DVD video is available to rear passengers. -
Page 72: Setup Menu
If you have a rear touch screen installed, you can touch the screen to control most rear zone functions. You can also use the remote control. The VME 9122 TS remote controls both the front and rear zones. To switch from front to rear zone, move the F/R switch (32) located on the right side of the remote controller. - Page 73 Accessing Menu Items Touch the sub-menu name or use the joystick to select a submenu (Language, Audio, RDS, etc.). The features availa- ble for adjustment under the highlighted sub-menu option will appear in the center of the screen. Adjusting a Feature 1.
- Page 74 Speaker Sub-menu Features • Choose 4 CH, 4.1 CH or 5.1 CH depending on the speaker configuration in your vehicle. • Use the Test Tone feature to verify speaker settings. Make changes using the EQ/FAD-BAL menu, accessed by pres- sing and holding the AUDIO button (volume control). •...
- Page 75 Rating Sub-menu Features The DVD system has a built-in parental lock feature to prevent unauthorized persons from viewing restricted disc con- tent. By default, the rating system is set at the highest setting (with no restrictions). The parental lock is released only by entering the correct password.
- Page 76 If the monitor is in display mode, the monitor automatically switches to CAMERA mode upon reverse driving. When the reverse driving stops, the monitor return to its original input mode. P.VOL Sub-menu Features TS Cal (Screen Calibration) To access the “Screen Calibration” function from the SETUP menu, select the “TS CAL” option. After entering calibra- tion mode, a crosshair appears in a corner quadrant of the screen.
-
Page 77: Tuner Operation
TUNER OPERATION 1. Current radio band indicator 2. Radio frequency indicator / PS information 3. Clock 4. Stereo broadcasting indicator 5. Strong Local signal broadcasting indicator 6. Preset radio stations: Touch to recall preset stations 7. RDS Information: 8. EQ: Touch to view Spectrum Analyzer > Equalizer 9. - Page 78 Switch to Radio Tuner source • Touch the top left corner of the screen (the RADIO circle) to view the SOURCE MENU. Touch “RADIO”. • Press the SRC button (6) on the front panel or remote control (8) to switch to the AM/FM or RADIO source. Select FM/AM Band Touch the BAND button (15) on the screen, or press the BAND button on the unit (4) or remote control (20) to change between the following bands: FM1, FM2, FM3, AM1, and AM2.
- Page 79 Recalling and Storing broadcaster using the presets and the Automatic Storing ( AS) Function: Recalling a Station 1. Select a band (if needed) 2. Touch an on-screen button (P1- P6) to select the corresponding stored station. Manual Storing of a Station 1.
-
Page 80: Dvb-T Operation
DVB-T 999 connected at the VME Monceiver using the BUS connection and controlling via the TS Monitor of the VME headunit. Adjustments at the Setup page Using of the on Screen buttons To change the Source please use the SRC/Wide NAV button on the front of the VME head unit or at the remote control. -
Page 81: Dvd/Vcd Video Operation
DVD/VCD VIDEO OPERATION NOTE: When properly installed, DVD video cannot be displayed on the main TFT screen unless the parking brake is applied. If you attempt to play a DVD while the vehicle is moving, the TFT screen displays “PARKING” with a blue background. Rear video screens, if applicable, will operate normally. - Page 82 Fast Forward Playback Press the /\ button on the joystick or the >> button on the screen to fast forward. Keep pressing and releasing the but- ton to increase the rate from “2X” to “4X”, “6X”, and “8X”. Press the joystick enter button (18) on the remote control or touch the play button (>) to resume normal playback.
- Page 83 Direct Chapter / Track Selection Remote Control Direct Entry During DVD, VCD and CD playback, you can use the numeric keypad on the remote control (29) to access a track directly. Touch Screen Direct Entry To select a title, chapter/track, or specific playback time directly, touch the button on screen control to display the direct entry menu.
- Page 84 DVD Playback Information The following information is displayed at the top of the screen during DVD playback: • Title: 05/08 – “05/08" indicates the fifth of 8 titles on the DVD is currently playing. • Chapter: 012/016 – “002/016" indicates that the second of 16 titles on the DVD is currently playing.
-
Page 85: Dvd/Cd Audio Operation
Instructions for TFT control and Insert/Eject are the same for DVD and CD operation. Please see the DVD/Disc Video Operation section for information about these topics. The VME 9122 TS will play music or other audio files from the following disc media: • CD-DA •... - Page 86 CD Player User Interface The on-screen indicators and touch key areas for CD playback are outlined below. 1. Current track and total number of tracks on disc 2. Elapsed playing time/length of track 3. Current track title 4. Available track titles 5.
-
Page 87: Mp3/Wma/Ipod Operation
NOTE: CD-R and CD-RW will not play unless the recording session is finalized. Fast Forward Touch the button on screen or press the /\ button on the joystick to fast forward. Keep pressing and releasing the button to increase the rate from “2X” to “4X”, “6X”, and “8X”. Fast Reverse Touch the button on screen or press the /\ button on the joystick to fast reverse. - Page 88 The VME 9122 TS player will only recognize three folder levels and does not display folders containing only other fol- ders. In the example above, the unit will display folders 3, 4, 6, and 8, but not 2 and 7 since they do not contain any tracks directly.
- Page 89 MP3 User Interface The on-screen indicators and touch key areas for MP3 playback are outlined below. 1. Current track and total number of tracks on root of disc 2. Elapsed playing time, track length 3. Current time 4. Track titles 5.
- Page 90 Controlling MP3/WMA Disc Playback Playing MP3/WMA Files After inserting a MP3/WMA disc, files will play in the sequence of the “Root’ directory. NOTE: When burning MP3 / WMA files onto a DVD disc, use the 2X or 4X burning option, if available. This slower bur- ning speed will help eliminate buffer errors and increase disc reading reliability.
- Page 91 iPod OPERATION iPod User Interface The on-screen indicators and touch key areas for iPod playback are outlined below. 1. Elapsed playing time 2. Current track and total number of files 3. Current time 4. Media titles/menu information 5. ID3 information 6.
- Page 92 SUB-TITLE button (9) on the remote control to access the iPod PHOTO mode. The VME 9122 TS will release control back to the iPod so you can select video media to be displayed on the TFT monitor.
- Page 93 Direct Track/File Entry To select a track/file directly, touch the button on screen control to display the direct entry menu. Enter the desired track/file using the on-screen number pad. Press the Enter button to tune to the selected station. To exit the screen without changing the station, touch Exit.
-
Page 94: Bluetooth Operation
• Try to perform pairing within a few minutes of the phone being turned on. • Once the unit has been paired with the phone, the unit’s model number, “VME 9122 TS”, will be displayed on the mobile phone. - Page 95 “0000”. See “Bluetooth Sub-menu Features” on page 93. 3. Select “VME 9122 TS” from the pairing list on the mobile phone. • If pairing is successful, the TFT will display the paired mobile phone model number or name (as specified in your pho- ne’s Bluetooth Setup menu).
- Page 96 Reconnecting Once the Bluetooth device has been paired, you can touch the connect button to reconnect.** * Function belongs to the mobile Phone or PDA ** Double click activation NOTE: You can only connect to a phone using the buttons on the on-screen Phone interface. Each time the button is pressed, the head unit will automatically reconnect with the mobile phone once (only if the mobile phone was previously paired with the head unit).
- Page 97 VME 9122 TS. Bluetooth Setup Auto Answer You can choose to have the VME 9122 TS automatically answer incoming calls to your paired Bluetooth phone. To turn “Auto answer” on: 1. Touch the button to view the SETUP menu.
-
Page 98: Troubleshooting
TROUBLESCHOOTING Problem Cause Corrective Action GENERAL Unit will not power on Radio Fuse blown Install new fuse with correct rating Car battery fuse blown Install new fuse with correct rating Illegal operation Press the RESET button located in the bottom right corner of the front panel Remote control does not function Battery depleted Replace battery with new one... - Page 99 Image blurred, distorted, or dark Disc is illegally copied Use original disc PCB cannot be used during VCD playback PCB is not available on the disc No repeat or searching while playing VCD PCB is on Turn PCB off Interruption occurred during playback Disc is dirty or scratched Clean disc or replace...
-
Page 100: Care And Maintenance
Care and Maintenance 1. Use only a clean silicone cloth and neutral detergent to clean the front panel or monitor. A rough cloth and nonneu- tral detergent (such as alcohol) may result in scratching or discoloration. 2. Do not get water or cleaning fluids on the unit. 3. -
Page 101: Specifications
SPECIFICATIONS DVD/CD Player Compatible Disc Media: DVD + R / RW (Single and Dual Layer) and CD-R / RW Compatible Media Formats: CD-DA, MP3, WMA, VCD, SVCD, AVI, MPEG1 / 2, XviD, DivX and Kodak picture CD (JPEG). Signal to Noise Ratio: >95dBA Dynamic Range: >95dB... - Page 102 VME 9122 TS...
- Page 103 Grazie per avere scelto un prodotto Audiovox. Speriamo che le istruzioni contenute in questo Manuale d’uso sono chiare e semplici da seguire. Se si spende qualche minuto per leggerlo, si apprenderà come utilizzare tutte le caratteristiche del nuovo Ricevitore multimediale portatile VME 9122 TS di Audiovox per fruirne al meglio.
-
Page 104: Preparazione
PREPARAZIONE Congratulazioni per l’acquisto del Ricevitore portatile multimediale Audiovox VME 9122 TS. Si consiglia di leggere tutte le istruzioni prima di iniziare l’installazione. Si consiglia anche di fare installare l’Audiovox VME 9122 TS da un tecnico affidabile. Funzionalità • Formato dello schermo - Cinema, Normale e OFF (Standby) •... -
Page 105: Apparecchiature Facoltative
• NAV101 / NAV 1352 TS L’VME 9122 TS è “predisposto per la navigazione”. Prima di accedere a qualsiasi funzionalità della navigazione, è necessario acquistare ed installare il modulo NAV. Tutte le istruzioni per l’uso e l’installazione saranno incluse nel modulo di navigazione NAV. -
Page 106: Avvertenze
NOTA: Se l’VME 9122 TS deve essere installato in un’automobile con un computer a bordo o un computer di navigazione, non scollegare il cavo della batteria. Se il cavo viene staccato, la memoria del computer potrebbe resettarsi. In queste circostanze, prestare un’attenzione supplementare durante l’installazione per evitare di causare cortocircuiti. -
Page 107: Schema Elettrico
Schema elettrico... -
Page 108: Media Link
Schema elettrico Medialink... -
Page 109: Installazione
NOTA: Nel sostituire un fusibile, verificare il tipo e l’amperaggio corretti per evitare di danneggiare la radio. L’VME 9122 TS utilizza un mini-fusibile ATM da 20 amp, situato nella scatola contenente il filtro nero in linea con il cablaggio principale. - Page 110 farlo sedere completamente e bloccare le clip della molla in posizione. NOTA: Per il funzionamento corretto del riproduttore di CD/DVD, lo chassis deve essere montato orizzontalmente entro 20°. Verificare che l’unità sia montata entro questi limiti. 4. Fissare un’estremità della cinghia di supporto perforata (fornita) alla vite prigioniera sulla parte posteriore dello chassis usando il dado esagonale fornito.
-
Page 111: Funzionalità Antifurto
Premere per silenziare il ricevitore. Premere di nuovo per riprendere il livello del volume precedente. Modalità BT: Risposta alla chiamata Bluetooth. NOTA: Le caratteristiche Softmute dell’VME 9122 TS, che consentono di aumentare o diminuire gradualmente il volume quando la funzione MUTE è attivata o disattivata. - Page 112 13.Pausa/Riproduzione/Invio Premere per fare una pausa o riprendere la riproduzione o per confermare la selezione corrente. 14. (Joystick destro) Modalità Disco/DVD: Premere una volta per immettere il capitolo o il brano seguente. Modalità TUNER: Premere una volta per cercare automaticamente la stazione radiofonica disponibile successiva. Modalità MENU: Premere una volta per spostare il cursore verso destra.
-
Page 113: Telecomando
TELECOMANDO Il telecomando dell’VME 9122 TS controlla sia le zone anteriori che posteriori. Per passare dalla zona posterioore, spostare l’interruttore R/F (32) situato sul lato destro del controller. NOTA: Il telecomando può differire leggermente da quello mostrato in questa immagine. Lo schema in alto serve... -
Page 116: Utilizzo Del Monitor Tft
UTILIZZO DEL MONITOR TFT Apertura/chiusura del monitor TFT Apertura del monitor TFT Premere il tasto OPEN (1) sul pannello anteriore o premere il tasto ( ) (25) sul telecomando per attivare il meccanismo che sposta il quadro comandi nella posizione di visualizzazione. Chiusura del monitor TFT Premere il tasto OPEN (1) sul pannello anteriore o premere il tasto ( ) (25) sul telecomando per ricaricare il quadro... - Page 117 CINEMA L’intero schermo viene esteso orizzontalmente fino al rapporto 16 - 9. Il rapporto di estensione è lo stesso in un punto qualunque. NORMAL L’immagine di visualizzazione convenzionale ha un rapporto 4 - 3 in orizzontale e verticale, lasciando uno spazio vuoto a destra e a sinistra del display. STANDBY Lo schermo diventa nero.
-
Page 118: Istruzioni Per L'uso
ISTRUZIONI PER L’USO Accensione/Spegnimento Premere il tasto/SRC (6) sull’unità (o il tasto POWER (4) sul telecomando) per accendere l’unità. I tasti sulla parte anteriore dell’unità si accendono e la modalità dello stato corrente compare sull’LCD (7). È anche possibile accendere l’unità premendo il tasto OPEN (1) ed aprendo lo schermo TFT. Premere e tenere premuto il tasto per spegnere il monitor dell’unità. - Page 119 Selezione della sorgente di riproduzione Premere il tasto SRC sul pannello anteriore (6) o sul telecomando (8) per commutare le sorgenti di riproduzione disponibili nell’ordine seguente: RADIO, DVB-T, DISC, NAV, BT, iPod, SD, USB, AUX e CAMERA. La modalità di riproduzione viene visualizzata sugli schermi TFT.
-
Page 120: Funzionamento Multi-Zona
NOTA: Se l’unità viene ripristinata durante la riproduzione di un DVD, il DVD riprende la riproduzione una volta che il reset è completo. FUNZIONAMENTO MULTI-ZONA Le sorgenti indipendenti possono essere riprodotte simultaneamente sull’VME 9122 TS. Per esempio, la consolle di un videogioco può essere visualizzata sullo schermo anteriore mentre il monitor DVD è disponibile per i passeggeri posteriori. -
Page 121: Menu Setup
Se si dispone di uno schermo tattile posteriore installato, è possibile toccare lo schermo per controllare la gran parte delle funzioni della zona posteriore. È anche possibile usare il telecomando. Il telecomando dell’VME 9122 TS controlla sia le zone anteriori che posteriori. Per passare dalla zona completa, spostare l’interruttore F/R (32) situato sul lato destro del telecomando. - Page 122 Accesso alle voci di menu Toccare il nome del sottomenu o utilizzare il joystick per selezionare un sottomenu (lingua, audio, RDS, ecc.). Le opzioni disponibili o la regolazione sotto al sottomenu evidenziato compariranno al centro dello schermo. Regolazione delle funzionalità 1.
- Page 123 Funzionalità del sottomenu Speaker • Selezionare 4 CH, 4.1 CH o 5.1 CH a seconda della configurazione degli altoparlanti nel proprio veicolo. • Usare la funzionalità Test Tone per verificare le impostazioni dell’altoparlante. Eseguire le modifiche usando il menu EQ/FAD-BAL, accessibile premendo e tenendo premuto il tasto AUDIO (controllo del volume). •...
- Page 124 Impostazione Opzioni Funzione Password ------ Digitare la password predefinita a sei cifre (012345). Rating 1. Kid Selezionare il livello adatto per il pubblico di Safe destinazione. 2. G È possibile escludere gli altri divieti usando la propria 3. PG password. 4.
- Page 125 Impostazione Opzioni Funzione Camera In Normal Inverte le immagini della fotocamera come se si stesse Mirror visualizzando tramite uno specchio con vista posteriore. Il pannello TFT si apre automaticamente quando l'unità TFT Auto Auto viene accesa. Open Manual Quando l'accensione viene spenta, il pannello TFT NON si ritrae, se precedentemente era estratto.
-
Page 126: Utilizzo Del Sintonizzatore
FUNZIONAMENTO DEL TUNER 1. Indicatore della banda radiofonica attuale 2. Intervallo di frequenze radio 3. Orologio 4. Indicatore delle trasmissioni stereo 5. Indicatore delle trasmissioni con segnale locale forte 6. Preimpostazioni stazioni radiofoniche: Toccare per richiamare le stazioni preimpostate 7. Informazioni RDS: 8. - Page 127 Passare alla sorgente del sintonizzatore radiofonico • Toccare l’angolo a sinistra superiore dello schermo (il cerchio RADIO) per visualizzare il SOURCE MENU. Toccare “RADIO”. • Premere il tasto SRC (6) sul pannello anteriore o sul telecomando (8) per passare alla sorgente AM/FM o RADIO. Selezionare la banda AM/FM Toccare il tasto BAND (15) sullo schermo, o premere il tasto BAND sull’unità...
- Page 128 Richiamo e memorizzazione di una trasmissione con le preimpostazioni e la funzione di memorizzazione automatica (AS): Richiamo di una stazione 1. Selezionare una banda (se necessario) 2. Toccare un tasto sullo schermo (P1- P6) per selezionare la stazione memorizzata corrispondente. Memorizzazione manuale di una stazione 1.
-
Page 129: Utilizzo Del Dvb-T
DVB-T 999 collegato al ricevitore VME con il collegamento del BUS e controllo tramite il monitor ST dell’unità principale VME . Regolazioni nella pagina Setup con i tasti dello schermo Per cambiare la sorgente, utilizzare il tasto SRC/Wide NAV nella parte anteriore dell’unità... -
Page 130: Utilizzo Di Vcd/Dvd Video
FUNZIONAMENTO DEL MONITOR VCD/DVD NOTA: Una volta installato correttamente, il monitor DVD non può essere visualizzato sullo schermo principale TFT, a meno che il freno di stazionamento sia applicato. Se tentate di riprodurre un DVD durante lo spostamento del veicolo, lo schermo TFT visualizza “PARKING” con lo sfondo blu. Gli schermi del video posteriore, se applicabili, funzioneranno normalmente. - Page 131 Avanzamento rapido della riproduzione Premere il tasto /\sul joystick o il tasto >> sullo schermo per avanzare velocemente. Continuare a premere e rilasciare il tasto per aumentare la velocità da “2X“a “4X”, a “6X” e “8X”. Premere il tasto ENTER del joystick (13) sul telecomando o toccare il tasto di riproduzione (>) per riprendere la riproduzione normale.
- Page 132 Immissione diretta del capitolo / brano Immissione diretta dal telecomando Durante la riproduzione di DVD, VCD e CD, è possibile usare la tastiera numerica sul telecomando (29) per accedere direttamente ad un brano. Immissione diretta sullo schermo tattile Per selezionare direttamente il titolo, il capitolo/brano o il tempo di riproduzione specifico, toccare il tasto di controllo sullo schermo per visualizzare il menu di immissione diretta.
- Page 133 Informazioni sulla riproduzione di DVD Le seguenti informazioni vengono visualizzate nella parte superiore dello schermo durante la riproduzione dei DVD: • Title: 05/08 – “05/08” indica che un quinto degli 8 titoli presenti sul DVD è attualmente in riproduzione. • Chapter: 012/016 – “002/016” indica che il secondo di 16 titoli sul DVD è...
-
Page 134: Utilizzo Di Cd/Dvd Audio
Le istruzioni per il controllo dello schermo TFT e l’inserimento/espulsione sono analoghe a quelle per l’utilizzo dei DVD e degli MP3. Vedere la sezione Utilizzo dei DVD/Dischi video per informazioni su questi argomenti. L’VME 9122 TS riprodurrà la musica o altri file audio dai seguenti supporti: • CD-DA •... - Page 135 Interfaccia utente del riproduttore di CD Gli indicatori sullo schermo e le aree tattili per la riproduzione dei CD vengono descritte sotto. 1. Brano attuale e numero totale di file sul disco 2. Tempo di riproduzione trascorso, lunghezza del brano. 3.
-
Page 136: Utilizzo Di Mp3/Wma/Ipod
NOTA: I CD-R ed i CD-RW non verranno riprodotti a meno che la sessione di registrazione venga finalizzata. Avanzamento veloce Toccare il tasto sullo schermo o premere il tasto /\ del joystick per avanzare velocemente. Continuare a premere e rilasciare il tasto per aumentare la velocità... - Page 137 Il riproduttore VME 9122 TS riconoscerà soltanto tre livelli di cartella e non visualizza le cartelle che contengono soltanto altre cartelle. Nell’esempio in alto, l’unità visualizzerà le cartelle 3, 4, 6 e 8, ma non 2 e 7, poiché non contengono direttamente nessun brano.
- Page 138 Interfaccia utente MP3 Gli indicatori sullo schermo e le aree dei tasti tattili per la riproduzione degli MP3 sono descritti sotto. 1. Brano corrente e numero totale di brani sul disco 2. Tempo di riproduzione trascorso, lunghezza del brano 3. Ora attuale 4.
- Page 139 Controllo della riproduzione dei dischi WMA/MP3 Riproduzione dei file MP3/WMA Una volta inserito il disco WMA/MP3, i file verranno riprodotti nella sequenza della directory “Principale”. NOTA: Quando i file MP3/WMA vengono masterizzati su un disco DVD, usare l’opzione di masterizzazione 2X o 4X, se disponibile.
- Page 140 FUNZIONAMENTO dell’iPod Interfaccia utente dell’iPod Gli indicatori sullo schermo e le aree dei tasti tattili per la riproduzione sull’iPod sono descritti sotto. 1. Tempo di riproduzione trascorso 2. Brano attuale e numero totale di file 3. Ora attuale 4. Titoli supporti/Informazioni del menu 5.
- Page 141 Uscita TV = On, TV Segnale = PAL, e Widescreen = On. NOTA: Una volta scollegato l’iPod, il VME 9122 TS ritornerà sempre all’ultima modalità a cui si accede quando l’iPod viene ricollegato all’unità.
- Page 142 Immissione diretta dei file/brani Per selezionare direttamente un brano/file, toccare il tasto sullo schermo per visualizzare il menu di immissione diretta. Immettere il brano/file desiderato con il tastierino numerico sullo schermo. Premere il tasto Enter per sintonizzare la stazione selezionata. Per uscire dalla schermata senza cambiare la stazione, toccare Exit. Per annullare la ricerca e ricominciare, toccano Clear.
-
Page 143: Utilizzo Del Bluetooth
• Provare a realizzare l’accoppiamento entro alcuni minuti dall’accensione del telefono. • Una volta che l’unità è stata accoppiata con il telefono, il numero di modello dell’unità, “VME 9122 TS”, verrà visualizzato sul telefonino. - Page 144 Pairing Code sotto al menu Bluetooth SETUP. Il codice di accoppiamento predefinito per molti telefoni è “0000”. Vedere “Funzionalità del sotto-menu Bluetooth” alla pagina 141. 3. Selezionare “VME 9122 TS” nell’elenco di accoppiamento del telefonino. • Se l’accoppiamento riesce, il display TFT visualizzerà il numero di modello o il nome del telefonino accoppiato (come specificato nel menu di impostazione Bluetooth del telefonino).
- Page 145 Ricollegamento Una volta che il dispositivo Bluetooth è stato accoppiato, è possibile toccare il tasto di collegamento per ricollegarlo.** * Questa funzione è disponibile nel telefonino o nel PDA ** Attivazione con doppio clic NOTA: È possibile eseguire il collegamento con un telefono soltanto con i tasti dell’interfaccia sullo schermo del telefono.
- Page 146 3. Toccare la zona a destra di “Connect” per selezionare “Auto”. Riproduzione della musica L’VME 9122 TS consente di riprodurre i file musicali attraverso il proprio collegamento Bluetooth ad un telefono, un PDA o a un riproduttore di musica personale. Per ulteriori informazioni, fare riferimento alle istruzioni sull’interfaccia musicale...
-
Page 147: Risoluzione Dei Problemi
RISOLUZIONE DEI PROBLEMI Problema Causa Azione correttiva GENERALE L’unità non si accende Fusibile guasto Installare un nuovo fusibile della potenza corretta Fusibile dell’automobile guasto Installare un nuovo fusibile della potenza corretta Operazione non valida Premere il tasto RESET situato nell’angolo in basso a destra del pannello anteriore Il telecomando non funziona Batteria scarica... - Page 148 TUNER Ricerca di una stazione debole L’antenna automatica non è estesa Collegare il cavo di controllo dell’antenna completamente automatica correttamente L’antenna automatica non è estesa Collegare il cavo di controllo dell’antenna correttamente automatica correttamente La funzione LOCAL è attivata Attivare la funzione LOCAL Il disco non viene riprodotto Il disco è...
-
Page 149: Cura E Manutenzione
Cura e manutenzione 1. Per pulire il pannello anteriore o il monitor, usare soltanto un panno di silicone pulito e un detergente neutro. Un detergente non neutro (quale l’alcool) ed un panno ruvido possono graffiare o scolorire l’unità. 2. Non utilizzare acqua o liquidi per la pulizia nell’unità. 3. -
Page 150: Caratteristiche Tecniche
SPECIFICHE Riproduttore di DVD/CD Supporti compatibili: DVD + R / RW (strato singolo e doppio) e CD-R / RW Formati multimediali compatibili: CD-DA, MP3, WMA, VCD, SVCD, AVI, MPEG1 / 2, XviD, DivX e CD immagini Kodak (JPEG). Rapporto segnale/disturbo: 95dBA Serie Dinamica: >95dB... - Page 151 La Vostra garanzia Gentile Cliente, grazie per aver acquistato questo prodotto Audiovox, prodotto studiato secondo i più elevati standard di qualità e sottoposto a test rigorosi. Se utilizzato correttamente, esso funzionerà perfettamente per molti anni. La garanzia copre la sostituzione gratuita dei ricambi e la prestazione di manodopera per tutti i prodotti Audiovox di elettronica di consumo venduti in Italia.
- Page 152 VME 9122 TS...
- Page 153 Gracias por elegir un producto Audiovox. Esperamos que encuentre las instrucciones de este manual de usuario claras y fáciles de seguir. Si se toma unos minutos para leerlo aprenderá a utilizar todas las funciones de su nuevo receptor móvil multimedia Audiovox VME 9122 TS para disfrutarlo al máximo.
-
Page 154: Preparación
PREPARACIÓN Felicidades por su reciente compra del receptor multimedia Audiovox VME 9122 TS. Es una buena idea leer todas las instrucciones antes de iniciar la instalación. Le recomendamos que solicite a una empresa instaladora que instale su Audiovox VME 9122 TS. - Page 155 • Cámara trasera El VME 9122 TS está “preparado para cámara”. Antes de acceder a las funciones de cámara deberá adquirir e instalar una cámara de vídeo trasera. Una vez conectada la cámara trasera y puesta en funcionamiento, se activará el modo de fuente CAMERA.
- Page 156 NOTA: Si desea instalar el sistema VME 9122 TS en un vehículo equipado con un ordenador de abordo o navegación, no desconecte el cable de la batería. Si desconecta el cable podría perderse la memoria del ordenador. Bajo estas condiciones, tenga especial cuidado durante la instalación para no causar un cortocircuito.
-
Page 157: Diagrama De Cableado
Diagrama de cableado... - Page 158 Cableado Medialink...
- Page 159 INSTALACIÓN Preinstalación 1. Pulse las palancas metálicas situadas a ambos lados para retirar la carcasa superior de la radio. 2. Instale la carcasa superior. a. Si es necesario, instale el adaptador (opcional). b. Instale la carcasa superior en el adaptador o en el salpicadero (utilice únicamente los tornillos suministrados). No fuerce la carcasa para evitar doblarla o combarla.
-
Page 160: Instalación
Instalación final Después de completar las conexiones de cableado, encienda el aparato para confirmar su funcionamiento (el motor debe estar arrancado). Si el aparato no funciona, vuelva a comprobar todo el cableado hasta corregir el problema. Una vez instalado correctamente, apague el motor y continúe con el montaje final del chasis. 1. -
Page 161: Función Antirrobo
FUNCIÓN ANTIRROBO El VME 9122 TS está equipado con una función antirrobo que solicita una contraseña al usuario antes de encenderse. La contraseña predeterminada es 012345 (6 dígitos). Para cambiar la contraseña de protección antirrobo y de CLASIFICACIÓN, lleve a cabo los pasos siguientes: 1. -
Page 162: Controles E Indicadores
Pulse para silenciar el receptor. Pulse de nuevo para continuar al volumen anterior. Modo BT: Responde una llamada Bluetooth. NOTA: El VME 9122 TS dispone de la función Softmute que permite aumentar o reducir gradualmente el volumen cuando se activa o desactiva la función MUTE. - Page 163 13.Pause/Play/Enter Pulse este botón para realizar una pausa, continuar con la reproducción o confirmar la selección actual. 14. (dirección derecha) Modo DVD/Disc: Pulse este botón una vez para acceder al siguiente capítulo o pista. Modo TUNER: Pulse este botón una vez para buscar automáticamente la siguiente emisora de radio disponible. Modo MENU: Pulse una vez este botón para desplazar el cursor a la derecha.
-
Page 164: Control Remoto
CONTROL REMOTO El control remoto del VME 9122 TS controla las zonas delantera y trasera. Para cambiar de la zona delantera a la trasera, mueva el interruptor F/R (32) ubicado en el lado derecho del controlador. NOTA: Su control remoto podría ser ligeramente diferente del que se muestra en la imagen. El diagrama anterior tiene... - Page 165 Tabla 1...
- Page 166 Tabla 2...
-
Page 167: Uso Del Monitor Tft
USO DEL MONITOR TFT Abrir/Cerrar el monitor TFT Abrir el monitor TFT Pulse el botón OPEN (1) en el panel frontal, o el botón ( ) (25) en el control remoto para activar el mecanismo que desplaza el panel de pantalla hasta la posición de visualización. Cerrar el monitor TFT Pulse el botón OPEN (1) en el panel frontal, o el botón ( ) (25) en el control remoto para activar el mecanismo que desplaza el panel de pantalla hacia el compartimento. - Page 168 Relación de aspecto Pulse el botón WIDE (28) e el control remoto, o el botón WIDE (22) en el monitor para ajustar la relación de aspecto de la siguiente forma (sólo activo con la fuente de vídeo): CINEMA La pantalla entera se extenderá horizontalmente a la relación de aspecto 19/6. La relación de extensión será...
-
Page 169: Instrucciones De Uso
INSTRUCCIONES DE USO Encendido / Apagado Pulse el botón /SRC (6) en el dispositivo (o el botón ( ) / POWER (4) en el control remoto) para encender el equipo. Los botones situados en la parte frontal del equipo se iluminarán y aparecerá el modo actual en la pantalla TFT (7). También puede encender el equipo pulsando el botón OPEN (1) y abriendo la pantalla TFT. - Page 170 Selección de fuente de reproducción Pulse el botón SRC en el panel frontal (6) o en el control remoto (8) para cambiar entre las fuentes de reproducción disponibles en el orden siguiente: RADIO, DVB-T, DISC, NAV, BT, iPod, SD, USB, AUX y CAMERA. El modo de reproducción se muestra en las pantallas TFT y LCD.
-
Page 171: Funcionamiento Multizona
NOTA: Si se reinicia el equipo durante la reproducción de un DVD, el DVD continuará la reproducción una vez finalizado el reinicio. FUNCIONAMIENTO MULTIZONA Es posible reproducir fuentes independientes en el VME 9122 TS. Por ejemplo, puede verse una consola de videojuegos en la pantalla delantera y una película DVD en la trasera. Conexión de la zona trasera Pantalla táctil... - Page 172 Si dispone de una pantalla táctil instalada en la zona trasera, puede tocar la pantalla para controlar la mayoría de las funciones de la zona trasera. También puede utilizar el control remoto. El control remoto del VME 9122 TS controla las zonas delantera y trasera.
- Page 173 Acceso a los elementos del menú Toque el nombre del submenú o utilice el mando para seleccionarlo (Language, Audio, RDS, etc.). Las funciones disponibles en la opción de submenú se mostrarán en el centro de la pantalla. Ajustar una función 1.
- Page 174 Funciones del submenú de altavoz • Seleccione 4 CH, 4.1 CH o 5.1 CH según la configuración de altavoces de su vehículo. • Utilice la función de tono de prueba para verificar la configuración de los altavoces. Haga los cambios utilizando el menú...
- Page 175 Configuración Opciones Función Separación de frecuencias AM – 10kHz Banda de frecuencias AM - 530kHz~ 1720kHz Separación de frecuencias FM – 200kHz Banda de frecuencias FM – 87,5MHz~107,9MHz America 1 Separación de frecuencias AM – 10kHz Banda de frecuencias AM - 530kHz~ 1720kHz Separación de frecuencias FM –...
- Page 176 Funciones del submenú de DivX Seleccione el submenú de DivX para ver su código de registro de DivX. Debe utilizar este código par registrar su reproductor, el cual le permitirá adquirir vídeos utilizando el formato de vídeo bajo demanda en DivX. Funciones del submenú...
- Page 177 USO DEL SINTONIZADOR 1. Indicador de banda de radio actual 2. Indicador de frecuencia de radio 3. Reloj 4. Indicador de emisión estéreo 5. Indicador de emisión de señal local fuerte 6. Emisoras predefinidas: toque esta opción para abrir las emisoras predefinidas 7.
-
Page 178: Uso Del Sintonizador
Cambia a la fuente de sintonizador de radio • Toque la esquina superior izquierda de la pantalla (el círculo de RADIO) para ver el menú SOURCE. Toque en “RADIO”. • Pulse el botón SRC (6) en el panel frontal o el control remoto (8) para cambiar a la fuente de RADIO AM/FM. Seleccionar la banda FM o AM Toque el botón BAND (15) en la pantalla, o pulse el botón BAND en el equipo (4) o el control remoto (20) para cambiar entre las bandas siguientes: FM1, FM2, FM3, AM1, y AM2. - Page 179 Puede almacenar o cargar emisoras utilizando la función de almacenamiento automático (AS): Cargar una emisora 1. Seleccione una banda (si es necesario). 2. Toque uno de los botones en pantalla (P1-P6) y seleccione la emisora almacenada correspondiente. Almacenamiento manual e una emisora. 1.
- Page 180 DVB-T 999 conectado al Receptor VME utilizando l conexión de BUS y controlándolo por medio de TS Monitor en el equipo VME. Ajustes en la página de configuración Uso de los botones en pantalla Para cambiar la fuente, utilice el botón SRC / Wide NAV en la parte frontal del equipo VME o en el control remoto.
-
Page 181: Uso Del Vídeo Dvd/Vcd
USO DEL VÍDEO DVD/VCD NOTA: Si está instalado correctamente, el vídeo DVD no se mostrará en la pantalla TFT a menos que el freno de mano esté accionado. Si intenta reproducir un DVD mientras el vehículo está en marcha, la pantalla TFT mostrará la palabra “PARKING” sobre fondo azul. Las pantallas traseras, si están instaladas, funcionarán normalmente. - Page 182 Reproducción en avance rápido Pulse el botón /\ en el mando o el botón >> en la pantalla para avanzar rápidamente. Mantenga pulsado el botón para aumentar la velocidad a “2X”, “4X”, “X6” y “X8”. Pulse el botón Enter en el mando (18) del control remoto, o toque el botón play (>) para continuar con la reproducción normal.
- Page 183 Selección directa de capítulo / título Introducción directa de control remoto Durante la reproducción de DVD, VCD y CD, puede utilizar el teclado numérico del control remoto (29) para acceder directamente a una pista. Entrada directa a través de la pantalla táctil Para seleccionar un título, capítulo/pista o tiempo de reproducción específico, toque el botón ( en la pantalla para abrir el menú...
- Page 184 Información de reproducción de DVD Se mostrará la información siguiente en la parte superior de la pantalla durante la reproducción del DVD: • Title: 05/08 – “05/08” indica que se trata del quinto de ocho títulos en el DVD que se encuentra en reproducción. •...
- Page 185 Las instrucciones para el control de la pantalla TFT y la Inserción/Expulsión son las mismas que para el uso del DVD o CD. Consulte la sección de Uso de vídeos DVD para más información sobre estos temas. El VME 9122 TS reproducirá música u otros archivos de audio desde los siguientes medios de disco: • CD-DA •...
- Page 186 Interfaz de usuario del reproductor de CD Los indicadores en pantalla y áreas táctiles del reproductor de CD se describen a continuación. 1. La pista actual y el número total de pistas en el disco. 2. Tiempo de reproducción transcurrido / duración de la pista. 3.
-
Page 187: Uso De Mp3/Wma/Ipod
NOTA: Los discos CD-R y CD-RW no se reproducirán a menos que la sesión de grabación se encuentre finalizada. Avance rápido Toque el botón en la pantalla o pulse el botón /\ en el mando para avanzar rápidamente. Continúe pulsando este botón para aumentar la velocidad a “2X”, “4X”, “X6”... - Page 188 El reproductor VME 9122 TS sólo reconocerá tres niveles de carpetas y no mostrará aquellas carpetas que sólo contengan otras carpetas. En el ejemplo anterior, el equipo mostrará las carpetas 3, 4, 6 y 8, pero no la 2 y la 7, ya que no contienen pistas directamente.
- Page 189 Interfaz de usuario MP3 Los indicadores en pantalla y áreas táctiles del reproductor de MP3 se describen a continuación. 1. La pista actual y el número total de pistas en la raíz del disco. 2. Tiempo de reproducción transcurrido / duración de la pista. 3.
- Page 190 Control de la reproducción de un disco MP3/WMA Reproducir archivos MP3/WMA Después de insertar un disco MP3/WMA, los archivos se reproducirán en el orden en que se encuentren dentro del directorio “Raíz”. NOTA: Al grabar archivos MP3 / WMA en un disco DVD, utilice la opción de grabación 2X o 4X si están disponibles. Se reducirá...
- Page 191 USO DE iPod Interfaz de usuario de iPod Los indicadores en pantalla y áreas táctiles del reproductor iPod se describen a continuación. 1. Tiempo de reproducción transcurrido. 2. Pista actual y número total de archivos. 3. Tiempo actual. 4. Títulos multimedia / información de menú. 5.
- Page 192 TFT. Para salir del modo de fotografía, toque la pantalla. Reproducción de vídeo Aunque se puede ver el vídeo de iPod en la pantalla del VME 9122 TS, deberá utilizar iPod para controlar las opciones de reproducción de vídeo. Toque el botón ( ) en la pantalla o pulse el botón ANGLE (13) en el control remoto para...
- Page 193 Introducción directa de pistas/archivos Para seleccionar directamente una pista/archivo, toque el botón ( ) en la pantalla para ver el menú de introducción directa. Introduzca el archivo / pista que desee utilizando el teclado numérico en pantalla. Pulse el botón Enter para sintonizar la emisora seleccionada.
- Page 194 USO DE BLUETOOTH Antes de intentar utilizar las funciones Bluetooth del VME 9122 TS, asegúrese de que su teléfono móvil es compatible con Bluetooth (perfiles de auricular, manos libres o ambos). Respete las directivas siguientes para utilizar esta función con éxito.
-
Page 195: Uso De Bluetooth
Consulte la sección “Funciones del submenú Bluetooth” en la página 174. 3. Seleccione “VME 9122 TS” en la lista de emparejamiento del teléfono móvil. • Si el emparejamiento se realiza con éxito, la pantalla TFT mostrará el número o el nombre del modelo de teléfono móvil emparejado (según lo especificado en el menú... - Page 196 Volver a conectar Una vez emparejado el dispositivo Bluetooth, puede tocar el botón de conexión ( ) para volver a conectar.** * Esta función pertenece al teléfono móvil o PDA. ** Activación con doble clic NOTA: Sólo podrá conectar un teléfono utilizando los botones de la interfaz de teléfono en pantalla. Cada vez que pulse el botón ( ), el equipo principal volverá...
- Page 197 Reproducir música El VME 9122 TS permite reproducir música a través de su conexión Bluetooth a un teléfono, una PDA o un reproductor de música personal. Consulte las instrucciones de la interfaz de música en la sección “Interfaz de usuario Bluetooth”...
-
Page 198: Solución De Problemas
RESOLUCIÓN DE PROBLEMAS Problema Causa Acción correctora GENERAL El equipo no se enciende El fusible de radio se ha fundido Instale un fusible nuevo del valor correcto El fusible de la batería del vehículo se ha Instale un fusible nuevo del valor correcto fundido Uso ilegal Pulse el botón RESET que se encuentra en... - Page 199 La lente láser está sucia Limpie la lente láser con un disco limpiador Está utilizando un disco incompatible Utilice un disco compatible La calificación del disco excede el límite del Cambie la configuración de bloqueo paterno bloqueo paterno a un nivel menor El código de región del disco no es compatible Utilice un disco con el código de región con el equipo adecuado...
-
Page 200: Cuidados Y Mantenimiento
Cuidados y mantenimiento 1. Utilice sólo un paño de silicona y un detergente neutro para limpiar el panel frontal o el monitor. El uso de un paño duro y un detergente no neutro (como alcohol) podría provocar arañados o decoloración. 2. - Page 201 CARACTERÍSTICAS Reproductor de DVD/CD Discos compatibles: DVD + R / RW (una o dos capas) y CD-R / RW Formatos compatibles: CD-DA, MP3, WMA, VCD, SVCD, AVI, MPEG1 / 2, XviD, DivX y CD de imágenes Kodak CD (JPEG). Relación señal a ruido: >95dBA Rango dinámico: >95dB...
- Page 202 Congratulations! You have made a wise selection in becoming the owner of a AUDIOVOX Mobile Video equipment. Due to high quality AUDIOVOX products have earned an excellent reputation through the western world. And this high quality stan- dard enables us to grant a 2-years warranty for AUDIOVOX Mobile Video products.
- Page 203 ARANTIEKARTE ARRANTY Typ/ Type Serien-Nr./Serial-No. Name und Anschrift des Händlers /Stempel Name and address of the dealer/stamp Käufer/Customer Name/Name Straße/Street PLZ, Ort /City Land /Country Kaufdatum / buying date Nur gültig in Verbindung mit Ihrer Kaufquittung! No warranty without receipt!
- Page 204 Audiovox Audio Produkte GmbH Lise-Meitner-Str. 9 • D-50259 Pulheim • Germany Tel. ++49 (0) 2234 807-0 • Fax++49 (0) 2234 807-399 www.audiovox-germany.de...