Table of Contents
Advertisement
RS 5200
Digital wireless TV listening system
Model: TR 5000, RR 5200
Instruction manual
Use the search function, the navigation (left) or the following links:
"Start "
"Product overview"
"Putting the RS 5200 into operation"
"Using the RS 5200"
"Using the RS 5200's additional functions"
"If a problem occurs..."
"Specifications"
Sennheiser electronic GmbH & Co. KG
Am Labor 1
30900 Wedemark
Germany
www.sennheiser.com
Version: 06/21 A01
Advertisement
Table of Contents

Related Manuals for Sennheiser TR 5000

Summary of Contents for Sennheiser TR 5000
- Page 1 RS 5200 Digital wireless TV listening system Model: TR 5000, RR 5200 Instruction manual Use the search function, the navigation (left) or the following links: “Start ” “Product overview” “Putting the RS 5200 into operation” “Using the RS 5200” “Using the RS 5200’s additional functions”...
-
Page 2: Important Safety Instructions
Protect your hearing from high volume levels. Permanent hearing damage may occur when headphones are used at high volume levels for long periods of time. Sennheiser headphones sound exceptionally good and provide clear speech intelligibility at low and medium volume levels. - Page 3 ▷ Clean the product only with a soft, dry cloth. ▷ Use only attachments/accessories/spare parts supplied or rec- ommended by Sennheiser. Safety instructions for Lithium rechargeable batteries WARNING If abused or misused, rechargeable batteries may leak. In extreme cases, they may even present a risk of: •...
- Page 4 It is considered improper use when the product is used for any appli- cation not named in the corresponding product documentation. Sennheiser does not accept liability for damage arising from misuse or improper use of this product and its attachments/accessories.
-
Page 5: Package Contents
• this detailed instruction manual and additional information (www.sennheiser.com/download) A list of accessories can be found on the RS 5200 product page at www.sennheiser.com. For information on suppliers, contact your Sennheiser partner. To find a Sennheiser partner in your country, search at www.sennheiser.com/service-support RS 5200 | 5... -
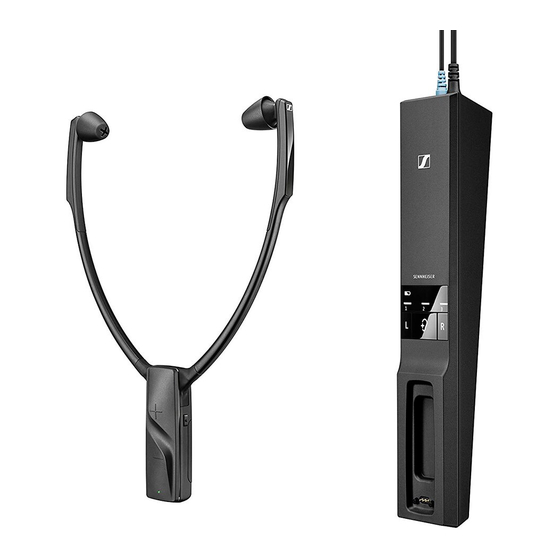
Page 6: Product Overview
Product overview Product overview Overview of the stethoset receiver Model: RR 5200 Ear pads, replaceable Ear bows with on/off function Volume buttons – Receiver status (see page 8) Speech intelligibility button marking for the right ear and marking for the left ear Built-in rechargeable battery Charging contacts 6 | RS 5200... -
Page 7: Overview Of The Transmitter
Product overview Overview of the transmitter Model: TR 5000 Battery indicating the charging process/remaining operating time of the receiver (see page 15 und 16) Balance buttons for right ear and left ear Hearing profile button for selecting the hearing profiles (see page 23) - Page 8 Product overview Overview of the Receiver status LED Receiver status LED The stethoset receiver... – ... is switched off..is connected to the transmitter. lights up green ... is connected to the transmitter, the rechargeable battery is almost empty. lights up red ...
- Page 9 Product overview The LEDs on the stethoset receiver and on the transmitter indi- cate the current operating state. If you are not pressing any button on the stethoset receiver, the LEDs automatically dim after approx. 30 seconds to not disturb you. Overview of the acoustic signals/beeps Beeps Meaning...
-
Page 10: Setting Up The Transmitter
You can also refer to the beginner’s video guides on how to con- nect your digital wireless headphone system to a TV: www.sennheiser.com/how-to-videos ▷ Switch your audio source off before connecting the transmitter. - Page 11 HDMI output, you need an active HDMI audio adapter. Using this adapter, you can connect your TV to the transmitter. An HDMI audio adapter and/or other accessories are available from your Sennheiser partner. Connection possibility A: optical (digital) To achieve the best possible listening experience, connect the trans- mitter to your TV or hi-fi system using the supplied optical digital cable.
- Page 12 Putting the RS 5200 into operation OPTICAL OUT 12 | RS 5200...
- Page 13 Putting the RS 5200 into operation Connection possibility B: 3.5 mm jack socket (analog) ▷ Connect the stereo audio cable to the blue Analog 3.5 mm In audio input (3.5 mm jack socket) of the transmitter and to the 3.5 mm headphone socket of your audio source. PHONES TV VOLUME Adjust the volume of the headphone socket on your TV/audio...
- Page 14 Putting the RS 5200 into operation Connection possibility C: RCA sockets (analog) ▷ Plug the RCA adapter onto the stereo audio cable. ▷ Connect the stereo audio cable to the blue 3.5 mm jack socket of the transmitter. ▷ Connect the RCA connectors to the RCA sockets (mostly labeled “AUDIO OUT”...
-
Page 15: Connecting The Transmitter To The Power Supply System
Putting the RS 5200 into operation Connecting the transmitter to the power supply system ▷ Connect the connector of the power supply unit to the yellow socket of the transmitter. ▷ Select a suitable country adapter and slide it onto the power supply unit until it clicks audibly into place. -
Page 16: Displaying The Remaining Operating Time Of The Rechargeable Battery
Putting the RS 5200 into operation Battery LED Meaning – The transmitter is not charging. The rechargeable battery is being charged. Less than 1/3 of the charge LED segment flashes capacity is reached. The rechargeable battery is being LED segment lit, charged. - Page 17 Putting the RS 5200 into operation Battery LED Meaning Battery Rechargeable battery flashes slowly is empty; recharge the rechargeable battery approx. 4 hours of LED segment operating time approx. 8 hours of operating time segment lit All LED approx. 12 hours of segments lit operating time To indicate that the operating time is decreasing, each LED segment...
- Page 18 Putting the RS 5200 into operation Selecting and replacing the ear pads You can choose between: • Ear pads made of silicone, large (pre-mounted upon delivery) – for easy use due to uncomplicated alignment in the ears. – Easy to clean and long lasting even with intensive use. •...
- Page 19 Putting the RS 5200 into operation Spare ear pads in different materials and forms are available from your Sennheiser partner. RS 5200 | 19...
-
Page 20: Switching The Wireless Headphone System On
Using the RS 5200 Using the RS 5200 Switching the wireless headphone system on WARNING Danger of hearing damage due to high volumes! This receiver allows you to set higher volumes than conventional devices. Constant high-volume use can cause hearing damage. ▷... -
Page 21: Switching The Wireless Headphone System Off
Using the RS 5200 Switching the wireless headphone system off ▷ Take the stethoset receiver off so that the ear bows fold inwards. The stethoset receiver automatically switches off after 20 sec- Receiver status onds. The LED goes off. The transmitter automat- ically switches off (standby) when there is no stethoset receiver Transmitter status connected. -
Page 22: Adjusting The Volume
Using the RS 5200 Adjusting the volume WARNING Danger of hearing damage due to high volume levels! ▷ Before putting the stethoset receiver on, set the volume on the receiver to a low level. ▷ Do not expose yourself to high volume levels for extended periods of time. -
Page 23: Selecting A Hearing Profile For Sound Enhancement
Using the RS 5200 The balance setting is stored on the stethoset receiver. If you are using several receivers with a transmitter, the respective receivers are optimally adjusted to match the personal hearing preferences of the users (e.g. you and your partner). Please note that the personal hearing preferences can only be adjusted when only one stethoset receiver is connected to the transmitter. - Page 24 Using the RS 5200 All hearing profiles feature a compression function which compen- sates for volume differences by boosting the volume of quiet pas- sages and reducing the volume of loud passages if necessary. The balance setting is saved on the stethoset receiver. If you are using several receivers with a transmitter, the respective receivers are optimally adjusted to match the personal hearing preferences of the users (e.g.
- Page 25 Using the RS 5200 1. Switch your audio source on and select a program where speech is foregrounded. 2. Put the stethoset receiver on and make sure that only this receiver is connected to the transmitter. Otherwise, a hearing profile cannot be adjusted. 2...4 3.
-
Page 26: Activating/Deactivating The Speech Intelligibility Function
Using the RS 5200 Since your level of hearing impairment may change over time, we recommend that you repeat the selection of the hearing profile from time to time. If you switch to the next hearing profile, the speech intelligibil- ity function is automatically deactivated so that you can hear the hearing profile unchanged (see page 26). - Page 27 Using the RS 5200 Transmitter status Speech intelligibility function activated; Annoying background noise is effectively reduced, speech becomes clearer and lights up blue easier to understand. deactivated lights up white The speech intelligibility function can also be used in addition to one of the hearing profiles 1-3.
- Page 28 Cleaning and maintaining the RS 5200 Cleaning and maintaining the RS 5200 CAUTION Liquids can damage the electronics of the product! Liquids entering the housing of the product can cause a short-circuit and damage the electronics. ▷ Keep all liquids far away from the product. ▷...
-
Page 29: Replacing The Stethoset Receiver's Rechargeable Battery
Sennheiser service partner. You need suitable tools for replacement. We therefore recommend to have the rechargeable battery replaced by your Sennheiser service partner. To find a Sennheiser partner in your country, search at www.sennheiser.com/service-support RS 5200 | 29... - Page 30 Using the RS 5200’s additional functions Using the RS 5200’s additional functions The following additional functions are not required for normal use of the wireless headphone system. You can, however, extend the potential use of the system and adjust some of the functions to your individual needs.
-
Page 31: Advanced Settings
Using the RS 5200’s additional functions LED flashes white. Release the buttons. Advanced settings The advanced settings allow you to adjust the wireless headphone system to your individual needs and to protect the settings against accidental changes. Activating the protected settings mode You can change the advanced settings by activating the protected settings mode: 1. - Page 32 Using the RS 5200’s additional functions Battery status display This setting is saved on the transmitter, independent of the stethoset receiver you are using. To change the battery status display: ▷ Make sure that the protected settings mode is activated (see page 31).
- Page 33 Using the RS 5200’s additional functions Status and display of the charging Function/behavior reminder function activated* When you switch the stethoset receiver off and the transmitter switches to standby mode, the battery status display will flash for 10 minutes to remind you to charge the LED segment lit stethoset receiver.
-
Page 34: Restoring The Factory Default Settings
Using the RS 5200’s additional functions Status and display of the protection Function/behavior function activated The activated hearing profile and the balance setting cannot be changed/ deactivated. LED segment lit deactivated* The hearing profiles can be changed at any time by pressing the Hearing profile button for 2 seconds. -
Page 35: Charging The Rechargeable Battery Using The Mca 800 Charging Adapter
Using the RS 5200’s additional functions ▷ Place the stethoset receiver into the transmitter’s charging com- partment. Receiver status LED flashes green. The settings of the ste- thoset receiver are also restored to the factory settings. If you place the stethoset receiver into the transmitter’s charging compartment at the very beginning of the restore pro- cedure, the factory settings of the transmitter and the receiver are restored simultaneously. - Page 36 Using the RS 5200’s additional functions WARNING Interference due to magnetic fields! The MCA 800 charging adapter generates stronger permanent mag- netic fields that could cause interference with cardiac pacemakers, implanted defibrillators (ICDs) and other implants ▷ Always maintain a distance of at least 3.94" (10 cm) between the holding magnets of the charging adapter and the cardiac pace- maker, implanted defibrillator or other implant.
- Page 37 If a problem occurs... If a problem occurs... Problem Possible cause Possible solution Page The transmitter No connection to the power supply Check the connections of the power does not switch system. supply unit. The rechargeable battery is empty. Recharge the rechargeable battery. Recharge the rechargeable battery for The headphones several hours.
- Page 38 There you will find a current list of frequently asked questions (FAQ). You may also contact your local Sennheiser partner for assistance. To find a Sennheiser partner in your country, search at www.sennhe- iser.com/service-support 38 | RS 5200...
-
Page 39: Leaving The Range Of The Transmitter
If a problem occurs... Leaving the range of the transmitter The range of the transmitter largely depends on environmental con- ditions such as wall thickness, wall composition etc. If you leave the range of the transmitter, the audio drops out occasionally at first before the connection breaks down completely. -
Page 40: Specifications
Specifications Specifications RS 5200 system Carrier frequency 2.4 to 2.4835 GHz Modulation 8-FSK Digital analog input: typ. 85 dBA at 1 V Signal-to-noise ratio digital input: > 90 dBA RF output power max. 10 dBm Audio latency < 60 ms Range up to 70 m (line of sight) Stethoset receivers that can... - Page 41 Power consumption standby: ≤ 0.5 W (without charging) Dimensions (W x H x D) approx. 50 mm x 42 mm x 270 mm Sennheiser NT 5-10AW power supply unit Nominal input voltage/cur- 100 – 240 V~/300 mA rent Power frequency 50 –...
-
Page 42: Manufacturer Declarations
• RoHS Directive (2011/65/EU) Hereby, Sennheiser electronic GmbH & Co. KG declares that the radio equipment type TR 5000, RR 5200 is in compliance with the Radio Equipment Directive 2014/53/EU. The full text of the EU declaration of conformity is available at the fol- lowing Internet address: www.sennheiser.com/download.