Table of Contents
Advertisement
Available languages
Available languages
Quick Links
Advertisement
Table of Contents

Summary of Contents for Oster CKSTSC3D
- Page 1 MODELO CKSTSC3D MODEL Manual de Instrucciones 3 , 3 OLLA DE COCCIÓN LENTA HOOK UP DE LEA TODAS LAS INSTRUCCIONES ANTES DE USAR ESTE APARATO Instruction Manual L HOOK UP SLOW COOKER PLEASE READ ALL INSTRUCTIONS BEFORE USING THIS APPLIANCE...
-
Page 2: Precauciones Importantes
Deje que se enfríe antes de colocarle o retirarle piezas. 6. No utilice el artefacto con un cable o enchufe dañado, después de un mal funcionamiento o si se ha dañado de alguna manera. Lleve el producto al Centro de Servicio Autorizado Oster para examinarlo, repararlo o ajustarlo. ®... - Page 3 Siempre coloque el posafuentes debajo del recipiente de cerámica antes de colocarlo sobre una mesa o mostrador. Nada crea a stronger una conexión más grande que socializar con familiares y amigos. Con el Sistema de Entretenimiento Conectable Oster Hook Up, ser ®...
-
Page 4: Des Cr I P Ci Ó N D El Arte Fa C To
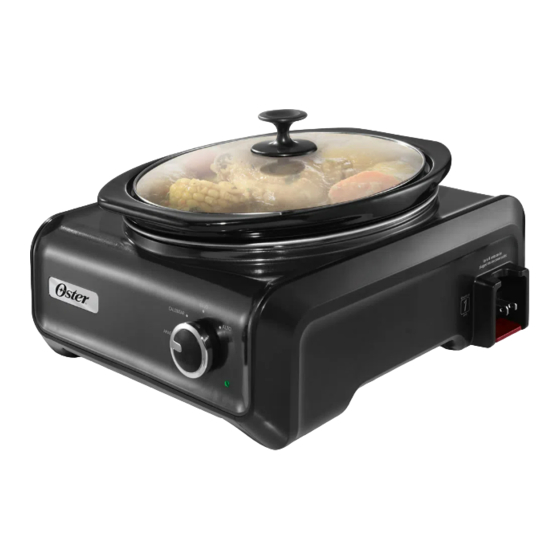
DES CR I P CI Ó N D EL ARTE FA C TO 1. Asa de la Tapa 7. Asa Integrada 2. Tapas de Vidrio Removibles 8. Luz indicadora 3. Recipiente de Cerámica Removible 9. Perilla de Control de Temperatura 4. - Page 5 INTERRUPTOR DE CIRCUITO REAJUSTABLE (FIGURA A) Vista inferior ENCHUFE DE CONEXIÓN (FIGURA B) Frente Lado izquierdo PESTILLO PARA LIBERAR EL CABLE (FIGURA C) Frente Empuje el cable de-liberación del pestillo hacia abajo para Lado derecho quitar el cable / enchufe. Consulte el ícono que se encuentra a la izquierda del cable eléctrico (ejemplo mostrado en Figura C) para ver cuántas unidades de su sistema están representadas.
- Page 6 C ON O C I EN DO S U A RTE FA C TO PREPARANDO SU SISTEMA DE ENTRETENIMIENTO OSTER HOOK UP PARA ® SU USO: 1. Antes de utilizar sus unidades, retire todos los materiales de embalaje y lave la tapa y el recipiente de cerámica con agua tibia y jabón, luego seque bien.
- Page 7 NOTA: El ajuste de CALIENTE es sólo para mantener caliente los alimentos que ya están cocinados. No cocine en el ajuste de Caliente. PARA EL USO CON MÚLTIPLES UNIDADES: El Sistema de Entretenimiento Conectable Oster Hook Up tiene un exclusivo ®...
- Page 8 Mientras el extremo macho esté enchufado en el extremo hembra, las unidades van a encender. (Ver Figura B) Figura B ADVERTENCIA: El sistema fue diseñado para conectarse exclusivamente con otras unidades Oster Hook Up. No intente conectar otros aparatos distintos a ® los que se venden dentro de este sistema.
- Page 9 10. Una vez que las unidades se hayan enfriado, sepárelas y hálelas del sistema para apartarlas usando las asas integradas situadas en la parte inferior de los lados izquierdo y derecho de cada unidad. 11. Una vez que la unidad se haya enfriado, almacene el cable colocándolo de nuevo lentamente en la base hasta que encaje en su lugar.
- Page 10 SU SISTEMA ESTÁ DISEÑADO DE MANERA QUE SE PUEDE APILAR PARA UN ALMACENAMIENTO MÁS FÁCIL. PARA APILAR SU SISTEMA: Voltee la Tapa(s) de Vidrio de cada unidad de su sistema al revés y asiéntelas dentro del Recipiente de Cerámica (Ver Figura A). Figura A Apile cada unidad en la parte superior de cada una colocando la base de la Unidad A encima de la base de la Unidad B (Ver Figura B).
-
Page 11: Cuidado Y Limpieza
Asegúrese de que el número total de los íconos a añadir no se exceda de seis (6). ¿PUEDO CONECTAR OTROS PRODUCTOS ELÉCTRICOS EN EL SISTEMA OSTER HOOK UP? ® No. Para su satisfacción y seguridad, sólo unidades vendidas en el sistema Oster Hook Up pueden conectarse entre sí. - Page 12 paño suave y húmedo. Seque. No utilice limpiadores abrasivos. ATENCIÓN: Este artefacto no es fácil de reparar. El servicio sólo debe ser realizado por un centro de servicio autorizado. Nunca sumerja la Base de Calentamiento en agua u otros líquidos. Apto para Apto para Apto para...
-
Page 13: Problemas Y Soluciones
PR O B L EM A S Y SOLU CIO NES LA UNIDAD NO ENCIENDE • Asegúrese de que la unidad esté enchufada en un tomacorriente. • Asegúrese de que la perilla de control esté colocada en cualquier posición que no sea la de apagado. •... - Page 14 4 pedazos de plátano verde Sal y pimiento al gusto (aproximadamente 1 plátano) PREPARACIÓN: Gire el control de temperatura de su Oster Hook Up a la posición alto espere ® diez minutes. Mientras tanto, en el recipiente de cerámica coloque la gallina junto con el agua, las cebollas, el tomate, los ajos, el comino, sal y pimienta al gusto.
- Page 15 PREPARACIÓN: Lave muy bien el mondongo con abundante agua y el jugo de limón. Acomódelo en el recipiente de cerámica de su Oster Hook Up con 2 tazas de ® agua, gire el control de temperatura a ALTO y tape por 2 horas. Al cabo de las 2 horas, bote el agua y pique el mondongo en trozos pequeños, vuélvalo a...
- Page 16 Oster Hook Up, con 4 tazas de agua desde la noche anterior. ® Al día siguiente, gire el control de temperatura de su Oster Hook Up a la ® posición alto y agregue a los frijoles la pezuña, la zanahoria, el plátano, 1 taza de hogao, la sal y el comino al gusto;...
- Page 17 2 tazas de agua 3 hojas de laurel PREPARACIÓN: Coloque la punta de anca en el recipiente de cerámica de su Oster Hook Up. ® Mezcle la panela, la cebolla, los ajos, el laurel, el tomillo, la salsa negra y la sal al gusto y unte la carne con esto por todos sus lados;...
- Page 18 Sal y pimienta al gusto 2 dientes de ajo machacados PREPARACIÓN: Lleve el control de temperatura de su Oster Hook Up a posición alto. ® En el recipiente de cerámica coloque la falda y vierta sobre ella el vinagre, el agua, sal y pimienta al gusto, tape y deje cocinar por 4 ½...
- Page 19 1 taza de hogao PARA ACOMPAÑAR: 4 huevos fritos y 4 arepas PREPARACIÓN: Lleve el control de temperatura de su Oster Hook Up a la posición alto y en ® el recipiente de cerámica coloque la mantequilla, tape y espere 10 minutos o hasta que se derrita.
-
Page 20: Important Safeguards
6. Do not operate any appliance with a damaged cord or plug or after the appliance malfunctions or has been damaged in any manner. Take appliance to the nearest Authorized Oster Service Center for examination, repair, or adjustment. ®... - Page 21 NOTE: This appliance has a unique plug design that will only allow it to work when used as a single unit and plugged into a wall outlet or when using with other units in the Oster Hook Up Connectable Entertaining System. For your safety, do not ®...
-
Page 22: Description Of The Appliance
DES CR I P T I ON O F T HE A PPLIA NC E 1. Lid Handle 7. Integrated Handle 2. Removable Glass Lids 8. Indicator Light 3. Removable Stoneware 9. Temperature Control Knob 4. Heating Base 10. Resettable Circuit Breaker 5. - Page 23 RESETTABLE CIRCUIT BREAKER (FIGURE A) Bottom View PLUG CONNECTION (FIGURE B) Front Left Side CORD RELEASE LATCH (FIGURE C) Front Push the Cord-Release Latch down to remove cord/plug. Right Side Refer to the icon to the left of the power cord (example shown in View C) to see how many units each unit in your system represents.
- Page 24 LE ARN I N G A B O U T YOUR A PPLIA NC E PREPARING YOUR OSTER HOOK UP CONNECTABLE ENTERTAINING ® SYSTEM FOR USE: 1. Before you use your units, remove all packaging components and wash the lid and stoneware with warm, soapy water and dry thoroughly.
- Page 25 NOTE: WARM is only for keeping already- cooked foods warm. Do not cook on the Warm setting. FOR USE WITH MULTIPLE UNITS: The Oster Hook Up Connectable Entertaining System has a unique electrical ® connector that will only allow units in the Hook Up system to be able to connect and draw power from each other.
- Page 26 (See Figure B) Figure B WARNING: Your system was designed to connect only with other Oster Hook Up ® units. Do not attempt to plug in any other appliances other than those that are sold within this system.
- Page 27 • After resetting Circuit Breaker, plug first unit into outlet and reconnect remaining units. Turn on units again as needed. YOUR SYSTEM IS DESIGNED TO STACK FOR EASIER STORAGE. TO STACK YOUR SYSTEM: Turn the Glass Lid(s) of each unit in your system upside down and nest it inside the Stoneware (See Figure A).
-
Page 28: Care And Cleaning
CAN I PLUG OTHER ELECTRICAL PRODUCTS INTO THE OSTER HOOK UP ® SYSTEM? No. For your satisfaction and safety, only units sold in the Oster Hook Up system ® can be connected together. The plug has a special design that will not allow other electrical products to be plugged in. -
Page 29: Sto R I N G You R App Lia Nc E
water or other liquids. Dishwasher Oven Microwave Stovetop Safe Safe Safe Safe Glass Lid (But not with the broiler) Stoneware STO R I N G YOU R APP LIA NC E HOW DO I STACK MY SYSTEM? Turn the Glass Lid(s) of each unit in your system upside down and nest it inside the Stoneware (See Figure A). -
Page 30: Troubleshooting
TR O U BL E S HOOT ING • Make sure unit is plugged into power outlet. • Make sure Control Knob is turned to any position other than Off. If both items above are met, press the Reset Button and turn the unit on. •... - Page 31 Características eléctricas de los modelos de la serie: CKSTSC3D-XXX Electric characteristics of series models: Voltaje/Voltage Frecuencia/Frequency Potencia/Power 120 V 60 Hz 180 W XXX en donde X es cualquier numero entre 0 y 9 o cualquier letra entre A y Z.