Epson LABELWORKS PX User Manual
Hide thumbs
Also See for LABELWORKS PX:
- User manual (61 pages) ,
- Operator's manual (14 pages) ,
- User manual (59 pages)
Table of Contents
Advertisement
Quick Links
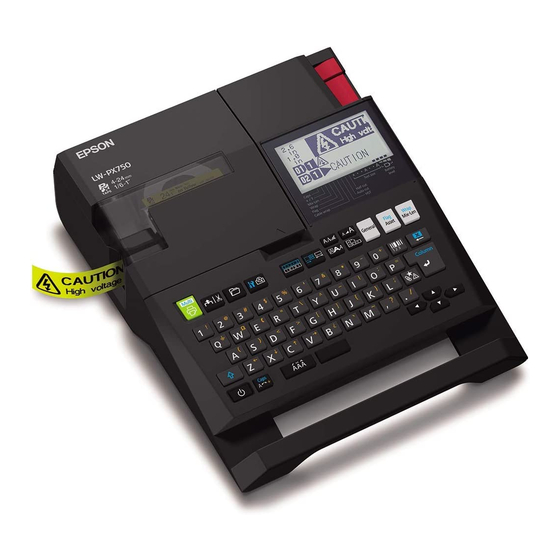
LABELWORKS PX
LW-PX750
User's Guide
Ver.01
TOP
Read this document carefully to use this product safely and correctly. If your
product is faulty, please read the included warranty card and contact the store
you purchased it from. If you require further assistance, contact your local K-Sun
customer support center.
Please also visit us at http://labelworks.epson.com for help and support. You
can download the latest version of this User's Guide from the website.
Content menu
Safety Instructions
Specifications
Troubleshooting
Part Names and Functions
Start Here
Cleaning
Initializing the Settings
Purpose-based Index
Key Menu Index
Frame and Table Lists
Notation used in this manual
Indicates information that, if ignored, could possibly result in serious
WARNING
personal injury or even death due to incorrect handling.
Indicates information that, if ignored, could possibly result in
CAUTION
personal injury, physical damage, or damage to equipment due to
incorrect handling.
Attention
Indicates important information about the printer.
Indicates additional information and points which may be useful to
MEMO
know regarding a topic.
Indicates a place with more detailed information.
Shows an image of the label to be used as an example.
,
,
Indicates the buttons on the printer.
Indicates the menu items, messages shown on the display, or the
"Name"
name of a manual. Example: "On", "Start print?"
Advertisement
Table of Contents

Related Manuals for Epson LABELWORKS PX


Summary of Contents for Epson LABELWORKS PX
- Page 1 Shows an image of the label to be used as an example. Please also visit us at http://labelworks.epson.com for help and support. You can download the latest version of this User’s Guide from the website. Indicates the buttons on the printer.
-
Page 2: Safety Instructions
Safety Instructions For your safety, read the attached documents carefully to use this product WARNING Safety Instructions correctly. After you have read all instructions, keep this manual handy for future reference and to make your concerns clear. When using the AC adapter and power cable Items below indicate safety precautions to protect users, their surroundings The cords included with this product contain chemicals, including and their property from possible injury or damage. - Page 3 Safety Instructions When using this product Others Safety Instructions Do not apply any strong force or shocks to the product such as Do not use or store the product, batteries, AC adapter, power cable, standing on, dropping or hitting it. Otherwise, the product may be or tape cartridges in the following places.
- Page 4 Safety Instructions Other cautions When using the AC adapter Safety Instructions Do not unplug the AC adapter while the product is in operation, Notes on usage otherwise printing may not be successful. • Do not touch the thermal head. Static electricity may damage the Do not use the AC adapter in a small, confined space, or cover it with Specifications thermal head.
-
Page 5: Specifications
Rated operating time / Rated resting time 0.5h / 1.0h Key Menu Index AC adapter Type AST1116Z2-1 Manufacturer Seiko Epson Corp. Frame and Table Lists Input AC100-240V, 0.4A, 50-60Hz (dedicated adapter, power cable only) Output DC11V, 1.64A Total output power... -
Page 6: Troubleshooting
Troubleshooting Messages Problem Safety Instructions This section explains the remedies when the following messages Unable to detect the tape correctly appear on the display. Is the tape cartridge correctly installed? Specifications Check that the tape cartridge is correctly installed. Check battery The batteries run out. -
Page 7: Part Names And Functions
Part Names and Functions Body Safety Instructions 11. Enters a symbol. Specifications 12. Confirms the settings. Hold down and press this to add a column. 13. Delete. Hold down and press this to clear all text Troubleshooting and/or setting. 14. - Page 8 Part Names and Functions Display Safety Instructions Indicators Specifications Remaining battery level Troubleshooting Displays font size. "Changing the Font Size" Part Names and Half cut ON Functions "Auto cut" Auto cut ON Start Here "Auto cut" The Heat Shrink Tube tape cartridge is set. The Self-Lamination Overwrap tape Cleaning cartridge is set.
-
Page 9: Start Here
Start Here 1. Connecting the supplied AC adapter Safety Instructions 1. Connect the AC adapter as shown below. CAUTION Specifications Be sure to use only the supplied AC adapter. Troubleshooting Part Names and Functions Start Here Using batteries (commercially available) Cleaning 1. - Page 10 Start Here Using Label Editor Professional Safety Instructions CAUTION Specifications Do not connect the printer to the computer until you are instructed to do so. Troubleshooting Label Editor Professional is an application software for editing label. For how to install and operate the software, see "Label Part Names and Editor Professional User's Guide".
-
Page 11: Installing A Tape Cartridge
Start Here 2. Installing a tape cartridge Safety Instructions 1. Rewind the ink ribbon. 3. Install a tape cartridge. Specifications CAUTION Use a pen • Make sure that the power is turned off. • You cannot use tape other than PX-tape. or a pencil. -
Page 12: Turning The Power On
Start Here 3. Turning the power on Safety Instructions Feeding the tape 1. Press Specifications CAUTION Troubleshooting Be sure to feed the tape every time after you install a tape cartridge. Part Names and Functions 1. Press Start Here Auto power-off 2. -
Page 13: Entering Text
Start Here 4. Entering text Deleting text Safety Instructions 1. Press 1. Press A character is deleted backward. Specifications 2. Press Deleting all text Troubleshooting 1. Press 3. Press A list of characters appears. 2. Select a function with Part Names and then press Functions... -
Page 14: Printing Label
Start Here 5. Printing label Safety Instructions 1. Press Specifications CAUTION • Do not insert your fingers into the tape eject slot. Setting the label auto " Auto cut" • Do not pull the tape until the printing is completed. Troubleshooting cut to Off Printing with special... -
Page 15: Attaching Label
Start Here 6. Attaching label 7. Turning the Power Off Safety Instructions 1. Peel off the backing paper. 1. Press Specifications The characters you have entered in the current session are stored even after the printer is turned off. They are displayed when it is turned on again. - Page 16 Cleaning Safety Instructions PeelGuard CAUTION Turn off the printer and remove the batteries before cleaning. WARNING If the AC adapter is connected, disconnect the AC adapter cable Specifications from the printer. To prevent the risk of cuts, never insert fingers in the PeelGuard. Troubleshooting 1.
-
Page 17: Initializing The Settings
Initializing the Settings Initialize the settings if the printer does not operate normally Safety Instructions such as the display is interrupted. Specifications Attention This function initializes the settings. Take extreme care before initializing it. All the stored text and settings you made will be Troubleshooting lost. -
Page 18: Label Types
Purpose-based Index Click the illustration of the label you wish to create or function you wish to use, to display information such as the creation procedure Safety Instructions or setting procedure. Label Types Specifications Troubleshooting Part Names and Functions Cable label (Flag) Cable label (Wrap) Self-Lamination Overwrap Equipment label... -
Page 19: Useful Functions
Purpose-based Index Customizing Labels Safety Instructions Specifications Troubleshooting Length Format/Style Font size Font Part Names and Functions Start Here Cleaning Margins Adding column Text orientation Initializing the Settings Useful Functions Purpose-based Index Key Menu Index Frame and Table Lists Saving/Recalling Creating Multiple Labels Printing Same Label Printer Settings... - Page 20 Creating Special Labels Creating equipment labels Safety Instructions Simply enter the required information to create equipment labels. Specifications Troubleshooting Display Label Part Names and Default item Functions names When you press , you will see this area. Start Here Cleaning 1.
- Page 21 Creating Special Labels Creating Labels to Wrap Around Cable Safety Instructions You can repeatedly print text so that it can be seen regardless of the angle from which the cable is viewed. Specifications Troubleshooting Label length Part Names and Tape width Functions Margin Margin...
- Page 22 Creating Special Labels Creating Labels to Wrap around Cable like a Flag Safety Instructions This label is useful for differentiating cables because the flag portion of the label wrapped around the cable is easy to see. Specifications Troubleshooting Space length Block 1 Block 2 Part Names and...
- Page 23 Creating Special Labels Creating Multiple Labels at Once Safety Instructions You can create many labels at once. Specifications Troubleshooting Label length Margin Margin Part Names and Tape width Functions Labels number Start Here 1. Press 5. Select the orientation with and then press Cleaning In this example, we will select "Hori.".
- Page 24 Creating Special Labels Creating Labels with Self-Lamination Overwrap Safety Instructions Use the dedicated Self-Lamination Overwrap. This label tape comes with transparent film. The film can be Specifications wrapped around the label to prevent it from getting dirty. Troubleshooting Label length Part Names and Functions Start Here...
-
Page 25: Creating Barcode Labels
Creating Special Labels Creating Barcode Labels Creating Labels with Symbol Safety Instructions Specifications 1. Press MEMO Troubleshooting • You may not be able to add a barcode depending on the label 2. Select a category with and press type you create. •... -
Page 26: Creating Sequentially Numbered Labels
Creating Special Labels Creating Sequentially Numbered Labels Creating Labels with Column Sequence Safety Instructions Numbers Assigned Specifications The number is automatically incremented each time a label You can assign sequential numbers to columns. is printed. Up to four digits including numbers (0 to 9) and Up to four digits including numbers (0 to 9) and alphabet alphabet letters (a to z and A to Z) can be entered. - Page 27 Creating Special Labels Cutting rounded label corners Safety Instructions You can use the PeelGuard to round off label corners. Specifications 1. Insert the tape in the tape insertion slot, following Troubleshooting the guide. The tape is cut to form rounded label corners. Part Names and Functions Guide...
- Page 28 Creating Special Labels Printing and cutting multiple labels one by one (Drop stop) Safety Instructions If this function is enabled, the next label is not printed until MEMO Specifications the current label is removed from the tape eject slot when •...
-
Page 29: Customizing Labels
Customizing Labels Setting the Format and Style (Edit menu) Safety Instructions MEMO The setting items displayed when you press differ depending on the label type you create. Specifications Procedure for setting Troubleshooting 1. Place the cursor. You can decorate your label by setting the following. Place the cursor on the left of the characters to which Part Names and you want to apply a function. - Page 30 Customizing Labels Bold & Italic Safety Instructions Italic, Normal, Bold, B+I Changes the text in bold or italics. Specifications Length This setting is the same as when is pressed. "Setting the Label Length" Troubleshooting Margins This setting is the same as when is pressed.
-
Page 31: Changing The Font
Customizing Labels Changing the Font Size Changing the Text Orientation Safety Instructions You can change the font size of text or a column line by line. Changes the text orientation to vertical or horizontal. Among the preset setting items, select one with the same Specifications MEMO number of lines as that of the text or column you want to... -
Page 32: Setting The Label Length
Customizing Labels Setting the Label Length Setting the Margins Safety Instructions You can set the length of label or column. Sets the left and right margins. Specifications 1. Press MEMO 2. Select the setting method of the length with You may not be able to set the margins depending on the label type you create. - Page 33 Saving Frequently Used Labels By saving frequently used labels, you will be able to easily recall and print from them next time. Safety Instructions Up to 100 labels can be saved. Specifications Saving a label Deleting the saved label 1.
- Page 34 Utilizing Print Functions Enlarge print Mirror print Safety Instructions You can create a label that is larger than the width of a single label. Specifications Print the created content separately on multiple labels and then put them together to use as a single label. 1.
-
Page 35: Changing The Printer Settings
Changing the Printer Settings Setting items inch:cm Safety Instructions The unit of length used to indicate the label size can be Auto cut switched between inch and cm. Auto cut: Specifications MEMO Sets whether or not to cut automatically. Version: To make sure the version number that has been installed in Half cut: the printer. - Page 36 Transferring Original Symbol Data Safety Instructions You can transfer your original symbol data to the printer MEMO and use it without connecting to a computer. For how to install and operate Label Editor Professional, see "Label Editor Professional User's Guide". Specifications Operation flow Troubleshooting...
- Page 37 Key Menu Index MEMO Click a key in the illustration to display the menu list. Safety Instructions To select a setting item: To confirm the setting: Specifications Changes the font. Changes the font size. Troubleshooting Changes the text orientation. Part Names and Functions Previews the created label.
- Page 38 Mix-Len Safety Instructions Specifications Margins Orientation Label length Labels num Hori. Auto Short Enter number Troubleshooting Vert.1 of labels Middle Vert.2 Label length Long Part Names and Enter length Functions Start Here Cleaning Initializing the Wrap Settings Purpose-based Index Key Menu Index Diameter Margins Enter length...
- Page 39 Flag Safety Instructions Specifications Troubleshooting Part Names and Functions Start Here Orientation Separator Cleaning Space length Hori.1 Space length Text length None Hori.2 Enter length Enter length Line Initializing the Length Vert.1 Settings Vert.2 Purpose-based Index Key Menu Index Frame and Table Lists...
- Page 40 Edit 1 Layout Left Safety Instructions Center Justify Right Specifications Table Frame & Table "Table" Troubleshooting Table Frame Part Names and Frame "Frame" Functions Edit menu Style Start Here Layout Outline Frame & Table Normal Style Cleaning Shadow Char. spacing Border &...
- Page 41 Edit 2 Safety Instructions Specifications Troubleshooting Part Names and Functions Edit menu Start Here Layout Frame & Table Char. Width Style Smaller Cleaning Char. spacing Small Border & Line Narrow Initializing the Settings Char. Width Normal Bold & Italic Wide Purpose-based Index Length Margins...
- Page 42 Edit 3 Margins Minimum 1mm Short Safety Instructions Middle 10mm Long 18mm Specifications Orientation AB A 1 Line Troubleshooting 1/4 to 4/4 Part Names and Font size 2 Lines Functions Auto 1/8 to 8/8 Edit menu 1Line Start Here Layout 2 Lines 3 Lines Frame &...
- Page 43 Length Safety Instructions Specifications Length Length Left Length Auto Center Troubleshooting Enter length Justify Right Part Names and Functions Start Here MEMO The setting items displayed when you press differ depending on the label type you create. Cleaning Initializing the Margins Settings Purpose-based Index...
-
Page 44: Advanced Serialize
Serialize Safety Instructions Repetition Specifications 1 time 2 times Serialize Text 3 times Troubleshooting Enter start value 4 times 5 times Part Names and Functions 10 times Start Here Cleaning Initializing the Advanced Serialize Settings Purpose-based Index Repetition Key Menu Index 1 time 2 times Adv.Seri.Text... - Page 45 Barcode 1 Width EAN-8 Small Safety Instructions Enter barcode Medium information Large Specifications Width Troubleshooting EAN-13 Small Enter barcode Medium information Part Names and Large Functions Bar code Start Here EAN-8 Width CODE128 EAN-13 Small Enter barcode Cleaning CODE128 Medium information CODE39 Large...
- Page 46 Barcode 2 Safety Instructions Specifications Width Ratio Check Digit Troubleshooting Small Enter barcode Medium information Part Names and Large Functions Bar code Width Ratio Start Here Check Digit EAN-8 CODABAR Small EAN-13 Enter barcode Medium information Cleaning CODE128 Large CODE39 Initializing the QR CODE Settings...
- Page 47 File Safety Instructions Specifications Local File Save Recall Troubleshooting Delete End? Part Names and Functions Start Here Cleaning Initializing the Clear Settings Purpose-based Index Key Menu Index Clear Text Text Only Frame and Table Lists Text & Setting All Format MEMO The setting items displayed when you press differ...
-
Page 48: Multi Print
Multi print *2size *5size Enlarge print *2size Safety Instructions *3size *3size *4size Specifications Special print *5size Enlarge print *6size Print copies Troubleshooting *6size Repeat Copies Mirror print Enter number of Start print? Part Names and *4size print copies Functions Mirror print MEMO Start Here The setting items displayed when... - Page 49 Setting 1 Safety Instructions Specifications Troubleshooting Auto cut Half cut Part Names and Functions Print density Start Here Preference -3 to +3 Auto cut Cleaning Print density Drop stop Drop stop Initializing the Backlight Settings Language inch:cm Purpose-based Index Backlight Version Key Menu Index Frame and Table Lists...
- Page 50 Setting 2 Safety Instructions Specifications Troubleshooting Language Dansk Part Names and Deutsch Functions English Español Start Here Français Preference Italiano Auto cut Nederlands Cleaning Print density Norsk Drop stop Português-Br Initializing the Backlight Settings Português-EU Language Suomi inch:cm Purpose-based Index Svenska Version Türkçe...
- Page 51 Accent Safety Instructions Specifications Troubleshooting Part Names and Functions Start Here Cleaning Initializing the Settings Purpose-based Index Key Menu Index Frame and Table Lists...
- Page 52 Frame and Table Lists Frame Safety Instructions Specifications Troubleshooting Part Names and Functions Start Here Cleaning Initializing the Settings Purpose-based Index Key Menu Index Frame and Table Lists...
- Page 53 Frame and Table Lists Table Safety Instructions Specifications Troubleshooting Part Names and Functions Start Here Cleaning Initializing the Settings Purpose-based Index Key Menu Index Frame and Table Lists...