
Summary of Contents for Westinghouse MH-28012
- Page 1 BLUETOOTH POWER REMOTE STATION STATION D’ALIMENTATION À DISTANCE BLUETOOTH Model/Modèle #MH-28012...
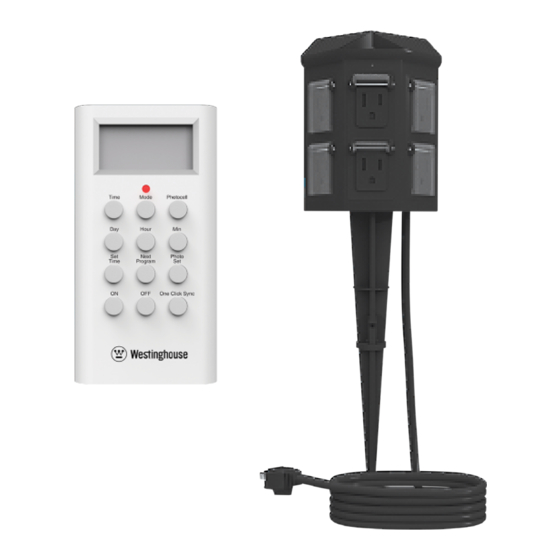
- Page 2 Manual ON/OFF override button and timer mode LED Photocell Countdown Timer Repeat Photocell indicator...
- Page 3 Photocell (not shown) Individual outlet covers with spring-loaded hinges 6 Grounded outlets Time Mode Photocell Hour Next Photo Time Program One Click Sync 12” ground stake Rated: 125VAC/60Hz 15A/1875W Resistive 15A/1875W Tungsten Remote uses: 2 x AAA (Not included)
- Page 4 1. Download the HYBLU app from the Google play or Apple App store. 2. Plug your socket in 3. Open the HYBLU App. 4. The HYBLU App will automatically discover new sockets 5. To change the name of your socket, tap on the default name created by the App.
-
Page 5: Timer Features
TIMER FEATURES The HYBLU app features a built-in timer function to schedule all your Bluetooth devices around the home. Follow the steps below for timer programming. 1. Open the HYBLU app. 2. On the home screen, depending on what type of socket you have (indoor/ outdoor), a timer icon will appear to the right of the socket name. - Page 6 VACATION MODE Vacation mode is an additional daily timer that will give your home an appearance that someone is home. 1. Tap on the “Set On Time” to set. A scrolling window will appear to set. 2. Tap on the “Set Off Time” to set. A scrolling window will appear to set. TO REVIEW/DELETE TIMER SETTINGS 1.
-
Page 7: Safety Information
BLUETOOTH OUTDOOR DIGITAL POWER CENTER REMOTE INSTRUCTIONS LCD REMOTE PAIRING To set up the LCD remote for the first time, plug in the ground stake, push the “power” button for 3 seconds. Then red LED indicator will flash. Push “ON” button of the remote. The remote is now paired with the receiver. - Page 8 TO SET DIGITAL TIMER Push the “Time” button To Set Current Time While time appears in the LCD. 1. Push the “Set Time” button once. The time will be flashing. 2. Push the “Day” button until current day appears on top. 3.
- Page 9 3. Push the “Photo set” button once. You will see the words: On at Dusk, Off Hour after Dusk. (This means the plugged-in device will be powered ON when it gets dark, and will shut OFF after set hours.) 4. Push the “Photo Set” button repeatedly to cycle through the number of hours after Dusk that your timer will stay on.
-
Page 10: Bouton On/Off
Bouton ON/OFF (Marche/arrêt) manuel Photocell Countdown Timer Repeat de surpassement et Photocell indicateur à DEL du mode minuterie... - Page 11 Cellule photoélectrique (non Couvercles de prises individuels avec charnières à ressorts 6 Prises misé à la terre Time Mode Photocell Hour Next Photo Time Program One Click Sync Pieu de 30,5 cm à enfoncer dans le sol Capacité Nominale de: 125VAC/60Hz 15A/1875W Resistive 15A/1875W Tungsten...
- Page 12 1. Téléchargez l’application HYBLU sur Google Play ou sur l’App Store d’Apple. 2. Branchez la prise. 3. Ouvrez l’application HYBLU. 4. Celle-ci détectera automatiquement les nouvelles prises. 5. Pour modifier le nom de votre prise, appuyez sur le nom créé par défaut par l’application.
-
Page 13: Minuterie Hebdomadaire
CARACTÉRISTIQUES DE LA MINUTERIE L’application HYBLU dispose d’une fonction de minuterie intégrée pour programmer tous vos périphériques Bluetooth de la maison. Suivez les étapes ci-dessous pour programmer la minuterie. 1. Ouvrez l’application HYBLU. 2. Sur l’écran d’accueil, selon le type de prise que vous avez (intérieure/ extérieure), une icône de minuterie s’affiche à... - Page 14 MINUTERIE COMPTE À 1. Appuyez sur l’onglet Countdown Timer (Minuterie du compte à rebours) pour faire apparaître les options de réglage du compte à rebours. L’heure actuelle est définie automatiquement par l’application. La minuterie du compte à rebours commencera le compte à rebours à partir de l’heure actuelle.
- Page 15 RETRAIT DES PRISES DÉBRANCHÉES/INUTILISÉES DE 1. Mettez le doigt sur le côté droit du bouton On/Off (Marche/arrêt) (page d’accueil de l’appareil) de la prise que vous souhaitez retirer de l’application. 2. Maintenez le bouton enfoncé jusqu’à ce qu’apparaisse un signe « - » rouge. Appuyez sur le signe «...
-
Page 16: Renseignements Sur La Sécurité
STATION D’ALIMENTATION À DISTANCE BLUETOOTH INSTRUCTIONS À DISTANCE JUMELAGE D’UN ÉMETTEUR À ÉCRAN ACL Pour configurer l’émetteur à écran ACL pour la première fois, branchez le piquet de terre, puis enfoncez le bouton d’alimentation « Power » pendant trois secondes. L’indicateur à DEL rouge se met à clignoter. Appuyez sur le bouton «... - Page 17 POUR RÉGLER LA MINUTERIE NUMÉRIQUE Enfoncez le bouton « Time » (Minuterie). Pour régler l’heure actuelle Lorsque l’heure s’affiche sur l’écran ACL. 1. Enfoncez une fois le bouton « Set Time » (Régler l’heure). L’heure se met à clignoter. 2. Enfoncez le bouton « Day » (Jour) jusqu’à ce que le jour actuel apparaisse dans le haut.
- Page 18 9. Enfoncez le bouton « Set Time » (Régler l’heure) pour afficher l’heure actuelle. 10. Enfoncez le bouton « One Clic Sync » (Synchro en un clic). Les programmes définis dans l’émetteur seront transmis au récepteur. L’écran affiche « ERR » (Erreur) si le téléchargement des données a échoué.
- Page 19 POUR EFFACER TOUS REMARQUES LES PROGRAMMES DE - Vous pouvez programmer la minuterie L’ÉMETTEUR de la cellule photoélectrique pour qu’elle s’éteigne à l’aube, ou de 1 à 12 heures Enfoncez les boutons « après le crépuscule. ON » (Marche) et « OFF » (Arrêt) ensemble pendant - N’oubliez pas de placer les lumières à...
- Page 20 ©2017 The NCC MADE IN CHINA / FABRIQUÉ EN CHINE , WESTINGHOUSE, and INNOVATION YOU CAN BE SURE OF are trademarks of Westinghouse Electric Corporation. Used under license by The NCC. All rights reserved. Les termes et WESTINGHOUSE et INNOVATION YOU CAN BE SURE OF sont des marques de commerce de la société...