Advertisement
Table of Contents
- 1 Table of Contents
- 2 Important Safety Instructions
- 3 Product Registration
- 4 Normal Sounds
- 5 Unit Description
- 6 Accessories Included
- 7 Installation Instructions
- 8 Air Conditioner Features
- 9 Operating Instruction
- 10 Care and Cleaning
- 11 Before You Call
- 12 Major Appliance Limited Warranty
- Download this manual
Important Safety Instructions..............................2-3
Product Registration...............................................4
Normal Sounds.......................................................4
Unit Description......................................................5
Accessories Included.............................................5
Installation Instructions.......................................6-7
Air Conditioner Features.....................................8
Operating Instruction......................................8-14
Care and Cleaning.............................................15
Before You Call..................................................16
Major Appliance Limited Warranty................. ...17
Advertisement
Table of Contents

Related Manuals for Frigidaire FHPC082AC1


Summary of Contents for Frigidaire FHPC082AC1
-
Page 1: Table Of Contents
Important Safety Instructions......2-3 Air Conditioner Features........8 Product Registration..........4 Operating Instruction........8-14 Normal Sounds............4 Care and Cleaning..........15 Unit Description............5 Before You Call..........16 Accessories Included..........5 Major Appliance Limited Warranty....17 Installation Instructions........6-7... -
Page 2: Important Safety Instructions
Important Safety Instructions NOTE: WARNING NOTE: WARNING WARNING WARNING SAFETY PRECAUTIONS This appliance is not intended for use by persons (including children) with reduced physical ,sensory or mental capabilities or lack of experience and knowledge, unless they have been given supervision or instruction concerning use of the appliance by a person responsible for their safety. Children should be supervised to ensure that they do not play with the appliance. - Page 3 Important Safety Instructions SAFETY PRECAUTIONS Provide ventilation per installation instructions. Do not direct airflow at fireplaces or other heat related sources as this could cause flare ups or make units run excessively. NOTE: fails manufacturer. manufacturer. WARNING of ventilation shall continue during the period that the work is carried out. The ventilation should safely disperse any released refrigerant and preferably expel it externally into the atmosphere.
-
Page 4: Product Registration
Model No. Serial No. Register Your Product The self-addressed PRODUCT REGISTRATION C ARD should be filled in completely, signed and returned to the Frigidaire Company. Normal Sounds Sound of Rushing Air At the top of the unit, you may hear the sound of rushing air being moved by the fan. -
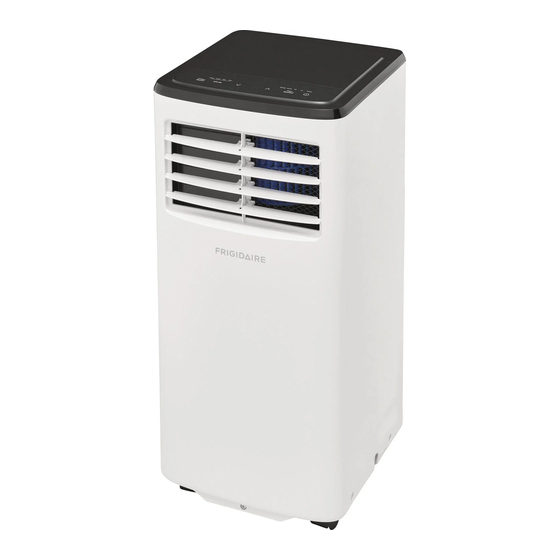
Page 5: Unit Description
Unit Description & Accessories Included Unit Description Control Panel Air Intake Air Outlet Grill Air Intake Signal Receiver Continuous Air Exhaust Drain Outlet Remote Control Power Cord Air Intake Bottom Drain Outlet Castor Accessories Included PARTS: PARTS NAME: QUANTITY: Window Kit Connector A Exhaust hose connector B Window Kit Exhaust Hose... -
Page 6: Installation Instructions
Installation Instructions Installation Instructions EXHAUSTING HOT AIR In the Cool Mode the appliance must be placed close to a window or opening so that the warm exhaust air can be ducted outside. First position unit on a flat floor and is within the vicinity of a single circuit outlet power source. - Page 7 Installation Instructions Installation Instructions(continued) Installation in a double-hung sash window 1.Cut the foam seals A(adhesive type) to the proper lengths and attach them to the window and stool.(Fig.6) Foam seal A 2.Open the window sash and place the window slider kit on the window (adhesive type) stool (Fig.7).
-
Page 8: Air Conditioner Features
Air Conditioner Features & Operating Instructions Control Panel Display Sleep Timer indicator Temperature/Timer indicator Adjust Mode Power Filter Temperature Selection Speed on/off Reset or Timer Operating Instruction Cool mode Press the “mode” button until the Cool mode indicator lights. Press the "fan speed" button to choose the fan speed according to the illumination of the fan speed indicator. You can choose the “hi”, “low”, or “auto”... - Page 9 Operating Instructions Dry mode Press the “mode” button until the Dry mode indicator lights. In this mode, the “ ” or “ ” button is disabled and the screen displays the room temperature. The unit will continuously drain moisture from the room. Note: In this mode, the fan speed will be set as “low”...
- Page 10 Operating Instructions Filter reset This feature is a reminder to clean the Air Filter (See Care and Cleaning) for more efficient operation. The filter indicator will illuminate after 250 hours of fan operation. Press the “filter reset” button, to reset after cleaning the filter.
- Page 11 Operating Instructions Remote Control Fan Speed button Temp/Timer setting button On/off button Fan mode button Dry mode button Sleep button Cool mode button Timer button Auto mode button Change °F/°C button Battery Installation and Important Instructions When using the remote for the first time, pull out the plastic film on the back of the remote control. To replace the battery (when it has been used up), unscrew the screw at the back of the remote control then slide the cover off (Fig.
- Page 12 Operating Instructions How to Use the Remote Control TURNING THE UNIT ON Plug in the unit, then press the “ ” button (when turned on, the unit will operate as the last setting before shutdown. To switch the unit off, press “ ”...
- Page 13 If the display reads "E4" , the communication “AS”, the room temperature sensor between display PCB and main control PCB has failed. Contact your Authorized is faulty. Contact your Authorized Frigidaire Frigidaire Service Center. Service Center. If the screen on the unit displays Emptying the condensate residue inside the unit “ES”, the pipe temperature sensor...
- Page 14 Operating Instructions Drainage Instructions Continuous Drainage During the Dry mode, you will need a garden hose (sold separately) to drain the condensate from the unit. Follow the steps below: Unscrew the drain cap of continuous drain outlet and remove the rubber plug(Fig.20). Connect one end of the garden hose (sold separately) to the drain outlet then lead the other end into a drain that is lower than the unit(Fig.21).
-
Page 15: Care And Cleaning
Care and Cleaning Cleaning Clean your air conditioner occasionally to keep it looking new. Be sure to unplug the unit before cleaning to prevent shock or fire hazards. CLEANING THE UNIT The cabinet and front may be dusted with an oil-free cloth or washed with a cloth dampened in a solution of warm water and mild liquid dishwashing detergent. -
Page 16: Before You Call
Before You Call Wait approximately 4 minutes and listen for compressor to restart when set in the Cool mode. -
Page 17: Major Appliance Limited Warranty
Major Appliance Limited Warranty year from your original date of purchase, the consumer will be responsible for diagnostic, labor and parts costs as well as any removal, transportation and reinstallation expenses which are incurred during service on components. Exclusions This warranty does not cover the following: Products with original serial numbers that have been removed, altered or cannot be readily determined.