
Related Manuals for Gear Head 8DPF200

Summary of Contents for Gear Head 8DPF200
- Page 1 Digital Photo Frame 8” LCD Model #:8DPF200 User’s Manual PID 161297-109240 Rev. 070817...
-
Page 2: User's Record
All brand name and trademarks are the property of their respective owners USER’S RECORD: To provide quality customer service and technical support, it is suggested that you keep the following information as well as your store receipt and this user’s manual. Date of Purchase: ________________________________ Model Number:... -
Page 3: Package Contents
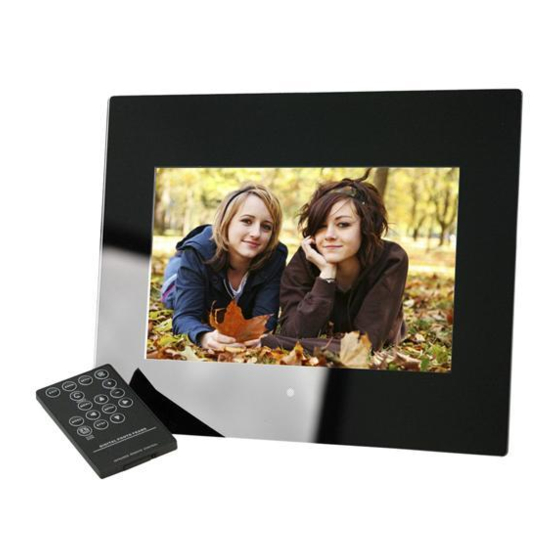
PACKAGE CONTENTS: Your new Digital Photo Frame will ship with the following items. 8” LCD Digital Photo Frame(1 Black Acrylic and 1 Wood Frame) USB Extension Cable Power Adapter Remote Control User’s Manual & Warranty Information SYSTEM SPECIFICATIONS: Your new Digital Photo Frame complies with the following specifications. Screen Dimensions: 8.0 inches Resolution: 800X600 Brightness: 250cd/m... -
Page 4: Hardware Description
HARDWARE DESCRIPTION: Display Screen Remote Control USB Cable Switching Power Adapter USB Type A Port (For connecting flash drive) CF Card Slot USB mini-B Port (For connecting to computer) 3.5mm SD/MMC/MS headphone jack Card Slot Power Jack... - Page 5 Remote Control EXIT Press to go back to the previous screen. ZOOM Press to zoom in. SETUP Press to open the “Setting” menu. Press to rotate the photo counter-clockwise 90 degrees MENU Press to open the operation mode menu. ENTER Press to select an option, to save a changed setting in the setup screen, or to open the control menu of a photo or movie.
-
Page 6: Hardware Installation
HARDWARE INSTALLATION: 1. Connect the power jack of the enclosed Switching Power Adapter to your Digital Photo Frame, and plug the other end into an electric outlet. 2. Pull out the photo frame stand at the back of your Digital Photo Frame, and place your Digital Photo Frame on a flat and steady surface. -
Page 7: Using The Digital Photo Frame
USING THE DIGITAL PHOTO FRAME: 1. Make sure that you have properly connected the Switching Adapter; refer to the Hardware Installation instructions above if necessary. 2. Carefully insert your memory card into the proper slot as shown below following the orientation guide on the memory card. - Page 8 4. Use the enclosed Remote Control or the Built-in Control and select either “Picture”, “Music”, “Combo”, or “Movie”, the following screen will show. 5. Select the memory that you wish to view your files from, then press “Enter” and “Exit” on the remote control or “E”...
- Page 9 Music control menu Rewind Fast Forward Previous Next Play / Pause Playing mode Stop indication Playing Information File Information Movie control menu Rewind Fast Forward Previous Next Playing mode Play / Pause indication Stop Zoom in File Information 7. Select the “Setting” icon of the mode menu or press the “Setup” button on the Remote Control to open the “Setting”...
-
Page 10: Connecting To A Computer
CONNECTING TO A COMPUTER: 1. Make sure all memory cards have been removed from your Digital Photo Frame and your Digital Photo Frame is turned on. (Warning: Turning on the Digital Photo Frame after it has been connected to a computer can cause irreversible damage to you digital photo frame.) 2. - Page 11 CHANGING THE OUTER FRAME: To properly change the outer frame for your Digital Photo Frame, please follow the instructions below. 1. Press the latch at the side of your Digital Photo Frame to separate the display screen from the outer frame. 2.
-
Page 12: Warranty Information
1-866-890-7115 Return Merchandise for Service Any claim under this warranty must be made in writing to Gear Head, LLC, at the address provide by our technician, within 30 days after the owner discovers the circumstances giving rise to any such claim, and must include a copy of this warranty document, a receipt or copy of your invoice marked with the date of purchase, and the original packaging.