Table of Contents
Advertisement
Advertisement
Chapters
Table of Contents

Related Manuals for Brother P-touch Extra PT-300


Summary of Contents for Brother P-touch Extra PT-300
- Page 2 INTRODUCTION This machine will help you design and print labels for any application. Extremely versatile, it can create characters of many sizes and styles. In addition, with the use of colorful tape cartridges, you can print labels with a variety of let- ter and background colors.
-
Page 3: Table Of Contents
CONTENTS ... OVERVIEW ... GENERAL PRECAUTIONS ... BEFORE YOU START ... INSERTING A TAPE CASSETTE ... INSERTING BATTERIES ... CHANGING THE CUTTER UNIT ... STARTING... CREATING A MESSAGE ... 10 DISPLAY... 10 MOVING THE CURSOR ... 10 CLEARING THE DISPLAY... 11 KEY OPERATIONS ... -
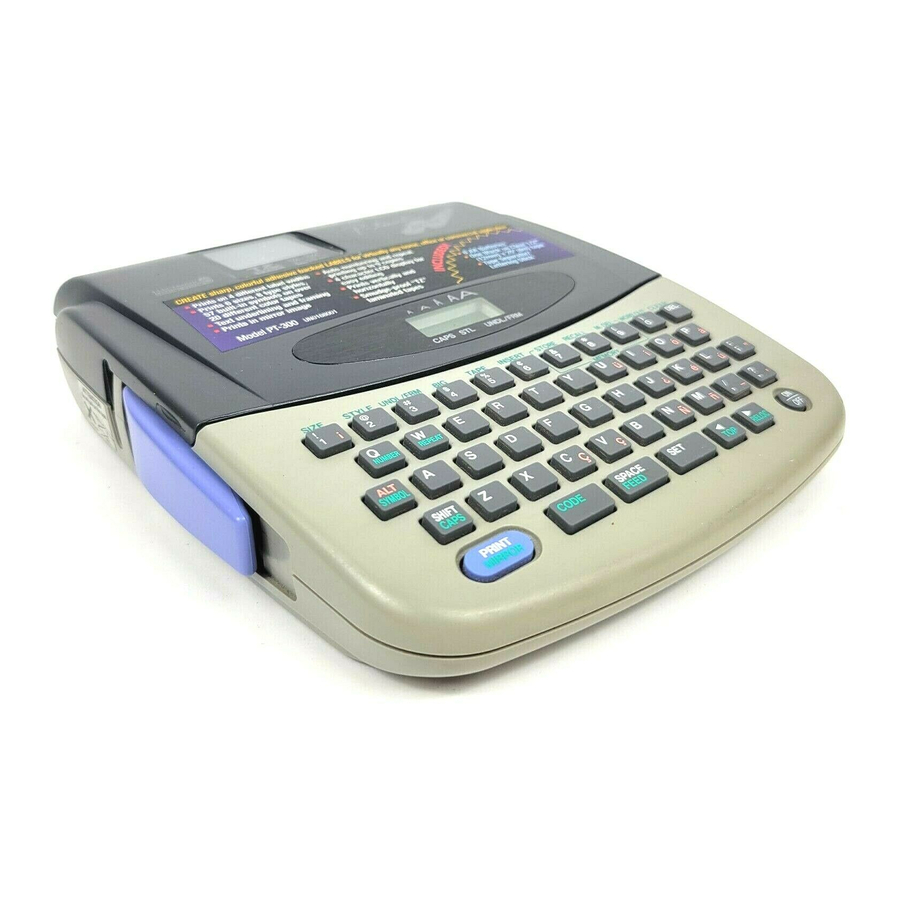
Page 4: Product View
OVERVIEW Cover lift Tape exit slot SIZE ¡ NUMBER SYMBOL SHIFT CAPS PRINT MIRROR PRINT key Tape cartridge cover CAPS UNDL/FRM UNDL/FRM STYLE TAPE INSERT ¢ REPEAT Ç ç SPACE CODE FEED CODE key SET key To use functions written in pink, you must press and hold down the CODE key, then press the desired function key. - Page 5 Print head Tape cutter unit Tape release lever...
- Page 6 Battery compartment latch Tape exit slot Battery compartment Tape cutter lever...
-
Page 7: General Precautions
GENERAL PRECAUTIONS Use only Brother TZ tapes with this machine. Do not use tapes that do not have the mark. Four different tape widths are available: 1/4”(6mm), 3/8”(9mm), 1/2”(12mm) and 3/4”(18mm). Do not pull the tape. This may damage the tape cassettes. -
Page 8: Before You Start
Brother TZ tapes are only available in the following widths for this machine: 1/4”(6mm), 3/8”(9mm), 1/2”(12mm) and 3/4”(18mm). To insert a new tape cassette: (1) Lift the cassette cover so that you can reach the tape cassette easily. This will also release the installed cassette. -
Page 9: Inserting Batteries
The machine uses six “AA” size (AM3, LR6, SUM-3, R6) batteries. To insert batteries: (1) Turn the machine over. Remove the battery compartment cover by pinching the latch and lifting. (2) Follow the diagrams on the back of the compartment to insert the batteries in the proper direction. -
Page 10: Changing The Cutter Unit
When the cutter is not cutting well, replace it with a new one. To replace a cutter with a dull or broken blade: (1) Open the tape cassette compartment cover and carefully remove the tape cassette if it is installed. (2) Grasp the cutter with your fingers and pull it out. -
Page 11: Starting
STARTING To start the machine: Press the ON/OFF key. The machine’s internal memory retains the last message created, and displays it when you turn on the machine. This feature allows you to stop work on a mes- sage, turn off the machine, and return to it later without having to re-enter the message. -
Page 12: Creating A Message
CREATING A MESSAGE You are now ready to create a message on the machine. The machine’s LCD display is four characters wide. Actually though, you can create messages up to 55 characters in length. The four-character display is like a window which moves across your message. -
Page 13: Clearing The Display
CLEARING THE DISPLAY Before entering a new message, you will often need to clear an old message. To erase the previous message from the display: Hold down the CODE key and press the CLEAR key. Example Erase any message from the display by pressing CLEAR CODE CAPS... -
Page 14: Key Operations
KEY OPERATIONS CODE KEY By holding down the CODE key and pushing the appropriate key, you can use the functions written in pink characters. SHIFT KEY By using the SHIFT key you can type capital letters, and symbols located on the upper part of keys. -
Page 15: Input
You can now use the keys to enter a message. Example To input “Mr.”: SHIFT Press CAPS Complete “Mr.” by pressing INPUT to input a capital M. ñ CAPS UNDL/FRM then M r . CAPS UNDL/FRM -13-... -
Page 16: Space Key
As on a typewriter, this machine’s SPACE key lets you add a blank space into your message. Note: The SPACE key and the moves the cursor forward without adding blank spaces. Example To complete the message “Mr. J Smith”: Enter the initial “J”: SHIFT Press CAPS... -
Page 17: Symbols
In addition to the letters, symbols, and numerals on the key tops, there are 57 symbols available in Symbol Mode. These 57 additional symbols are arranged into 15 groups, corresponding to the numbers A to O on the keyboard. Group No. SYMBOLS Ü... - Page 18 Example First, make sure that the cursor is located at the place where you want to add a symbol. To add a telephone symbol ( the message to “Mr. J Smith Enter Symbol Mode by pressing The following message will be displayed: Press the G key, as its group includes the telephone symbol.
- Page 19 Push to input a The message should now look like this: Mr.J Sm i t h CAPS UNDL/FRM After a non-keyboard symbol has been entered, the machine automatically exits from Symbol Mode. If you wish to enter another symbol, you must re-enter Sym- bol Mode by holding down the CODE key and pressing the SYMBOL key.
-
Page 20: Editing A Message
EDITING A MESSAGE The DELETE key allows you to remove characters from your message. To delete a character: (1) Using the character you want to delete. (2) Press the DELETE key. Example To delete the Make sure the cursor is positioned to the right of the telephone symbol. Mr.J Sm CLEAR Press... - Page 21 Now we will delete the blank space between the “J” and “S”: Press until the cursor is positioned to the right of the blank space (under the “S”). Mr.J S m i t CAPS CLEAR Press to remove the blank space. Mr.J S m i t CAPS...
-
Page 22: Word Out
This function allows you to erase one word at a time, simplifying the editing of long messages. To use the WORD OUT function: (1) Position the cursor to the right of the word you want to delete. (2) Hold down the CODE key and press the WORD OUT key. A number or word located before the cursor and after the nearest preceeding space will be deleted. -
Page 23: Over Typing
The machine normally operates in Overtype Mode. In Overtype Mode, you can change a character simply by typing a new one in its place. To type over a character: (1) Move the cursor to the character you want to change. (2) Press the character or symbol you want. -
Page 24: Inserting
Sometimes you may want to insert a character into the middle of your message. To do so, you must change from Overtype Mode to Insert Mode. To insert characters: (1) Hold down the CODE key and press the INSERT key until display shows “I : ”. - Page 25 (OVERWRITE MODE) CAPS Release the Press the To leave INSERT Mode: Holding down the CODE key press the INSERT key again. UNDL/FRM CODE key when the display shows “I: key. • . S M I CAPS UNDL/FRM -23- (INSERT MODE) CAPS UNDL/FRM ”.
-
Page 26: Setting The Format
SETTING THE FORMAT You can print your completed message using a variety of different character sizes, styles, fonts, underline/frames and tape feed settings. Choose character size, style, underline/box and tape feed before printing the label. Note: The type of character you choose will be used for all the characters in your message. - Page 27 To choose a character size: (1) Holding down the CODE key, press the SIZE key to change the character size. The size indicator on the display advances in the order shown. (2) Stop pressing the SIZE key when your desired character size is indicated. Example To use Double Width and Double Height (4) characters: Hold down...
- Page 28 Note: The size of the characters that can be printed are limited by the width of the tape. Tape width 3/4”(18mm) 3/4”(12mm) 3/8”(9mm) 1/4”(6mm) If a character size is set which is not shown in the above table for the tape width being used and the PRINT key is pressed, an error message will be displayed and the label can not be printed.
-
Page 29: Big Size Font
This machine has a BIG size font in addition to the normal font. The normal size font can be set at the standard size, W2 (double width), H2 (double height), 4 (double width & double height) and 8 (4 font is chosen, all other settings are cancelled. To choose the BIG size font: (1) Holding down the CODE key, press the BIG key. -
Page 30: Style
There are also nine different print styles: Normal (NORM) Outline (OUTL) Bold (BOLD) Shadow (SHAD) Vertical (VERT) To choose a print style for your label: (1) Holding down the CODE key, press the STYLE key once. The display will show the current print style. (2) Still holding down the CODE key, press the STYLE key again. - Page 31 Note: Only Normal style characters can be printed vertically. Vertical printing can not be used with some tape width and character size combinations. Example To use Outline print: Hold down STYLE Press The style indicator turns on. CODE Release CODE until the display reads “OUTL”.
-
Page 32: Underline/Frame
You can add an underline or frame text when you wish to emphasize it. To add Underline or Box around the text. (1) Holding down the CODE key, press UNDERLINE/FRAME ( (2) The current style will be shown on the display. (3) Still holding down the CODE key, press UNDERLINE/FRAME key to change the style. - Page 33 Tape width 3/4” (18 mm) 1/2” (12 mm) 3/8” (9 mm) 1/4” (6 mm) A triangle indicator on the display appears whether Underline or Frame is set on. Box 1 Box 2 Possible character sizes 1, W2, H2, 4, 8, 1, W2, H2, 4, 8 1, W2, H2, 4, 8 1, W2...
-
Page 34: Printing A Label
After you have chosen the character size, print style and tape feed style, you are ready to print the label. To print a label: Press the PRINT key. The printed label comes out of the tape exit slot on the side of the machine. Press the CODE + FEED key before cutting the tape if TAPE FEED mode is set to “_”, “#”, “##”... -
Page 35: Cutting
To cut the tape: Pull out the tape cutter lever on the side of the machine. Example To cut the label: Pull out the tape cutter lever. Note: If you pull out the tape cutter lever too far, it may break. To attach the label: Remove the label backing and attach the label at the desired position. -
Page 36: Repeat Printing
The Repeat function allows you to repeatedly print the same label up to nine times. To use the REPEAT PRINTING function: It is recommended to set the TAPE FEED mode to “#”, “##” or “###”. (Please refer to page 39.) (1) Hold down the CODE key and press the REPEAT ( (2) The following message appears on the display: (3) Select the number of labels you want. -
Page 37: Numbering
The NUMBERING function can be used to automatically increment numbers included in otherwise identical texts. For example, when printing text with a series of dates (“JULY 4, 1962”; “JULY 5, 1962”; and “JULY 6, 1962”), the auto count function will enable printing of all three texts in a single print operation. To use the AUTO COUNT function when printing: It is recommend to set the TAPE FEED mode to “#”, “##”... - Page 38 Numbers are always incremented one at a time. If the battery becomes weak during a NUMBERING operation, the operation will be interrupted. Example To use the NUMBERING function: Position the cursor beneath the number in the text to be incremented. Hold down the changes as follows: L Y 4...
- Page 39 Press numeric key “6”. CAPS UNDL/FRM PRINT Press . Your text will be printed out. MIRROR The number will automatically be incremented by one, and the text will be printed out again. The printing operation will be repeated until the number you selected as the last number has been printed out.
-
Page 40: Mirror Printing
For this application, tape with a clear adhesive must be used. When the mirror Printing function is used, characters are printed so as to be legi- ble from the adhesive side of the tape. If the labels are then attached to glass or some other transparent material, they can be read correctly from the opposite side. -
Page 41: Tape Feed
The tape feed function can be used to leave equal margins on the left and right sides of the label. The margins can be set to any of the following four widths: 1/6”(4mm), 1/3”(8mm), 1/2”(12mm) or 1”(24mm). When continuously printing labels, the labels can be printed without extra margins. - Page 42 Note: When “- ”, “# ”, “## ” or “### ” is set, press feed the tape after the label is printed and before the tape is cut. If the tape is not fed before being cut, some of the printed characters may be cut off.
- Page 43 If the tape is cut at the cutline, the text is centered in the middle of the label. The tape is automatically fed 1/3”(8mm) when “## ” is set, and 1/2”(12mm) when “### ” is set. Continuous printing When “# ” is set and three labels are printed continuously, the tape is fed and a label like that shown in the illustration below is produced.
-
Page 44: Phrase Memory Operation
PHRASE MEMORY OPERATION You can use the Phrase Memory function to store your most frequently used mes- sages. Text stored in the Phrase Memory will not be deleted by the usual message clear operation (CODE + CLEAR). You can easily recall your message from this Phrase Memory any time you want to work with it. - Page 45 If the area you select is already being used, an error message will briefly appear, and then the display will again ask you to choose an area. In that event, please select a different number from 1 to 9. If all nine areas are being used, you must clear one of them before you can store your current message.
-
Page 46: Recalling From Phrase Memory
RECALLING FROM PHRASE MEMORY To recall a message stored in one of the nine PHRASE MEMORY areas: (1) Holding down the CODE key, press the RECALL key. (2) The display will read: (3) Select the number of the area you want to recall, and press it. (4) The key number and the beginning of the message appear on the display. - Page 47 Press 1, since you stored your message in area 1. The stored message appears on the display, along with its area number. 1 : J . CAPS To alter recalled memory: Press . The message is moved to the working area and remains on the display.
-
Page 48: Deleting The Phrase Memory
DELETING THE PHRASE MEMORY To delete an area of PHRASE MEMORY: (1) Hold down the CODE key and press the M.DEL key. The following message appears on the display: (2) Select the number key (1-9) of the memory area you want to delete, and press it. - Page 49 To delete Phrase Memory Press 1. The stored message appears on the display. 1 : J . CAPS UNDL/FRM Press . The message is deleted from the memory. The message previously in the working area (in this case, the same “J. SMITH”) appears on the display.
-
Page 50: Message List
MESSAGE LIST BATT FULL NORM OUTL BOLD SHAD ITAL IT+O IT+B IT+S VERT A-O? 1-9? #### – TEXT UNDL BOX 1 BOX 2 BOX 3 BOX 4 Input error. The selected tape type is incorrect. The batteries are weak or empty. The working area is full (max: 55 characters) or the Phrase Memory is full (see page 42). -
Page 51: Troubleshooting
TROUBLESHOOTING Problem 1. The display stays blank after you have turned on the machine. 2. The machine does not print, or the printed characters are blurred. 3. The printed characters are not formed properly. 4. The tape cannot be cut. 5. -
Page 52: Specifications
SPECIFICATIONS Input Device: Print Speed: Character Size: Internal Character: Print Tape: LCD: Power Supply: Dimensions: Weight: Memory Buffer Size: Phrase Memory Size: 49 keys (39 character keys and 10 function keys) 10 mm/sec. Standard Size (1) Double Width (W2) Double Height (H2) Double Width &... -
Page 53: Accessories
Obtain tape cassettes, AC Adaptors and tape cutters from your nearest autho- rized dealer. Brother cannot be held responsible for trouble caused by the use of unauthorized supplies. Use only Brother TZ tapes with this machine. Do not use tapes that do not have the mark. - Page 54 TAPE CUTTER Most retailers and distributors carry a full line of tape cassettes. If you wish to order accessories for your P-Touch direct from Brother, please refer to the “Acces- sory Order Form” or visit us on-line at “http://www.brothermall.com”. Description...
- Page 55 Stock No. Description Name: Address: City: State/Zip: Daytime Phone: SEND ORDER FORM TO: Brother International Corp. Attn: Consumer Accessory Div. P.O. Box 341332 Bartlett, TN38184-1332 Method of payment (Check one) ) Visa ( ) MasterCard ( Account Number Expiration Date...
- Page 56 Stock No. Description Name: Address: City: State/Zip: Daytime Phone: SEND ORDER FORM TO: Brother International Corp. Attn: Consumer Accessory Div. P.O. Box 341332 Bartlett, TN38184-1332 Method of payment (Check one) ) Visa ( ) MasterCard ( Account Number Expiration Date...
- Page 57 GUIA DEL USUARIO...
- Page 58 INTRODUCCION Esta máquina le ayudará a diseñar e imprimir etiquetas para cualquier aplicación. Es muy versátil y puede utilizarse para crear caracteres de varios tamaños y estilos. Además, con el empleo de las cintas de colores, podrá imprimir las etiquetas con colores diferentes para las letras y para el fondo. Ya no será...
- Page 59 PRECAUCIONES GENERALES ... ANTES DE EMPEZAR ... INSERCION DE UN CASSETTE DE CINTA ... INSERCION DE LAS BATERIAS ... CAMBIO DE LA CUCHILLA ... OPERACIONES DE LAS TECLAS ... CREACION DE UN MENSAJE ... PANTALLA ... DESPLAZAMIENTO DEL CURSOR... SIMBOLOS... EDICION DE UN MENSAJE ...
-
Page 60: Precauciones Generales
PRECAUCIONES GENERALES Utilice solamente cintas TZ Brother con esta máquina. No utilice cintas que no tengan la marca Las cintas están disponibles en cuatro anchuras diferentes: 1/4” (6 mm), 3/8” (9 mm), 1/2” (12 mm) y 3/4” (18 mm). No tire de la cinta. Si lo hiciese podría dañar los cassettes de cinta. -
Page 61: Antes De Empezar
ANTES DE EMPEZAR INSERCION DE UN CASSETTE DE CINTA Las cintas TZ Brother están sólo disponibles en las anchuras siguientes para esta máquina: 1/4”(6 mm), 3/8”(9 mm), 1/2”(12 mm) y 3/4”(18 mm). Para insertar un nuevo cassette de cinta: (1) Levante la cubierta del cassette de modo que pueda tener acceso con facilidad al cassette de cinta. -
Page 62: Insercion De Las Baterias
La máquina usa seis baterías de tamaño “AA” (AM3, LR6, SUM-3, R6). Para insertar las pilas: (1) Dé la vuelta al P-Touch. Retire la cubierta del compartimento de las baterías presionando el pestillo y levantando la cubierta. (2) Siga los diagramas del fondo del compartimento para insertar las baterías en la dirección correcta. -
Page 63: Cambio De La Cuchilla
Cuando la cuchilla no corte bien, reemplácela con una nueva. Para reemplazar una cuchilla gastada o rota: (1) Abra la cubierta del compartimiento del cassette de cinta y saque con cuidado el cassette de cinta si estuviera instalada. (2) Agarre la cuchilla entre los dedos y sáquela. (3) Tome la cuchilla nueva con la lengüeta de la película protectora e inserte la cuchilla en la máquina. -
Page 64: Operaciones De Las Teclas
OPERACIONES DE LAS TECLAS Tecla CODE Manteniendo presionada la tecla CODE y pulsando la tecla adecuada, puede utilizar las funciones indicadas en caracteres de color rosa o los caracteres de color azul del de color azul de esta máquina. Tecla SHIFT Con la tecla SHIFT puede escribir mayúsculas, y símbolos de la parte superior de las teclas. -
Page 65: Creacion De Un Mensaje
CREACION DE UN MENSAJE Una vez realizados los pasos anteriores ya puede proceder a la creación de un mensaje en el de color azul máquina. La pantalla LCD de la máquina tiene una capacidad de 4 caracteres. No obstante, podrá crear mensajes con una longitud de hasta 55 caracteres. La pantalla de 4 caracteres actúa como una ventana que se desplazase a lo largo del mensaje. -
Page 66: Simbolos
Además de las letras, símbolos y números en la parte superior de las teclas, existen 57 símbolos en el Modo Symbol. Estos 57 símbolos adicionales están dispuestos en 15 grupos, correspondientes a los números del A al O del teclado. N.˚... -
Page 67: Edicion De Un Mensaje
Para borrar un carácter: (1) Utilice las teclas del cursor para colocar éste un espacio a la derecha del carácter que desea borrar. (2) Presione la tecla DELETE. Para borrar una palabra: (1) Coloque el cursor un espacio a la derecha de la palabra que desee borrar. (2) Mantenga presionada la tecla CODE y pulse la tecla WORD OUT. -
Page 68: Tamaño
Para elegir el tamaño de los caracteres: Mantenga presionada la tecla CODE y pulse la tecla SIZE el número de veces necesario hasta que en la pantalla se indique el tamaño de caracteres deseado. Nota: El tamaño de los caracteres que podrán imprimirse está limitado por la anchura de la cinta. - Page 69 1:Standard Size W2:Double Width H2:Double Height 4:Double Width & Double Height Width & Double Height -11-...
-
Page 70: Estilo
Para elegir un estilo de impresión: Mantenga presionada la tecla CODE y pulse la tecla STYLE el número de veces necesario hasta que en la pantalla aparezca el estilo de caracteres deseado. Si selecciona un estilo que no sea NORMAL, en la pantalla aparecerá el indicador de tal estilo. -
Page 71: Subrayado/Encuadre
Para añadir un subrayado o un encuadre: Mantenga presionada la tecla CODE y pulse la tecla UNDERLINE/FRAME UNDL/FRM el número de veces necesario hasta que en la pantalla aparezca el estilo de subrayado/encuadre deseado. Cuando haya establecido el estilo de subrayado/encuadre, el indicador correspondiente aparecerá... -
Page 72: Impresion Y Corte
Después de haber elegido el tamaño de los caracteres, el estilo de impresión, y el juego tipográfico, podrá imprimir la etiqueta. Para imprimir una etiqueta: Pulse la tecla PRINT. La etiqueta impresa saldrá por la ranura de salida de la cinta de la parte lateral de la máquina. -
Page 73: Impresión Repetida
Esta función le permitirá imprimir repetidamente la misma etiqueta hasta nueve veces. Para utilizar la función de impresión repetida : Se recomienda ajustar el modo TAPE FEED a “#”, “##”, o “###”. (1) Mantenga presionada la tecla CODE y pulse la tecla REPEAT ( (2) Introduzca el número de veces que desee imprimir la etiqueta. -
Page 74: Numeración
Esta función podrá utilizarse para que aumente automáticamente el número en una serie de etiquetas impresas. Para utilizar la función de cómputo automático : Se recomienda ajustar el modo TAPE FEED a “#”, “##”, o “###”. (1) Coloque el cursor debajo del número que desee aumentar. (2) Mantenga presionada la tecla CODE y pulse la tecla NUMBER. -
Page 75: Impresion Invertida
Esta función imprimirá los caracteres de forma que podrán leerse desde el lado adhesivo de la cinta. Con esta función hay que utilizar una cinta con adhesivo transparente. Mantenga pulsada la tecla CODE y presione la tecla MIRROR ( número de veces necesario hasta que en la pantalla aparezca “M: Para volver a la impresión normal, mantenga presionada la tecla CODE y pulse PRINT la tecla MIRROR (... -
Page 76: Avance De La Cinta
Esta función podrá utilizarse para dejar márgenes iguales en la parte izquierda y derecha de la etiqueta. Los márgenes podrán ajustarse a cuatro anchuras: 1/6” (4 mm), 2/3”(8 mm), 1/2”(12 mm), o 1”(24 mm), cuando la alimentación de la cinta esté... -
Page 77: Operacion De La Memoria De Frases
OPERACION DE LA MEMORIA DE FRASES Usted podrá utilizar la función de memoria de frases para almacenar sus mensajes utilizados con más frecuencia. Estos mensajes no se borrarán con la operación de borrado normal de mensajes (CODE + CLEAR). En la memoria de frases podrá almacenar un total de 300 caracteres. Estos 300 caracteres podrán dividirse en un total de nueve áreas, y la capacidad máxima de un área es de 55 caracteres. - Page 78 Para borrar un área de la memoria de frases : (1) Mantenga presionada la tecla CODE y pulse la tecla M.DEL. “1-9?” aparecerá en la pantalla. (2) Pulse la tecla correspondiente al área que desee borrar. En la pantalla aparecerán el número de la tecla y el comienzo del mensaje. Si ha seleccionado un número erróneo, podrá...
-
Page 79: Lista De Mensajes
LISTA DE MENSAJES BATT FULL NORM OUTL BOLD SHAD ITAL IT + O IT + B IT + S VERT A-O? 1-9? #### – TEXT UNDL BOX 1 BOX 2 BOX 3 BOX 4 Error de entrada. El tipo de cinta seleccionado es inco- rrecto. -
Page 80: Accesorios
ACCESORIOS Suministros Adquiera los cassetes de cinta, los adaptadores de CA y las cuchillas de cinta en el distribuidor autorizado más cercano. Brother no asume ningún tipo de responsabilidad por problemas causados por la utilización de suministros no autorizados. Utilice solamente cintas TZ Brother con esta máquina. No utilice cintas que no tengan la marca No. - Page 81 La mayor parte de tiendas y distribuidores tienen una línea completa de cintas- cassettes. Si desea hacer un pedido de accesorios para su P-Touch directamente a Brother, tenga la amabilidad de consultar el “Formulario de pedido de accesorios” o visítenos en línea en “http://www.brothermall.com”.
- Page 82 PROVIDED WITH A STOPPER. · USE YOUR FINGER TO TIGHTEN THE RIBBON. · INSTALL AND PRESS CODE+FEED. BROTHER INDUSTRIES, LTD. 1995~ • Please read this notice carefully before starting. Cutting tape · DO NOT PULL TAPE TO ADVANCE IT. · TO CUT TAPE, USE THE BUILT-IN CUTTER LEVER.