Advertisement
Quick Links
• Please read this instruction sheet before assembly and use.
Keep this instruction sheet for future reference, as it contains
important information.
• Adult assembly is required. Tool required: Phillips screwdriver
(not included).
• Requires four C (LR14) alkaline batteries (not included).
• Wipe this toy with a clean, damp cloth. Do not immerse.
• This toy has no consumer serviceable parts. Do not take apart.
• Prière de lire ce mode d'emploi avant d'assembler et d'utiliser le
produit. Conserver ce mode d'emploi pour s'y référer en cas de
besoin car il contient des informations importantes.
• Assemblage par un adulte requis. Outil requis : un tournevis
cruciforme (non fourni).
• Fonctionne avec quatre piles alcalines C (LR14), non incluses.
• Nettoyer le produit avec un chiffon propre et humide. Ne
pas immerger.
• Il n'existe pas de pièce de rechange pour ce produit. Ne pas
le démonter.
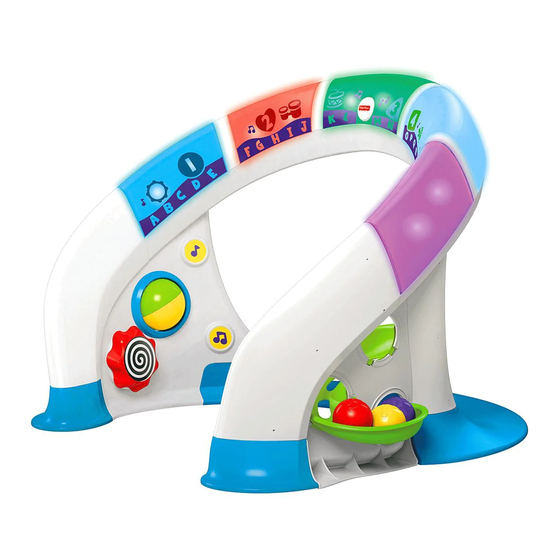
Slide the power/volume switch to
ON with high volume or
Mettre le bouton marche/volume à
MARCHE à volume fort ou
• Slide the mode switch to:
Sit & Play – Touch a block on the arch to hear a piano note
and watch the block light up! Then, wait and listen for a song
to play!
Stand & Dance – Touch a block to hear a song. Touch
any other block while a song is playing for sounds effects,
phrases and dancing lights!
Move & Explore – Touch a block to hear colors, numbers and
letters, or listen to a song. You can also listen for prompts to
play a game!
• Mettre le sélecteur de mode à :
Jeu assis – Toucher un des panneaux de l'arche pour
entendre une note de piano et voir le panneau s'illuminer.
Puis attendre quelques instants pour entendre une chanson!
Jeu debout – Toucher un panneau pour activer une chanson.
Lorsqu'une chanson joue, toucher un autre panneau pour
activer des effets sonores, des phrases et des lumières
dansantes.
Jeu d'exploration – Toucher un panneau pour apprendre les
couleurs, les chiffres et les lettres ou écouter une chanson.
Le jouet invite aussi l'enfant à jouer à un jeu!
fisher-price.ca
1
CFM96
ON with low volume,
OFF.
MARCHE à volume faible,
ARRÊT.
1 2 3
Advertisement

Related Manuals for Fisher-Price CFM96


Summary of Contents for Fisher-Price CFM96
- Page 1 CFM96 Slide the power/volume switch to ON with low volume, ON with high volume or OFF. Mettre le bouton marche/volume à MARCHE à volume faible, MARCHE à volume fort ou ARRÊT. 1 2 3 • Please read this instruction sheet before assembly and use.
-
Page 2: Fcc Statement (United States Only)
NOTE: Changes or modifications not expressly approved by the UNITED STATES manufacturer responsible for compliance could void the user’s 1-800-432-5437. Fisher-Price, Inc., 636 Girard Avenue, authority to operate the equipment. East Aurora, NY 14052. Hearing-impaired consumers: This device complies with Part 15 of the FCC Rules. Operation 1-800-382-7470. - Page 3 Assembled Parts Éléments à assembler Arch Wall with Activities Wall with Holes Arche Mur d’activités Mur troué 2 Feet (left and right) 2 pieds (gauche et droit) 2 Wide Legs (left and right) 2 Narrow Legs (left and right) 2 pattes larges (gauche et droite) 2 pattes étroites (gauche et droite) Upper Ramp Rampe supérieure...
- Page 4 Battery Installation Installation des piles Battery Safety Information In exceptional circumstances, batteries may leak fluids that can 1,5V x 4 1,5V x 4 cause a chemical burn injury or ruin your product. To avoid battery leakage: C (LR14) C (LR14) •...
-
Page 5: Assembly Assemblage
Assembly Assemblage Foot Pied Wall with Holes • When properly assembled, the wall with openings will fit to the Mur troué arch as shown. • Lorsque l’assemblage est bien effectué, le mur troué s’insère • “Snap” a foot onto the wall with holes. dans l’arche comme illustré. - Page 6 Assembly Assemblage • Insert three screws into the holes in the narrow leg and tighten. • Insert five screws into the holes in the wide leg and tighten. • Repeat steps 1-7 to assemble the remaining foot, narrow and • Insérer trois vis dans les trous de la patte étroite et les serrer. wide legs and the wall with activities.
- Page 7 Assembled Parts Éléments à assembler Upper Ramp Lower Ramp Rampe supérieure Rampe inférieure OUTSIDE VIEW VUE DE L’EXTÉRIEUR INSIDE VIEW VUE INTÉRIEURE • Fit the the scoop end of the lower ramp through the lower hole in the outside of the wall. •...
- Page 8 Assembled Parts Éléments à assembler • While pushing the upper ramp towards the wall, push the end of • When properly assembled, the lower ramp should look the lower ramp down to “snap” in place. as shown. • En poussant la rampe supérieure contre le mur, pousser le bout •...