Table of Contents
Advertisement
Available languages
Available languages
Advertisement
Chapters
Table of Contents

Related Manuals for Hyundai HRH-09UVMV

Summary of Contents for Hyundai HRH-09UVMV
- Page 1 HRH-09UVMV/HRO-09UVMV HRH-12UVMV/HRO-12UVMV UPUTSTVA ZA KORIŠTENJE/USER MANUAL...
-
Page 2: Table Of Contents
Sadržaj Specifikacije daljinskog upravljača ............02 Rukovanje daljinskim upravljačem ..........03 Tipke funkcija ..................04 Indikatori upravljača na LCD ekranu ..........05 Kako koristiti osnovne funkcije .............06 Kako koristiti napredne funkcije ...........09 NAPOMENA • Dizajn tipki zasnovan je na tipičnom modelu i može biti blago drugačiji od pravoga kojega ste kupili. -
Page 3: Specifikacije Daljinskog Upravljača
Specifikacije daljinskog upravljača RG10A1(G2S)/BGEF Model 3.0V( Dry batteries R03/LR03×2) Procijenjena voltaža Domet primanja signala Okoliš -5°C~60°C(23°F~140°F) Brza uputstva AUTO COOL HEAT UMETNITE BATERIJE ODABERITE NAČIN RADA ODABERITE TEMPERATURU AU-100% ODABERITE BRZINU USMJERITE UPRAVLJAČ PRITISNITE TIPKU ZA PREMA KLIMA UREĐAJU VENTILACIJE PALJENJE UREĐAJA NISTE SIGURNI ŠTO FUNKCIJA RADI? Pogledajte dio Kako koristiti osnovne funkcije i Kako koristiti napredne funkcije... -
Page 4: Rukovanje Daljinskim Upravljačem
Rukovanje daljinskim upravljačem Umetanje i zamjena baterija Vaš uređaj dolazi s dvije AAA baterije.Stavite ih u daljinski upravljač prije uporabe. Odstranite poklopac na poleđini daljinskog upravljača i izložite dio za baterije. Umetnite baterije i pazite da ih pravilno umetnete u odjeljak za baterije. Vratite poklopac. -
Page 5: Tipke Funkcija
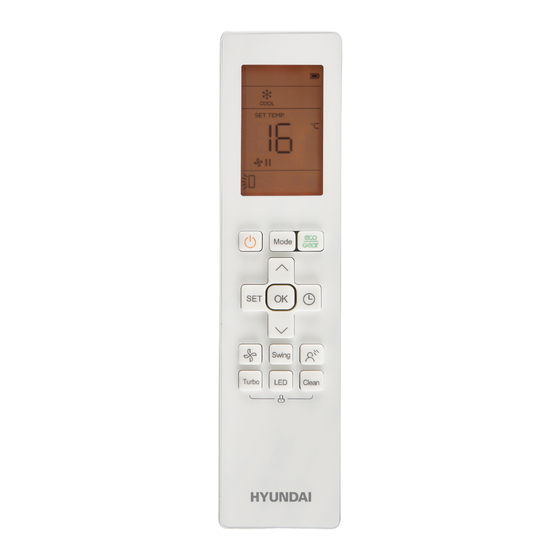
Tipke funkcija MODE ON/OFF Prođite kroz načine rada u Pali i gasi uređaj redoslijedu: AUTO COOL DRY HEAT FAN TEMP Povećava temperaturu za 1°C (1°F).Maksimalna temperatura je 30°C (86°F). NAPOMENA: Pritisnite ECO/GEAR zajedno tipke u isto Pritisnite tipku za odabir vrijeme 3 sekunde kako bi energetske efikasnosti u... -
Page 6: Indikatori Upravljača Na Lcd Ekranu
Indikatori upravljača na LCD ekranu Informacije su prikazane kada je kada je daljinski upravljač uključen. Prikaz funkcije Breeze Away Prikaz funkcije aktivnog čišćenja Prikaz funkcije Fresh Prikaz načina Sleep Prikaz funkcije Follow me Prikaz funkcije Wifi upravljanja Prijenos naredbi Prikazuje se kada je niska razina baterije Prikazuje se kada daljinski upravljač... -
Page 7: Kako Koristiti Osnovne Funkcije
Kako koristiti osnovne funkcije Osnovne funkcije POSTAVLJANJE TEMPERATURE Raspon radne temperature za uređaje je UPOZORENJE! Prije svake operacije 16-30°C(60-86°F)/20-28°C(68-82°F). provjerite da je klima uređaj uključen u Možete ju povećavati ili smanjivati u struju. razmacima od 1°C (1°F). AUTO način rada U načinu rada AUTO, uređaj će automatski odabrati način COOL (hlađenje), FAN (ventilacija) ili HEAT (grijanje) ovisno o zadanoj temperaturi. - Page 8 Način rada DRY (odvlaživanje) Pritisnite tipku MODE za odabir načina DRY. Odaberite željenu temperaturu koristeći tipke TEMP ili TEMP Pritisnite tipku ON/OFF da bi uključili uređaj. NAPOMENA: Brzina ventilacije se ne može mijenjati u načinu rada DRY. Način rada FAN (ventilacija) 1.
- Page 9 Postavljanje TAJMERA TIMER ON/OFF - Postavlja vrijeme nakon kojeg se tajmer automatski pali/gasi. TIMER ON postavke Pritisnite tipku Temp. Pritisnite tipku TIMER za Usmjerite daljinski upravljač prema više puta da biste postavili vrijeme pokretanje vremenskog uređaju i pričekajte 1 sekundu, TIMER slijeda ON.
-
Page 10: Kako Koristiti Napredne Funkcije
Kako koristiti napredne funkcije Swing funkcija Pritisnite tipku Swing Swing Swing Pritiskom na tipku Swing horizontalni Držite tipku više od 2 sekunde, pokrenut će se poklopac će se kretati gore-dolje. Pritisnite automatsko vertikalno kretanja zraka .(Ovisi o tipku još jednom kako bi zaustavili kretanje. modelu) Smjer ispuha zraka Sa svakim pristiskom na gumb, poklopac... - Page 11 ECO/GEAR funkcija Pritisnite tipku X-ECO za ulazak u način energetske efikasnosti u sljedećem redoslijedu: GEAR(75%) GEAR(50%) Prethodni način rada ECO..Napomena:Ova funkcija je dostupana samo u načinu rada COOL (hlađenje). ECO funkcija: U režimu hlađenja pritisnite ovu tipku, daljinski upravljač automatski će prilagoditi temperaturu na 24°C / 75°F, brzina ventilatora će se prebaciti na Auto radi uštede energije (samo kad je zadana temperatura manja od 24°C / 75°F).
- Page 12 Tihi način rada Držite pritisnutu tipku FAN dulje od 2 sekunde da biste aktivirali/onemogućili funkciju tihog načina rada (neke jedinice). Zbog niskofrekventnog rada kompresora, to može rezultirati nedovoljnim kapacitetom hlađenja i grijanja. Pritiskom na tipku ON/OFF, Mode, Sleep, Turbo ili Clean otkazat će se funkcija tihog rada. FP funkcija Pritisnite ovu tipku dva puta tijekom jedne sekunde u načinu HEAT (grijanje) i zadanom temperaturom od 16°C / 60°F ili 20°C / 68°F.
- Page 13 SET funkcija Pritisnite tipku SET za ulazak u postavke funkcija, a zatim pritisnite tipku SET ili tipku TEMP TEMP za odabir željene funkcije. Odabrani simbol će treptati na području zaslona, p ritisnite tipku OK za potvrdu. Da biste poništili odabranu funkciju, samo ponovite postupak. Pritisnite tipku SET za pomicanje kroz radne funkcije na sljedeći način: Breeze Away Fresh...
- Page 14 HRH-09UVMV/HRO-09UVMV HRH-12UVMV/HRO-12UVMV USER MANUAL...
- Page 15 Table of Contents Remote Controller Specifications ............02 Handling the Remote Controller ............03 Buttons and Functions ..............04 Remote Screen Indicators ..............06 How to Use Basic Functions ............07 How to Use Advanced Functions ..........10 SPECIAL NOTE • Button designs on your unit may differ slightly from the example shown. If the indoor unit does not have a particular function, pressing that function’s button on •...
-
Page 16: Remote Controller Specifications
Remote Controller Specifications RG10A(F2S)/BGEF, RG10A(F2S)/BGEFU1,RG10A1(F2S)/BGEF, RG10A2(F2S)/BGEFU1, RG10A2(F2S)/BGCEFU1, RG10A2(F2S)/BGCEF, RG10A10(F2S)/BGEF, RG10A(H2S)/BGEF, RG10A(H2S)/BGEFU1, RG10A1(H2S)/BGEF, RG10A2(H2S)/BGEFU1, RG10A2(H2S)/BGCEFU1, RG10A2(H2S)/BGCEF, RG10A10(H2S)/BGEF, RG10A(G2S)/BGEF, RG10A(G2S)/BGEFU1,RG10A1(G2S)/BGEF,RG10A2(G2S)/BGEFU1, RG10A2(G2S)/BGCEFU1, RG10A2(G2S)/BGCEF, RG10A10(G2S)/BGEF, RG10Y2(F2S)/BGEF,RG10Y2(G2S)/BGEF,RG10Y2(H2S)/BGEF . 3.0V( Dry batteries R03/LR03×2) -5°C~60°C(23°F~140°F) NOTE: For model of RG10Y2(F2S/G2S/H2S)/BGEF, If the unit is turned off under COOL, AUTO or DRY mode with the set temperature less than 24 C, the set temperature will be automatically set to 24 C when you turn on the unit again. -
Page 17: Handling The Remote Controller
Handling the Remote Controller Inserting and Replacing Batteries NOTES FOR USING REMOTE CONTROL Your air conditioning unit may come with two The device could comply with the local national batteries(some units). Put the batteries in the regulations. remote control before use. In Canada, it should comply with •... -
Page 18: Buttons And Functions
Buttons and Functions Before you begin using your new air conditioner, make sure to familiarize yourself with its remote control. The following is a brief introduction to the remote control itself. For instructions on how to operate your air conditioner, refer to the How to Use Basic Functions section of this manual. - Page 19 MODE ON/OFF Scrolls through operation modes Turns the unit on or off. as follows: AUTO COOL DRY HEAT FAN TEMP Increases temperate in NOTE: HEAT mode is not 1°C (1°F) increments. supported by the cooling only Max.
-
Page 20: Remote Screen Indicators
Remote Screen Indicators Information are displayed when the remote controller is power up. Breeze Away display Active clean feature display Fresh feature display Sleep mode display Follow me feature display Wireless control feature display Transmission Indicator Low battery detection display(If flashes) Lights up when remote sends signal to indoor MODE display... -
Page 21: How To Use Basic Functions
How to Use Basic Functions Basic operation SETTING TEMPERATURE The operating temperature range for units ATTENTION! Before operation, please is 16-30°C (60-86°F)/20-28 C(68-82 F). ensure the unit is plugged in and power You can increase or decrease the set is available. temperature in 1°C (1°F) increments. - Page 22 DRY Mode (dehumidifying) 1. Press the MODE button to select DRY. 2. Set your desired temperature using the TEMP or TEMP button. 3. Press the ON/OFF button to start the unit. NOTE: FAN SPEED cannot be changed in DRY mode. FAN Mode Press the MODE button to select FAN mode.
- Page 23 Setting the TIMER TIMER ON/OFF - Set the amount of time after which the unit will automatically turn on/off. TIMER ON setting Press TIMER button to initiate Press Temp. up or down button for Point remote to unit and wait 1sec, the ON time sequence.
-
Page 24: How To Use Advanced Functions
How to Use Advanced Functions Swing function Press Swing button Swing Swing The horizontal louver will swing up and down Keep pressing this button more than 2 seconds, automatically when pressing Swing button. the vertical louver swing function is activated. Press again to make it stop. - Page 25 ECO/GEAR function Press X-ECO button to enter the energy efficient mode in a sequence of following: GEAR(75%) GEAR(50%) Previous setting mode ECO..Note:This function is only available under COOL mode. ECO operation: Under cooling mode, press this button, the remote controller will adjust the temperature automatically to 24 C/75 F, fan speed of Auto to save energy (only when the set temperature is less than 24 C/75 F).
- Page 26 Silence function Keep pressing Fan button for more than 2 seconds to activate/disable Silence function(some units). Due to low frequency operation of compressor, it may result in insufficient cooling and heating capacity. Press ON/OFF, Mode, Sleep, Turbo or Clean button while operating will cancel silence function.
- Page 27 SET function Press the SET button to enter the function setting, then press SET button or TEMP or TEMP button to select the desired function. The selected symbol will flash on the display area, press the OK button to confirm. To cancel the selected function, just perform the same procedures as above.