Table of Contents
Advertisement
Quick Links
Orion Atlas
Francais
➊
Pour obtenir le manuel d'utilisation complet,
veuillez vous rendre sur le site Web OrionTele-
scopes.eu/fr et saisir la référence du produit dans
la barre de recherche.
➋
Cliquez ensuite sur le lien du manuel
d'utilisation du produit sur la page de description
du produit.
Deutsche
➊
Wenn Sie das vollständige Handbuch einsehen
möchten, wechseln Sie zu OrionTelescopes.de,
und geben Sie in der Suchleiste die Artikelnum-
mer der Orion-Kamera ein.
➋
Klicken Sie anschließend auf der Seite mit
den Produktdetails auf den Link des entsprech-
enden Produkthandbuches.
Español
➊
Para ver el manual completo, visite
OrionTelescopes.eu y escriba el número de
artículo del producto en la barra de búsqueda.
➋
A continuación, haga clic en el enlace al
manual del producto de la página de detalle del
producto.
Italiano
➊
Per accedere al manuale completo, visitare
il sito Web OrionTelescopes.eu. Immettere the
product item number nella barra di ricerca
➋
Fare quindi clic sul collegamento al manuale
del prodotto nella pagina delle informazioni sul
prodotto.
A N E M P L O Y E E - O W N E D C O M P A N Y
Copyright © 2021 Orion Telescopes & Binoculars. All Rights Reserved. No part of this product instruction or any of its contents
may be reproduced, copied, modified or adapted, without the prior written consent of Orion Telescopes & Binoculars.
INSTRUCTION MANUAL
™
GoTo Mount
#10010
Pro AZ/EQ-G
Corporate Offices: 89 Hangar Way, Watsonville CA 95076 - USA
Toll Free USA & Canada: (800) 447-1001
International: +1(831) 763-7000
Customer Support: support@telescope.com
IN 479 Rev. B 06/17
Advertisement
Table of Contents

Related Manuals for Orion Atlas Pro AZ/EQ-G GoTo Mount


Summary of Contents for Orion Atlas Pro AZ/EQ-G GoTo Mount
- Page 1 A N E M P L O Y E E - O W N E D C O M P A N Y Copyright © 2021 Orion Telescopes & Binoculars. All Rights Reserved. No part of this product instruction or any of its contents may be reproduced, copied, modified or adapted, without the prior written consent of Orion Telescopes &...
-
Page 2: Unpacking
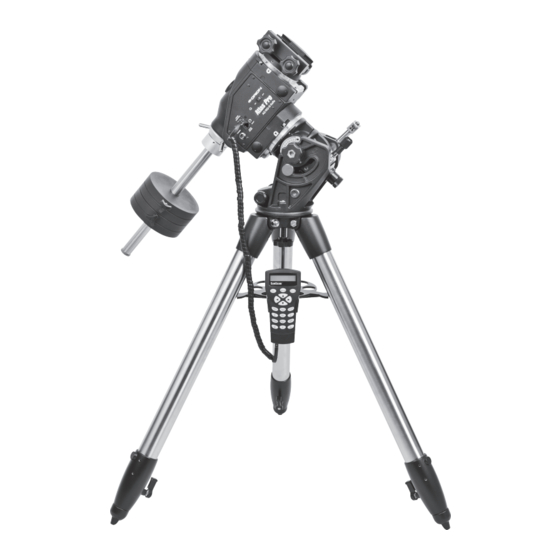
Orion Atlas Pro AZ/EQ-G GoTo Figure 1. The Atlas Pro AZ/EQ-G mount Mount. Designed for use in either alt- azimuth or equatorial modes, this ver- satile, precision GoTo mount provides a stable, high-performance platform for astronomical observing or astrophotog- raphy. -
Page 3: Table Of Contents
Accessory AZ/EQ tray mount head Camera control cable PC interface Secondary (serial) cable saddle Counterweight shaft extension Tripod SynScan hand controller Hand controller cable Set of Allen wrenches Counter- Washer Hand DC power cable weights controller Cable guide Knob bracket Figure 2. -
Page 4: Setting Up The Atlas Pro Az/Eq-G Mount
2. Setting Up the Atlas Pro AZ/EQ-G Mount Setting Up the Tripod and Mount Head Stand the tripod upright and spread the legs out as far as they will go. Make certain that the leg lock levers are tightened. Keep the tripod legs at their shortest (fully retracted) length, for now;... -
Page 5: Attaching The Counterweights
Upper knob Center Accessory support Slot tray/spreader shaft Hand controller bracket Figure 6. Hand controller bracket snaps into the slot in the Washer accessory tray. Knob Figure 4. Installing the tripod leg spreader, which doubles as an eyepiece/accessory tray. T-bolt Bubble level Figure 5. -
Page 6: Installing A Telescope On The Mount
R.A. clutch handle Dec clutch “captain’s wheel” Figure 9. The included 150mm counterweight shaft threads into the bottom of the main shaft. 75mm, wide Clamp knobs 45mm, narrow Figure 10. The primary dual-width saddle accommodates narrow Figure 8. a) Right ascension clutch. The handle can be placed in or wide dovetail plates. -
Page 7: Balancing The Telescope
anced. We will first balance the telescope with respect to the right ascension (R.A.) axis, then the declination (Dec.) axis, in Thumbscrew the equatorial mode. lock Keeping one hand on the telescope optical tube, loosen the R.A. clutch (Figure 8a). Make sure the Dec. clutch setting “captain’s wheel”... -
Page 8: Adjusting The R.a. Axis Elevation (Latitude)
in the Southern Hemisphere; the middle scale is used to indicate the right ascension in Equatorial mode when Altitude lock knobs operating in the Northern Hemisphere; the lower scale is used to indicate the azimuth angle when operating in Alt- azimuth mode. - Page 9 Alt-azimuth mode lock hole Short knob Long knob Long knob Figure 15. Single scope mount setup in Alt-Azimuth mode, with one counterweight added. Note: • When setting the mount to Equatorial mode, the longer knurled knob on the left side of the mount must first be moved to the lower threaded hole on the same side, otherwise the mount may be damaged when cranking Short knob...
-
Page 10: Mounting A Second Telescope (Alt-Azimuth Mode Only)
Mounting a Second Telescope (Alt-azimuth Secondary saddle mode only) The secondary telescope saddle (included) can be installed at Allen screw the end of the Atlas Pro mount’s counterweight shaft to mount a second telescope. Slide the counterweight shaft out and rotate it so the flat strip at the end of the shaft is facing up, then lock the shaft with the T-bolt. -
Page 11: Polar Alignment
4. Polar Alignment What Is It? When you look at the night sky, you no doubt have noticed that the stars appear to move slowly from east to west over time. That motion is actually caused by the Earth’s rotation (from Polar axis west to east). -
Page 12: Aligning The Polar Axis Scope To The R.a. Axis
Aligning the Polar Axis Scope to the R.A. Axis Before using the polar scope for polar alignment, the polar scope itself must be aligned to the mount’s R.A. axis. The reticle of the polar axis finder scope has a tiny star map printed on it that makes precise polar alignment quick and easy (Figure 21). -
Page 13: Another Way To Determine Position Of Polaris On Reticle
Now, sight Polaris in the polar axis finder scope. If it’s not in the field of view, move the mount left or right using the azimuth adjustment knobs, and adjust the altitude up or down using the jackscrew until Polaris is visible in the polar scope. -
Page 14: Drive Panel Interface
5. Drive Panel Interface Drive Panel The drive panel of the Atlas Pro AZ/EQ-G is shown in Figure Panel Interface Components: POWER: This is a threaded 12V DC power input jack that pro- vides a secure connection to the power source. The 12V DC Power LED “cigarette lighter”... -
Page 15: Other Atlas Pro Az/Eq-G Features
Internal Circuit HAND CONTROL Vpp+ RX(3.3V) Optoisolator TX(3.3V) TRIGGER Control Signal DELAYED TRIGGER 10uF/25V DEC- DEC+ POWER AUTO GUIDE SNAP Figure 25. Schematic diagram of the drive panel port circuitry. continue tracking even when a user unlocks the clutches and manually rotates the mount in R.A. - Page 16 A N E M P L O Y E E - O W N E D C O M P A N Y Copyright © 2021 Orion Telescopes & Binoculars. All Rights Reserved. No part of this product instruction or any of its contents...