Breville BES920 Instruction Book
The dual boiler
Hide thumbs
Also See for BES920:
- Instruction booklet (22 pages) ,
- Instruction book (20 pages) ,
- Descaling manual (2 pages)
Advertisement
Quick Links
Advertisement

Related Manuals for Breville BES920


Summary of Contents for Breville BES920
- Page 1 Dual Boiler ™ Instruction Book - BES920...
-
Page 2: Table Of Contents
Do not let the cord hang over SAFETY FIRST the edge of a bench or table, or become knotted. Keep away At Breville we are very safety from hot gas or electric burner, conscious. We design and or where it could touch a heated manufacture consumer oven. - Page 3 Breville Service the frequency of use of the Centre for examination, appliance and the manner in replacement or repair.
- Page 4 Never remove the SPECIFIC portafilter during the brewing INSTRUCTIONS FOR process. BES920 DUAL BOILER • Do not leave the product unattended when in use. This appliance is recommended for household use only. Do not • Do not touch hot surfaces.
- Page 5 SPECIFIC HOT SURFACES INSTRUCTIONS FOR DO NOT TOUCH WATER FILTER This symbol indicates, • Filter cartridge should be kept temperature of accessible out of reach of children. surfaces may be high when the • Store filter cartridges in a dry appliance is operating and for place in the original packaging.
-
Page 6: Features
Features TRIPLE HEAT SYSTEM ADDITIONAL FEATURES Dual Stainless-Steel Boilers Backlit LCD Dedicated espresso and steam boilers for Displays current settings and simplifies simultaneous milk texturing and espresso programming functions. extraction at the optimum temperature. High Volume Instant Steam Actively Heated Group Head Dedicated 950ml steam boiler delivers instant and continuous steam. -
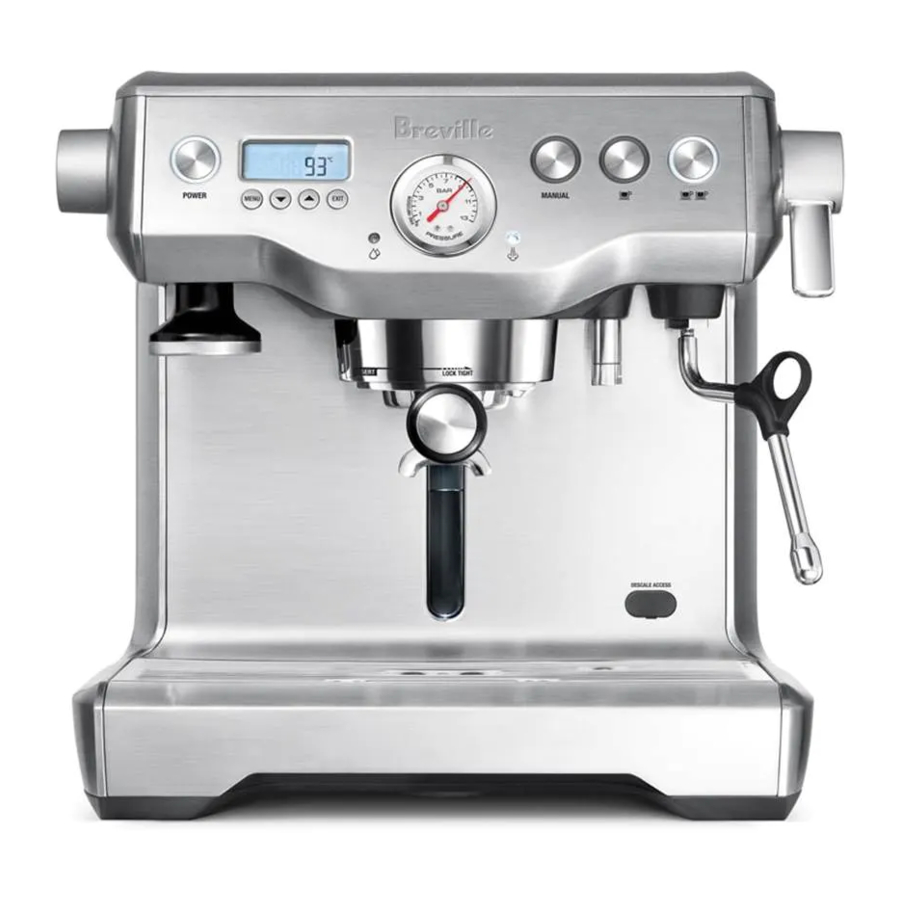
Page 7: Components
Components KNOW YOUR BREVILLE PRODUCT I. 58mm full stainless steel portafilter J. Heated cup warming tray A. Top-fill 2.5L removable water tank With integrated water filter and backlit K. 1 CUP, 2 CUP and MANUAL buttons level indicator. With preset shot durations, manual override or reprogrammable B. - Page 8 ACCESSORIES A. Stainless steel milk jug B. Water filter holder with filter C. 1 CUP & 2 CUP single wall filter baskets D. 1 CUP & 2 CUP dual wall filter baskets E. Cleaning disc F. The Razor™ precision dose trimming tool G.
-
Page 9: Operation
• Wash the filter holder with cold water. NOTE Replacing the water filter after three months or 40L will reduce the need to descale the machine. Filters can be purchased at Breville webpage. NOTE DO NOT use highly filtered, demineralised or distilled water in this machine. - Page 10 INITIAL START UP START UP • Fill tank with cold tap water. Press the POWER button to switch the machine ON. The POWER button will flash • Dip Water Hardness Test Strip into water and the LCD screen will display the current tank for 1 second &...
- Page 11 LCD INTERFACE If selected, the clock will display for 10 seconds before returning to the default shot temperature display mode. Display modes 3 modes can be displayed on the LCD screen: GENERAL OPERATION Shot Temperature, Shot Clock or Clock. The 1 CUP & 2 CUP buttons use duration to Press UP or DOWN arrow to change the control espresso volume.
- Page 12 2 CUP BUTTON NOTE Press 2 CUP button once to extract a double To stop an extraction at any time, press the shot of espresso at the preset duration (30 1 CUP, 2 CUP or MANUAL button and the seconds). The extraction will start using the machine will return to STANDBY mode.
- Page 13 Without the portafilter in place, press the NOTE button you’d like to reprogram (either 1 CUP or 2 CUP button) to start water flow from the Hot water will cease to dispense after approx. group head. Using the shot clock on the LCD, 30 seconds.
- Page 14 EXTRACTION TEMPERATURE SET CLOCK Press MENU button until ‘SHOT TEMP’ Setting the clock is optional. Press MENU flashes. The LCD will display the current button until ‘SET CLOCK’ flashes. The default shot temperature. is 12.00AM if time has not been set. Press UP or DOWN arrow to adjust the time.
- Page 15 AUTO START Press the EXIT button to set. A small clock icon will be displayed on the LCD when the Auto Start is optional. It allows you to program Auto Start function has been programmed. the specific time when the machine will automatically turn on.
- Page 16 Reset Default Settings (rSEt) Descale (dESC) Use this function to reset all programmable Select this feature to access the step by step values back to the default settings. The descale procedure on the LCD. Refer to machine has the following default settings: page 24 for the accompanying instructions.
- Page 17 PRE-INFUSION PROGRAMMING Disable AUTO OFF (A OF) With the machine on and in STANDBY mode, press UP and DOWN arrow together to enter Pre-Infusion Programming mode. Press MENU button to move between Pre-Infusion Duration (Pd) and Pre-Infusion Power (PP). Pre-Infusion Duration (Pd) The LCD will display the current Pre-Infusion Use this function to disable the Auto Off Duration.
- Page 18 ALERTS Clean Me! Indicates when 200 extractions have been STEAM LEVER beeps during heat-up carried out since the last cleaning cycle. The cleaning cycle cleans the shower screen and The machine will beep 3 times and not back-flushes the group head. For information reach operating temperature (STANDBY on how to clean the machine, refer to ‘Cleaning mode) if the STEAM LEVER is in the OPEN...
-
Page 19: Coffee Making Tips & Preparation
Coffee Making Tips & Preparation PRE-HEATING SELECTING FILTER BASKET Heating your cup or glass Single Wall Filter Baskets A warm cup will help maintain the coffee’s Use Single Wall filter baskets if grinding fresh optimal temperature. Pre-heat your cup by whole coffee beans Single Wall filter baskets rinsing with hot water from the hot water outlet allow you to experiment with grind and dose to... - Page 20 THE GRIND TRIMMING THE DOSE If grinding coffee beans, the grind size should The Razor™ precision dose trimming tool be fine but not too fine. The grind size will allows you to trim the puck to the right level for affect the rate at which the water flows through a consistent extraction.
- Page 21 PURGING THE GROUP HEAD TEXTURING MILK Before placing the portafilter into the group • Always start with fresh cold milk. head, run a short flow of water through the • Fill the jug just below the “V” at the bottom of group head by pressing and holding the 1 the spout.
- Page 22 HINTS & TIPS • Fresh, quality coffee beans will give you the best possible extraction. • We recommend quality 100% Arabica beans with a ‘Roasted On’ date stamped on the bag, not a ‘Best Before’ or ‘Use By’ date. • Coffee beans are best consumed between 5–20 days after the ‘Roasted On’...
-
Page 23: Care, Cleaning & Storage
Replacing the water To purchase water filters, visit filter after three months or 40L will reduce the Breville webpage. need to descale the machine. The limitation of 40L is based on water hardness level 4. If you are in level 2 area, you WARNING can increase this to 60L. - Page 24 CLEANING THE STEAM WAND CLEANING THE DRIP TRAY & STORAGE TRAY • Immediately after texturing milk, wipe the steam wand with a damp cloth and purge by • The drip tray should be removed, lifting the STEAM LEVER for a few seconds. emptied and cleaned after each use or when the drip tray indicator is showing •...
- Page 25 1 – Prepare for Descale 2 – Empty Boilers a) Empty the drip tray and insert a) Remove the grey silicone cover on the into position. lower front panel marked DESCALE ACCESS. Place a cloth over the drip tray b) Turn the machine off and allow to cool to stop steam escaping.
- Page 26 When the water is completely empty, close the a) Place a cloth over the drip tray to stop valve by rotating screws clockwise until sealed. steam escaping. Do not over tighten screws to avoid damages b) Empty boilers by repeating to the valves.
-
Page 27: Troubleshooting
Screw tip back onto the steam wand using the integrated spanner in the cleaning tool. The machine is on but Turn machine off. Wait for 60 minutes and turn machine ceases to operate back on. If problem persists, call Breville Consumer Support. - Page 28 Steam pouring out Turn machine off. Wait for 60 minutes and turn machine of group head back on. If problem persists, call Breville Consumer Support. Espresso only drips • Coffee is ground too finely. Use slightly coarser grind. from the portafilter •...
- Page 29 3 suggestions above (finer grind, increase dose, increase tamp). If the pressure gauge reads below 5 bar, call Breville Consumer Support. • Coffee beans are stale. Use freshly roasted coffee beans with a ‘Roasted On’ date and consume between 5–20...
- Page 30 LCD will display a clock icon when the Auto Start time is programmed. E1, E2 or E3 error • An error that cannot be Call Breville Consumer reset by the user has Support. message on LCD occurred. Coffee puck is sticking •...
- Page 31 PROBLEM POSSIBLE CAUSES WHAT TO DO Too much • Coffee is ground • Adjust the grind size slightly too coarsely. coffee extracted finer. Tamp then use the Razor™ dose trimming tool to trim off excess coffee. • Shot duration/ volume •...
-
Page 32: Coffee To Try
Coffee to Try CAPPUCCINO A single shot of espresso with textured milk and garnished with drinking chocolate. ESPRESSO Intense and aromatic, it is also known as short black and is served in a small cup or glass. LATTÉ A latté consists of a single espresso with textured milk and approximately 10mm of foam. - Page 33 Notes...
- Page 34 Notes...
- Page 35 Notes...
- Page 36 ® Breville, the Breville logo, Barista Pro, ThermoJet, the Razor and Master Every Moment are trademarks of Breville Pty Ltd (“Breville”). A.B.N. 98 000 092 928. Copyright Breville Pty. Ltd. 2021. Due to continued product improvement, the products illustrated/photographed in this brochure may vary slightly from the actual product.