Table of Contents

Related Manuals for Crosley C100BT


Summary of Contents for Crosley C100BT
- Page 1 Turntable Instruction Manual Questions, problems, missing parts? Before returning to the store, call Customer Service 8 a.m. – 6 p.m., EST, Monday – Friday 1-888-CROSLEY www.crosleyradio.com...
-
Page 2: Important Safety Instructions
English Important Safety Instructions Read and understand this entire manual before using this product. Keep these instructions for future reference. Read these instructions carefully. Keep these instructions for later reference. Heed all warnings. Follow all instructions. Do not use the device near water. Clean only with a dry cloth. -
Page 3: Specifications
• Turntable slip mat • Headshell • 45 RPM adapter • Tonearm Counterweight • RCA Cable Please contact Crosley customer service if there is any accessory missing from the package. Retain the original packaging materials for exchange or return purposes. Specifications Power... -
Page 4: Product Description
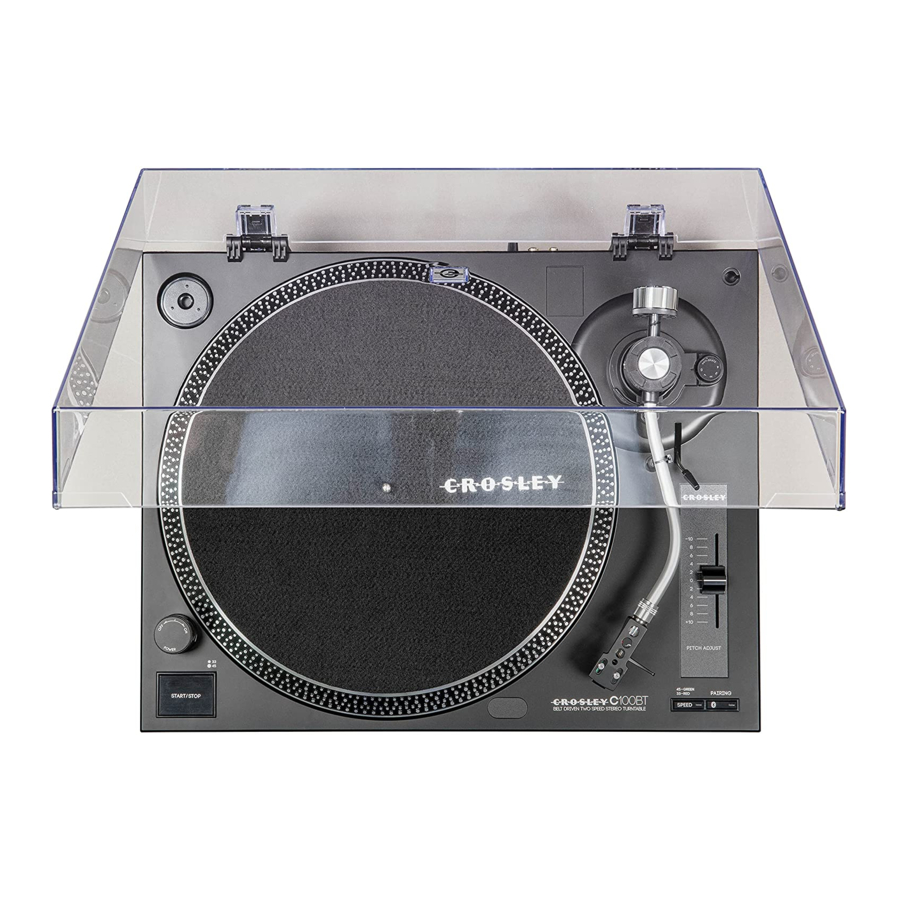
English Product Description 1. 45 RPM Adapter 14. Tonearm Rest 2. Turntable Platter 15. Hold Down Clip 3. Turntable Spindle 16. Tonearm 4. Strobe Dots 17. Pitch Control 5. Power Knob 18. Headshell Locking Ring 6. Start/Stop Button 19. Headshell 7. -
Page 5: Initial Setup
English Initial Setup Essential Setup 1. Place the unit on a flat and level surface. The selected location should be stable and free from vibration. 2. Install the turntable lid to the hinges. 3. Remove the tie-wrap that is holding the tonearm. 4. - Page 6 English Turntable Platter and Belt Setup 1. Install the drive belt over the inner ring under the platter and make sure it won’t fall off during the setup. 2. Place the platter through the turntable spindle, then rotate the platter until you see the drive motor pulley through the window at the top right corner.
-
Page 7: Turntable Operation
English Turntable Operation 1. Turn the Power Knob clockwise to turn on the power. 2. Set the Speed Switch accordingly Note: When 33 RPM is selected the Speed Switch LED will be red. When 45 RPM is selected the Speed Switch LED will be green. 3. -
Page 8: Bluetooth Operation
English Bluetooth Operation This turntable features Bluetooth output which is a device that transmits audio from this turntable to another Bluetooth device such as wireless Bluetooth headphones, Bluetooth speakers, or other Bluetooth receiving devices. When connecting a new Bluetooth device to receive a signal from the turntable, you need to pair it with the product. -
Page 9: Needle Replacement
English 5. To turn off the Bluetooth connect, press the Bluetooth Pairing Button and the LED will be red. Note: - You can connect up to 8 different Bluetooth devices. - You can delete all previous connected devices by pressing and holding the Bluetooth Pairing Button for 10 seconds, and then releasing it. -
Page 10: Cartridge Replacement
English Installing Needle 1. To install, position new needle with stylus tip facing down. 2. Align the needle with the cartridge, and gently push onto cartridge until fully seated. Avoid touching the stylus tip during installation. Cartridge Replacement 1. Before replacement, put the stylus protector back on the stylus to prevent damage to the stylus during the replacement process. -
Page 11: Troubleshooting
Note: Do not use cleanser other that contains alcohol, benzene or any other harsh chemicals, which might damage the paint and finish of the turntable. ** Crosley offers a product line of different cleaning accessories. Please ask your retailer or check out our website www.crosleyradio.com for more cleaning product information. -
Page 12: Fcc Statements
English FCC Statements This equipment has been tested and found to comply with the limits for a Class B digital device, pursuant to Part 15 of the FCC Rules. These limits are designed to provide reasonable protection against harmful interference in a residential installation. This equipment generates, uses, and can radiate radio frequency energy and, if not installed and used in accordance with the instructions, may cause harmful interference to radio communications. - Page 13 ¿Tiene preguntas, ha tenido problemas o hay piezas faltantes? Antes de devolver el producto a la tienda, comuníquese con nuestro Servicio al Cliente de 8 a. m. a 6 p. m., hora del este, de lunes a viernes 1-888-CROSLEY www.crosleyradio.com...
-
Page 14: Instrucciones De Seguridad Importantes
Español Instrucciones de seguridad importantes POR FAVOR LEA CON MUCHO CUIDADO LAS PRÉCAUCIONES SIGUIENTES QUE SE APLICAN À SU EQUIPO. Lea atentamente estas instrucciones. Guarde estas instrucciones para futuras consultas. Preste atención a todas las advertencias. Siga todas las instrucciones. No utilice el dispositivo cerca del agua. -
Page 15: Especificaciones
• Adaptador de 45 rpm • Contrapeso del brazo del tocadiscos Comuníquese con el Servicio al Cliente de Crosley en caso de que faltara algún accesorio en el empaque. Conserve el material de embalaje original para realizar cambios o devoluciones. -
Page 16: Descripción Del Producto
Español Descripción del producto 1. Adaptador de 45 rpm 13. Palanca de indicación 2. Bandeja del tocadiscos 14. Soporte del brazo del tocadiscos 3. Eje del tocadiscos 15. Broche de sujeción 4. Puntos estroboscópicos 16. Brazo del tocadiscos 5. Perilla de encendido 17. -
Page 17: Instalación Inicial
Español Instalación inicial Instalación indispensable 1. Coloque la unidad en una superficie plana y nivelada. El lugar seleccionado debe ser estable y estar libre de vibraciones. 2. Instale la tapa del tocadiscos en las bisagras. 3. Quite la banda de sujeción que sostiene el brazo del tocadiscos. 4. -
Page 18: Conexión Del Sistema Estéreo
Español Instalación de la bandeja y la correa del tocadiscos 1. Instale la correa de transmisión en el anillo interior debajo de la bandeja y asegúrese de que no se salga durante la instalación. 2. Coloque la bandeja a través del eje del tocadiscos y luego gírela hasta que observe la polea de motor de accionamiento a través de la ventana que se encuentra en la esquina superior derecha. -
Page 19: Funcionamiento Del Tocadiscos
Español − Si el interruptor para Fono/Línea está en la posición FONO pero el conector RCA está conectado a la entrada de línea del sistema estéreo, el volumen será muy bajo debido a la falta de preamplificación de la señal. −... -
Page 20: Funcionamiento De Bluetooth
Español Funcionamiento de Bluetooth Este tocadiscos cuenta con salida Bluetooth, que es un dispositivo que transmite audio desde este tocadiscos a otro dispositivo Bluetooth, como audífonos Bluetooth inalámbricos, altavoces Bluetooth u otros dispositivos receptores Bluetooth. Al conectar un nuevo dispositivo Bluetooth para recibir una señal del tocadiscos, debe emparejarlo con el producto. -
Page 21: Ajuste De Control De Tono
Español 5. Para apagar la función Bluetooth, presione el botón de emparejamiento Bluetooth y el LED aparecerá rojo. Nota: - Puede conectar hasta 8 dispositivos Bluetooth diferentes. - Puede eliminar todos los dispositivos conectados anteriormente presionando y manteniendo presionado el botón de emparejamiento Bluetooth durante 10 segundos y luego soltándolo. - Page 22 Español Instalar la aguja 1. Para instalarla, coloque la aguja nueva con la punta de la aguja fonográfica hacia abajo. 2. Alinee la aguja con el cartucho y empuje suavemente sobre el cartucho hasta que esté completamente asentada. Evite tocar la punta de la aguja fonográfica durante la instalación.
-
Page 23: Solución De Problemas
Nota: No utilice otros limpiadores que contengan alcohol, benceno o cualquier otro químico agresivo que pueda dañar la pintura y la terminación del tocadiscos. ** Crosley ofrece una línea de productos de distintos accesorios de limpieza. Para obtener más información acerca de los productos de limpieza, consulte a un comerciante o visite nuestro sitio web www.crosleyradio.com. - Page 24 Español Declaraciones de la FCC Este equipo se verificó y se comprobó que cumple con los límites para un dispositivo digital clase B, conforme a la Sección 15 de las reglas de la FCC. Estos límites están diseñados para brindar una protección razonable frente a interferencia perjudicial en un establecimiento residencial.
- Page 25 Platine tourne-disque Manuel d’utilisation Des questions, problèmes, pièces manquantes? Avant de retourner au magasin, appelez le service à la clientèle De 8 h à 18 h, HNE, du lundi au vendredi 1-888-CROSLEY www.crosleyradio.com...
-
Page 26: Instructions De Sécurité Importantes
Français Instructions de sécurité importantes VEUILLEZ LIRE ATTENTIVEMENT LES PRÉCAUTIONS SUIVANTES QUI S’APPLIQUENT À VOTRE ÉQUIPEMENT. Lisez attentivement ces instructions. Conservez ces instructions pour référence ultérieure. Tenez compte de tous les avertissements. Suivez toutes les instructions. N'utilisez pas l'appareil à proximité de l'eau. Nettoyez uniquement avec un chiffon sec. -
Page 27: Contenu De La Trousse
• Porte-cellule • Adaptateur 45 tours • Contrepoids du bras de lecture Veuillez contacter le service à la clientèle de Crosley s'il manque des accessoires dans la trousse. Conservez les emballages d'origine pour procéder à un échange ou à un retour. -
Page 28: Description Du Produit
Français Description du produit 1. Adaptateur 45 tours 13. Levier de déplacement 2. Plateau du tourne-disque 14. Support du bras de lecture 3. Axe du tourne-disque 15. Attache de retenue 4. Points stroboscopiques 16. Bras de lecture 5. Bouton d'alimentation 17. -
Page 29: Configuration Initiale
Français Configuration initiale Configuration de base 1. Placez l’appareil sur une surface plane. L’emplacement choisi doit être stable et sans vibration. 2. Installez le couvercle du tourne-disque sur les charnières. 3. Retirez l’attache qui retient le bras de lecture. 4. Installez comme il se doit le plateau du tourne-disque et la courroie d'entraînement 5. - Page 30 Français Configuration du plateau du tourne-disque et de la courroie 1. Installez la courroie d'entraînement sur la bague intérieure sous le plateau et vérifiez qu'elle ne tombe pas pendant la configuration. 2. Passez le plateau par la broche du tourne-disque, puis faites pivoter le plateau jusqu'à...
-
Page 31: Utilisation Du Tourne-Disque
Français − Si le commutateur Phono/Line (Phono/ligne) est en position PHONO (PHONO), mais que la prise RCA est branchée à l'entrée ligne du système stéréo, le volume sera très bas à cause de l'absence de préamplification du signal. − La prise RCA n'est pas conçue pour être branchée directement aux haut-parleurs passifs/qui ne sont pas sous tension, et si cela arrive, le volume sera très bas. -
Page 32: Utilisation Du Bluetooth
Français Utilisation du Bluetooth Ce tourne-disque est doté d’une sortie Bluetooth qui transmet l’audio de ce tourne- disque à un autre appareil Bluetooth comme un casque sans fil, des haut-parleurs ou d’autres appareils de réception Bluetooth. Lorsque vous connectez un nouvel appareil Bluetooth pour recevoir un signal du tourne-disque, vous devez le jumeler au produit. -
Page 33: Remplacement De L'aiguille
Français 5. Pour désactiver la fonction Bluetooth, appuyez sur le bouton de jumelage Bluetooth et le voyant DEL changera au rouge. Remarque : - Vous pouvez connecter jusqu’à huit appareils Bluetooth différents. - Vous pouvez supprimer tous les appareils connectés précédents en appuyant sur le bouton jumelage Bluetooth et en le maintenant enfoncé... -
Page 34: Remplacement De La Cartouche
Français 2. Alinee la aguja con el cartucho y empuje suavemente sobre el cartucho hasta que esté completamente asentada. Evite tocar la punta de la aguja fonográfica durante la instalación. Remplacement de la cartouche 1. Avant le remplacement, remettez en place la protection du stylet pour éviter d'endommager le stylet pendant le processus de remplacement. -
Page 35: Dépannage
Remarque : Ne pas utiliser d'autre nettoyant contenant de l'alcool, du benzène ou tout autre produit chimique nocif qui pourrait endommager la peinture et la finition du tourne-disque. ** Crosley propose toute une gamme d'accessoires de nettoyage. Veuillez contacter votre détaillant ou consulter notre site Web www.crosleyradio.com pour obtenir plus d'informations sur les produits de nettoyage. - Page 36 Français Déclarations relatives à la FCC Ce matériel a été testé et jugé en conformité avec les limites pour un appareil numérique de Classe B, conformément à la partie 15 des règles de la FCC. Ces limites ont été établies pour offrir une protection raisonnable contre l’interférence nuisible dans une installation résidentielle.
- Page 37 Caution: This device complies with Part 15 of the FCC rules and Industry Canada license‐exempt RSS standard(s). Operation is subject to the following two conditions: (1) this device may not cause harmful interference, and (2) this device must accept any interference received, including interference that may cause undesired operation. The manufacturer is not responsible for any radio or TV interference caused by unauthorized modifications ...