Advertisement
Available languages
Available languages
Quick Links
Page 1 of 24
LP0264
FITTING INSTRUCTIONS FOR LP0264BK LICENCE PLATE BRACKET
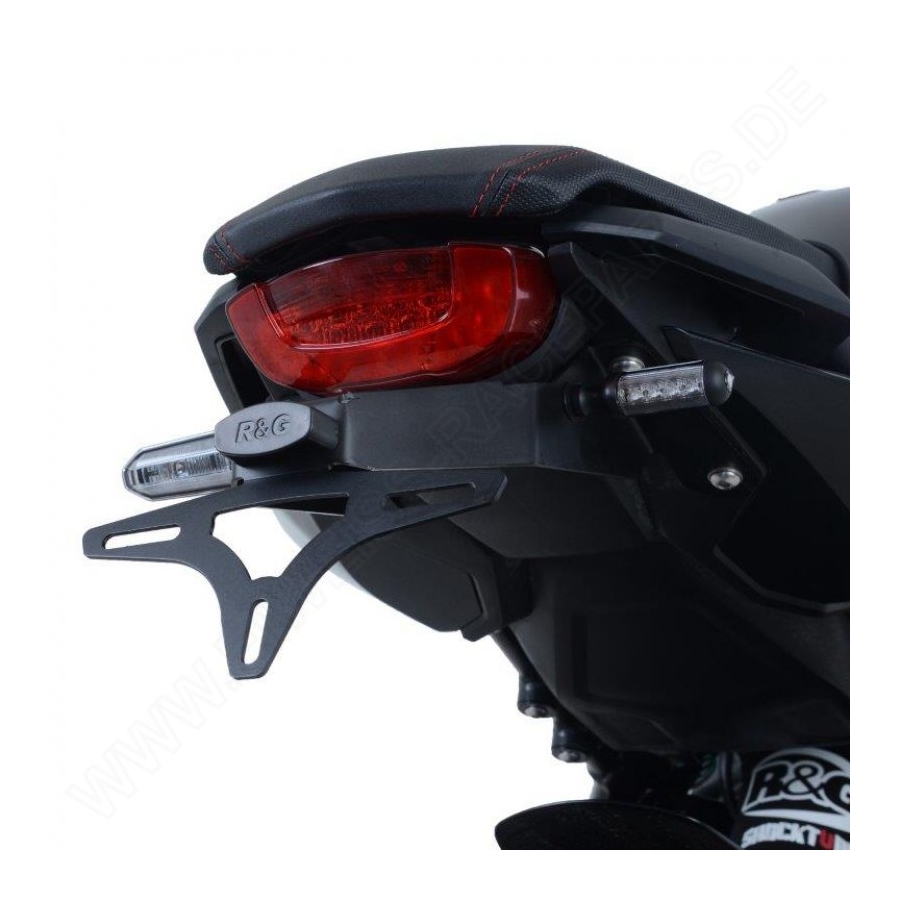
HONDA CB650R & CBR650R 2019-
THIS KIT CONTAINS THE ITEMS PICTURED AND LABELLED BELOW.
DO NOT PROCEED UNTIL YOU ARE SURE ALL PARTS ARE PRESENT.
Please note that the way the kit is packed does not necessarily represent the way of
mounting to the bike.
T
(
).
HE PARTS SHOWN MAY BE REPRESENTATIVE ONLY
FOR CLARITY OF INSTRUCTIONS ONLY
Please note that in cases where kits are packed with rubber washers holding the
components onto the bolt – the rubber washers should be thrown away!
Digital copies of these instructions are available to download from
www.rg-racing.com
R&G
Unit 1, Shelley's Lane, East Worldham, Alton, Hampshire, GU34 3AQ
Tel: +44 (0)1420 89007 Fax: +44 (0)1420 87301
www.rg-racing.com
Email:
info@rg-racing.com
Advertisement

Related Manuals for R&G LP0264BK


Summary of Contents for R&G LP0264BK
- Page 1 Page 1 of 24 LP0264 FITTING INSTRUCTIONS FOR LP0264BK LICENCE PLATE BRACKET HONDA CB650R & CBR650R 2019- THIS KIT CONTAINS THE ITEMS PICTURED AND LABELLED BELOW. DO NOT PROCEED UNTIL YOU ARE SURE ALL PARTS ARE PRESENT. Please note that the way the kit is packed does not necessarily represent the way of mounting to the bike.
- Page 2 Page 2 of 24 LP0264 R&G Unit 1, Shelley’s Lane, East Worldham, Alton, Hampshire, GU34 3AQ Tel: +44 (0)1420 89007 Fax: +44 (0)1420 87301 www.rg-racing.com Email: info@rg-racing.com...
-
Page 3: Tools Required
Page 3 of 24 LP0264 LEGEND ITEM 1 = TB0264 LICENCE PLATE MOUNTING BRACKET (WITH 4 x SPACERS INSTALLED) ITEM 2 = LA0002 No PLATE LIGHT ASSEMBLY (INCLUDES SHROUD) ITEM 3 = SMW0146 No PLATE LIGHT GUARD ITEM 4 = M8x1.25x20mm LONG BUTTON HEAD BOLTS (4) ITEM 5 = M8 WASHERS 16mm O/DIA (4) ITEM 6 = I0049 INDICATOR ADAPTORS (4) ITEM 7 = I0050 INDICATOR SPACERS (4) - Page 4 Page 4 of 24 LP0264 Picture 1 Picture 2 Picture 3 Picture 4 R&G Unit 1, Shelley’s Lane, East Worldham, Alton, Hampshire, GU34 3AQ Tel: +44 (0)1420 89007 Fax: +44 (0)1420 87301 www.rg-racing.com Email: info@rg-racing.com...
- Page 5 Page 5 of 24 LP0264 Picture 5 Picture 6 Picture 7 Picture 8 R&G Unit 1, Shelley’s Lane, East Worldham, Alton, Hampshire, GU34 3AQ Tel: +44 (0)1420 89007 Fax: +44 (0)1420 87301 www.rg-racing.com Email: info@rg-racing.com...
- Page 6 Page 6 of 24 LP0264 Picture 9 Picture 10 Picture 11 Picture 12 R&G Unit 1, Shelley’s Lane, East Worldham, Alton, Hampshire, GU34 3AQ Tel: +44 (0)1420 89007 Fax: +44 (0)1420 87301 www.rg-racing.com Email: info@rg-racing.com...
- Page 7 Page 7 of 24 LP0264 Picture 13 Picture 14 Picture 15 Picture 16 R&G Unit 1, Shelley’s Lane, East Worldham, Alton, Hampshire, GU34 3AQ Tel: +44 (0)1420 89007 Fax: +44 (0)1420 87301 www.rg-racing.com Email: info@rg-racing.com...
- Page 8 Page 8 of 24 LP0264 Picture 17 Picture 18 Picture 19 Picture 20 R&G Unit 1, Shelley’s Lane, East Worldham, Alton, Hampshire, GU34 3AQ Tel: +44 (0)1420 89007 Fax: +44 (0)1420 87301 www.rg-racing.com Email: info@rg-racing.com...
-
Page 9: Fitting Instructions
Page 9 of 24 LP0264 FITTING INSTRUCTIONS • Remove both seats, using the lock under the tail for the passenger seat. Then using a 5mm allen key, remove the 2 rider seat bolts as shown in pictures 1 and 2. •... - Page 10 Page 10 of 24 LP0264 • Fit one length of heat shrink (Item 11) over each pair of indicator wires and heat with a hot air gun or hair dryer to neatly hold and protect the wires. • To assemble your R&G tail tidy with mini indicators, you will need to use the indicator adapter plates (item 6) included with the kit.
- Page 11 Page 11 of 24 LP0264 • Place the pre-fitted tail bracket spacers into the recesses left by the OEM unit and use your 5mm allen key to affix to the bike using the 4 x M8 spacers (item 5) and 4 x 20mm M8 Button head bolts (item 4) as shown in picture 18.
- Page 12 Page 12 of 24 LP0264 NOTICE DE MONTAGE POUR LP0264BK SUPPORT DE PLAQUE HONDA CB650R & CBR650R 2019- Le kit contient les articles exposés ci-dessous, vérifier que toutes les pièces soient présentes avant de procéder au montage. La façon dont le kit est emballé ne correspond pas forcément à la façon de monter les pièces sur la moto.
- Page 13 Page 13 of 24 LP0264 R&G Unit 1, Shelley’s Lane, East Worldham, Alton, Hampshire, GU34 3AQ Tel: +44 (0)1420 89007 Fax: +44 (0)1420 87301 www.rg-racing.com Email: info@rg-racing.com...
-
Page 14: Outils Requis
Page 14 of 24 LP0264 LÉGENDE ARTICLE 1 = TB0264 SUPPORT DE PLAQUE (AVEC 4 x ENTRETOISES INSTALLÉES) ARTICLE 2 = LA0002 ASSEMBLAGE FEU DE PLAQUE (INCLUS PROTECTION) ARTICLE 3 = SMW0146 PROTECTION FEU DE PLAQUE ARTICLE 4 = M8x1.25x20mm BOULONS (4) ARTICLE 5 = M8 RONDELLES 16mm (4) ARTICLE 6 = I0049 ADAPTATEURS DE CLIGNOTANTS (4) ARTICLE 7 = I0050 ENTRETOISES DE CLIGNOTANT (4) - Page 15 Page 15 of 24 LP0264 • À l'aide d'une clé Allen de 8 mm, retirez les 4 boulons qui connectent l'unité de plaque d'immatriculation d’origine à la moto (comme indiqué sur la photo 4) et éloignez-le de la moto avec précaution, tout en passant les 3 fils déconnectés à travers l'ouverture en plastique du support de plaque gauche, comme indiqué...
- Page 16 Page 16 of 24 LP0264 entretoise sur le fil de clignotant avec la plus grande surface contre le corps de clignotant. • Faites passer le fil et l’entretoise de clignotant dans l’un des supports de clignotant situé sur le support arrière. Passez la deuxième plaque d’adaptateur de clignotant sur le fil dénudé, de manière à...
- Page 17 Page 17 of 24 LP0264 • Placez les entretoises de queue pré-montées dans les renfoncements laissés par l’unité d’origine puis utilisez votre clé Allen de 5mm pour fixer sur la moto à l’aide des 4 entretoises M8 (article 5) et de 4 boulons M8 (article 4) montrés sur la photo 18. •...
- Page 18 Page 18 of 24 LP0264 MONTAGEANLEITUNG FÜR LP0264BK KENNZEICHENHALTER HONDA CB650R & CBR650R 2019- ALLE KIT-TEILE SIND UNTEN ABGEBILDET UND GEKENNZEICHNET. BEVOR SIE MIT DER MONTAGE BEGINNEN, ÜBERPRÜFEN SIE, DASS ALLE TEILE VORHANDEN SIND. Hinweis: Die Verpackung der Teile stellt nicht die Reihenfolge der Montage dar.
- Page 19 Page 19 of 24 LP0264 R&G Unit 1, Shelley’s Lane, East Worldham, Alton, Hampshire, GU34 3AQ Tel: +44 (0)1420 89007 Fax: +44 (0)1420 87301 www.rg-racing.com Email: info@rg-racing.com...
-
Page 20: Sie Benötigen Folgendes Werkzeug
Page 20 of 24 LP0264 LIEFERUMFANG ARTIKEL 1 = TB0264 KENNZEICHENHALTER (MIT 4 VORINSTALLIERTEN DISTANZHALTER) ARTIKEL 2 = LA0002 KENNZEICHENBELEUCHTUNG (INKL. ABDECKUNG) ARTIKEL 3 = SMW0146 SCHUTZ- KENNZEICHENHALTERLICHT ARTIKEL 4 = M8x1,25x20mm INBUSSCHRAUBE (4) ARTIKEL 5 = M8 UNTERLEGSCHEIBE 16mm O/DIA (4) ARTIKEL 6 = I0049 BLINKER-ADAPTER (4) ARTIKEL 7 = I0050 DISTANZHALTER BLINKER (4) ARTIKEL 8 = IWC0002 ABDECKUNGEN FÜR VERKABELUNG DER MINIBLINKER (2) - Page 21 Page 21 of 24 LP0264 MONTAGEANLEITUNG • Entfernen Sie beide Sitze – das Schloss ist am Heck unter dem Beifahrersitz. Danach Die zwei Schrauben am Fahrersitz mit einem 5mm Inbusschlüssel entfernen – siehe Abbildungen 1 und 2. • Die original Verbindungen für die Blinker und die Kennzeichenbeleuchtung unter dem Sitz orten.
- Page 22 Page 22 of 24 LP0264 Wenn Sie R&G Miniblinker verwenden: HINWEIS: 1 x Satz RGR0002 Widerstände (separat erhältlich) werden eventuell benötigt, um die richtige Blitzgeschwindigkeit einzustellen. • Den Kennzeichenhalter zur Seite legen und vorsichtig aufbewahren, so dass das Motorrad kann, wenn erwünscht, wieder zum Originalzustand umgebaut werden. •...
- Page 23 Page 23 of 24 LP0264 • Benutzen Sie einen 6mm Steckschlüssel, um die Einheit mit den zwei Unterlegscheiben und Muttern zu befestigen. • Einen CON0009 Verbinder für die Kennzeichenbeleuchtung (Artikel entsprechenden Kabelverbindung für die Kennzeichenbeleuchtung verbinden Einheit am Motorrad montieren •...
- Page 24 Page 24 of 24 LP0264 AUSGABE 1 18/03/19 (DM) CONSUMER NOTICE The catalogue description and any exhibition of samples are only broad indications of the Products and R&G may make design changes which do not diminish their performance or visual appeal and supplying them in such state shall conform to the order. The Buyer acknowledges no representation or warranty (other than as to title) has been given or will apply to the Products other than those in R&G’s order or confirmation and the Buyer confirms it has chosen the Products as being of merchantable quality and suitable for its particular purposes.