Bosch spexor Original Instructions Manual
Mobile danger warning device
Hide thumbs
Also See for spexor:
- Original instructions manual (54 pages) ,
- Original instructions manual (56 pages)
Table of Contents
Advertisement
Quick Links
Advertisement
Table of Contents

Related Manuals for Bosch spexor


Summary of Contents for Bosch spexor
- Page 1 Original instructions English...
- Page 2 – Note – Since these instructions were printed, additional functions may have been implemented which are not described here. You can download the current operating instructions describing all additional functions from www.spexor-bosch.com. English | 2...
-
Page 3: Table Of Contents
Contents About this manual 4 Safety 5 Description 11 Commissioning 21 Operation 28 Monitoring 29 Alarm functions 41 Charging the battery 44 Updating 45 Switching off and storage 50 Maintenance and service 51 Legal notice 57 English | 3... -
Page 4: About This Manual
– Quick Start Guide from the scope of delivery – Current operating instructions describing all functions added since the last printing of this manual are available at www.spexor-bosch.com. Presentation of information Hazards and instructions are marked as follows in this user manual: –... -
Page 5: Safety
▷ Carry out all work exclusively according to the complete operating instructions. ▷ Only operate spexor if it is in a technically flawless condition. ▷ Keep the operating instructions and Quick Start Guide in a safe place. Don't throw either one away! - Page 6 The mobile alarm device spexor monitors its environment with various sensors and triggers an alarm in case of deviations. spexor should only be used in closed rooms or vehicles and only in dry environments. spexor may only be used in a normal household environ- ment or in vehicles and under no circumstances in parti- cularly critical areas.
- Page 7 Safety Hazards No modifications to the alarm device! Modifications to the alarm device can result in hazardous damage to the battery, short circuit and malfunction. Do not modify the alarm device in any way. Do not open the alarm device. The alarm device does not contain any components that you can maintain or replace.
- Page 8 Safety Hazardous vapors or liquids! If the device and battery are damaged, vapors or flammable liquids may escape from the battery. The vapors can irritate the respiratory system. Ventilate the area with fresh air and seek medical help in case of complaints. Leaking battery fluid may cause skin irritation or burns.
- Page 9 Safety Loud alarm signal! If an alarm is triggered, the audio module of the alarm device emits an acoustic signal that is loud enough to damage your hearing. Do not hold the alarm device directly against your ears or those of other people.
- Page 10 Safety Damaged or entangled charging cable! Damaged or tangled charging cables can result in a short circuit. Do not misuse the charger cable for other purposes, such as carrying or hanging the alarm device or to pull the plug from the electrical socket. Keep the charger cable away from heat, oil, sharp edges, tools and other machines.
-
Page 11: Description
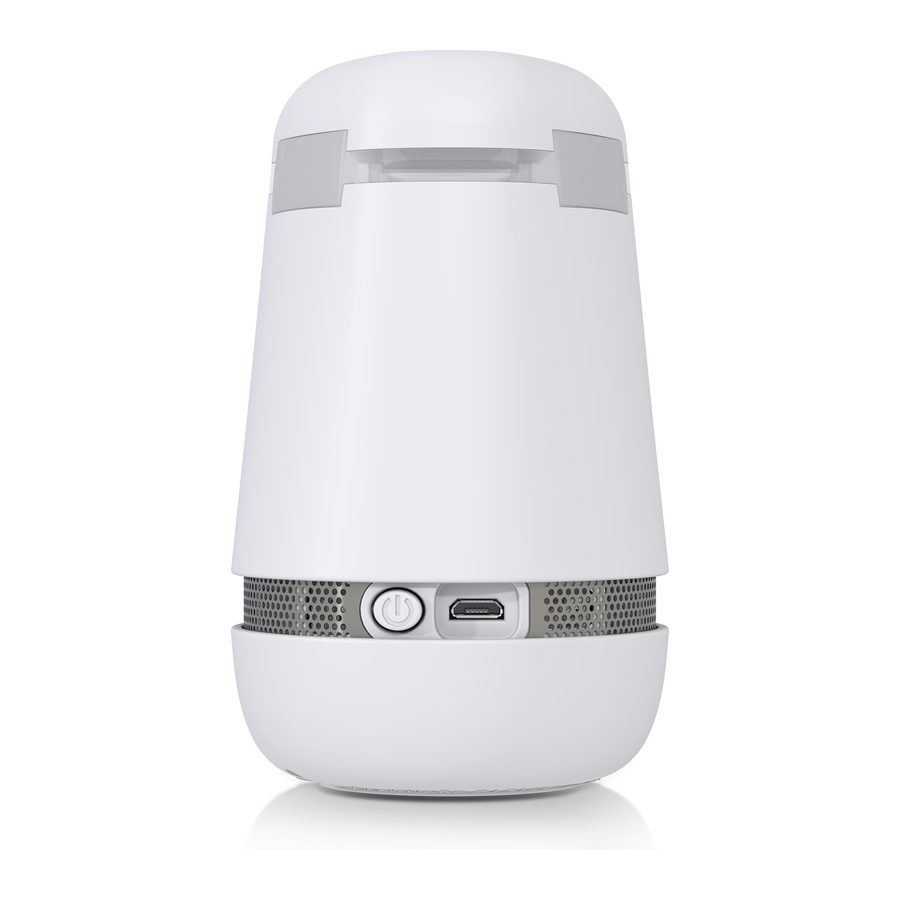
Description Scope of delivery – Alarm device spexor ▷ Check that all items have been delivered. Do not – Power supply unit use damaged parts. – USB charger cable – Operating instructions – Quick Start Guide with QR code English | 11... - Page 12 Description Components Infrared motion sensor LED array bar ON/OFF switch Micro-USB port Sound bar, behind it there are further sensors (e.g. pressure, sound) Keypad with LED English | 12...
- Page 13 English | 13...
- Page 14 Bluetooth®. White Short continuous light-up: Switch on at the ON/OFF switch. Short flashes: spexor is still switched on if it is touched or moved while monitoring is deactivated. Short flashes every 30 seconds: spexor is active when monitoring is activated.
- Page 15 Description Green Six flashes sequentially emitted all around the LED array bar: spexor boots up after switching on. Pulse for 60 seconds: Indicates sensor calibration after monitoring is activated as well as the remaining time to leave the monitored room. Only then does spexor recognize an alarm event.
- Page 16 Description Function spexor is a mobile danger warning device. Its sensors monitor the environment in closed rooms, e.g. at home, in the garage, in the garden shed, in the mobile home or in vehicles with regard to pressure, sound and movement, vibration, air, temperature, brightness, humidity, fire-related gases, hazardous gases (e.g.
- Page 17 It is roaming-enabled and uses all major network operators. If you are nearby, spexor establishes a direct connection to your smartphone and the app via Bluetooth®. This is only used when setting up and editing the device settings, but...
- Page 18 This saves mobile phone time and conserves battery power. No matter where spexor is installed and how far away from your smartphone, it sends alarm messages via the mobile phone network with the permanently installed mobile phone card first to the automated Bosch data processing system.
- Page 19 Description Technical Data – Batteries: Lithium-ion battery pack with 10 Ah, 3.7 V – Charging current: 1.6 A at 5 V – Battery self-discharge: approx. 4% per month – Charging time: approx. 8 h until fully charged – Supported smartphone operating systems (status 2020): iOS 12.0 or higher, Android 8.0 or higher –...
- Page 20 Description – Mobile phone network: GSM, 2G (D2 Vodafone), eSIM roaming capable – Localization: GPS – Sensor detection: up to 5 m radius for motion detection – Audible alarm signal: approx. 70 ... 80 dB(A) – Permissible ambient temperature during operation and storage: –10 …...
-
Page 21: Commissioning
Commissioning Installing app and setting up alarm device ▷ Download the free “Bosch spexor” app from the Google Play Store or the Apple App Store. English | 21... - Page 22 ▷ The Bosch ID is a central authentication system of Robert Bosch GmbH that is used for many Bosch products or on Bosch Internet pages. It is best to use the Bosch ID user name and password for login. You can also create a new user account via the app.
- Page 23 Always keep the QR code together with the Quick Start Guide for safekeeping. Don‘t throw it away; you will need the QR code if you want to set up spexor again or transfer it to a new owner later. ▷ You can also reproduce the QR code in the app.
- Page 24 ▷ Load the app on any other smartphone and use the same access data during installation. Switching on alarm device In its as-delivered condition, spexor is switched off and its battery may be severely discharged. ▷ Switch on spexor at its ON/OFF switch.
- Page 25 Commissioning An acoustic signal confirms the switch-on. After switching on, the LEDs light up white briefly. While spexor boots up, they light up green six times. Charging the battery During the charging process the ambient temperature should be between 0 °C and +40 °C.
- Page 26 LED array bar thereby indicating the power supply unit has been detected and the charging process has begun. ▷ Fully charge spexor before using it for the first time. This can take up to 8 hours depending on the ambient conditions.
- Page 27 Commissioning ▷ You can now use the app to operate and configure spexor. Adding alarm devices You can also control multiple alarm devices with your smart- phone. There is no limit to how many. You can add more alarm devices in the app. To do this, the alarm device to be added must be turned on and the app must be running.
-
Page 28: Operation
You can also manage your user account information, activate or deactivate monitoring or the alarm function, add more alarm devices, detect the location of your spexor via GPS, view the history of alarm events, use help topics or book additional features or services later. -
Page 29: Monitoring
Monitoring Placing it where you want to monitor – Note – Risk of damage! The alarm device is not protected against moisture and water. Penetrating water or moisture can damage or destroy the alarm device. Keep the alarm device away from water or other liquids. –... - Page 30 Monitoring ▷ Note the operating temperature range; see “Technical Data” on page 20. ▷ Only place spexor in closed rooms, e.g. inside a house or apartment, in a car, mobile home, garage, garden shed, etc. Close the windows. ▷ Only place spexor in dry places. Do not place spexor outdoors, e.g.
- Page 31 Avoid closed or partially closed installation locations such as on a shelf between books, behind cabinet doors, in a cup holder or in the glove compartment. ▷ You can find further installation instructions on www.spexor-bosch.com. English | 31...
- Page 32 People or animals on the other side of glass panes are not detected by the intrusion sensors. ▷ Position spexor in such a way that pets cannot be detected. English | 32...
- Page 33 ▷ Of course you can also activate monitoring at any time via the app. Important: To ensure that spexor remains mobile for a long time and that its battery lasts as long as possible, it has English | 33...
- Page 34 2 to 3 minutes whether you have activated or deactivated monitoring. So it can take 2 to 3 minutes until spexor reacts to your input in the app. This is normal and correct. – During battery operation, spexor is notified every 15 minutes whether you have activated or deactivated...
- Page 35 Monitoring times were empirically tested during practical tests and times were selected that are neither too long nor too short. ▷ If you do not want to wait for this time, you can activate monitoring by entering the device PIN, see page 33. You will receive a push message when the monitoring has been successfully activated.
- Page 36 Monitoring After this, spexor monitors the environment and can trigger an alarm. Important: When monitoring is active, spexor cannot be switched off at the ON/OFF switch. – Note – Loud alarm signal! If an alarm is triggered, the audio module of the alarm device emits an acoustic signal that is loud enough to damage your hearing.
- Page 37 Settings At this point, you can also select various settings in the app. For example, you can specify whether spexor should emit an acoustic alarm, optical flashing alarm or discreetly send the alarm message to you in case of an alarm. In any case you will receive a message on your smartphone.
- Page 38 In the standard setting with activated power save mode, the battery should last as long as possible. Activating monitor- ing can then take up to 15 minutes because spexor saves power by only communicating with the backend server every 15 minutes.
- Page 39 ▷ If you flip the switch in the app, the power save mode is deactivated. spexor then works just as quickly as if it were connected to the mains power with the charging cable – activating monitoring or installing updates is much faster. However,...
- Page 40 33. It may therefore take a few minutes before spexor deactivates itself. ▷ If you want to check if spexor is still switched on when monitoring is deactivated, just touch it or move it a little. The LEDs flash white briefly if it is still switched on.
-
Page 41: Alarm Functions
Bosch data processing back-end. Depending on the previous selection, the LEDs flash red for 10 minutes and spexor emits an alarm tone. When an alarm is active, spexor cannot be switched off at the ON/OFF switch. English | 41... - Page 42 It connects you to the emergency call center in the country where you are. If you are abroad and your spexor is monitoring your home, ask neighbors or friends to call the police in case of an alarm.
- Page 43 PIN. If you enter the wrong device PIN, two short, falling signal tones will sound. spexor will also deactivate both monitoring as well as the alarm if you have deactivated the alarm yourself or notified the emergency call center. If you want the alarm device to continue to monitor for you, then you must reactivate the monitoring.
-
Page 44: Charging The Battery
▷ To start the charging process, see “Charging the battery” on page 25. A full charge can take up to 8 hours depending on the ambient conditions. When connected to mains power, spexor can also continuously monitor and perform alarm functions during the charging process. English | 44... -
Page 45: Updating
Updating Book additional functions ▷ In the future, you can extend the application areas of your spexor with additional paid functions or services in the app. The dates, types and costs of such additional functions have not yet been determined. - Page 46 LEDs light up red and three short, falling signal tones confirm the deactivation. In some cases, restarting may cause settings to be lost. ▷ Switch spexor on again at the ON/OFF switch. An acoustic signal confirms that the device has been switched on.
- Page 47 Important: For an update spexor needs WLAN. ▷ To deactivate the monitoring; see “Deactivating monitor- ing” on page 38. ▷ Use the USB cable to connect spexor's Micro-USB port to the power supply unit. Then plug the power supply unit into the mains power.
- Page 48 1 hour, because spexor will only be recognized as “update worthy” after 60 minutes. ▷ Only then open the app and start the update while spexor is still switched off. A pop-up appears. ▷ Before you select “Start with Bluetooth®” in the pop-up, switch spexor on again at the ON/OFF switch and acti- vate Bluetooth®...
- Page 49 Updating A current version of the operating instructions – which describes all functions added by the device update – can be downloaded at www.spexor-bosch.com. Updating the app If an app update is available, you will automatically receive a message on your smartphone.
-
Page 50: Switching Off And Storage
Switching off and storage ▷ If you do not need spexor, switch it off at the ON/OFF switch. Three short, falling signal tones confirm that the device is switching off. After switching off, the LEDs light up red briefly. ▷ Note the storage temperature range; see “Technical Data”... -
Page 51: Maintenance And Service
The alarm device does not contain any components that you can maintain or replace. ▷ If your device does not function as described or if your spexor is damaged, please contact customer service; see page 53. English | 51... - Page 52 Maintenance and service Cleaning – Note – Risk of damage! Penetrating water or chemicals can damage or destroy the alarm device. Do not use either water or chemicals to clean the alarm device. ▷ It is best to use a soft, clean, dry and lint-free cloth to clean the alarm device, cable and power supply unit.
- Page 53 Maintenance and service Customer Service The spexor customer service will be happy to help you with any questions regarding the device and the app if your device does not work as described, is damaged, has to be returned or disposed of.
- Page 54 Maintenance and service Transfer of device ▷ Before sharing your spexor, delete all individual data by selecting the trash can (“Delete device”) under “Device settings” in the app. ▷ Follow the instructions in the app. ▷ Hand over the alarm device with the complete scope of delivery, see page 11.
- Page 55 Maintenance and service Disposal ▷ Before disposing of your spexor, delete all individual data by selecting the trash can (“Delete device”) under “Device settings“ in the app. ▷ Follow the instructions in the app. ▷ Just uninstalling the app will not delete your data.
- Page 56 ▷ Return the alarm device to the appropriate return or col- lection system for proper disposal. If this is not possible, contact the dealer from whom you purchased your spexor or the customer service department; see page 53. According to the European Directive...
-
Page 57: Legal Notice
Legal notice EU Conformity grow platform GmbH hereby declares that the radio com- munication device type spexor complies with the Directive 2014/53/EU. The complete text of the EU Declaration of Conformity is available for download at www.spexor-bosch.com. License The Bluetooth® word mark and logos are registered trade- marks of Bluetooth SIG, Inc. - Page 58 GmbH Team spexor Grönerstrasse 9 71636 Ludwigsburg 2020.11 – EN – F.01U.385.655 V03...