Table of Contents
Advertisement
Advertisement
Table of Contents

Related Manuals for BenQ DC 1500


Summary of Contents for BenQ DC 1500
- Page 1 Digital Camera1500 User’s Manual...
-
Page 2: Taking Care Of Your Camera
Disclaimer BenQ makes no warranty of any kind with regard to this material, including, but not limited to, the implied warranties of merchantability and fitness for a particular purpose. BenQ assumes no responsibility for any error that may appear in this document. BenQ makes no commitment to update nor to keep current the information contained in this document. -
Page 3: Table Of Contents
BenQ DC 1500 User’s Manual 1. Touring your DC 1500 ... 1 1.1. Checking package contents ... 1 1.2. Parts of the DC 1500 and their names ... 1 1.2.1. Front View ... 1 1.2.2. Rear View ... 2 1.2.3. Bottom View ... 2 2. - Page 4 BenQ DC 1500 User’s Manual 3. Using the DC 1500 ... 12 3.1. Camera Mode ...12 3.1.1. Use Camera Mode to take photos ...12 3.1.2. The Camera Mode Setting Menu on LCD screen ...12 3.1.2.2. Adjusting image compression ...14 3.1.2.4. Setting exposure compensation value ...15 3.2.
- Page 5 BenQ DC 1500 User’s Manual 3.6.2.3. Copy from Flash memory to SD card ...29 3.6.2.4. Video out type ...29 3.6.2.5. Format SD card and the flash memory of DC 1500 ...30 3.6.2.6. Firmware version ...30 4. PC dependent features ... 31 4.1.
- Page 6 BenQ DC 1500 User’s Manual <Memo>...
-
Page 7: Benq Dc 1500 User's Manual 1. Touring Your Dc 1500
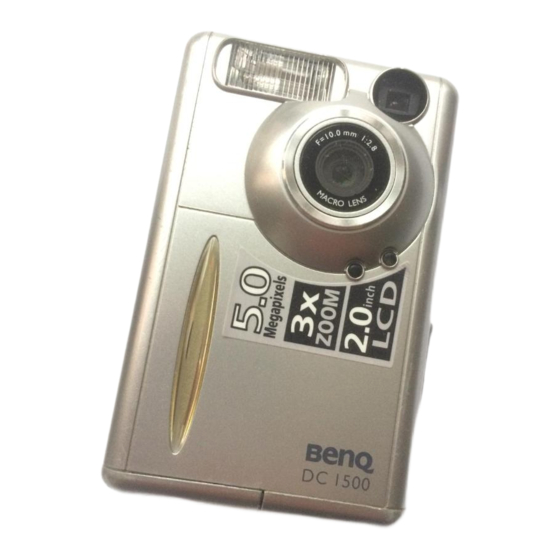
]1. T OURING YOUR 1.1. Checking package contents The package should include the following items: DC 1500 digital camera User’s Manual 1.2. Parts of the DC 1500 and their names 1.2.1. Front View Capture button Flash light Lens Hand stop... -
Page 8: Rear View
BenQ DC 1500 User’s Manual 1.2.2. Rear View Viewfinder LCD monitor 1.2.3. Bottom View Battery compartment cover Strap Eyelet Busy indicator Power/ Mode/ OK button Menu button LCD/ Up button Flash/ Down button Tripod set... -
Page 9: Preparing Your Dc 1500 For Using
REPARING YOUR 2.1. Charging built-in lithium batteries The DC 1500 has a lithium battery built in it. Before you start to use DC 1500 for the very first time, please use the bundled USB cable to fully charge the built-in lithium battery. -
Page 10: Installing Memory Card
BenQ DC 1500 User’s Manual 2.3. Installing memory card Follow the steps below to install memory card. Open the cover in the direction shown. Insert the SD card into the memory card slot in the direction shown and make sure that it’s firmly fixed. -
Page 11: Turning On The Power
2.5.1. Turning off the power 2.5.2. Power Save Mode The DC 1500 supports power save function. If the DC 1500 doesn’t receive any operation from the user for 1 minute, it will enter power save mode automatically. However, you can press any key to wake up the DC1500 from power save mode. -
Page 12: Forced Shut Down Mode
The DC 1500 supports forced shut down function. If the DC 1500 fails to operate normally, you can press the “Down” button and the capture button at the same time to forced the DC 1500 to be shut down. To turn on the power, press the “Power” but- ton for 2 seconds again. - Page 13 Note 2: If you insert a SD/MMC card in your DC1500, the captured images will be automatically saved to the SD/MMC card. On the contrary, if you remove the SD/MMC card from your DC 1500, then the captured images will be automatically saved to the camera flash memory instead.
-
Page 14: Function Keys For Taking Photos
2.7.1.1. To set the LCD monitor icon display mode off: Turn on the power of your DC 1500 and you will see all the icons on the LCD monitor appear. To turn the LCD monitor icon display off, press the “LCD/Up”... -
Page 15: To Set The Lcd Monitor Display Mode Off
BenQ DC 1500 User’s Manual 2.7.1.3. To set the LCD monitor display mode off: Turn on the power of your DC 1500 and you will see all the icons on the LCD monitor appear. To turn the LCD monitor display off, long press the “LCD”... -
Page 16: Selecting Flash Mode
2.7.3. Setting the macro mode The DC 1500 provides macro function that allows you to capture images at a close range (15~50 cm). You can select the macro mode by simply sliding the macro switch. - Page 17 Macro Mode 1: Macro Mode 2: When the macro mode is set, the relative icon will appear on the LCD screen. Note: The distance range of DC 1500 macro mode is shown as follows: Infinity 2.5 m 1.5 m set the macro function off (1.5 m ~ set the macro function on (30 ~ 50 cm).
-
Page 18: Benq Dc 1500 User's Manual 3. Using The Dc 1500
Battery capacity 3.1.2. The Camera Mode Setting Menu on LCD screen When in camera mode, the DC 1500 provides a setting menu that allows you to make adjustments on various photo taking and image saving settings. To enter the setting menu, press the “Menu” button and you can switch the LCD screen frame from shutter menu to the main setting menu of the camera mode. -
Page 19: Menu Operations
BenQ DC 1500 User’s Manual The menu bar appears on the bottom part of the LCD screen. Image resolution Image compresstion White balance Menu operations • Press the “Menu” button to move among main items or highlight a main item on the menu bar. -
Page 20: Adjusting Image Compression
BenQ DC 1500 User’s Manual Enter the image resolutioun sub-menu. Select a image resolution mode: 1600 x 1200 resolution: 1280 x 1024 resolution: 1024 x 768 resolution: 640 x 480 resolution: Press the “OK” button. The image resolution mode is set. The corresponding icons will be displayed on the LCD screen. -
Page 21: Setting Exposure Compensation Value
3.1.2.3. Setting white balance Under different environments, you can adjust white balance mode to get the best color registration image effect. The DC 1500 provides 5 white balance modes to modify white balance under different situations. To select a white balance mode to use: Enter the white balance sub-menu. - Page 22 BenQ DC 1500 User’s Manual Select item and the exposure value adjustment screen will appear. Press the up arrow button and the down arrow button to decrease exposure value or increase exposure value. The result will appear on the LCD screen instantly.
-
Page 23: Play Mode
3.2.1. Use Play Mode to view photos and images on the LCD screen The pictures you took are saved in the flash memory of DC 1500 or the memory card. You can view these pictures on the LCD screen and delete, protect one or all of them if necessary. -
Page 24: The Play Mode Setting Menu On Lcd Screen
BenQ DC 1500 User’s Manual 3.2.2. The Play Mode Setting Menu on LCD screen When in play mode, the DC 1500 provides a setting menu that allows you to make adjustments on various photo viewing and image saving settings. To enter the setting menu, press the “Menu” button and you can switch the LCD screen frame from viewer menu to the main setting menu of the play mode. -
Page 25: Erasing Images
BenQ DC 1500 User’s Manual Play mode setting functions There are 3 different setting functions of the camera mode: 1. Erase image; 2. Lock image; 3. Slide show. Press “Menu” button to change different setting functions in turns. The menu bar appears on the bottom part of the LCD screen and the menu is shown as follows: 3.2.2.1. -
Page 26: Slide Show Mode
The locked image will not be erased when you erase all images in the flash memory of DC 1500 or the memory card. II. To unlock images In the image lock submenu, highlight the icon The current image will be unlocked. -
Page 27: Burst Mode
Battery capacity 3.3.2. The Burst Mode Setting Menu on LCD screen When in burst mode, the DC 1500 also provides a setting menu that allows you to make adjustments on various photo taking and image saving settings. To enter the setting menu, press the “Menu” button and you can switch the LCD screen frame from shutter menu to the main setting menu of the burst mode. -
Page 28: Adjusting Image Resolution
BenQ DC 1500 User’s Manual The menu bar appears on the bottom part of the LCD screen. Image resolution Image compresstion White balance Menu operations • Press the “Menu” button to move among main items or highlight a main item on the menu bar. -
Page 29: Adjusting Image Compression
BenQ DC 1500 User’s Manual Enter the image resolutioun sub-menu. Select a image resolution mode: 1280 x 1024 resolution: 1024 x 768 resolution: 640 x 480 resolution: Press the “OK” button. The image resolution mode is set. The corresponding icons will be displayed on the LCD screen. -
Page 30: Self-Timer Mode
BenQ DC 1500 User’s Manual 3.4. Self-timer Mode 3.4.1. Use Self-timer Mode to take photos If the self-timer mode is activated in camera mode, 10 seconds after you press the capture button, the camera will take photo automatically. To activate the self-timer mode:... -
Page 31: Video Mode
If the video mode is activated, you can shoot video by pressing the capture button. The image resolution of Video mode is 320 x 240 and the video length will be limited by the remaining memory capacity in the flash memory of DC 1500 or your memory card. It is shown as follows:... -
Page 32: Viewing Videos
BenQ DC 1500 User’s Manual 3.5.2. Viewing videos The videos you shot will be saved in the flash memory of DC 1500 or your SD memory card. To view these videos, press the "Mode" button to switch the LCD screen frame from the video mode to play mode. -
Page 33: Setup Mode
Battery capacity 3.6.2. The Setup Mode Setting Menu on LCD screen When in setup mode, the DC 1500 provides a setting menu that allows you to change the DC 1500 inner settings. To enter the setting menu, press the “Menu” button and you can switch the LCD screen frame from viewer menu to the main setting menu of the setup mode. -
Page 34: Setting Date
BenQ DC 1500 User’s Manual The menu bar appears on the bottom part of the LCD screen. Date setting Time setting Save from Flash memory to SD card Menu operations • Press the “Menu” button to move among main items or highlight a main item on the menu bar. -
Page 35: Setting Time
3.6.2.3. Copy from Flash memory to SD card This main item allows you to copy data which stored in the flash memory of DC 1500 to an exterior SD card. Please note that this function is only available when the SD card is plugged in. -
Page 36: Format Sd Card And The Flash Memory Of Dc 1500
3.6.2.5. Format SD card and the flash memory of DC 1500 This main item allows you to format SD card and the flash memory of DC 1500. When the SD card is plugged in your DC1500, it allows you to format SD card. On the other hand, when the SD card is not plugged in your DC1500, it allows you to format the flash memory of the camera. -
Page 37: Pc Dependent Features
BenQ DC 1500 User’s Manual 4. PC DEPENDENT FEATURES 4.1. Preparations To use the PC dependent functions, you need to install your digital camera software and connect the camera to your PC. 4.1.1. Installing digital camera software • If your operation system is Windows 98/ME, please setup the DC1500 driver first,... -
Page 38: The Software Of This Installation Cd
We suggest users sincerely that setup DC1500 driver first under Windows 98SE/ ME operation system, then connect your digital still camara to PC. If your operation system is Windows 2000/XP, just connect your DC 1500 to PC directly, then DC 1500 will perform as a USB mass-storage device under your operating system which means that your operating sysytem will come out a new removable drive. -
Page 39: Connecting The Dc 1500 To Your Pc
BenQ DC 1500 User’s Manual 4.2. Connecting the DC 1500 to your PC • Use the USB cable included in the package to connect the DC 1500 to the USB port of your PC. • A new USB mass-storage device found and then DC 1500 will be used as a new removable drive under operating system. - Page 40 “Up”, “Down” and “OK” buttons. If you don’t press any button, the camera will enter mass storage mode. On the other hand, if you connect the DC 1500 to your PC when the camera power is on, the camera will automatically enter mass storage mode and you can press the “Menu”...
-
Page 41: Tv Dependent Features
TV. Connecting the DC 1500 to TV • Use the Video cable included in the DC 1500 package to connect the DC 1500 to the Video port of your TV. • After connecting to TV, all the frames and message appear on LCD screen will be displayed on your TV screen. - Page 42 BenQ DC 1500 User’s Manual Then connect the other end of the Video cable to the Video input port of your TV. Please note that the yellow header is for Video port. After the connection to your TV, you will see the LCD monitor function on your TV screen.
-
Page 43: Built-In Lithium Battery Usage
UILT Preparations The DC 1500 has a lithium battery built in it. Before you start to use DC 1500 for the very first time, please use the bundled USB cable to fully charge the built-in lithium battery. It takes 2 hours to fully charge the lithium battery. -
Page 44: Use Your Pc To Charge Lithium Battery
6.2. Use Your PC To Charge Lithium Battery The DC 1500 has a lithium battery built in it. Before you start to use DC 1500 for the very first time, please use the bundled USB cable to fully charge the built-in lithium battery. -
Page 45: Troubleshooting
DC 1500 does not appear as a new drive under my operating system. Make sure that there is enough power in DC 1500. Check if the camera power is turned on. If not, turn it on and then connect the camera to the computer again. -
Page 46: Service Information
BenQ DC 1500 User’s Manual 8. S ERVICE INFORMATION Technical support If you encountered problems using Digital Camera 1500 and the camera driver program, please send an E-mail (containing detailed descriptions of the problem you came upon, the hardware and software environment of your system) to the following addresses: USA: support-sc@BenQ.com...