Advertisement
Quick Links
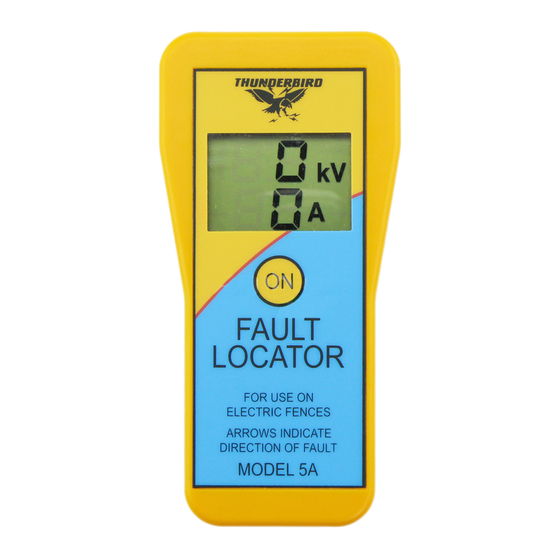
7. Specifications
Battery:
9V standard or alkaline
Voltage display:
0 - 15.0kV (kilovolts)
Current display:
0 - 99A (amps)
Low battery indication:
"Lo Bat" is displayed. Replace battery
Operating temperature:
0 deg. C to 50 deg. C @ 90% humidity (non condensing)
Storage temperature:
-20 deg. C to 60 deg. C @ 90 % humidity (non condensing)
Power mode:
Press button to turn on, auto off
Dimensions:
148x66x29mm
Weight:
189g (including battery)
Accuracy (voltage display):
+/- (10% reading + 1 digit)
Accuracy (current display):
+/- (25% reading + 2 digits)
THUNDERBIRD
WARRANTY
Thunderbird warrants the fault locator against defective workmanship and
faulty materials for 12 months from the date of purchase. We undertake, at our
option, to replace or repair free of charge this product, or part thereof, on
condition that it is returned to our factory freight prepaid, and found on
examination to be suffering from material or constructional defect. We cannot
be held responsible for any repair other than those carried out by us or our
authorised agent.
A photocopy of your proof of purchase and a request for warranty must also be
returned with the item.
This warranty is void if the product is subject to improper use or handling,
incorrect power input voltage, damage through contact with chemicals, flood-
ing, fire, explosion, excessive heat, lightning strikes, insect damage, moisture
damage or damage to external wiring.
Country Electronics Pty Ltd
ABN 38 003 806 040
11 Industrial Avenue
Mudgee NSW 2850
Phone: 02 63723600
Fax: 02 63722597
PO Box 391
Mudgee NSW 2850
Email: enquiries@thunderbird.net.au
Thunderbird Fault Locator
Instructions
1. Warnings and precautions in using your Thunderbird Fault Locator.
To avoid the possibility of electrical shock it is essential that certain precautions be taken during
both storage and use. Some important do's and don'ts are:
Do always store your Thunderbird Fault Locator in a dry environment and never use
this instrument if there is any possibility that water has entered into it.
Don't store your Thunderbird Fault Locator in a place where it may be exposed to
corrosive fumes, for example, near an automotive battery or near any chemicals.
Don't use this instrument for measuring any voltage or current other than that of an
electrified fence. Never attempt to use this instrument to measure live mains voltage.
Don't, under any circumstances, attempt to use this instrument if the case is cracked
or otherwise damaged. If the case is damaged, return it to the place of purchase or to an
authorized Thunderbird dealer for repair.
2. Battery installation
The Thunderbird fault locator comes with a 9V battery fitted. To replace a battery,
first remove the three screws underneath the cover using a Phillips type screwdriver. Disconnect
the old battery by pulling it away from the plug which is attached to the battery lead.
The battery terminals and the plug terminals are polarized so that the plug can be
connected in only one way. Make sure that the terminals of the plug are correctly orientated to
lock with the corresponding terminals of the battery. Do not allow the plug terminals to touch
the battery terminals in the reversed orientation.
When you have connected the battery leads to the battery, fit the battery into
battery compartment and replace the cover. Make sure that the cover is securely attached to the
case and that battery wires are not protuding from the case.
3. Operation
This fault locator may be used without an earth lead attached when used for finding
faults on an electric fence. It is safe to touch the earthing clip, and will provide a more accurate
fence voltage if it is touched. The earth lead should be attached and connected to the fence earth
if an accurate fence voltage is required. The earth lead must be attached to measure the voltage
directly from an energiser's terminals.
Press the "ON" pad to turn the fault locator on. It will stay on for approximately 15
seconds after detecting any fence voltage or current pulse.
There are 2 metal contacts in a groove across the bottom at the front of the fault
locator. These contacts are for connecting to the live fence wire. Place the fault locator on the
live fence wire so that the wire is in this groove, and rub the contacts on the wire to make good
contact.
Model 5A
the
Advertisement

Summary of Contents for Thunderbird 5A
- Page 1 Accuracy (voltage display): +/- (10% reading + 1 digit) Don’t store your Thunderbird Fault Locator in a place where it may be exposed to Accuracy (current display): +/- (25% reading + 2 digits) corrosive fumes, for example, near an automotive battery or near any chemicals.
- Page 2 In this respect, the effect of capacitance possible electrical shock. Never attempt to use the Thunderbird Fault Locator for any purpose other than as is similar to that of vegetative growth, for example, and can often be mistaken for a fault condition in a fence even when the fence appears to be otherwise in perfect condition.