
Related Manuals for Dreambox DM 5600-S


Summary of Contents for Dreambox DM 5600-S
- Page 1 3 . I n h a l t s v e r z e i c h n i s I N H A L T Bedienungsanleitung Instruction Manual Mode d’emploi...
- Page 2 S p ra ch c o d e D e u t s che Ve r s i o n E n g l i s che Ve r s i o n F ra n z ö s i s che Ve r s i o n Linux OS SetTopbox mit 2x PCMCIA-Schnittstelle für CA-Module zum Empfang von freien und verschlüsselten ASTRA und EUTELSAT DVB-Progra m m e n .
- Page 3 1 . F e r n b e d i e n u n g 1 . Fe r n b e d i e n u n g...
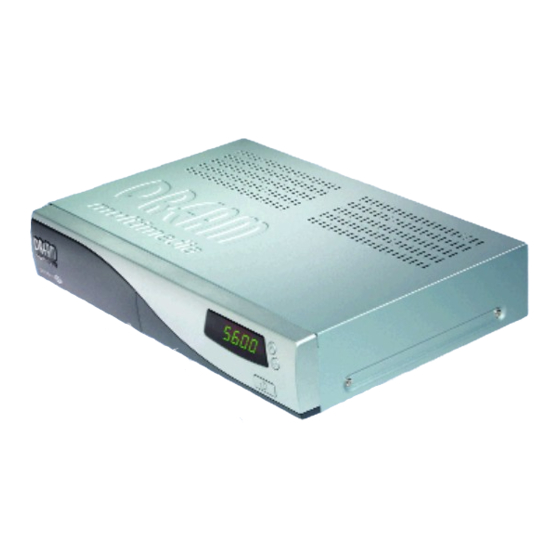
- Page 4 2 . G e r ä t e - A n s i c h t e n 2 .G e r ä t e - A n s i c h t e n...
-
Page 6: Table Of Contents
3 . I n h a l t s v e r z e i c h n i s I N H A L T K a p i t e l S e i t e Fe r n b e d i e n u n g G e r ä... -
Page 7: Fe R N B E D I E N U N G
N av i g i e ren Sie zur gewünschten Option und bestätigen Sie diese mit der "OK" Ta s t e. Drücke n Sie nur einmal kurz die " Power" Ta s t e, geht die Dreambox gleich in Standby (Ruhezustand). - Page 8 4 . Ta s t e n e r k l ä r u n g F E R N B E D I E N U N G A U D I O - Ta s t e : Über die "AUDIO"...
- Page 9 4 . Ta s t e n e r k l ä r u n g F E R N B E D I E N U N G Pfeil nach unten-Ta s t e : Ist kein OSD Menü auf Ihrem Fernsehgerät gewählt (sich t b a r ) , s chaltet die "Pfeil nach unten" Ta s t e zum nächsten Service (Sender).
- Page 10 4 . Ta s t e n e r k l ä r u n g F E R N B E D I E N U N G Blaue Options-Ta s t e : Diese Taste besitzt mehre re Funktionen, w e l che abhängig von der jeweils gewählten Menü Position sind.
-
Page 11: Wichtige Hinweise Zur Bedienung 1
5. W i chtige Hinweise zur Bedienung Über ein OSD (On Screen Display) w i rd die Bedienung der Dreambox stark vere i n f a cht. A l l e m ö g l i chen Optionen werden über vier farbige Punkte ( r o t ,g r ü n , g e l b ,b l a u ) angezeigt und können über die Fernbedienung aktiviert werd e n . -
Page 12: S I Ch E R H E I T S H I N W E I S
6 . S i c h e r h e i t s h i n w e i s e S I C H E R H E I T 6 . S i ch e r h e i t s h i n w e i s e Bevor Sie Ihre DM5600 in Betrieb nehmen, sollten Sie zu Ihrem Schutz die Sich e r h e i t s - Hinweise gut durchlesen. -
Page 13: Z U S Ä T Z L I Che Sich E R H E I T S H I N W E I S E
Das Erdungssystem muss dem SABS 061 entspre ch e n R e i n i g u n g : Ziehen Sie das Netzkabel der Dreambox aus der Netzdose, bevor Sie Ihre Dre a m b o x reinigen. Benutzen Sie einen leicht angefeuchteten Lappen ohne Reinigungsmittel. -
Page 14: I N B E T R I E B N A H M
7 . 1 . 1 A n a l o g Um Ihre Dreambox mit Ihrem H i F i - Ve r s t ä r k e r zu verbinden, benutzen Sie bitte ein geeignetes C h i n c h - K a b e l und schließen Sie dies am Receiver an AUDIO R/L an und an einen fre i e n Eingang ( z . -
Page 15: E N T S O Rg U N G S H I N W E I S
8 . E n t s o r g u n g s h i n w e i s e E N S O R G U N G 8 . E n t s o rg u n g s h i n w e i s e Die Ve r p a ckung der D M 5 6 0 0 besteht aussch l i e ß... -
Page 16: 0 . Satelliten Einrichten Und Scannen (Such L A U F )
1 0 . S a t e l l i t e n e i n r i c h t e n S A T E L L I T E N 1 0 . Satelliten einrichten und scannen (Such l a u f ) Lesen Sie den Abschnitt 5. -
Page 17: 1 . Tv - Modus 1
1 1 . T V- M o d u s M O D U S 1 1 . T V- M o d u s Lesen Sie den Abschnitt 5. Wichtige Hinweise zur Bedienung , bevor Sie anfa n g e n . Sie wollen in den TV - Modus, es ist kein OSD Menü... -
Page 18: 3 . Info - Menü 1
1 3 . I N F O - M e n ü I N F O - M E N Ü 1 3 . I N F O - M e n ü Lesen Sie den Abschnitt 5. Wichtige Hinweise zur Bedienung , bevor Sie anfa n g e n . Sie befinden sich im TV oder Radio - Modus, es ist kein OSD Menü... -
Page 19: 6 . Osd Setup 1
1 6 . O S D S e t u p O S D 1 6 . OSD Setup Lesen Sie den Abschnitt 5. Wichtige Hinweise zur Bedienung , bevor Sie anfa n g e n . Sie befinden sich im T V- oder Radio - Modus, es ist kein OSD Menü gewählt (sichtbar). D r ü... -
Page 20: Audio/Video Einstellungen 1
( S e n d e r ) , der in Dolby Digital sendet, s t a n d a rdgemäß über den AC3-Ausgang wiederg e g e b e n . W i ch t i g : Haben Sie keinen DSP (Digital Sound Processor) an Ihre Dreambox angesch l o s s e n , so werden Sie bei gesetzter Option keinen Ton höre n . -
Page 21: 9 . J U G E N D S Chutz (Parental Lock ) 2
1 9 . J u g e n d s c h u t z J U G E N D S C H U T Z 1 9 . J u g e n d s chutz (Parental Lock ) Lesen Sie den Abschnitt 5. -
Page 22: 1 . Eigene Bouquets (Favoriten) Erstellen, V E R Wa L T E
2 1 . E i g e n e B o u q u e t s B O U Q U E T S 2 1 . Eigene Bouquets (Favoriten) erstellen, v e r wa l t e n Lesen Sie den Abschnitt 5. -
Page 23: 2 . A K T I V I E Ren Des Expert Mode 2
2 2 . E x p e r t M o d e E X P E R T M O D E 2 2 . A k t i v i e ren des Expert Mode Lesen Sie den Abschnitt 5. Wichtige Hinweise zur Bedienung , bevor Sie anfa n g e n . Sie befinden sich im T V- oder Radio - Modus, es ist kein OSD Menü... -
Page 24: 3 . Skin (Oberfläche Des Osd) (Nur Im Expert Mode) 2
2 3 . S k i n O B E R F L Ä C H E 2 3 . Skin (Oberfläche des OSD) (nur im Expert Mode) Lesen Sie den Abschnitt 5. Wichtige Hinweise zur Bedienung und den Abschnitt 22. Aktivieren des Expert Mode, bevor Sie anfa n g e n . -
Page 25: 5 . Epg (Electronic Program Guide) 2
"OK" Ta s t e. Geben Sie nun über die Zehner - Tastatur Ihrer Fernbedienung eine Zeit in Minuten e i n , n a ch der Ihre Dreambox sich abschalten soll. Speich e rn Sie Ihre Einstellung mit einem D r u ck auf die "Grüne Options"... -
Page 26: 7 . D R E A M U P - Update Der Betriebssoftwa
Sie benötigen einen PC mit serieller Schnittstelle (COM1 oder COM2) und ein serielles N u l l m o d e m k a b e l , um die Dreambox mit Ihrem Rechner zu verbinden. In dieser Anleitung gehen wir davon aus, dass Sie über die Com1 Schnittstelle eine Verbindung zur Dreambox herstellen. -
Page 27: D Reamup - Verbindung Herstellen
Nun Klicken Sie auf " C o n n e c t " . Die Softwa re zeigt Ihnen mit der Statusmeldung an, dass sie für eine Verbindung vorbere i t e t ist. Schalten Sie jetzt Ihre Dreambox wieder hinten am Netzschalter ein. 27.2 DreamUp... -
Page 28: D Reamup - Backup Funktion
D R E A M U P Haben Sie Ihre Dreambox mit Strom versorg t ,b e reitet die Softwa re alles Nötige für das Flashen I h rer Dreambox vor. Verfolgen Sie den Status. Das Display zeigt die Laufschrift "5600 boot". - Page 29 2 7 . 3 D r e a m U p D R E A M U P N a ch dem Klick öffnet sich folgendes Fenster. Hier können Sie einen Dateinamen für Ihr zu s i ch e rndes Image wählen und abspeich e rn . N a chdem Sie auf "...
-
Page 30: D Reamup - Betriebssoftwa Re Lösch E N
2 7 . D r e a m U p D R E A M U P Wenn die Sicherung (Backup) fertig ist, b e kommen Sie eine Meldung von der Softwa re, wie folgt. Bestätigen Sie diese Meldung mit einem Klick auf " O K " 2 7 . - Page 31 2 7 . 4 D r e a m U p D R E A M U P Verfolgen Sie den Status. Hier sehen Sie die Meldung, dass das Löschen (Erase) erfolgre i ch abgeschlossen ist. K l i cken Sie auf " O K ". 27.4 DreamUp...
-
Page 32: D Reamup - Betriebssoftwa Re Flashen
2 7 . 5 D r e a m U p D R E A M U P 2 7 . 5 D reamUp - Betriebssoftwa re flashen K l i cken Sie auf " F l a s h ". Sie werden nun nach der Betriebssoftwa re (Image) gefra g t , die Sie aufspielen möchten. - Page 33 2 7 . 5 D r e a m U p D R E A M U P D a n a ch wird die Betriebssoftwa re auf Ihre Dreambox hoch g e l a d e n . Verfolgen Sie den Status.
- Page 34 2 7 . 5 D r e a m U p D R E A M U P Das Hochgeladene Image wird geprüft. Verfolgen Sie den Status. N a chdem das Flashen beendet ist, b e kommen Sie von der Softwa re eine Meldung, dass alles in Ordnung ist.
- Page 35 Sofort nach dem Einschalten halten Sie die obere linke Taste an Ihrer Dreambox gedrückt und lassen die Taste erst wieder los, wenn " 9 9 9 " im Display Ihrer Dreambox ersch e i n t . Dieser Vo rgang dauert ein wenig, bitte haben Sie Geduld.
-
Page 36: 8 . Te Ch N I S Che Daten
2 8 . Te ch n i s c h e D a t e n D A T E N 2 8 . Te ch n i s che Daten DreamBox DM5600 Fe a t u r e s : - 250 MHz IBM PowerPC Processor (350 Mips) - Page 37 2 8 . Te ch n i s c h e D a t e n D A T E N Vi d e o d e k o d i e r u n g : V i d e o ko m p ression MPEG-2 und MPEG-1 ko m p a t i b e l V i d e o s t a n d a rd PAL G/ 25 Hz B i l d f o rmat 4:3 / 16:9 Bildmaterial 16:9, a u t o m a t i s che Anpassung für 16:9 T V-Geräte (über Scart)
- Page 38 2 8 . Te ch n i s c h e D a t e n D A T E N LNB Stromversorgung: LNB Strom 500mA max. ; kurzsch l u s s f e s t LNB Spannung Vertikal < 14V ohne Last, > 11,5V bei 400mA LNB Spannung horizontal <...
- Page 39 2 9 . S t i c h wo r t v e r z e i ch n i s V E R Z E I C H N I S 2 9 . S t i ch wo r t v e r z e i ch n i s A C 3 D o l by Digital, To n s y s t e m A G C...
- Page 40 2 9 . S t i c h wo r t v e r z e i ch n i s V E R Z E I C H N I S 2 9 . S t i ch wo r t v e r z e i ch n i s Coding Systeme siehe Ve r s ch l ü...
- Page 41 2 9 . S t i c h wo r t v e r z e i ch n i s V E R Z E I C H N I S 2 9 . S t i ch wo r t v e r z e i ch n i s D T S Digital Theater System, To n s y s t e m DVB - S / T / C...
- Page 42 2 9 . S t i c h wo r t v e r z e i ch n i s V E R Z E I C H N I S 2 9 . S t i ch wo r t v e r z e i ch n i s I n t e rnet Protokoll.
- Page 43 2 9 . S t i c h wo r t v e r z e i ch n i s V E R Z E I C H N I S 2 9 . S t i ch wo r t v e r z e i ch n i s M I P S Millions of Instructions Per Second.
- Page 44 2 9 . S t i c h wo r t v e r z e i ch n i s V E R Z E I C H N I S 2 9 . S t i ch wo r t v e r z e i ch n i s QPSK / QAM Q u a d ratur Phase Shift Keying ist ein Modulationsverfahren für digitale Fern s e h p r o gra m m e, d i e über Satellit empfangen werden.
- Page 45 2 9 . S t i c h wo r t v e r z e i ch n i s V E R Z E I C H N I S 2 9 . S t i ch wo r t v e r z e i ch n i s S / P D I F Sony/Philips Digital Interface Format.
- Page 46 2 9 . S t i c h wo r t v e r z e i ch n i s V E R Z E I C H N I S 2 9 . S t i ch wo r t v e r z e i ch n i s 4 .
- Page 47 3 0 . G a r a n t i e s ch e i n G A R A N T I E 3 0 . G a ra n t i e s ch e i n G A R A N T I E S C H E I N G e r ä...
- Page 48 Instruction Manual D reambox DM5600S English Linux OS SetTopbox with 2x PCMCIA interfacefor CA-modules, for receiving clear and encoded ASTRA and EUTELSAT DVB-progra m m e s . 1x Smartcard interfaceRF-modulatorSegment display...
- Page 49 1 . R e m o t e c o n t r o l 1 . Remote control...
- Page 50 2 . D r e a m b o x v i e w s 2 . Dreambox views...
- Page 51 75 - 76 2 7 . 5 D reamUp - Flash operating softwa re 77 - 79 2 7 . 6 Reset Dreambox to factory settings 2 8 . Te chnical Data 81 - 83 2 9 . G l o s s a ry of term s 84 - 91 3 0 .
-
Page 52: Remote Control 4
P ress and hold down the " Power" key for 3 seconds, then the Shutdown / Standby menu will appear. Navigate to the option chosen and confirm with " O K ". To put your Dreambox into S t a n d by mode, briefly press the " Power" key. The display shows the time. To re - a c t i vate your D reambox press the "... - Page 53 4 . D e s c r i p t i o n o f k e y s R E M O T E C O N T R O L AUDIO ke y : The "AUDIO" key a l l ows to select a sound tra ck out of those offered by the broadcasting s e rv i c e.
- Page 54 4 . D e s c r i p t i o n o f k e y s R E M O T E C O N T R O L D own arrow ke y : When no OSD menu is displayed on your screen you can switch to the next service with the "Down arrow"...
- Page 55 4 . D e s c r i p t i o n o f k e y s R E M O T E C O N T R O L Blue Option ke y : The functions of this key change depending on the menu position. In the TV mode without any OSD menu displayed on your screen you can switch directly to the Te l e t ext of the chosen service with the "Blue Option"...
-
Page 56: Important Notes On Operation 5
5. Important notes on opera t i o n The operation of the Dreambox is greatly simplified with an OSD (On Screen Display). All available options are displayed with 4 coloured dots ( r e d ,g r e e n , y e l l o w, b l u e ) and can be activated with the remote control. -
Page 57: Safety Instructions 5
6 . S a f e t y i n s t r u c t i o n s S A F E T Y 6 . Safety instructions For your protection, please read the safety instructions thouroughly before starting to use your D M 5 6 0 0. -
Page 58: Additional Safety Instructions 5
The earthing system must conform to SABS 061. C l e a n i n g : R e m ove the power cable of the Dreambox from the mains socket before you clean the Dreambox. Use a slightly damp cloth without cleaning agents. -
Page 59: Getting Started 5
7 . 1 . 1 A n a l o g To connect your Dreambox to a HiFi amplifier, please use a suitable ch i n ch cable. Connect this to the receiver at AUDIO R/L and to a free input ( e . g . AUX or CD) on your HiFi amplifier. -
Page 60: Disposal Notes 6
8 . D i s p o s a l n o t e s D I S P O S A L N O T E S 8 . Disposal notes The packaging of the D M 5 6 0 0 consists exclusively of re cyclable materials. Please dispose of these appropriately to the "Dual System". -
Page 61: 0 . C O N F I G U Ration Of Satellites And Scanning (Search )
1 0 . C o n f i g u r a t i o n s a t e l l i t e s S A T E L L I T E S 1 0 . C o n f i g u ration of satellites and scanning (search ) Please read 5. -
Page 62: 1 . Tv Mode 6
1 1 . T V m o d e M O D E 1 1 . TV mode Please read 5. Important notes on operation before starting. You want to go into the TV mode, and no OSD menu is displaye d . P ress the "Dream"... -
Page 63: Info Menu 6
1 3 . I N F O m e n u I N F O M E N U 1 3 . INFO menu Please read 5. Important notes on operation before starting. You are in the TV or radio mode, and no OSD menu is displayed. Press the "Dream" key, n avigate to "... -
Page 64: Timezone Settings 6
1 6 . O S D S e t u p O S D 1 6 . OSD Set up Please read 5. Important notes on operation before starting. You are in the TV or radio mode, and no OSD menu is displaye d . P ress the "Dream"... -
Page 65: Audio/Video Settings 6
The direction keys allow to choose the colour format which is supplied by the Scart output of your Dreambox to the T V. Choose between CVBS (FBAS), RGB und V i d e o. You can also choose the aspect ra t i o. Choose between 4:3 Letterbox, 4:3 panscan or 16:9. -
Page 66: 9 . P A Rental Lock 6
1 9 . P a r e n t a l L o c k P A R E N T A L L O C K 1 9 . P a rental Lock Please read 5. Important notes on operation before starting. You are in the TV or radio mode, and no OSD menu is displaye d . - Page 67 2 1 . B o u q u e t s B O U Q U E T S 2 1 . Edition and management of Bouquets (fav o u r i t e s ) Please read 5. Important notes on operation before starting. You are in the TV or radio mode, and no OSD menu is displaye d .
-
Page 68: 2 . A C T I Vating The Expert Mode 6
2 2 . E x p e r t m o d e E X P E R T M O D E 2 2 . A c t i vating the Expert mode Please read 5. Important notes on operation before starting. You are in the TV or radio mode, and no OSD menu is displaye d . - Page 69 2 3 . S k i n S U R F A C E T H E O S D 2 3 . Skin (Surface of the OSD) (only within the Expert mode) Please read 5. Important notes on operation and 22. A c t i vating the Expert mode before starting.
- Page 70 Navigate to "set sleeptimer” and press the " O K ” k e y. With your numeric keypad of your Remote control you can now enter a time in minutes when your Dreambox should s w i t ch off. Store your settings with the "Green option” k e y.
- Page 71 !!!! Please study these instructions thoroughly before you begin !!!! In order to connect the Dreambox with your computer, you need a PC with a serial interface (COM1 or COM2) and a null modem cable. In these instructions we assume that you create a connection to your Dreambox via the COM1 interface.
-
Page 72: D Reamup - Establish Connection
2 7 . 2 D r e a m U p D R E A M U P 2 7 . 2 D reamUp - establish connection N ow click on " C o n n e c t ". The softwa re informs you with a status message that it is pre p a red for a connection. -
Page 73: D Reamup - Backup Function
2 7 . 2 D r e a m U p D R E A M U P When you have supplied power to your D r e a m b o x, the softwa re pre p a res everything necessary for flashing your D r e a m b o x. - Page 74 2 7 . 3 D r e a m U p D R E A M U P After the click , the following window opens. This allows you to select a file name for the image you are going to sav e, and store it. After you have clicked on "...
-
Page 75: D Reamup - Delete Operating Softwa Re
2 7 . D r e a m U p D R E A M U P When the backup is complete, you will receive a message from the softwa re, as follow s : A ck n owledge this message by clicking " O K ”. 2 7 . - Page 76 2 7 . 4 D r e a m U p D R E A M U P O b s e rve the status. H e re you see the message that the erase has been successfully completed. C l i ck on " O K ". 27.4 DreamUp...
-
Page 77: D Reamup - Flash Operating Softwa Re
2 7 . 5 D r e a m U p D R E A M U P 2 7 . 5 D reamUp - flash operating softwa re C l i ck on " F l a s h ". You will now be asked for the operating softwa re (image) which you want to re c o rd. - Page 78 The operating softwa re will then be uploaded to your Dre a m b o x . O b s e rve the status. When the upload is complete, the flash of your Dreambox will be era s e d . O b s e rve the status.
- Page 79 2 7 . 5 D r e a m U p D R E A M U P The uploaded image will be ch e cked. Observe the status. After the flashing is complete, you will receive a message from the softwa re that every t h i n g has been completed successfully.
- Page 80 S w i t ch off your Dre a m b o x , re m ove the serial cable from the Dre a m b o x . Wait 30 seconds. Plug the TV Scart plug and the coaxial cable (satellite system) into your Dreambox. S w i t ch on your Dre a m b o x .
-
Page 81: 8 . Te Chnical Data
2 8 . Te ch n i c a l D a t a D A T A 2 8 . Te chnical Data DreamBox DM5600 Fe a t u r e s : - 250 MHz IBM PowerPC Processor (350 Mips) - Page 82 2 8 . Te ch n i c a l D a t a D A T A Video decording: Video compression MPEG-2 und MPEG-1 compatible Video standard PAL G/ 25 Hz P i c t u re format 4:3 / 16:9 P i c t u re material 16:9, automatic adjustment for 16:9 TV equipment (via Scart) Letterbox filtering for 4:3 TV equipment Audio coding:...
- Page 83 2 8 . Te ch n i c a l D a t a D A T A LNB power supply: LNB power 500mA max. ; short-circuit proof LNB voltage vertical < 14V without load, > 11,5V at 400mA LNB voltage horizontal < 20V without load, > 17,3V at 400mA LNB switch-off in standby mode Number of active satellite positions: DiSEqC 1.0/1.2 SAT POSITION / SAT OPTION...
- Page 84 2 9 . G l o s s a r y G L O S S A R Y 2 9 . G l o s s a ry A C 3 D o l by Digital, sound system A G C Automatic Gain Control.
- Page 85 2 9 . G l o s s a r y G L O S S A R Y 2 9 . G l o s s a ry Coding systems See Encryption systems. Compact Flash. Standard for a storage medium (memory card) with Flash memory, w h i ch retains imformation even without pow e r.
- Page 86 2 9 . G l o s s a r y G L O S S A R Y 2 9 . G l o s s a ry D T S Digital Theater System, sound system DVB - S / T / C Digital Video Broadcasting.
- Page 87 2 9 . G l o s s a r y G L O S S A R Y 2 9 . G l o s s a ry I n t e rnet Protocol. Level 3 protrocol in the TCP/IP communications standard. It mediates data p a ckets in "insecure"...
- Page 88 2 9 . G l o s s a r y G L O S S A R Y 2 9 . G l o s s a ry M I P S Millions of Instructions Per Second. Measurement of millions of machine instructions carried out per second.
- Page 89 2 9 . G l o s s a r y G L O S S A R Y 2 9 . G l o s s a ry QPSK / QAM Q u a d ratur Phase Shift Keying is a modulation method for digital television programmes re c e i- ved via satellite.
- Page 90 2 9 . G l o s s a r y G L O S S A R Y 2 9 . G l o s s a ry S / P D I F Sony/Philips Digital Interface Format. Definition of an interface and a protocol for digital audio d a t a , used in consumer equipment.
- Page 91 2 9 . G l o s s a r y G L O S S A R Y 2 9 . G l o s s a ry 4 . C ry p t o w o r k s : A CA system developed by Philips. 5 .
-
Page 92: Warranty Card
3 0 . W a r r a n t y c a r d W A R R A N T Y 3 0 . Wa r ranty card W A R R A N T Y C A R D Device type: . - Page 93 Mode d'emploi D reambox DM5600S F ra n c e Linux OS SetTopbox avec 2 x emplacement PCMCIA pour modules CA d'accès à la réception de programmes DVB libres et cry p t é s ASTRA und EUTELSAT. 1x emplacement pour carte électronique modulateur RFRF affich e u r...
-
Page 94: T É L É C O M M A N D E
1 . T é l é c o m m a n d e 1 .T é l é c o m m a n d e... -
Page 95: Vu E
2 . V u e s 2 . Vu e... - Page 96 D reamUp - Enre g i s t rement du logiciel sur mémoire Flash 123 - 125 2 7 . 6 Ramener la Dreambox sur les réglages par défaut 1 2 6 2 8 . Données tech n i q u e s 127 - 129 2 9 .
-
Page 97: Description Des Touches De La Télécommande
S h u t d o w n / S t a n d b y. Sélectionnez l'option voulue et valider avec " O K ". Pour amener v o t re Dreambox en mode Veille (Standby ) , a p p u yez brièvement sur la touche " Po w e r ". L'heure est affich é... - Page 98 4 . D e s c r i p t i o n / t o u c h e s D E S C R I P T I O N To u che A U D I O : A l'aide de la touche "...
- Page 99 4 . D e s c r i p t i o n / t o u c h e s D E S C R I P T I O N To u che Flèche vers le bas: Quand aucun menu OSD est sélectionné (affiché sur votre écra n ) , la touche "Flèche vers le b a s "...
- Page 100 4 . D e s c r i p t i o n / t o u c h e s D E S C R I P T I O N To u che d'Options bleue: Cette touche possède de différentes fonctions qui dépendent de la position choisie dans le m e n u .
-
Page 101: Consignes D'utilisation Importantes 1 0
Un affichage sur écran (OSD - On Screen Display) simplifie considérablement la commande de la Dreambox. Toutes les options disponibles sont indiquées par 4 points de couleurs (rouge, v e r t , j a u n e, bleu) et peuvent être activées à l'aide de la télécommande. -
Page 102: Consignes De Sécurité
6 . C o n s i g n e s d e s é c u r i t é C O N S I G N E S 6 . Consignes de sécurité Avant de mettre la DM5600 en serv i c e, v e u i l l e z , pour votre propre protection, l i re entière m e n t les consignes de sécurité. -
Page 103: Consignes De Sécurité Supplementaire
Le système de terre doit corre s p o n d re à SABS 061. N e t t o ya g e : De la prise de coura n t , d é b ra n chez le cordon électrique de la Dreambox avant de la nettoye r. -
Page 104: Mise En Serv I C E
7 . 1 . 1 A n a l o g i q u e Pour ra c c o rder la Dreambox à votre amplificateur HiFi, veullez utiliser un câbel Chinch appro- prié. Raccordez-le au port Audio R/L (D/G) et à une entrée libre (par ex. AUX ou CD) de votre amplificateur HiFi. -
Page 105: Consignes De La Mise Au Re B U
8 . L a m i s e a u r e b u t M I S E 8 . Consignes pour la mise au re b u t L'emballage de la D M 5 6 0 0 se compose exclusivement de matériaux re cyclabes. Veuillez trier les composants et les jeter selon le système DUAL. - Page 106 1 0 . L’ i n s t a l l a t i o n / s a t e l l i t e s S A T E L L I T E S 1 0 . L'installation de satellites et scanner (re ch e rch e ) Avant de commencer cette opération, veuillez lire section 5.
-
Page 107: 1 . Mode T
1 1 . M o d e T V M O D E 1 1 . Mode T V Avant de commencer cette opération, veuillez lire section 5. Consignes d'utilisation impor- t a n t e s . Aucun menu OSD est sélectionné (affiché sur votre écra n ) , et vous voulez acceder au mode TV. A p p u yez sur la touche Dre a m ,n aviguez sur "mode TV"... -
Page 108: Menu Info
1 3 . M e n u I n f o r m a t i o n s M E N U I N F O R M A T I O N S 1 3 . Menu Inform a t i o n s Avant de commencer, veuillez lire section 5. - Page 109 1 6 . O S D S e t u p O S D 1 6 . OSD Setup (Configuration de l'OSD) Avant de commencer, veuillez lire section 5. Consignes d'utilisation importantes. Aucun menu OSD est sélectionné (affiché sur votre écra n ) , et vous êtes en mode TV ou radio. A p p u yez sur la touche "...
- Page 110 " A / V S e t t i n g s " et confirmez chaque opération par " O K ". A l'aide des touches de direction vous pouvez sélectionner le format couleurs provenant de la sortie Scart de votre Dreambox au téléviseur. Vous pouvez choisir parmi CVBS (FBAS), RGB et S V i d e o.
- Page 111 1 9 . B a r r i è r e d ’ a c c è s s B A R R I È R E D ’ A C C È S S 1 9 . P a rental Lock (Barrière d'accèss Avant de commencer, veuillez lire section 5.
- Page 112 2 1 . B o u q u e t s B O U Q U E T S 2 1 . Créer et gérer les bouquets (fovorites) individuels Avant de commencer, veuillez lire section 5. Consignes d'utilisation importantes. Aucun menu OSD est sélectionné (affiché sur votre écra n ) , et vous êtes en mode TV ou radio. A p p u yez sur la touche "...
-
Page 113: Activer Le Mode Expert 1 1
2 2 . M o d e E x p e r t M O D E E X P E R T 2 2 . Activer le mode Expert Avant de commencer, veuillez lire section 5. Consignes d'utilisation importantes. Aucun menu OSD est sélectionné... - Page 114 2 3 . S k i n S K I N 2 3 . Skin (Présentation de l’écran) (uniquement dans le mode E x p e r t ) Avant de commencer, veuillez lire section 5. Consignes d’utilisation importantes et section 2 2 .
- Page 115 E n s u i t e, par le bloc numérique de votre télécommande, re n t rez l’heure (en minutes) à laquelle v o t re Dreambox devra s’éteindre. Sauvegardez votre réglage par la touche d’"Option verte". Pour vérifier votre minuteur, n aviguez dans le menu minuteur et là sur la liste (timer) minuteur et sur le réglage en question et appuyez sur "...
-
Page 116: 7 . Dreamup - Actualisation Du Logiciel D'ex P L O I T A T I O
Dans la présente notice d’utilisation, nous partons du principe que vous établissez un ra c c o rd avec la Dreambox par l’interface COM1. Si ce sujet vous paraît trop complex e, veuillez vous a d reser en toute confiance à votre revendeur ou à notre Hotline technique sous w w w. d r e a m - m u l t i m e d i a - t v. - Page 117 2 7 . 2 D r e a m U p D R E A M U P 2 7 . 2 D reamUp – Etablissement de la liaison Cliquez sur " C o n n e c t ". Sur la ligne de statut, le logiciel vous indique qu’il est prêt pour l’établissement d’une liaison.
- Page 118 D R E A M U P Une fois la Dreambox sous tension, le logiciel effectue tous les préparatifs nécessaires au t ransfert des données dans la mémoire Flash de la Dreambox. Observez le statut. La barre de progrès indique "5600 boot".
- Page 119 2 7 . 3 D r e a m U p D R E A M U P Après avoir cliqué, la fenêtre suivante s’ouvre. Ici vous pouvez choisir le nom du fichier de l’image à sauvegard e r, puis le mémoriser. Après avoir cliqué...
-
Page 120: D Reamup - Effacer Le Logiciel D'ex P L O I T A T I O N
2 7 . 4 D r e a m U p D R E A M U P Quand la sauvegarde (Backup) est term i n é e, le logiciel émet le message suiva n t : C o n f i rmez ce message en cliquant " O K ". 2 7 . - Page 121 2 7 . 4 D r e a m U p D R E A M U P O b s e rvez le statut. Ensuite s’affiche une fenêtre indiquant que l’effacement (Erase) s’est achevé avec succès. Cliquez " O K ". 27.4 DreamUp...
-
Page 122: D Reamup - Enre G I S T Rement Du Logiciel Sur Mémoire Flash
2 7 . 5 D r e a m U p D R E A M U P 2 7 . 5 D reamUp – Enre g i s t rement du logiciel sur mémoire Flash Cliquez " F l a s h ". Le système vous demandera quel logiciel d’exploitation (Image) vous voulez enre g i s t re r. - Page 123 E n s u i t e, le système ch a rge le logiciel d’exploitation dans votre D r e a m b o x. O b s e rvez la ligne de statut. Quand le ch a rgement est term i n é , le contenu de la mémoire Flash de votre Dreambox s’éfface. O b s e rvez la ligne de statut.
- Page 124 2 7 . 5 D r e a m U p D R E A M U P Le système vérifie l’image ch a rg é e. Observez le statut. Quand l’opération en mémoire Flash est term i n é e, le logiciel vous indique que tout s’est bien passé.
- Page 125 Mettez votre D r e a m b o x en route. Ceci fait, maintenez la touché supérieure gauche de votre Dreambox appuyée et ne la re l â ch e z qu’une fois " 9 9 9 ” s ’ a f f i che sur l’écran de votre D r e a m b o x.
-
Page 126: 8 . Données Tech N I Q U E S
2 8 . D o n n é e s t e c h n i q u e s D O N N É E S 2 8 . Données tech n i q u e s DreamBox DM5600 Fe a t u r e s : - Processeur 250 MHz IBM PowerPC (350 Mips) - Page 127 2 8 . D o n n é e s t e c h n i q u e s D O N N É E S Décodage vidéo: C o m p ression vidéo compatible à MPEG-2 et MPEG-1 standard vidéoPAL G/ 25 Hz F o rmats d’image 4:3 / 16:9 Films en 16:9, adaptation automatique pour téléviseurs 16:9 (via Scart) Letterbox Filtrage pour appareils TV 4:3...
- Page 128 2 8 . D o n n é e s t e c h n i q u e s D O N N É E S Alimentation électrique LNB: LNB intensité 500mA max. ; résistante aux courts-circ u i t s LNB tension verticale <...
- Page 129 2 9 . M o t s - c l é s M O T S - C L É S 2 9 . Récapitulatif des mots-clés A C 3 D o l by Digital, système de restitution de son A G C Contrôle automatique de l’amplification (Automatic Gain Control) Grâce à...
- Page 130 2 9 . M o t s - c l é s M O T S - C L É S 2 9 . Récapitulatif des mots-clés Compact Flash. Standard applicable à un support mémoire (carte mémoire) équippé d’une m é m o i re Flash et capable de conserver l’information sans alimentation électrique. CF est une version miniaturisée, très légèrement modifiée des cartes mémoire CMCIA à...
- Page 131 2 9 . M o t s - c l é s M O T S - C L É S 2 9 . Récapitulatif des mots-clés développés et sont fabriqués conformément au standard DVB peuvent arborer le logo DVB les indentifiant comme tels.
- Page 132 2 9 . M o t s - c l é s M O T S - C L É S 2 9 . Récapitulatif des mots-clés te (downlink). Les stations de télévision utilisent souvent la transmission satellite pour envoye r le signal de son lieu d’enre g i s t rement à...
- Page 133 2 9 . M o t s - c l é s M O T S - C L É S 2 9 . Récapitulatif des mots-clés N u m é r i q u e Procédé du future servant à tra n s m e t t re les signaux. Les signaux sont convertis en code numérique binaire (0 et 1) et envoyés ainsi.
- Page 134 2 9 . M o t s - c l é s M O T S - C L É S 2 9 . Récapitulatif des mots-clés QPSK / QAM Q u a d ratur Phase Shift Keying est un procédé de modulation dédié aux programmes TV numéri- ques reçus par satellite.
- Page 135 2 9 . M o t s - c l é s M O T S - C L É S 2 9 . Récapitulatif des mots-clés S / P D I F F o rmat d’interface numérique Sony/Philips (Sony/Philips Digital Interface Format). Définition d’une interface et d’un protocole destinés aux données audio numériques et s’employant dans les appareils grand public.
- Page 136 2 9 . M o t s - c l é s M O T S - C L É S 2 9 . Récapitulatif des mots-clés emplacements pour l’interface commune. Ces emplacements peuvent aussi bien être installés plus tard. Les modules multi-accès offrent la plus grande sécurité pour évoluer avec aisance, à l ’...
-
Page 137: Carte De Garantie
3 0 . C a r t e d e g a r a n t i e G A R A N T I E 3 0 . Carte de gara n t i e C A R T E G A R A N T I E Type: .