Table of Contents
Advertisement
Available languages
Available languages
Quick Links
USE AND CARE GUIDE
SMART LED TAPE LIGHT
Questions, problems, missing parts? Before returning to the store,
call Design Solutions International Customer Service Mon-Fri 9:30 am to 3:00 pm EST
1-800-388-6141 ext. 216
For customer service support and the fastest response, please email us at
CustomerSupport@DSILighting.com
w
c
+
c
w
w
c
+
c
w
www.SMRTLite.com
Item # 312 199 115
TM
MR
Model # DS18979
w
c
+
c
w
w
c
+
c
w
Advertisement
Chapters
Table of Contents

Related Manuals for NBG Home SMRTLite DS18979


Summary of Contents for NBG Home SMRTLite DS18979
- Page 1 Item # 312 199 115 Model # DS18979 USE AND CARE GUIDE SMART LED TAPE LIGHT Questions, problems, missing parts? Before returning to the store, call Design Solutions International Customer Service Mon-Fri 9:30 am to 3:00 pm EST 1-800-388-6141 ext. 216 For customer service support and the fastest response, please email us at CustomerSupport@DSILighting.com www.SMRTLite.com...
-
Page 2: Table Of Contents
Table of Contents Table of Contents ............2 Package Contents ..............5 Safety Information ............2 Installation ..............6 Warranty ................. 3 Operation ................ 10 Three (3) Year Warranty ............. 3 SMRTLite APP How to ........... 11 What is Covered ................ 3 Care and Cleaning ............ -
Page 3: Warranty
Warranty THREE (3) YEAR WARRANTY WHAT IS COVERED The manufacturer warrants this fixture to be free from defects in materials and workmanship for a period of three (3) years from date of purchase. This warranty applies only to the original consumer purchaser and only to products used in normal use and service. If this product is found to be defective, the manufacturer’s only obligation, and your exclusive remedy, is the repair or replacement of the product at the manufacturer’s discretion, provided that the product has not been damaged through misuse, abuse, accident, modifications, alteration, neglect, or mishandling. -
Page 4: Pre-Installation
Pre-Installation PLANNING INSTALLATION Read all instructions before installing. To avoid damaging this product, place it on a soft, non-abrasive surface, such as carpet or cardboard. IMPORTANT: Inspect the LED tape light for any cuts, NOTE: The Smart LED tape light must be installed within abrasions, or exposed copper that may have occurred range of your home’s Wi-Fi in order to communicate during shipping. -
Page 5: Package Contents
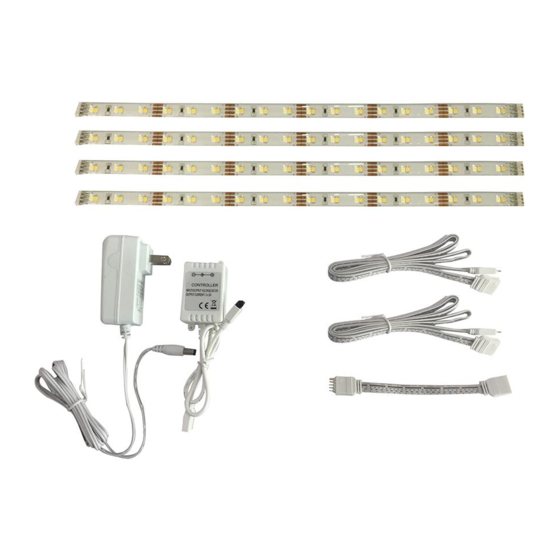
Pre-Installation (continued) PACKAGE CONTENTS NOTE: Hardware not shown to actual size. Part Description Quantity Adapter In-line remote control with connector 12” LED tape light Connector wire (3.9”) Connector wire (39”) -
Page 6: Installation
Installation Things to consider before installing □ What is the best layout configuration for your installation? □ How will you run and conceal the wires to your LED tape light? □ Temporarily mounting the LED tape light using painter’s tape allows you to experiment with tape light positioning before permanent installation. - Page 7 Installation (continued) Connecting LED tape light and adaptor □ Insert the plug from the adaptor (A) into the outlet on the side of the in-line remote control. □ Use the four configuration options below to connect up to four LED tape lights. •...
- Page 8 Installation (continued) Installing the LED tape light □ There are 2 methods for installing your LED tape light: • 4A Tape method: Working from one end to the other, remove the 3M paper backing and press into place. Press between the LEDs to help ensure secure contact with the mounting surface.
- Page 9 Installation (continued) Installing the in-line remote □ There are two installation options to choose from: • 5A: Remove the protective tape from the adhesive back of the in-line remote careful. Then place the in-line remote control into position and press to ensure a proper adhesion to the surface. •...
-
Page 10: Operation
Operation Operating the LED tape light Configuration ON/OFF Increase warm white brightness Increase cool white brightness Decreased brightness Increased brightness Operating the remote control: There are two options for you to choose from: A: Using the in-line remote: Click on/off button: To turn LED tape light on/off. Configuration button resets smart control access. -
Page 11: Smrtlite App How To
SMRTLite APP How To Download or open the SMRTLite App □ Turn on the SMRTLite lamp while ensuring that your phone is connected to a secure 2.4GHz WiFi network. 5GHz networks are not supported. □ Download and Open the app by searching for SMRTLite in the Apple App Store or Google Play Store or by visiting one of the URLs below: http://ios.smrtlite.com http://android.smrtlite.com... - Page 12 SMRTLite APP How To (continued) SMRTLite Network Configuration (continued) 3. Press and hold the “configuration” button on the in-line remote of the LED Strip for 3 seconds. Once the light flashes once, 4. Press “Confirm Rapid Blinking” release the button and wait until the LED Strip begins to flash rapidly.
- Page 13 SMRTLite APP How To (continued) SMRTLite Network Configuration (continued) NOTE: For tutorials on additional features including sharing your lighting device with family members and how to control your LED lamp via Amazon Alexa, Google Assistant or Apple Siri please visit SMRTLite.com. 7.
-
Page 14: Care And Cleaning
Care and Cleaning □ Do not use any cleaners with chemicals, solvents, or harsh abrasives. Use only a dry, soft cloth to dust or wipe carefully. □ To clean the fixture, disconnect power by turning off the circuit breaker or by removing the fuse at the fuse box. Use a dry or slightly dampened, clean cloth to wipe the exterior surface of the fixture. -
Page 15: Service Parts
Service Parts MODEL: DS18979 Part Description Screw Clip Wire clip Adapter In-line remote control and connector connected as one set 12” LED tape Connector wire (3.9”) Connector wire (39”) - Page 16 Questions, problems, missing parts? Before returning to the store, call Design Solutions International Customer Service Mon-Fri 9:30 am to 3:00 pm EST 1-800-388-6141 ext. 216 For customer service support and the fastest response, please email us at CustomerSupport@DSILighting.com www.SMRTLite.com Retain this manual for future use.
- Page 17 Artículo núm. 312 199 115 Modelo DS18979 GUÍA DE USO Y MANTENIMIENTO LÁMPARA INTELIGENTE EMPOTRADA QUE CAMBIA DE COLOR ¿Tiene alguna pregunta o algún problema? ¿Le faltan piezas? Antes de volver a la tienda, llame al Servicio de atención al cliente de Design Solutions International, de lunes a viernes, de 9.30 a 15 h EST 1-800-388-6141 ext.
- Page 18 Tabla de contenidos Tabla de contenidos............2 Contenidos del paquete.............. 5 Información de seguridad..........2 Instalación............... 6 Garantía................3 Funcionamiento.............. 10 Garantía de tres (3) años............3 Cómo utilizar la aplicación SMRTLite......11 Mantenimiento y limpieza..........14 ¿Qué cubre?................3 ¿Qué...
-
Page 19: Garantía
Garantía GARANTÍA DE TRES (3) AÑOS ¿QUÉ CUBRE? El fabricante garantiza que esta la tira de LED no presentará defectos de material ni de mano de obra durante un período de tres (3) años a partir de la fecha de compra. Esta garantía se aplica solo al comprador original y únicamente a los productos que se utilicen en condiciones normales y reciban un mantenimiento adecuado. -
Page 20: Preinstalación
Preinstalación PLANIFICACIÓN DE LA INSTALACIÓN Lea las instrucciones antes de comenzar la instalación. Para evitar dañar este producto, colóquelo sobre una superficie suave, no abrasiva, como una alfombra o un cartón. IMPORTANTE: Retirar la tira de LED de la superficie OBSERVACIÓN: The Smart LED tape light must be de montaje podría producir lesiones, así... -
Page 21: Contenidos Del Paquete
Preinstalación (continuación) CONTENIDOS DEL PAQUETE OBSERVACIÓN: La tornillería no se muestra en tamaño real. Pieza Descripción Cantidad Adaptador In-line remote control with connector 12” LED tape light Cable conector (3,9”) Cable conector (39”) -
Page 22: Instalación
Instalación Things to consider before installing □ What is the best layout configuration for your installation? □ How will you run and conceal the wires to your LED tape light? □ Temporarily mounting the LED tape light using painter’s tape allows you to experiment with tape light positioning before permanent installation. - Page 23 Instalación ( continuación) Conexión de la cinta de LED y el adaptador □ Insert the plug from the adaptor (A) into the outlet on the side of the in-line remote control. □ Use the four configuration options below to connect up to four LED tape lights. •...
- Page 24 Instalación ( continuación) Installing the LED tape light □ There are 2 methods for installing your LED tape light 4A Método de jación con cinta: trabajando de un extremo al otro, retire el papel de respaldo 3M y presione para jar en la posición adecuada.
- Page 25 Instalación ( continuación) Installing the in-line remote □ Puede elegir entre dos opciones: 5A: Retire la cinta protectora de la parte trasera adhesiva del receptor de infrarrojos y, a continuación, coloque el receptor de infrarrojos en la posición deseada y presione para asegurarse de que se ha adherido correctamente a la supercie. 5B: Use the two wire clips to install the in-line remote into desired location.
-
Page 26: Funcionamiento
Funcionamiento Operating the LED tape light Configuración ON/OFF Increase warm white brightness Increase cool white brightness Decreased brightness Increased brightness Funcionamiento del control remoto: Puede elegir entre dos opciones: A: Uso del mando integrado: Click on/off button: To turn LED tape light on/off. El botón de configuración reinicia el acceso al control inteligente. -
Page 27: Cómo Utilizar La Aplicación Smrtlite
Cómo utilizar la aplicación SMRTLite Descargar o abrir la aplicación SMRTLite □ Encienda la tira de LED SMRTLite y asegúrese de que el teléfono esté conectado a una red wifi segura de 2,4 GHz. Las redes de 5 GHz no son compatibles. □... - Page 28 Cómo utilizar la aplicación SMRTLite (continuación) SMRTLite Configuración de red (continuación) 3. Mantenga pulsado el botón “configuración.” del control remoto integrado de la tira de LED durante 3 segundos. Cuando la luz parpadee una 4. Presione “Confirmar Parpadeo vez, suelte el botón y espere a que la tira de LED Rápido”...
- Page 29 Cómo utilizar la aplicación SMRTLite (continuación) SMRTLite Configuración de red (continuación) OBSERVACIÓN: Para ver tutoriales sobre funciones adicionales, por ejemplo, cómo compartir el dispositivo de iluminación con otros familiares y cómo controlar la tira de LED a través de Alexa (Amazon), el Asistente de Google o Siri (Apple), visite SMRTLite.com.
-
Page 30: Mantenimiento Y Limpieza
Mantenimiento y limpieza □ No emplee productos de limpieza que contengan químicos, disolventes ni abrasivos. Utilice únicamente un paño seco para quitar el polvo o limpiar con cuidado. □ Para limpiar la lámpara, desconecte la alimentación apagando el disyuntor del circuito o retirando el fusible de la caja de fusibles. Utilice un paño suave seco o ligeramente mojado para limpiar la superficie exterior de la lámpara. -
Page 31: Piezas De Repuesto
Piezas de repuesto MODELO: DS18979 Pieza Descripción Tornillo Enganche Wire clip Adaptador In-line remote control and connector connected as one set Tira de LED 12” Cable conector (3,9”) Cable conector (39”) - Page 32 ¿Tiene alguna pregunta o algún problema? ¿Le faltan piezas? Antes de volver a la tienda, llame al Servicio de atención al cliente de Design Solutions International De lunes a viernes, de 9.30 a 15 h EST 1-800-388-6141 ext. 216 Para obtener ayuda de nuestro Servicio de atención al cliente y la respuesta más rápida, envíenos un correo electrónico a CustomerSupport@DSILighting.com www.SMRTLite.com...