Advertisement
Quick Links
Test Equipment Depot - 800.517.8431 - 99 Washington Street Melrose, MA 02176 - TestEquipmentDepot.com
SC-60C Scissor Cutter Head Instructions
Read and understand these instructions, the electrical tool in-
structions, and the warnings and instructions for all equip-
ment and material being used before operating this tool to
reduce the risk of serious personal injury.
SAVE THESE INSTRUCTIONS!
• Keep your fingers and hands away from the Scissor Cutter
Head during the cutting cycle. Your fingers or hands can be
crushed, fractured or amputated if they are caught in the head or
between the head and other objects.
• This head is not insulated for use on or near energized con-
ductors. Use of this head on or near energized conductors may
lead to electrical shock, causing severe injury or death.
• Large forces are generated during product use that can break
or throw parts and cause injury. Stand clear during use and wear
appropriate protective equipment, including eye protection.
• Never repair a damaged head. A head that has been welded,
ground, drilled or modified in any manner can break during use.
Only replace components as indicated in these instructions. Discard
damaged heads to reduce the risk of injury.
®
• Only use a RIDGID
or ILSCO
SC-60C Scissor Cutter Head. Use of other tools with this head may
damage the head, tool, cutting edge, or result in serious injury.
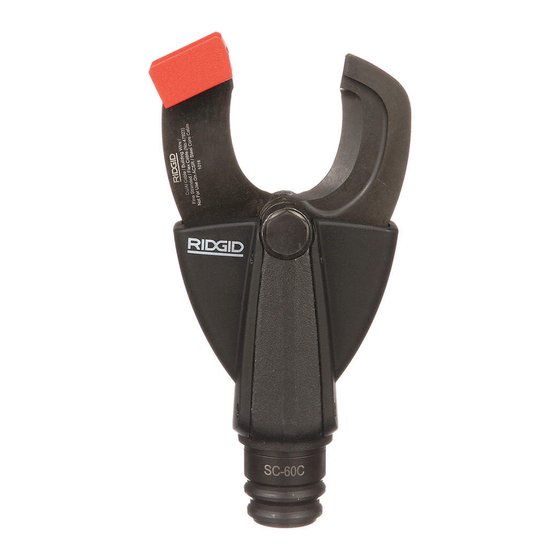
Description
The RIDGID SC-60C Scissor Cutter Head can be used to cut class B
copper and aluminum electrical wire up to 750 MCM (400mm²) or
ACSR (Aluminum Cable Steel Reinforced) up to 500 MCM (250mm
depending on the blades installed.
The Scissor Cutter Head attaches to the RIDGID or ILSCO Electrical
Tools and can rotate 360 degrees with the RIDGID QuickChange Sys-
tem™ (QCS™).
QCS Coupling
Guards
Figure 1 – SC-60C Scissor Cutter Head
Specification
Cable
Class B copper building wire, up to 750MCM (400mm
Aluminum building wire, up to 750MCM (400mm
Copper flex wire, up to 750MCM (400mm
Max. Dia. with insulation = 1.97" (50mm)
ACSR cable, 8GA to 500MCM (250mm
Max. Dia. = 1.18" (30 mm)
Compatible QCS
Type ......................6T QCS
60kN QCS
Max. Input Force......60 kN (13500 lbf)
Weight ....................4.85 lb (2.2 kg)
Printed 6/14
The Emerson logo and RIDGID logo are registered trademarks of Emerson Electric Co. or RIDGID, Inc. in the U.S. and other countries.
EC40700
WARNING
®
Electrical Tool with this RIDGID
Blade
Blade Bolt
Blade Guide
Blade Set Cat#
)
47923
2
2
)
2
)
2
)
47928
All other trademarks belong to their respective holders.
Cutting capacity depends on a variety of factors including material
thickness, type, hardness and configuration. Cuts may not be able to
be completed based on these and other variables.
Only cut material that the blades are rated for. Any other ma-
NOTICE
terial, such as steel, can dull and damage the blades.
Inspection/Maintenance
Inspect the Scissor Cutter Head before each use for issues that could
affect safe use.
1. With the battery removed from the tool, depress the QCS sleeve
and remove the head.
2. Clean the head and remove all dirt, oil, grease, and debris to aid
in inspection and improve control. Pay close attention to the QCS
coupling to ensure there is no debris to damage the coupling.
3. Inspect the head for:
• Proper assembly and completeness. Make sure guards are
present and secure.
• Wear, corrosion or other damage. Dimples in the grooves of the
QCS are normal with use and are not considered damage.
• Presence and readability of head markings.
If any issues are found, do not use head until corrected.
4. Inspect the electrical tool and any other equipment being used as
directed in their instructions.
5. The QCS coupling is lubricated for life at the factory and does not
require any further lubrication. Monthly or as required, lubricate
the pivot points of the Scissor Cutter Head with a light weight gen-
®
eral purpose lubricating oil. Wipe off any excess oil.
6. Changing cutting blades
– Remove the eight guard screws (A) and the guards (B).
– Remove the blade bolt (C) and nut (D).
– Remove the clips (E) and blade pins (F).
– Remove blades (G).
– Reverse steps to install a new, matched set of cutting blades.
– Tighten blade bolt until blades will not move. Loosen blade bolt
1
/
turn and tighten blade bolt nut. Manually move blades past
5
each other to confirm proper function.
2
)
Figure 2 – Changing Blades
Set Up/Operation
1. Determine the size and type of material to be cut. Select the ap-
propriate equipment per its specifications. If needed, change cut-
ting blades. Do not cut steel wire. Mark the cut location on the wire.
2. Make sure all equipment is inspected and set up per its instruc-
tions.
3. Remove the battery from the tool. Depress the QCS sleeve on
the electric tool and insert the Scissor Cutter Head. Release the
sleeve to retain the head. Confirm that the head is fully inserted
and locked into tool before turning ON. (If head will not lock into
QCS, ensure tool ram is fully retracted by pressing the pressure
release button.) With dry hands install the tool battery.
4. Place the wire between the cutting edges of the Scissor Cutter
Head, and squarely line up the cutting edge with the cut location.
Do not try to cut the wire at an angle.
©2014, RIDGID, Inc.
D
F
G
E
C
B
A
944-732-974.10
REV. B
Advertisement

Related Manuals for RIDGID SC-60C


Summary of Contents for RIDGID SC-60C
- Page 1 Do not try to cut the wire at an angle. ©2014, RIDGID, Inc. Printed 6/14 944-732-974.10 The Emerson logo and RIDGID logo are registered trademarks of Emerson Electric Co. or RIDGID, Inc. in the U.S. and other countries. EC40700 REV. B All other trademarks belong to their respective holders.
- Page 2 SC-60C Scissor Cutter Head Instructions Figure 3 – Cutter Square to Wire 5. With hands clear of the head and other moving parts, operate the Electrical Tool as per its instructions. Continue to press the run switch until the tool ram automatically retracts and the wire is cut.