Table of Contents
Advertisement
Available languages
Available languages
Quick Links
S150
STHT77404
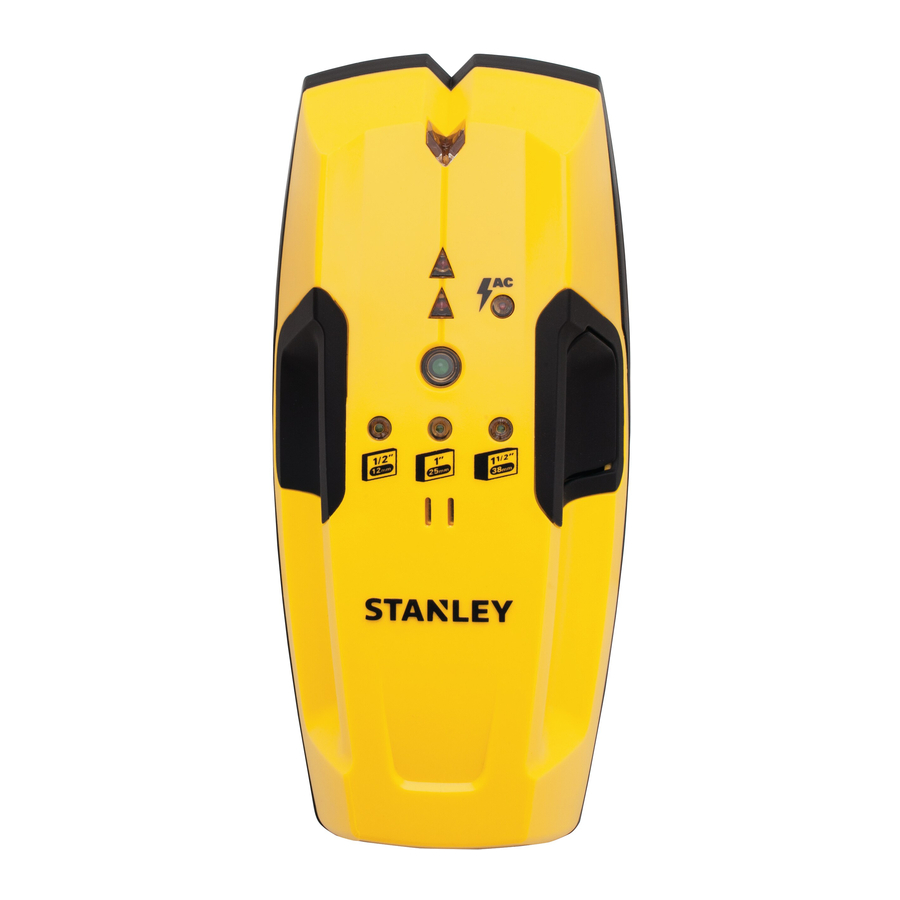
Stanley Stud Sensor 150
The Stud Sensor 150 uses electronic signals to locate the edges of studs, joists
or live AC wires through drywall or other common building materials. Depth
detection selected by activation button for 1/2 inch, 1 inch and 1-1/2 inch. Once
the edge of a stud has been detected, the Stud Sensor 150 displays red LED's
and sounds an audible tone. A marking channel allows you to easily note the
stud edges on the wall.
Note: Read all instructions prior to operating the Stud Sensor 150 and DO NOT
remove any labels from the tool.
WARNING:
Protect Your Eyes, Wear Safety Goggles.
1
77404
Questo manuale d'istruzione è fornito da trovaprezzi.it. Scopri tutte le offerte per
cerca il tuo prodotto tra le
migliori offerte di Elettroutensili
• Marking Channel
REV A 08
OPERATING INSTRUCTIONS
Battery
1
Open door on back of unit and connect a 9 volt battery
(not included) to clip. Put battery back into case and close
back battery door.
Note: Recommend to replace a new 9 volt battery
when low battery - fl ashing green LED.
Usage
Detecting Wood / Metal Studs
2
Hold the Stud Sensor 150 fl at against the surface,
making fi rm contact.
• LED Display
• Live Wire Warning LED
• Activation Button
• STUD Detected
• Live Wire Detected
• Self-Calibration Complete /
Low Battery Indicator
• Depth Detection Mode
1
2
Stanley S150
3
Selecting Scanner Depth Mode
• Depress and hold activation button once (1x) to
select to 1/2" read depth detection. The 1/2" mode
LED will illuminate.
• Double click (depress two times - 2x) and hold
activation to select to 1" read depth detection. The
1" mode LED will illuminate.
• Triple click (depress three times - 3x) and hold
activation button to select 1-1/2" read depth
detection. The 1-1/2" mode LED will illuminate.
Note: For best results the depth mode selected should be based on the
thickness of the surface material being scanned.
3
The green and top red LED will light.
Note: The unit cannot be moved before calibration is complete.
4
When the red LED goes off, the unit
4
is calibrated.
5
Keep holding the activation button
during all of the following procedures.
Note: Once the Activation button is
released, the unit shuts off.
> 3
sec
11
If the red LED stays lit, move the Stud Sensor 150
to a different location and try again. Releasing the
activation button will turn off the sensor.
Note: While calibrating, the Stud Sensor 150 must not
be placed directly over a stud, dense material such as
metal, or over a wet or newly painted area, or it will not
properly calibrate.
o
3
5
≤ 3
sec
11
11
>3
sec
2
Advertisement
Table of Contents

Related Manuals for Stanley S150


Summary of Contents for Stanley S150
- Page 1 Low Battery Indicator • Depth Detection Mode STHT77404 REV A 08 Stanley Stud Sensor 150 OPERATING INSTRUCTIONS When the red LED goes off, the unit The Stud Sensor 150 uses electronic signals to locate the edges of studs, joists Battery is calibrated.
-
Page 2: Operating Tips
The Stud Sensor 150 will scan through common building materials, Including: • Gypsum drywall WARRANTY • Plywood sheathing Stanley Tools warrants the Stud Sensor 150 against defects in material and • Hardwood fl oors workmanship for one year from the date of purchase. Stanley’s liability under • Linoleum over wood this warranty is limited the replacement of the unit. - Page 3 • Auto-étalonnage terminé/ Indicateur de pile faible • Mode détection de profondeur STHT77404 REV A 08 Détecteur de montant 150 Stanley MODE D'EMPLOI Lorsque le voyant rouge s'éteint, Le Détecteur de Montant 150 utilise des signaux électroniques pour trouver Pile l'appareil est étalonné.
-
Page 4: Conseils D'utilisation
à compter de la date d’achat. • Cloison sèche en plâtre La responsabilité de Stanley dans le cadre de cette garantie se limite au • Contreplaqué remplacement de l’appareil. Toute tentative de réparation du produit par •... - Page 5 Indicatore batteria scarica • Modalità di rilevazione della profondità STHT77404 REV A 08 Stanley Stud Sensor 150 ISTRUZIONI D'USO Quando il LED rosso si spegne, viene Lo Stud Sensor 150 utilizza segnali elettronici per localizzare le estremità Batteria effettuata la calibrazione dell'unità.
-
Page 6: Suggerimenti Per L'uso
• Moquette Il LED rosso per i fi li sotto tensione si illuminerà e lo o consequenziali. Gli agenti di Stanley non hanno la facoltà di modifi care la • Materiali in foglio di alluminio Stud Sensor 150 emette un segnale acustico, avvisando presente garanzia. -
Page 7: Instrucciones De Funcionamiento
/ Batería baja • Modo de detección de profundidad STHT77404 REV A 08 Sensor de parales Stanley 150 INSTRUCCIONES DE FUNCIONAMIENTO Cuando se apaga el LED rojo, la El sensor de parales 150 utiliza señales electrónicas para localizar los bordes de Batería... -
Page 8: Consejos Para El Funcionamiento
La calibración, las baterías y el mantenimiento recaen El sensor no puede explorar a través de: bajo la responsabilidad del usuario. En los casos que la ley lo permita, Stanley El LED rojo de cable con corriente se iluminará y el •... -
Page 9: Instruções De Funcionamento
Indicador de bateria fraca • Modo de detecção de profundidade STHT77404 REV A 08 Stanley Stud Sensor 150 INSTRUÇÕES DE FUNCIONAMENTO Quando o LED vermelho se apagar, O Stud Sensor 150 utiliza sinais electrónicos para localizar as extremidades de Bateria signifi... -
Page 10: Sugestões De Funcionamento
• Gesso GARANTIA • Revestimento de contraplacado A Stanley Tools garante o Stud Sensor 150 contra defeitos no material e fabrico • Pisos de madeira durante um ano a partir da data de aquisição. No que respeita a esta garantia, •... - Page 11 • Zelfkalibratie voltooid/ Batterij laag indicator • Dieptedetectie modus STHT77404 REV A 08 Stanley Stud Sensor 150 BEDIENINGSINSTRUCTIES Wanneer het rode LED uitgaat is het De Stud Sensor 150 gebruikt elektronische signalen om de zijkanten van Batterij apparaat gekalibreerd.
- Page 12 Werknemers van Stanley kunnen Stud Sensor 150 laat een toon horen die u waarschuwt • Cement of beton deze garantie niet wijzigen. Stanley is niet verantwoordelijk voor schade als in de nabijheid (normaal gesproken binnen 100 mm tot • Metaal & gestukadoorde muren gevolg van slijtage, misbruik of aanpassingen aan dit product.
- Page 13 • Anzeiger für Selbsteichung beendet / Schwache Batterie • Tiefenerkennungsmodus STHT77404 REV A 08 Stanley Stud Sensor 150 BETRIEBSANLEITUNG Wenn die rote LED ausgeht, ist das Der Stud Sensor 150 verwendet elektronische Signale, um Ränder von Pfosten, Batterie Gerät geeicht.
-
Page 14: Technische Daten
Der Stud Sensor 150 sucht durch gewöhnliche Baustoffe wie: GARANTIE • Gipstrockenwand Stanley Tools übernimmt die Garantie für den Stud Sensor 150 für 1 Jahr ab • Sperrholzverkleidung Kaufdatum gegen Schäden im Material und in der Verarbeitung. Stanleys • Hartholzfussboden Haftung unter dieser Garantie ist auf den Ersatz dieses Geräts beschränkt. - Page 15 • Selvkalibrering utført / Indikator for lavt batteri • Dybedeteksjonsmodus STHT77404 REV A 08 Stanley Stud Sensor 150 BRUKSINSTRUKSJONER Når den røde LED-en slukker seg, er Stud Sensor 150 bruker elektroniske signaler for å fi nne kantene til Batteri enheten kalibrert.
- Page 16 • tregulv GARANTI • linoleum over treverk Stanley Tools garanterer at Stud Sensor 150 er fri for defekter i materiale og • tapet utførelse i ett år fra kjøpsdatoen. Stanleys ansvar under denne perioden er Sensoren kan ikke skanne gjennom: begrenset til erstatning av enheten.
- Page 17 • Självkalibrering komplett/ Indikator för svagt batteri • Djupdetekteringsläge STHT77404 REV A 08 Stanley Stud Sensor 150 BRUKSANVISNING När den röda lysdioden slocknar är Stud Sensor 150 använder elektroniska signaler för att lokalisera mitten av Batteri enheten kalibrerad. reglar, balkar eller strömförande ledningar genom gips eller andra vanliga ≤...
-
Page 18: Tips För Användning
är Stanley inte ansvarig för indirekta skador eller följdskador. Stanleys agenter Den röda lysdioden för strömförande ledning tänds kan inte ändra denna garanti. Stanley är inte ansvarig för skada till följd av och Stud Sensor 150 avger en ljudsignal som varnar när Tapet slitage, missbruk eller förändring av denna produkt. - Page 19 Bemærk: Enheden kan ikke fl yttes, før kalibreringen er afsluttet. • Selvkalibrering afsluttet/ indikator for lavt batteri • Dybdesporingstilstand STHT77404 REV A 08 Stanley Studsensor 150 DRIFTSINSTRUKTIONER Når den røde LED slukkes, kalibreres Studsensor 150 bruger elektroniske signaler til at lokalisere kanterne på stolper, Batteri enheden.
- Page 20 Studsensor 150 vil scanne gennem almindelige byggematerialer, inklusive: • Gipsvægge GARANTI • Krydsfi nér Stanley Tools yder garanti for Studsensor 150 mod materialefejl og -udførelse i • Gulve af hårdt træ ét år fra købsdatoen. Stanleys erstatningsansvar i henhold til denne garanti er • Linoleum over træ...
- Page 21 Skannauslaitteen syvyystilan valitseminen • Merkintäkanava • Paina ja pidä alhaalla aktivointipainiketta kerran (1x) 12,7 mm (0.5 tuuman) lukusyvyyden tunnistamiseksi. S150 12,7 mm (0,5 tuuman) tilan LED-valo syttyy. • Nestekidenäyttö • Kaksoisnapsauta (paina kaksi kertaa - 2x) ja pidä alhaalla aktivointipainiketta 25,4 mm (1 tuuman) •...
-
Page 22: Tekniset Tiedot
Paaluanturi 150 skannaa yleisten rakennusmateriaalien läpi, mukaan lukien seuraavat: TAKUU • Kipsilevyseinä Stanley Tools myöntää paaluanturille 150 yhden vuoden takuun materiaali- ja • Vanerilevy valmistusvikojen varalta hankintapäivämäärästä laskettuna. Kyseisen takuun • Lehtipuulattiat mukainen Stanleyn vastuu rajoittuu laitteen vaihtamiseen. Mikäli tuotetta on •... -
Page 23: Инструкции По Эксплуатации
• Автокалибровка завершена/индикатор низкого заряда батареи • Режим определения глубины STHT77404 REV A 08 Детектор неоднородностей Stanley Stud Sensor 150 ИНСТРУКЦИИ ПО ЭКСПЛУАТАЦИИ Когда красный светодиод погаснет, Детектор неоднородностей Stud Sensor 150 использует электронные сигналы для Батарея калибровка прибора будет завершена. -
Page 24: Советы По Эксплуатации
Stanley Tools предоставляет гарантию на отсутствие дефектов материалов и исполнения Stud • Напольное покрытие из твердых пород древесины Sensor 150 сроком на один год с даты приобретения. Ответственность компании Stanley • Линолеум на деревянной поверхности согласно данной гарантии ограничена до замены прибора. Любая попытка ремонта изделия... -
Page 25: Instrukcja Obsługi
• Zakończenie kalibracji/Wskaźnik niskiego poziomu naładowania baterii • Tryb wykrywania głębokości STHT77404 REV A 08 Wykrywacz profi li Stanley 150 INSTRUKCJA OBSŁUGI Zgaśnięcie czerwonej diody LED in- Wykrywacz profi li Stud Sensor 150 wykorzystuje sygnały elektroniczne Bateria formuje o zakończeniu kalibracji. -
Page 26: Dane Techniczne
GWARANCJA Różnice dotyczące powierzchni Firma Stanley Tools udziela na wykrywacz Stud Sensor 150 gwarancji od wad Wykrywacz Stud Sensor 150 pozwala na przeszukiwanie typowych materia- materiałowych i wad wykonania na rok od daty zakupu. Odpowiedzialność fi rmy łów budowlanych, takich jak:... -
Page 27: Οδηγιεσ Λειτουργιασ
Ένδειξη χαμηλής τάσης μπαταρίας • Λειτουργία Ανίχνευσης βάθους STHT77404 REV A 08 Stanley - Ανιχνευτής ορθοστατών - 150 ΟΔΗΓΙΕΣ ΛΕΙΤΟΥΡΓΙΑΣ Όταν σβήσει η κόκκινη λυχνία LED, η μονάδα Ο Ανιχνευτής ορθοστατών 150 χρησιμοποιεί ηλεκτρικά σήματα για να εντοπίζει τα άκρα ορθοστατών, Μπαταρία... - Page 28 θα καταστήσει άκυρη την παρούσα εγγύηση. Η βαθμονόμηση, οι μπαταρίες και η συντήρηση εμπίπτουν • Μουσαμάς δαπέδου πάνω από ξύλο στην ευθύνη του χρήστη. Όπου επιτρέπεται από το νόμο, η Stanley δεν είναι υπεύθυνη για θετικές ή • Ταπετσαρία τοίχου...
-
Page 29: Üzemeltetési Utasítások
• Önkalibrálás elvégezve / alacsony telepfeszültség • Mélységérzékelési mód STHT77404 REV A 08 Stanley Stud Sensor 150 vezetékkereső műszer ÜZEMELTETÉSI UTASÍTÁSOK Amikor a vörös LED lámpa kialszik, a A Stud Sensor 150 vezetékkereső műszer elektronikus jelek segítségével Elem műszer kalibrálása befejeződött. -
Page 30: Használati Tanácsok
és fejlécekkel látják el. A Stud Sensor 150 műszer a dupla merevítők és tömör fejlécek szélét egyetlen széles merevítésnek érzékelik. GARANCIA A Stanley Tools a vásárlás napjától számított egy évig garanciát vállal a Stud Felületi egyenetlenség Sensor 150 műszer anyaghibáira és gyártási hibáira. A Stanley jelen garanci- A Stud Sensor 150 az alábbi gyakori építőanyagokból készült felületek... -
Page 31: Pokyny Pro Použití
• Dokončená automatická kalibrace/ Indikátor nedostatečného nabití baterie • Režim hloubkové detekce STHT77404 REV A 08 Detektor sloupků Stanley 150 POKYNY PRO POUŽITÍ Jakmile červená LED dioda zhasne, Detektor Stud Sensor 150 používá elektronické signály pro lokalizaci Baterie kalibrace přístroje je ukončena. -
Page 32: Technické Údaje
ZÁRUKA • Sádrokartonové desky Společnost Stanley Tools poskytuje na tento detektor Stud Sensor 150 záruku • Obložení z překližky týkající se vad materiálu a zpracování výrobku po dobu jednoho roku od data • Podlahy z tvrdého dřeva zakoupení. -
Page 33: Prevádzkové Pokyny
• Dokončenie samokalibrácie/ indikátor takmer vybitej batérie • Režim zistenia hĺbky STHT77404 REV A 08 Snímač Stanley Stud Sensor 150 PREVÁDZKOVÉ POKYNY Keď sa červená kontrolka LED vyp- Snímač Stud Sensor 150 používa elektronické signály na nájdenie hrán klincov, Batéria ne, zariadenie sa nakalibruje. - Page 34 • Tapety za následok stratu záruky. Kalibrácia, batérie a údržba sú zodpovednosťou Snímač nedokáže vyhľadávať cez: používateľa. Na miestach, kde to povoľuje zákon, nie je spoločnosť Stanley • Koberce Zaznamenanie káblov so striedavým prúdom pod Tools zodpovedná za náhodné alebo následné škody. Predajcovia spoločnosti •...
-
Page 35: Ekspluatācijas Norādījumi
• Paškalibrēšana pabeigta / zems baterijas indikatora līmenis • Dziļuma noteikšanas režīms STHT77404 REV A 08 Stanley balsta sensors 150 EKSPLUATĀCIJAS NORĀDĪJUMI Kad sarkanā gaismas diode izdziest, Balsta sensoru 150 izmanto elektronisko signālu, lai atrastu balstu malas, sijām Baterija iekārta ir kalibrēta. - Page 36 • cietkoksnes grīdām Stanley Tools garantē balsta sensoru 150 pret defektiem materiālos un darbā • linoleja virs koka klājumam vienu gadu no iegādes datuma. Stanley atbildība saskaņā ar šo garantiju ir • tapetēm ierobežota ar iekārtas nomaiņu. Jebkāds mēģinājums remontēt izstrādājumu Sensors nevar skenēt caur:...
- Page 37 Märkus: Seade ei tohi enne kalibreerimise lõppu liikuda. • Isekalibreerimine lõpetatud / Tühja patarei näit • Sügavuse tuvastamise režiim STHT77404 REV A 08 Stanley tikkpoldiandur 150 KASUTUSJUHENDID Kui punane LED kustub, on sead Tikkpoldiandur 150 kasutab elektroonilisi signaale tikkpoltide äärte, liigendi- Patarei kalibreerimas.
-
Page 38: Tehnilised Andmed
Kui seadus lubab, ei vastuta Standley juhuslike või tegevusest tulenevate • Tsement ega betoon Vahelduvvoolu juhtiva juhtme tuvastamine kahjustuste eest. Stanley agendid ei saa garantiid muuta. Stanley ei vastuta • Metall- ja kipsseinad Voolujuhtiva juhtme punane LED helendab ning kahjustuste eest, mis tulenevad kulumisest, väärkasutamisest või selle toote tikkpoldiandurist 150 kostab helitoon, et hoiatada, kui muutmisest. -
Page 39: Naudojimo Instrukcija
• Automatinis kalibravimas atliktas / išsekusios baterijos indikatorius • Gylio nustatymo režimas STHT77404 REV A 08 Kaiščių padėties jutiklis „Stanley Stud Sensor 150“ NAUDOJIMO INSTRUKCIJA Raudonam diodui užgesus, prietai- Prietaisas „Stud Sensor 150“ siunčia elektroninius signalus, kad nustatytų Baterija sas yra sukalibruotas. - Page 40 šias: • gipso kartono plokštes GARANTIJA • klijuotos faneros lakštus „Stanley Tools“ garantuoja, kad „Stud Sensor 150“ nebus medžiagų ir gamybos • kietmedžio grindis defektų vienus metus nuo šio gaminio įsigijimo datos. „Stanley“ įsipareigojimas • linoleumu dengtą medieną pagal šią garantiją apsiriboja prietaiso pakeitimu. Jeigu šį prietaisą bandys •...
-
Page 41: Instrucţiuni De Utilizare
în timpul procedurilor următoare. 1-1/2 ţol. După ce marginea montantului a fost detectată, se aprind LED-urile roşii de la Detectorul de montanţi Stanley 150 şi se aude un toc acustic. Un Observaţie: Vă recomandăm să înlocuiţi cu o nouă... -
Page 42: Sfaturi Pentru Utilizare
Reprezentanţii Stanley nu pot modifi ca această garanţie. • Tâmplărie şi Detectorul de montanţi 150 va emite un ton acustic, Compania Stanley nu este responsabilă pentru deteriorările care apar în urma • Materiale înfoliate avertizând în apropierea (în mod normal între 4” şi 18”... -
Page 43: Инструкции За Експлоатация
самокалибриране/изтощена батерия • Режим за откриване на дълбочина STHT77404 REV A 08 Сензор за шипове 150 на Stanley ИНСТРУКЦИИ ЗА ЕКСПЛОАТАЦИЯ Когато изгасне червеният светодиод, Сензорът за шипове 150 използва електронни сигнали, за да намира центъра на шипове, греди Батерия... - Page 44 • Шперплатови облицовки ГАРАНЦИЯ • Дървени подове Stanley Tools дава гаранция на сензора за шипове 150 срещу дефекти в материала и изработката • Балатум над дърво в течение на една година от датата на закупуване. Отговорността на Stanley по тази гаранция...
-
Page 45: Kullanim Tali̇matlari
• Otomatik Kalibrasyon Tamamlandı/ Düşük Pil Göstergesi • Derinlik Algılama Modu STHT77404 REV A 08 Stanley Dikme Sensörü 150 KULLANIM TALİMATLARI Kırmızı LED ışık söndüğünde, ünite- Dikme Sensörü 150, alçıpan ve diğer yaygın inşaat bina yapı malzemelerinin nin kalibrasyonu tamamlanmış olur. - Page 46 • Alçıtaşı/Alçıpan GARANTİ • Kontrplak kaplama Stanley Tools, Dikme Sensörü 150'ü satın alma tarihinden itibaren malzeme ve • Ahşap döşemeler işçilik hatalarına karşı garanti altında tutar. Stanley’nin bu garanti kapsamındaki • Ahşap üzeri muşamba sorumluluğu ünitenin yenisiyle değiştirilmesiyle sınırlıdır. Fabrikadan gelen •...
-
Page 47: Upute Za Rukovanje
• Samokalibracija je dovršena / Slaba baterija • Način detekcije dubine STHT77404 REV A 08 Stanley Stud Sensor 150 UPUTE ZA RUKOVANJE Kad se lampica ugasi, uređaj je Stud Sensor 150 koristi elektroničke signale za otkrivanje rubova stupova, greda Baterija kalibriran. -
Page 48: Savjeti Za Upotrebu
• Parketi • Linoleum preko drva JAMSTVO • Tapete Stanley Tools jamči da će Stud Sensor 150 biti bez nedostataka u materijalu Senzor ne može skenirati kroz: i izradi tijekom godine dana od datuma kupnje. Odgovornost tvrtke Stanley • Tepih u sklopu ovog jamstva ograničena je na zamjenu uređaja. -
Page 49: Navodila Za Uporabo
• Samokalibriranje dokončano/ Indikator izpraznjene baterije • Način zaznavanja globine STHT77404 REV A 08 Stanley senzor nosilcev 150 NAVODILA ZA UPORABO Ko se rdeča LED dioda izklopi, je Senzor nosilcev 150 za lociranje sredine nosilcev, prečnikov ali AC kablov pod Baterija enota koalibrirana. -
Page 50: Nasveti Za Uporabo
• Tal iz masivnega lesa GARANCIJA • Linoleja, položenega preko lesenega opaža Podjetje Stanley Tools jamči, da je senzor nosilcev 150 brez napak v materialu in • Tapet izdelavi in zagotavlja, da bo eno leto od nakupa brezhibno deloval. Odgovornost Senzor ne more zaznavati preko: podjetja Stanley je v okviru te garancije omejena na zamenjavo enote.