
Related Manuals for Hunter Solar Sync


Summary of Contents for Hunter Solar Sync
- Page 1 Solar Sync ® OWNER'S MANUAL Solar Sync Sensor Wired and Wireless Solar Sync Models Evapotranspiration Sensor for Compatible Hunter Controllers...
-
Page 2: Table Of Contents
System Overview and Operation Calibration and Setup Period Station Run Times System Installation Troubleshooting Guide Choosing the Sensor Location Wireless Solar Sync Sensor Components Notices Wireless Solar Sync Receiver Components FCC Notice Wired Solar Sync Components Innovation, Science and Economic Development Canada... -
Page 3: Introduction
Introduction Key Benefits The Solar Sync is a sensor system that, when connected to a compatible Hunter controller, will automatically adjust Wireless Operation: Up to 800' (243 m) line-of-sight. your controller watering schedule based upon changes in No wires are required between the rain sensor and local climate conditions. -
Page 4: System Overview And Operation
System Overview and Operation The Solar Sync system is easily installed on any compatible Enter a midsummer watering program in your controller Hunter irrigation controller (see controller Owner’s Manual per the programming instructions in the Owner’s Manual or application guide to verify compatibility). The system provided with your controller. -
Page 5: System Installation
System Installation Choosing the Sensor Location Using the screws provided, mount the Solar Sync sensor on Note any surface where it will be exposed to unobstructed sun Place the Solar Sync sensor where it can and rainfall, but not in the path of sprinkler spray. -
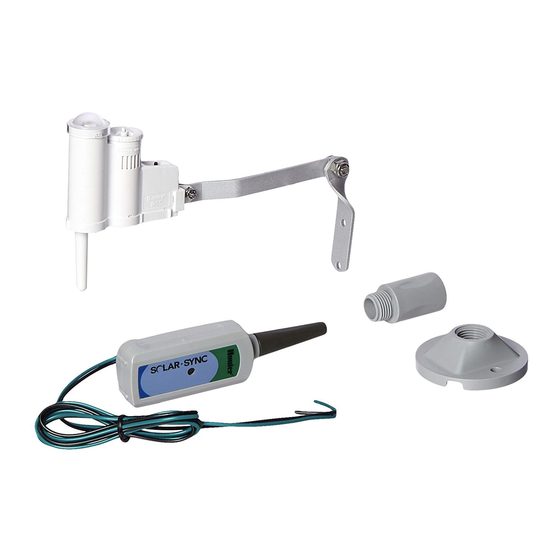
Page 6: Wireless Solar Sync Sensor Components
Wireless Solar Sync Sensor Components Wireless Solar Sync Receiver Components The Wireless Solar Sync includes a downward-facing The Solar Sync receiver is designed to be mounted on antenna that communicates with the receiver. the wall next to the controller, or mounted in an available knockout on the side of the controller. -
Page 7: Wired Solar Sync Components
(A), use the screws provided to attach the sensor. Solar radiation sensor To mount the Solar Sync using the gutter mount (B), tighten the locking screw over the edge of a rain gutter. Vent ring The sensor needs to be oriented upright (C) and the swivel Vents bracket can be moved for mounting on angled surfaces. -
Page 8: Installing The Receiver
System Installation Installing the Receiver Maintaining the Sensor The Solar Sync receiver (A) can be installed either on the The Solar Sync sensor is designed for outdoor use, but wall using the mounting bracket (C) provided, or by using must be kept clean to function correctly. We recommend an available knockout in the controller cabinet. -
Page 9: System And Controller Wiring
ACC to complete setup. • ACC2 controllers: Connect the black and green wires to the corresponding black and green "Solar Sync" terminals. Use "Devices and Sensor Response" https:/ /hunter.help/solarsyncsuport operations on ACC2 to complete setup. https:/ /hunter.help/acc2support... -
Page 10: Manual Pairing The Wireless Receiver/Sensor
Manual Pairing the Wireless Receiver/Sensor Initialize Communication Manually Between Wireless Receiver and Sensor The Wireless Solar Sync receiver and sensor are already paired with the same frequency for an easy installation. After the receiver's green and black wires are connected When installed, the wireless receiver will automatically go (see "Wiring the Sensor/Receiver to Hunter Controllers"... -
Page 11: Validate Receiver/Sensor Communication Or Readdress
System and Controller Wiring Validate Receiver/Sensor Communication or Readdress • Press and hold the spindle on the wireless sensor. • The LED on the wireless receiver will blink two times, confirming that the receiver is addressed to the sensor properly. Note In the event of a power outage (or any other reason when the receiver loses radio contact... -
Page 12: Setup And Programming
Programming the Controller Making Adjustments Program your Hunter controller as specified in the After programming the controller to use Solar Sync, we Owner’s Manual. When setting station run times, enter recommend that you leave it alone for a few days to gather the time that would normally be programmed during the sun and temperature data. - Page 13 10 and still require more Seasonal Adjustment, move down to the next lower Region (from Region The calibration of the Solar Sync to a particular site can 4 to 3, for example). easily be accomplished by adjusting the Region and/or Seasonal Adjustment too high: Make sure the Water Adjustment settings.
-
Page 14: Calibration And Setup Period
ET and temperature characteristics. If possible, choose the region based upon average July ET or peak summer ET. https:/ /hunter.info/ReferenceMap https:/ /hunter.info/SeasonalAdjustment Region based on Based upon the ET of your region... -
Page 15: Station Run Times
Calibration and Setup Period Station Run Times It is important to understand that Solar Sync provides a global Seasonal Adjustment to the controller. This means that all station run times will be modified by the Seasonal Adjustment percentage shown. When programming the controller, the run times should be entered that represent peak season watering schedules. -
Page 16: Troubleshooting Guide
Seasonal Adjustment, move up the next Region (from Region 2 to 3, for example). Controller’s Seasonal • If using a wireless Solar Sync Follow steps to readdress wireless sensor on page 13. Once Adjustment is reset model, the communication has... - Page 17 Solar Sync still • Solar Sync’s automated Use controller delay feature. To access the Solar Sync Delay setting: adjusting run times Seasonal Adjustment cannot Step 1: Place the dial in the RUN position. Then press and hold the...
-
Page 18: Notices
Notices FCC Notice Changes or modifications not expressly approved by Hunter Industries could void the user’s authority to operate this This equipment has been tested and found to comply with device. If necessary, consult a representative of Hunter the limits for a Class B digital device pursuant to Part 15 Industries Inc. -
Page 19: Innovation, Science And Economic Development Canada
Notices Innovation, Science and Economic Development Canada (ISED) Compliance Notice Hereby, Hunter Industries declares that the radio equipment type model WSS-SEN (comprised of WSSTR and WSSR) is in This device contains licence-exempt transmitter(s)/ compliance with Directive 2014/53/EU. receiver(s) that comply with Innovation, Science and Economic Development Canada’s licence-exempt RSS(s). - Page 20 HUNTER INDUSTRIES | Built on Innovation® 1940 Diamond Street, San Marcos, CA 92078 USA hunterindustries.com © 2021 Hunter Industries™. Hunter, all related logos, and all other trademarks are property of Hunter Industries, registered in the U.S. and other countries. Please recycle.