
Related Manuals for JDS Uniphase Certifier40G


Summary of Contents for JDS Uniphase Certifier40G
- Page 1 Table of Content JDSU Certifier40G Cable Certification Tester www.jdsu.com/go/certifier40G...
-
Page 2: Table Of Contents
Table of Content Getting Started ................5 What is in the box? ..............5 Certifier40G at a Glance ............6 Certifier40G Kits ................ 8 Software and Registration ........... 10 Touch Control ................. 11 Certifier40G Adapters ............11 Permanent Link Adapters and Channel Adapters ..11 Adapter Configuration Warnings ........ - Page 3 How do I save test data? ................ 33 2.1.10 How can I setup my Certifier40G to save results automatically?......................34 2.1.11 How do I add a new site in Certifier40G? ......... 35 2.1.12 Where do I change default labeling scheme for saving test results? 2.1.13 What are the labeling options available for saving test results in Certifier40G? ....................
- Page 4 Table of Content 3.3.2 TIA 606-A Class 1 Labels ............... 47 3.3.3 TIA 606A Class 2 ..................48 Adapter Configuration ............49 3.4.1 Adapter Insertion Counts ..............50 Set the Test Limit ..............51 Set the Cable Type..............51 Set Connector Information ..........51 Performing AutoTests ............
-
Page 5: Getting Started
Getting Started 1 Getting Started 1.1 What is in the box? Description Identical main and remote unit including: Li-Ion battery, stylus w. cord & display cover Carry Case CAT6A permanent link interface adapter CAT6A permanent link test cords CAT6A channel adapter 1GB USB thumb drive Talksets AC power adapters... -
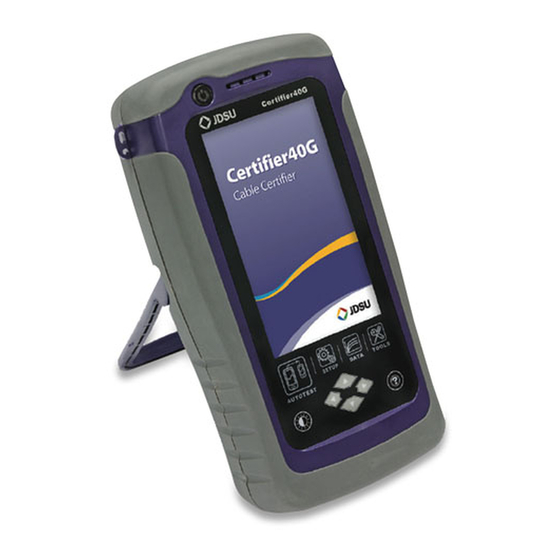
Page 6: Certifier40G At A Glance
Refer to battery charging section for more information. Touch Sensitive LCD screen All the of the Certifier40G are operated using the intuitive touch screen menus. A detailed description of various functionalities is described in... - Page 7 USB Host Connector Used to export saved test results and to perform firmware upgrades. Certifier40G allows an easy way to export the test results into a USB flash drive without having to carry the device around to connect to a...
-
Page 8: Certifier40G Kits
Getting Started performed Battery Compartment door Unscrew the fastener to change the battery 1.3 Certifier40G Kits The Certifier40G product line has the following orderable parts. Catalog Names Description NGC-4500-FA-NA Certifier40G Class Certifier40G LAN cable certifier master FA copper kit (class... - Page 9 Getting Started NGC-4500-FA-AU Certifier40G Class Certifier40G LAN cable certifier master FA copper kit (class unit, remote unit, with two CAT 6A FA adapters not channel adapters, two CAT 6A link included) with adapters and Class FA cable certification Australian Power...
-
Page 10: Software And Registration
Certifier40G Singlemode Fiber adapter set for Singlemode adapter certification testing at 1310 nm and 1550 pair nm wavelengths NGC-4500- Bare wire adapter Bare wire adapter for Certifier40G BAREWIRE for Certifier40G NGC-4500-BAT1 Battery pack for Battery pack for Certifier40G Certifier40G NGC-4500-SCASE... -
Page 11: Touch Control
1.6 Certifier40G Adapters All Certifier40G test adapters plug into the adapter slot at the top of the local and remote units. Certifier40G automatically detects any adapters connected to it and configures its interface to the matching parameters and limits. - Page 12 (patch cords) for performing certification. certification. Channel adapters connect to the customer’s patch cords at s connect to the customer’s patch cords at the wall plate and telecommunications panel. Certifier40G Certifier40G software compensates for the adapter’s transmission ’s transmission...
-
Page 13: Adapter Configuration Warnings
Getting Started 1.8 Adapter Configuration Warnings Certifier40G displays a warning when it detects a potential conflict between the detected adapter and any of the test settings. Using an inappropriate adapter will significantly affect measurement accuracy. This is especially important for category 6A and 7 installations. -
Page 14: Copper Cable Certification Testing
Getting Started 1.10 Copper Cable Certification Testing Standards for structured twisted pair cabling require that both ends of each cable run are tested to find the worst case performance condition. All certification testing requires a two-part test set consisting of a main unit and a remote unit, each of which has similar test capabilities. -
Page 15: Certifier40G User Interface
1.13.1 Touch Screen Layout The touchscreen interface of the local and remote Certifier40G is segmented into three. The Information Segment is the row at the top of the screen and provides Device Information, Device Name, Talk Set Status, Storage and Battery information. The Functionality Segment is below the information segment. -
Page 16: The One Touch Concept
Setup, Viewing/Editing databases, or various Tools, with just one click. 1.13.2 The One Touch Concept Most users of Certifier40G will use four very specific scenarios. a) To perform a certification test or an auto test b) To setup the auto test for various limits and cables that are to be certified. -
Page 17: Setup
Getting Started 1.13.4 Setup Pressing the SETUP button, or starting up the Certifier40G, brings you to this section. This section has 3 navigation tabs at the bottom, each allowing you to configure different settings. The test settings tab lets you setup the AutoTest configuration including the limits, cable type, labels for saving results etc. -
Page 18: Data
Getting Started is indicated at the top left of the screen. Further detailed plots and results can be viewed and saved in this section. Figure 6: Main Screen Figure 7: Detailed Figure 8: Plots Results 1.13.6 Data Selecting the DATA button allows you to manage site information, the test result database and test results. -
Page 19: Tools
PC based Reporter software. 1.13.7 Tools The TOOLS button selects the tools area that lets you perform advanced troubleshooting using Certifier40G and perform calibrations and referencing between local and remote measurements required for measurement accuracy. - Page 20 Getting Started Figure 10: Tools Screens...
-
Page 21: Certifier40G Functions
To print reports, archive test results and download Certifier40G profiles, the PC based data management software, Certifier40G Reporter and a Windows PC are required. The PC must run Windows 2000 or higher. This PC based SW will is available on the included USB drive. -
Page 22: Memory
Getting Started 1.15 Memory The Certifier40G includes 1 Gigabyte of internal memory The includes a USB Flash Drive allows for flexible test record transfer. 1.15.1 Memory Requirements for File Storage The amount of memory that each test result takes up depends on the options that you set before starting the test. -
Page 23: Battery Information
AC power. Connecting the Certifier40G to AC power, also recharges the batteries. A fully charged battery can run Certifier40G for five to eight hours before requiring recharging. Reducing the screen brightness and enabling the sleep function allows Certifier40G to run longer on a charge. -
Page 24: Battery Life
Getting Started The battery pack is suitable for use only with compatible Certifier40G devices. Do not disassemble the battery pack. There are no user serviceable parts inside. Do not dispose of the battery pack in fire or water. Handle a damaged or leaking battery with extreme care. If you come into contact with the electrolyte, wash the exposed area with soap and water. -
Page 25: Dimensions
Getting Started • Universal Serial Bus device connector • Talkset interface: 3.5mm stereo jack 1.21 Dimensions • Size: 232 mm x 126 mm x 86.7 mm (9.13” x 4.96” x 3.41”) • Weight: approx. 1.0 kg (approx 2.2 lbs.) 1.22 Environmental Specifications •... -
Page 26: Using The Certifier40G
Using the Certifier40G 2 Using the Certifier40G 2.1.1 How do I check the software (firmware) version information of my Certifier40G? Go to SETUP and then select the Information tab to check the software version and hardware version numbers. This screen also provides the next yearly calibration due date in the same screen. -
Page 27: How Do I Know If I Have The Correct Adapter For Testing
Using the Certifier40G 2.1.2 How do I know if I have the correct adapter for testing? The type of adapter that is installed in Certifier40G can be found from Test Settings tab in SETUP menu. Figure 12: Information Screen (showing attached probe) -
Page 28: How Do I Upgrade The Firmware
Using the Certifier40G 2.1.3 How do I upgrade the firmware? To upgrade the Certifier40G software, use a USB flash drive and prepare it for upgrade of the latest firmware using the Certifier40G Reporter software. Plug in the USB flash drive... -
Page 29: How To Setup Date/Time In My Certifier40G
Using the Certifier40G 2.1.4 How to setup date/time in my Certifier40G? From the SETUP one touch button, go to System tab and select time and date. It opens up the screens shown below. Choose the editable button to set or change date and time. -
Page 30: How Do I Select A Test Limits
Using the Certifier40G 2.1.5 How do I select a test limits? Figure 15: Test Setting Screen (showing setting test limits) From the SETUP one touch button, select the Test Settings tab. Then choose Limit menu at the top and it will open up a screen with different limits to choose from. -
Page 31: How Do I Select The Cable Type For Certification
Using the Certifier40G 2.1.6 How do I select the cable type for certification? Figure 16: Test Setting Screen (showing cable type selection) To select the type of cable under certification, go to Test Settings tab under SETUP one touch button. It will open up a screen to select the cable manufacturer followed by the name of the cable. -
Page 32: How Do I Set Reference Between Local And Remote Units
If there is a mismatch between the software versions or the reference calibration between local and remote units has expired, the Certifier40G would require you to perform a set reference measurement. To perform a set reference measurement, go to the TOOLS menu and select the set reference measurement icon. -
Page 33: How Do I Perform A Certification (Auto Test)
Using the Certifier40G 2.1.8 How do I perform a certification (auto test)? Once you have setup the Certifier40G for the desired certification process, Certifier40G allows you to perform an auto test with just one touch of AUTOTEST touch lens button. Once the test is completed it will show the summary results page with Pass or Fail message. -
Page 34: How Can I Setup My Certifier40G To Save Results
A keypad will open up letting you enter the name of the record to be saved and press Save. 2.1.10 How can I setup my Certifier40G to save results automatically? Auto saving of results removes the hassle of manually having to save after every test. You should setup the labeling scheme before enabling the autosaving option. -
Page 35: How Do I Add A New Site In Certifier40G
Figure 20: Systems Settings (showing setting auto saving) 2.1.11 How do I add a new site in Certifier40G? To add a new site for a certification job, go to Setup one touch menu, click the Site button and click on New, a keypad will allow you to enter the site name. - Page 36 Using the Certifier40G Figure 21: Site Setting Screen (showing how to change site information) 2.1.12 Where do I change default labeling scheme for saving test results? From the SETUP one touch button, under test settings, select Label Source. It will open up another screen with different types of labeling scheme to choose from.
-
Page 37: What Are The Labeling Options Available For Saving Test Results In Certifier40G
2.1.14 How do I export test results into the Certifier40G Reporter? Certifier40G Reporter is the PC based software that lets you store, manage and generate reports of the tests performed on the Certifier40G. To export test results from Certifier40G to the PC software you will need a USB flash drive. Plug a... -
Page 38: Now I Have My Results In Usb Thumbdrive, How Do I Import From The Pc
Using the Certifier40G Figure 23: Screens showing the insertion of USB drive and transferring results files 2.1.15 Now I have my results in USB thumbdrive, how do I import from the PC? Once the results are on the thumbdrive, run the Reporter application from your PC desktop. - Page 39 Using the Certifier40G Figure 24: Reporter Start Screen The splash screen will pop up. Type in the name of a project the results are to be stored and click Create Project. Once the project is created, click on the file menu-> import test results to start the import process.
- Page 40 Using the Certifier40G Figure 26: Reporter showing results from test You can view the desired plots by clicking on the respective labels of the test results. Figure 27: Reporter showing plot data...
-
Page 41: How Do I Export Result To Excel Sheets Or Pdf Reports
Using the Certifier40G 2.1.16 How do I export result to Excel sheets or pdf reports? From the list of results, either click on the Excel icon of the PDF icon to generate the reports. Figure 28: Reporter showing exporting results to PDF or Excel... -
Page 42: Where Can I Change The Auto Power-Off Time Setting
Using the Certifier40G Figure 29: Alternative method for exporting results 2.1.17 Where can I change the Auto Power-off time setting? In the SETUP one touch button, you can configure the Auto Power Off setting to the desired minute intervals. Figure 30: Setting the Auto Power Off time... -
Page 43: How Do I Check If My Certifier40G Is Running In Demonstration (Demo) Mode
How do I check if my Certifier40G is running in Demonstration (demo) mode? If Certifier40G is in demonstration mode, all the tests on Certifier40G are simulated tests and are not real. To switch between Demo Mode or Real Testing mode go to SETUP one touch button and SYSTEM tab and choose the Demo Mode. -
Page 44: How Do I Format The Internal Flash
Using the Certifier40G 2.1.19 How do I format the internal flash? You can restore all settings and internal flash memory to the factory settings from the SETUP one touch button and System Settings screen. Figure 32: Restoring Default Settings CAUTION... -
Page 45: How Do I Replace An Old Battery
2. Unscrew the flip battery compartment door and open 3. Pull the battery out and insert a new battery and close the compartment door and fasten it in place with the screw. CAUTION Only use standard JDSU Certifier40G replacement batteries. -
Page 46: Testing Copper Cables
3.2 Entering the Site Information Before starting a new certification job at a site, you can configure your Certifier40G with the Site information by creating a new site. The site information is useful in organizing the tests that are done under the site name you create. -
Page 47: Simple Labels
Testing Copper Cables 3.3.1 Simple Labels Simple labels provide auto incrementing feature that generate unique labels where the last character is incremented after every test. Figure 33: Adding Simple Labels 3.3.2 TIA 606-A Class 1 Labels This type of labeling scheme follows the TIA 606-A Class 1 standard labeling scheme. -
Page 48: Tia 606A Class 2
Testing Copper Cables Figure 34: Adding TIA 606-A Class 1 Labels 3.3.3 TIA 606A Class 2 This type of labeling scheme follows the TIA 606-A Class 2 standard labeling scheme. It is mostly used to support Backbone to Telecom Room type installations. Figure 35: Adding TIA 606-A Class 2 Labels... -
Page 49: Adapter Configuration
Testing Copper Cables Testing Copper Cables 3.4 Adapter Configuration Figure 36: Permanent Link Testing Figure 37: Channel Link Testing Two different methodologies are used to certify cables. Two different methodologies are used to certify cables. The permanent link model is used to certify new installations from permanent link model is used to certify new installations from the patch panel to the wall plate. -
Page 50: Adapter Insertion Counts
This data is helpful in determining when the adapter is reaching the end of its useful life. Certifier40G will show a warning whenever the adapter insertion counts has expired the specified life time insertion counts. -
Page 51: Set The Test Limit
Testing Copper Cables 3.5 Set the Test Limit In order to perform a certification, the appropriate test limit or standard must be selected. See section 2.1.5 for setting up your appropriate test limits. 3.6 Set the Cable Type When performing a copper test, selecting the correct cable type will set the right NVP for length measurements and make sure the correct cable type appears in the report. -
Page 52: Performing Autotests
Testing Copper Cables 3.8 Performing AutoTests After the setup is complete, automatic cable certification tests can be started by pressing the AUTOTEST one touch button. Figure 39: Autotest results Once the test is complete a summary results window will display the result of the test whether it is a Pass or Fail. Detailed results can be viewed by pressing the DETAILS tab at the bottom which will display all the parameters that are measured during the test with the worst case margin... -
Page 53: Weee Directive Compliance
WEEE Directive Compliance 4 WEEE Directive Compliance JDSU has established processes in compliance with the Waste Electrical and Electronic Equipment (WEEE) Directive, 2002/96/EC, and the Battery Directive, 2006/66/EC. This product, and the batteries used to power the product, should not be disposed of as unsorted municipal waste and should be collected separately and disposed of according to your national regulations. -
Page 54: Customer Services And Warranty
Customer Services and Warranty 5 Customer Services and Warranty This section provides a description of customer services available through JDSU (including returns policies and procedures) and warranty information. 5.1 Customer Service (Standard Services) Customer Service accompanies the sale of every JDSU product. -
Page 55: Repair
Customer Services and Warranty 5.3.1 Repair All equipment returned for service is tested to the same rigorous standards as newly manufactured equipment. This ensures products meet all published specifications, including any applicable product updates. 5.3.2 Calibration JDSU’s calibration methods are ISO approved and based on national standards. -
Page 56: Warranty Information
Customer Services and Warranty • Warranty status. (If you are unsure of the warranty status of your instrument, contact Technical Assistance.) • A detailed description of the problem or service requested. • The name and telephone number of the person to contact regarding questions about the repair. -
Page 57: Warranty Registration
Customer Services and Warranty 5.4.1 Warranty registration Please register your product at www.jdsu.com/know-register... - Page 58 Customer Services and Warranty www.jdsu.com/go/certifier40G Document Information Doc.# 21159675 Revision 000 English...