Advertisement
Quick Links
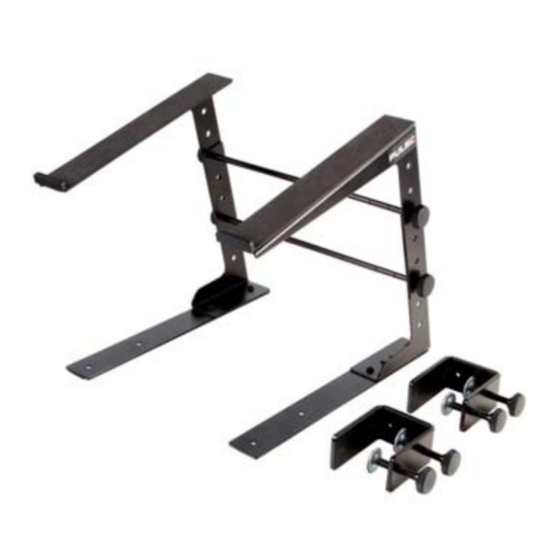
Multi-Purpose Laptop Stand
Model: LTS
www.pulse-audio.co.uk
Congratulations on your purchase of the PULSE LTS, Multi‐Purpose Laptop stand.
Please read the following assembly instructions carefully. We hope you enjoy your
new purchase!
Parts: Remove all parts from the box and identify them.
Required Tools: Philips head screw driver.
Advertisement

Related Manuals for Pulse LTS

Summary of Contents for Pulse LTS
- Page 1 Multi-Purpose Laptop Stand Model: LTS www.pulse-audio.co.uk Congratulations on your purchase of the PULSE LTS, Multi‐Purpose Laptop stand. Please read the following assembly instructions carefully. We hope you enjoy your new purchase! Parts: Remove all parts from the box and identify them. Required Tools: Philips head screw driver. ...
- Page 2 Support Assembly: 1. Take one of the Upper Supports and place it over the outside of one of the Lower Supports (See Figure A). Align the Upper Support holes with the Lower Support mounting holes to obtain the desired height. 2. One at a time, place one knob through the mounting holes (must be spaced at least 2 holes apart). 3. Take a Stabilizer Bar and screw the top knob into the end of the Stabilizer Bar. Repeat with bottom knob. 4. Install 1 inch spacers on each Stabilizer bar to increase stand width. Repeat Step 3 with the other Upper Support and Lower Support for the opposite side of the stand (see Figure B). Tighten all knobs to minimize wobble. 5. Depending on use of stand, please refer to one of the following mount options below. Table Top Stand: 1. Using four (4) A‐screws and washers, attach the flat foot bar to the lower support. (See Figure C) 2. Repeat step 1 on the opposite side of the stand. C‐Clamp Table Mount: 1. Turn the clamp so that the knob faces down. Using two (2) B‐screws and washers, attach the clamp to the lower support. (See Figure D) 2. Repeat step 1 on the opposite side of the stand. C‐Clamp DJ Coffin Mount: 1. Turn the clamp so that the knob faces out. Using two (2) B‐screws and washers, attach the clamp to the lower support. ...