Advertisement
Quick Links
Advertisement

Summary of Contents for Kamasa-TOOLS K 12130
- Page 1 Induction K 12130 heater...
-
Page 2: Table Of Contents
Thank you for purchasing the Kamasa Tools hand held induction heater. This tool is designed to loosen seized bolts and nuts. It is a precision instrument and to ensure safe and proper use and ensure a long service life, please read through the following instructions. CONTENT •... -
Page 3: Safety And Precaution
SAFETY AND PRECAUTION • Keep bystanders and children away while operating the induction heater. • Keep a fully charged fire extinguisher or fire blanket at hand at all times when using the induction heater. • Ensure no flammable products are near the work area while using the induction heater. - Page 4 Do not fit or remove a coil or rope coil with the induction heater plugged into the mains. • Before plugging in the induction heater, make sure that the outlet volt- age supplied is compatible with the voltage marked on the label and within 10% of the stated voltage.
- Page 5 • Use of damaged attachments will invalidate the warranty. Do not use the induction heater without an attachment fitted. Ensure attachment is securely located and locking screws are firmly tightened. Do not use the induction heater for longer than the stated duty cycle: THREE minutes on followed by THREE minutes off.
- Page 6 Do not use induction heater without an Do not use damaged attachments with attachment fitted. Ensure locking screws the induction heater. Use of damaged are firmly tightened. attachments can result in damage to the induction heater and affect your warranty. Choose the correct size attachment for the When using the rope coil, please ensure work piece.
-
Page 7: Product Specification
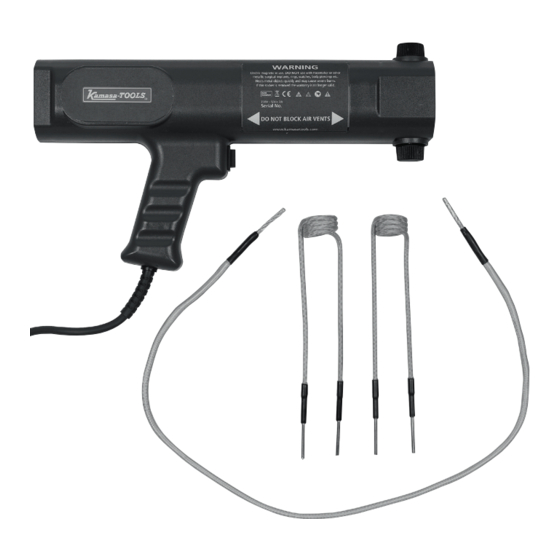
PRODUCT SPECIFICATION Power supply: 230V AC – 50Hz Out put: 1500W Cooling: fan Length: 340 mm Weight: 1820 g COMPONENTS 1 Power unit 2 Serial number 3 Model number 4 Cord and plug 230V AC 5 Vent (end) 6 Preformed coil - 19mm 7 Preformed coil - 22mm 8 Rope coil 9 Power trigger... -
Page 8: Operation Instructions
OPERATION INSTRUCTIONS Principles of operation A preformed coil (6, 7), the rope coil (8), is inserted into the coil location sockets (10) and then secured into place with the locking screws (11). The coil then converts the current to a high frequency alternating magnetic field. - Page 9 SAFETY SELF-PROTECTION The induction heater has a unique safety self-protection feature: under a number of conditions it will enter self-protection mode to protect the internal circuitry of the induction heater; in this mode the current is cut, the internal fan slows right down and the white LED at the front of the instrument flashes.
- Page 10 USING THE PREFORMED COILS The preformed coil is used to heat nuts, fasteners, caulking removal, door hinges, exhaust manifold bolts, oxygen sensors, etc. The working life of the preformed coil can be maximised by only heating objects enough to break the rust bond.
-
Page 11: Maintenance
MAINTENANCE Disassembly and storage 1 Turn unit off and allow it and all attachments to cool for at least 30 minutes before disassembly, cleaning or storage. Handling the unit or parts before they have cooled may result in injury; storage of unit while still hot may result in damage to equipment or pose a fire hazard. -
Page 12: Troubleshooting
SPARE COILS K 12131 Preformed 15 mm heating coil K 12132 Performed 19 mm heating coil K 12133 Preformed 22 mm heating coil K 12134 Preformed 26 mm heating coil K 12135 Rope coil K 12130 www.kamasatools.com...