Table of Contents
Advertisement
Quick Links
MODEL T26472Z/G4011Z/T26751Z
3-IN-1 SHEET METAL MACHINE
OWNER'S MANUAL
(For models manufactured since 02/14)
T26472Z
G4011Z
T26751Z
COPYRIGHT © MAY, 2014 BY GRIZZLY INDUSTRIAL, INC.
WARNING: NO PORTION OF THIS MANUAL MAY BE REPRODUCED IN ANY SHAPE
OR FORM WITHOUT THE WRITTEN APPROVAL OF GRIZZLY INDUSTRIAL, INC.
#DMTS16143 PRINTED IN CHINA
V1.05.14
Advertisement
Table of Contents

Related Manuals for Grizzly T26472Z


Summary of Contents for Grizzly T26472Z
- Page 1 (For models manufactured since 02/14) T26472Z G4011Z T26751Z COPYRIGHT © MAY, 2014 BY GRIZZLY INDUSTRIAL, INC. WARNING: NO PORTION OF THIS MANUAL MAY BE REPRODUCED IN ANY SHAPE OR FORM WITHOUT THE WRITTEN APPROVAL OF GRIZZLY INDUSTRIAL, INC. #DMTS16143 PRINTED IN CHINA V1.05.14...
- Page 2 This manual provides critical safety instructions on the proper setup, operation, maintenance, and service of this machine/tool. Save this document, refer to it often, and use it to instruct other operators. Failure to read, understand and follow the instructions in this manual may result in fire or serious personal injury—including amputation, electrocution, or death.
-
Page 3: Table Of Contents
SECTION 2: SETUP ......... 8 Checking Shear Blade Gap ........Unpacking ............8 Adjusting Shear Table ..........Needed for Setup ........... 8 Adjusting Blade Bow (T26472Z) ....... Inventory ............9 Adjusting Blade Bow (G4011Z & T26751Z) ....Cleanup ............10 Aligning Brake ..........32 Cleaning Fingers .......... -
Page 4: Introduction
INTRODUCTION Machine Description Manual Accuracy We are proud to provide a high-quality owner’s Models T26472Z/G4011Z/T26751Z are designed manual with your new machine! to roll, bend, and cut sheet metal. Though each machine can complete each of these tasks, We made every effort to be exact with the instruc-... -
Page 5: Identification
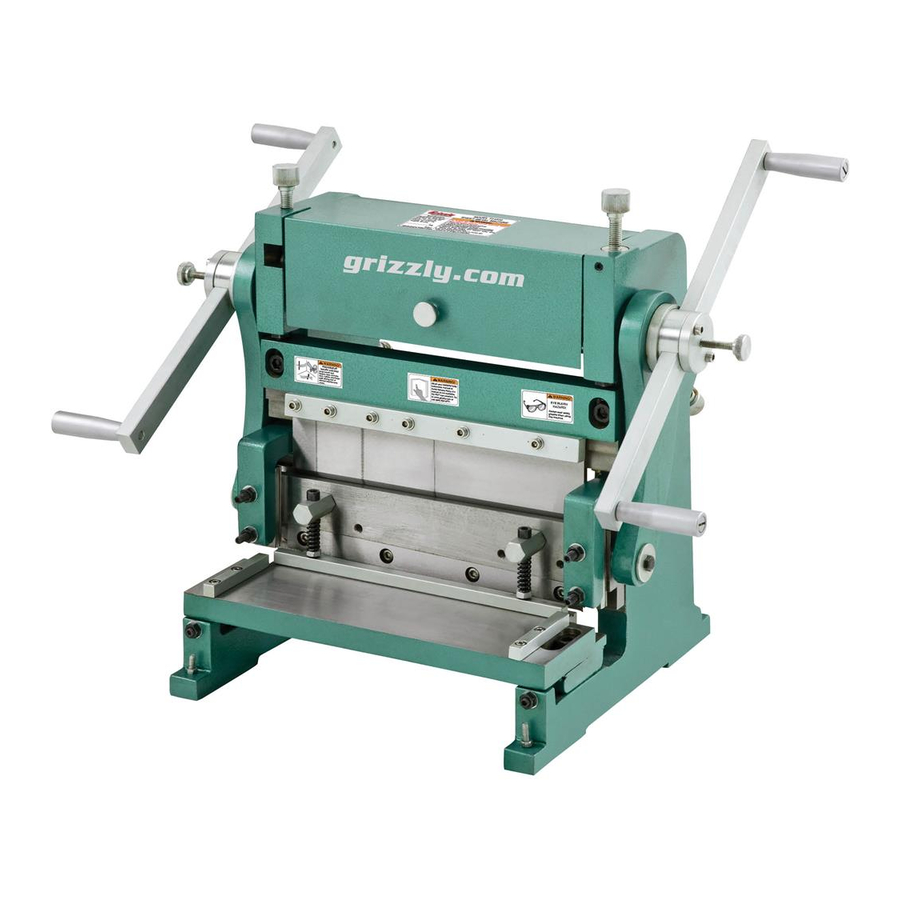
& Upper Shear Adjustable Blade Work Stop Shear Hold-Down Workbench Shear Table Mounting Locations G4011Z/T26751Z Blade Bow T26472Z Figure 1. Model T26472Z/ G4011Z/T26751Z identification. To reduce your risk of serious injury, read this entire manual BEFORE using machine. T26472Z/G4011Z/T26751Z (Mfd. Since 02/14) -
Page 6: Machine Data Sheet
"–16" ⁄ "–18" ⁄ "–18" Construction Brake Steel Frame Steel Rollers Precision-Ground Hardened Steel Table Steel Shear Blades Precision-Ground Hardened Steel Other Specifications Country of Origin China Warranty 1 Year Serial Number Location Machine ID Label T26472Z/G4011Z/T26751Z (Mfd. Since 02/14) -
Page 7: Section 1: Safety
Everyday ery. Never operate under the influence of drugs or eyeglasses are NOT approved safety glasses. alcohol, when tired, or when distracted. T26472Z/G4011Z/T26751Z (Mfd. Since 02/14) - Page 8 Contact our debris. Make sure they are properly installed, Technical Support at (570) 546-9663. undamaged, and working correctly. T26472Z/G4011Z/T26751Z (Mfd. Since 02/14)
-
Page 9: Additional Safety For 3-In-1 Sheet Metal Machines
If normal safety pre- respect. Failure to do so could result in cautions are overlooked or ignored, seri- serious personal injury, damage to equip- ous personal injury may occur. ment, or poor work results. T26472Z/G4011Z/T26751Z (Mfd. Since 02/14) -
Page 10: Section 2: Setup
Otherwise, filing a freight claim can be difficult. • When you are completely satisfied with the condi- tion of your shipment, inventory the contents. SUFFOCATION HAZARD! Keep children and pets away from plastic bags or packing materials shipped with this machine. Discard immediately. T26472Z/G4011Z/T26751Z (Mfd. Since 02/14) -
Page 11: Inventory
—4mm ............1 lost in packaging materials while unpack- —5mm ............1 ing or they are pre-installed at the factory. —6mm ............1 —8mm (T26751Z Only) ......1 —10mm ............1 —12mm (G4011Z Only) ......1 T26472Z/G4011Z/T26751Z (Mfd. Since 02/14) -
Page 12: Cleanup
Repeat Steps 2–3 as necessary until clean, then coat all unpainted surfaces with a quality metal protectant to prevent rust. NOTICE Avoid chlorine-based solvents, such as acetone or brake parts cleaner, that may damage painted surfaces. -10- T26472Z/G4011Z/T26751Z (Mfd. Since 02/14) -
Page 13: Site Considerations
25" Placement Location Figure 4. Model T26472Z minimum working Consider anticipated workpiece sizes and addi- clearances. tional space needed for auxiliary stands, work tables, or other machinery when establishing a location for this machine in the shop. -
Page 14: Bench Mounting
Figure 8. Example of "Direct Mount" setup. hex bolts, washers, and hex nuts are used to secure the machine in place. Bolt Flat Washer Machine Base Workbench Flat Washer Lock Washer Hex Nut Figure 7. Example of "Through Mount" setup. -12- T26472Z/G4011Z/T26751Z (Mfd. Since 02/14) -
Page 15: Assembly
(see Figure 10), depending on operation to be performed. Only hand-tighten these rods—over-tighten- Models T26472Z, G4011Z, and T26751Z are all ing will make removal difficult. packaged, shipped, and assembled the same way. The only difference during assembly is the... -
Page 16: Section 3: Operations
Adjustment ects. Regardless of the content in this sec- Knob tion, Grizzly Industrial will not be held liable for accidents caused by lack of training. Bottom Roller Figure 12. Identification of slip roll controls and main components. -
Page 17: Slip Roll Tips
This slip roll can be used to "flat roll" sheet metal. produced. This can be done to straighten sheet metal that is slightly out of form. Unless otherwise instructed, make all roller adjust- ments the same on each side to produce sym- metrical workpieces. -15- T26472Z/G4011Z/T26751Z (Mfd. Since 02/14) -
Page 18: Rolling Curves
Figure 15. Rear roller lowered so it is even with bottom roller. Performing multiple passes while gradu- ally reducing curve radius produces better results than trying to make curve in just one or two passes. -16- T26472Z/G4011Z/T26751Z (Mfd. Since 02/14) -
Page 19: Rolling Cylinders
Note: To make a cone, rotate one adjustment 6" Dia. knob more than the other. Repeat Step 5 until you have produced Workpiece desired curve. " Circumference ⁄ Figure 19. Calculating circumference example. -17- T26472Z/G4011Z/T26751Z (Mfd. Since 02/14) - Page 20 Turn hand crank clockwise to feed workpiece through machine until it is approximately half way through top and bottom rollers. Feed Direction Figure 22. Finishing first pass. -18- T26472Z/G4011Z/T26751Z (Mfd. Since 02/14)
-
Page 21: Removing Workpiece From Rollers
Figure 25. Figure 23. Curving workpiece by feeding opposite end first. Model T26472Z Only: Both left and right thickness adjustment knobs need to be rotat- Repeat Steps 4–6 until you have produced ed counterclockwise to release/secure top the desired cylinder (see Figure 24). -
Page 22: Bending Wire/Rods
Feed the workpiece material through the machine in the same manner described on the previous pages for sheet metal. Note: The bending grooves can also be used when rolling sheet metal that has a wire bead on the side. -20- T26472Z/G4011Z/T26751Z (Mfd. Since 02/14) -
Page 23: Brake Overview
(G4011Z shown). the same bend intended for the workpiece, then measure it again. The difference between the two measurements is the bend allowance, which you subtract from the dimension of the workpiece blank before the bend. -21- T26472Z/G4011Z/T26751Z (Mfd. Since 02/14) -
Page 24: Bending Sheet Metal
Figure 33, and repeat Steps 2–3. (Refer to Machine Data Sheet on Page 4 to determine minimum reverse bend of your particular model.) Figure 31. Positioning workpiece for bend. Figure 33. Minimum reverse bend. -22- T26472Z/G4011Z/T26751Z (Mfd. Since 02/14) -
Page 25: Pan/Box Bending
Shear that there is adequate room for workpiece on Blade both sides, then retighten cap screws. Fixed Shear Blade Figure 36. Example of shearing components (side view). -23- T26472Z/G4011Z/T26751Z (Mfd. Since 02/14) - Page 26 Figure 37. Note: Shearing action begins on right side of machine and moves to the left. Guide Block Figure 37. Positioning workpiece for shearing cut. -24- T26472Z/G4011Z/T26751Z (Mfd. Since 02/14)
-
Page 27: Section 4: Accessories
To reduce this risk, only install accessories recommended for this machine by Grizzly. NOTICE Refer to our website or latest catalog for additional recommended accessories. -
Page 28: Section 5: Maintenance
Treat all unpainted metal surfaces with quality tribute the lubricant. metal protectants like G96 Gun Treatment Spray (see Figure 41). Figure 43. T23964 Moly-D Multi-purpose NLGI#2 Grease. Figure 41. H3788 G96 Gun Treatment Spray. -26- T26472Z/G4011Z/T26751Z (Mfd. Since 02/14) -
Page 29: Section 6: Service
2. Properly adjust blade gap for material (Page 30). 2. Incorrect blade gap setup. tearing. 3. Loose blades. 3. Remove blades, clean thoroughly, and re-install. 4. Properly adjust blade bow (Page 31 4. Too much bow in blade. -27- T26472Z/G4011Z/T26751Z (Mfd. Since 02/14) -
Page 30: Replacing/Seating Fingers
Cap Screw Retighten cap screws. Finger Receiver/ Shear Blade Figure 44. Example of finger receiver fully lowered. Loosen cap screws and remove finger. Insert replacement finger(s) and tighten cap screw(s). -28- T26472Z/G4011Z/T26751Z (Mfd. Since 02/14) -
Page 31: Reversing/Replacing Shear Blade
Grizzly. The part numbers Shear Blade Cap for these blades are located in the back of the Screws manual. -
Page 32: Adjusting Shear Blade Gap
If paper cuts cleanly on the ends but not in the center, or it cuts cleanly in the center but not on the ends, blade bow needs to be adjusted (refer to Adjusting Blade Bow on Page 31). -30- T26472Z/G4011Z/T26751Z (Mfd. Since 02/14) -
Page 33: Adjusting Blade Bow (T26472Z)
Checking Blade Gap on Page 30. Adjustment Cap Screw Adjustment Bolt & Jam Nut Blade Bow Blade Bow Figure 49. T26472Z blade bow adjustment screw. Figure 50. G4011Z and T26751Z blade bow adjustment bolt. T26472Z Tools Needed Hex Wrench 6mm ..........1 G4011Z and T26751Z Tools Needed Wrench 24mm ........... -
Page 34: Aligning Brake
Retighten cap screw, remove metal bar, and use hand crank to cycle machine 2–3 times. Repeat Steps 3–6 until brake fingers rest evenly on metal bar along its entire length. -32- T26472Z/G4011Z/T26751Z (Mfd. Since 02/14) -
Page 35: Section 7: Parts
Please Note: We do our best to stock replacement parts whenever possible, but we cannot guarantee that all parts shown here are available for purchase. Call (800) 523-4777 or visit our online parts store at www.grizzly.com to check for availability. - Page 36 P4011Z039 SPACER P4011Z081 EYE INJURY WARNING LABEL P4011Z040 EXT RETAINING RING 65MM P4011Z082 MODEL NUMBER LABEL P-7527C P4011Z041 SHEAR BLADE HOLDER P4011Z083 GRIZZLY.COM LABEL P-7527C P4011Z042 THREADED BOLT BUSHING M12-1.75 P4011Z084 GRIZZLY GREEN TOUCH-UP PAINT -34- T26472Z/G4011Z/T26751Z (Mfd. Since 02/14)
-
Page 37: T26472Z Breakdown
T26472Z Breakdown -35- T26472Z/G4011Z/T26751Z (Mfd. Since 02/14) - Page 38 PT26472Z082 READ MANUAL LABEL PT26472Z040 THREADED BOLT BUSHING M8-1.25 PT26472Z083 EYE INJURY WARNING LABEL PT26472Z041 CONNECTING ARM (LH) PT26472Z084 PINCH/AMPUTATION WARNING LABEL PT26472Z042 BUSHING PT26472Z085 GRIZZLY.COM LABEL P-7527C PT26472Z043 BUSHING PT26472Z086 GRIZZLY GREEN TOUCH-UP PAINT -36- T26472Z/G4011Z/T26751Z (Mfd. Since 02/14)
-
Page 39: T26751Z Breakdown
T26751Z Breakdown 24 25 39 40 48 49 -37- T26472Z/G4011Z/T26751Z (Mfd. Since 02/14) - Page 40 PT26751Z042 KEY 8 X 8 X 28 PT26751Z087 MODEL NUMBER LABEL P-7527C PT26751Z043 EXT RETAINING RING 75MM PT26751Z088 GRIZZLY.COM LABEL P-7527C PT26751Z044 SPACER PT26751Z089 GRIZZLY GREEN TOUCH-UP PAINT PT26751Z045 LOCK KNOB M8-1,25 X 50, 35 -38- T26472Z/G4011Z/T26751Z (Mfd. Since 02/14)
- Page 41 Would you recommend Grizzly Industrial to a friend? _____ Yes _____No Would you allow us to use your name as a reference for Grizzly customers in your area? Note: We never use names more than 3 times. _____ Yes _____No 10.
- Page 42 FOLD ALONG DOTTED LINE Place Stamp Here GRIZZLY INDUSTRIAL, INC. P.O. BOX 2069 BELLINGHAM, WA 98227-2069 FOLD ALONG DOTTED LINE Send a Grizzly Catalog to a friend: Name_______________________________ Street_______________________________ City______________State______Zip______ TAPE ALONG EDGES--PLEASE DO NOT STAPLE...
-
Page 43: Warranty & Returns
WARRANTY & RETURNS Grizzly Industrial, Inc. warrants every product it sells for a period of 1 year to the original purchaser from the date of purchase. This warranty does not apply to defects due directly or indirectly to misuse, abuse, negligence, accidents, repairs or alterations or lack of maintenance.