
Related Manuals for 3Com IntelliJack NJ220


Summary of Contents for 3Com IntelliJack NJ220
-
Page 1: User Guide
3Com IntelliJack Switch NJ220 ® ® User Guide 3CNJ220 www.3Com.com Part No. 10016226 Rev. AA Published June 2007... - Page 2 3Com Corporation reserves the right to revise this documentation and to make changes in content from time to time without obligation on the part of 3Com Corporation to provide notification of such revision or change. 3Com Corporation provides this documentation without warranty, term, or condition of any kind, either implied or expressed, including, but not limited to, the implied warranties, terms or conditions of merchantability, satisfactory quality, and fitness for a particular purpose.
-
Page 3: Table Of Contents
ONTENTS NJ220 I NSTALLING THE NTELLI About the IntelliJack ..............2 Before You Begin. - Page 4 Advanced Settings..............41 Event Alerts 802.1X Settings Changing Device Configuration .
-
Page 5: Installing The Nj220 Intelli Jack
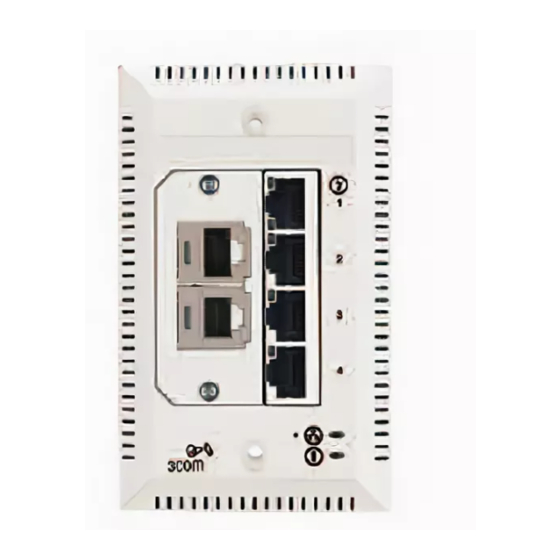
NSTALLING THE The 3Com NJ220 IntelliJack is a 4-port, managed Ethernet switch that fits into any standard electrical wall outlet or data port opening. It brings switching capabilities to any single port on an Ethernet network by allowing you to connect up to four networking devices, such as computer, printers, and Voice Over IP (VoIP) telephones to the network via one Ethernet port. -
Page 6: About The Intellijack
PBX telephone. The adapter plates are available from 3Com. However, you must purchase the connectors from the manufacturer. See “Installing the Adapter Plate and Pass-Through Ports” on... - Page 7 LEDs Power socket Can be used to power the IntelliJack with a local power supply (available for purchase from 3Com); required if your network does not support Power Over Ethernet. The following diagram shows the back view of the IntelliJack: Ethernet uplink port Connects the IntelliJack to the network.
-
Page 8: Before You Begin
For a list of supported connectors, go to the IntelliJack section of www.3com.com/. Obtaining Optional The IntelliJack works with the following optional components, all of which are Components available from 3Com. Order online at www.3com.com or by calling 1-877-949-3266. Component Adapter plates Single-port... -
Page 9: Installing The Intellijack
Component Local power supply VoIP telephone power cable Extension ring Installing the Installing the IntelliJack consists of the following steps: IntelliJack 1 Set up the power supply (page 6). 2 Install the adapter plate and pass-through ports (page 8). 3 Plan the installation (page 9). 4 Set up the network cabling at your site (page 10). - Page 10 NOTE: For a list of power supplies that support the IntelliJack, go to www.3com.com/. CAUTION: Use only a power supply that is provided or approved by 3Com for use with this IntelliJack. Failure to do so may result in damage to the IntelliJack, or may result in a hazardous situation or personal injury.
- Page 11 Installing the IntelliJack The multi-port Ethernet power supply from 3Com connects to an existing Ethernet or Fast Ethernet infrastructure with standard Category 5 or Category 5e UTP cabling, and powers up to 24 IntelliJacks. See “Obtaining Optional Components” on page 4 for ordering information. For complete installation instructions, see the multi-port Ethernet power supply documentation.
- Page 12 For a list of connectors that are supported with the IntelliJack adapter plates, as well as any corresponding installation instructions, go to the IntelliJack section on www.3com.com. NOTE: If you are not planning on installing the adapter plate and pass-through ports, skip this section.
- Page 13 Planning the Installation When installed, the back of the IntelliJack extends into a wall or cubicle opening 1.5 inches. Because the depth of some wall and cubicle openings differ, observe the following requirements and recommendations before installing the IntelliJack: • Make sure the wall or cubicle opening where the IntelliJack is being installed •...
- Page 14 1: I NJ220 I HAPTER NSTALLING THE Setting up the Network The network cabling at your site (from the wiring closet to the wall or cubicle Cabling at Your Site opening) may already be installed. If it is not, install the cabling following these general guidelines.
- Page 15 • If the end of the cable is terminated with a male connector, connect the Mounting the IntelliJack After connecting the IntelliJack to the network, use the two provided screws to mount the IntelliJack in any standard NEMA-WD6 cubicle opening or wall outlet. If the cubicle or wall opening has a depth of fewer than 1.5 inches, does not support the NEMA-WD6 standard, or does not have pre-drilled screw holes, mount the IntelliJack using the extension ring, as shown below.
- Page 16 Power Supply (Optional) single-port or multi-port Ethernet power supply, you must purchase a local power supply from 3Com (see “Obtaining Optional Components” on page 4). To connect the local power supply to the IntelliJack, please follow these steps: 1 Route the power cable through the strain relief of the IntelliJack (as shown in the diagram below).
-
Page 17: Checking The Leds
5 Plug the local power supply into the power source. WARNING: Use the local power supply available from 3Com. Failure to do so may result in damage to the IntelliJack, or may result in a hazardous situation. Connecting Devices to... - Page 18 1: I NJ220 I HAPTER NSTALLING THE NTELLI...
-
Page 19: Nstalling The
System Requirements Installing the Local and Central Configuration Managers 1 Insert the Configuration Manager software CD into your Windows 2000, NSTALLING THE ONFIGURATION Once you have installed the NJ220 hardware, you need to configure it for use on your particular network. To configure the NJ220, install the Local and Central Configuration managers. - Page 20 2: I HAPTER NSTALLING THE ONFIGURATION 2 If your computer is configured to Auto-Play CDs, the installation will start automatically. If not, double-click the setup.exe icon on the CD, and you will see this window: 3 Click Next to continue. ANAGERS...
- Page 21 Installing the Local and Central Configuration Managers 4 Carefully read the license agreement. If you agree, click “Yes, I accept” and Next to continue. 5 The installation will present Readme Information. This is also found in the Readme.txt file on the installation CD. Please read the information and click Next to continue.
- Page 22 2: I HAPTER NSTALLING THE ONFIGURATION ANAGERS 6 Enter your user and organization names. You can also specify whether you want the management programs to be available to just you or to anyone that may use the computer you’re installing these applications on. Select the option you prefer and click Next.
- Page 23 Installing the Local and Central Configuration Managers 7 The program files will be installed in the directory C:\Program Files\3Com\IntelliJack. If you want to change the location of the installation, click Change. Otherwise click Next to accept the default location and continue.
- Page 24 2: I HAPTER NSTALLING THE ONFIGURATION 8 Select a typical or custom setup and click Next. The Typical installation will install both the Local Configuration Manager and the Central Configuration Manager on your system. The Custom installation option lets you install just one of the programs if you wish.
-
Page 25: Installing The Web Configuration Manager On A Windows 2000 Machine
Local Configuration Manager and one for the Central Configuration Manager. You can also launch the programs from a program group you can access from the Start menu. The program group folder is labeled 3Com IntelliJack and can be found under the Programs menu. - Page 26 HAPTER NSTALLING THE ONFIGURATION To install the 3Com IJ/NJ Web Configuration Manager on a Windows 2000 computer, follow these steps: 1 If your machine does not have the Java Development Kit (JDK) installed, download the installation program from Sun’s Web site and install JDK v1.4. You can find JDK 1.4 at the following URL:...
- Page 27 8 If the ‘webapps’ subdirectory under the Tomcat installation directory already contains a subdirectory called ‘3ComIJNJ,’ delete this directory. 9 Start Apache Tomcat. To do so, open a DOS command window, go to the ‘bin’ subdirectory under the Tomcat installation directory, type ‘startup’, and hit Enter. A new command window will open.
- Page 28 2: I HAPTER NSTALLING THE ONFIGURATION ANAGERS...
-
Page 29: Sing The Local Configuration Manager
Initializing the NJ220 IntelliJack 1 The first step is to connect your computer to the NJ220 that you are installing. 2 Click on the desktop shortcut icon labeled IJ NJ Local Config Mgr to start the 3 The MAC address, Serial Number, and Firmware Version of the currently 4 Make sure the General tab is selected. - Page 30 3: U HAPTER SING THE OCAL ONFIGURATION 5 Enter Location Information for the NJ220 you are currently configuring. This field can help you and other network managers identify this IntelliJack in the future. You may enter any information you like (up to 128 characters), but we recommend that you enter a logical, easy to follow description, such as “Building A, 3rd floor, room 315, West wall.”...
-
Page 31: Setting Advanced Options
Make sure you remember the new password you set. If you forget the new password, you will not be able to perform any other configuration tasks unless you send the device back to 3Com. Setting Advanced Options... - Page 32 3: U HAPTER SING THE OCAL ONFIGURATION ANAGER...
-
Page 33: Sing The
Discovering NJ220 Devices on Your Network SING THE ENTRAL ONFIGURATION You should use the Local Configuration Manager to initialize each of the NJ220 IntelliJacks installed on your network. Once you have completed that step, you can manage all of them with the Central Configuration Manager. Install this program on any computer on your network you want to use as a central management console (See chapter 2, “Installing the Configuration Managers”... - Page 34 4: U HAPTER SING THE ENTRAL 1 Open the Central Configuration Manager by double-clicking on the IJ NJ Cent Config Mgr desktop icon. When it launches, you will see a window similar to this one: 2 Select Discovery from the Devices menu or click the Discover button on the toolbar.
- Page 35 3 You can discover new devices based on a specific subnet or on a specific range of IP addresses. a To discover devices by subnet, select that option on the screen. Click the Add button to add a new subnet to the discovery list. The following box will appear: Fill in the Subnet and Mask fields and click OK.
- Page 36 4: U HAPTER SING THE ENTRAL ONFIGURATION ANAGER You can view discovered devices many ways. On the left side of the toolbar, you can see a drop down box with options for either Subnet, Firmware Ver, or Group Name. The option you select in this box determines how the views are displayed in the left pane of the window.
-
Page 37: Viewing Device Properties
Viewing Device Once the database is populated with NJ220 IntelliJacks on your network, you can Properties begin to manage those devices. The main window of the Central Configuration Manager shows a list of devices in the current database with the information retrieved during the discovery process. -
Page 38: General
4: U HAPTER SING THE ENTRAL 2 Select Property from the Devices menu or from the toolbar. You can also open this window by right-clicking your mouse and selecting Property. General Tab 3 With the General tab selected, you can view and edit information about the device such as the IP address, subnet mask, default gateway, and whether it uses a static IP address or gets its address from a DHCP server. -
Page 39: Product Information
Viewing Device Properties You can double-click on any of the ports to find out more information or configure that particular port. Click OK to save your changes or Cancel to discard them. Product Information 6 Under the Product Information box, you can see the current firmware version of the IntelliJack, the Product Name, and the Serial Number. -
Page 40: Hardware Settings
4: U HAPTER SING THE ENTRAL Hardware Settings 7 Click on the Hardware Settings tab to view status information about the switch. Several fields in this window can be edited, a few cannot. You can change the values of the fields with drop-down lists: Priority Schedule Policy, LAN Port Egress Mode, LAN Port Ingress Mode, Max Frame Size, Counter Mode, and Power Forwarding. - Page 41 Viewing Device Properties 9 Click the ATU Table button to make changes to the NJ220’s ATU table. The screen you see allows you to display all MAC addresses that have been plugged into that IntelliJack or just the ones that you have “locked down” to it. You can refresh the list, add MAC addresses to it, edit existing ones or delete entries in the ATU table.
- Page 42 4: U HAPTER SING THE ENTRAL ONFIGURATION ANAGER 10 The NJ220 IntelliJack also lets you manage its VLAN table. To access the VLAN table, click on the Manage VLAN Table button. The screen you see allows you to display all the VIDs that have been assigned to that IntelliJack. You can refresh the list of VIDs or add to it.
-
Page 43: Statistics Log
Statistics Log 11 Click on the Statistics Log tab. From this view you can see statistics about the number of good or bad packets each port has received and transmitted, based on how you have configured the Counter Mode setting (see step 7 on page 36). The bottom half of the window shows Remote MONitoring (RMON) counters for the LAN port and each of the four PAN ports on the IntelliJack. -
Page 44: Snmp Settings
NOTE: The device log records information regarding watch-dog timer errors or other abnormalities. If, for example, the IntelliJack has unexpectedly rebooted, the event will be recorded in the device log. 3Com Customer Support can use information in the device log to help with troubleshooting. We recommend that you do not attempt to use this log. -
Page 45: Advanced Settings
15 To edit a Trap Destination, enter the IP address of your SNMP management console in the field. This eliminates the need to build a Trap Destination Table via a Management Information Database (MIB) browser. Advanced Settings 16 Click on the Advanced Settings tab to see the following window: 17 You can view the Event Alert Level and 802.1X Settings configured for this particular NJ220. - Page 46 4: U HAPTER SING THE ENTRAL Different Alert Levels notify you of specific events happening with the IntelliJack. Each level above 0 provides different types of event alerts as described below: Alert Level Level 0: Disable all alert messages Level 1: Allow critical alerts Level 2: Allow standard alerts Level 3: Allow all alerts Next to the Event Alert Level field is a box labeled Receive Alert.
-
Page 47: Changing Device Configuration
Changing Device Many of the properties that you can view from the Device Property windows can Configuration be changed from the Device Configuration window. Here’s how to use this feature: 1 Select one or more IntelliJacks from the devices list. NOTE: It is possible to configure multiple IntelliJacks at the same time. -
Page 48: General Configuration
4: U HAPTER SING THE ENTRAL This window has five tabs across the top--General Configuration, Priority & VLAN Configuration, Security Configuration, SNMP Configuration, and Advanced Configuration. Check the box next to any setting you want to change from within these five areas. The bottom of the window has buttons labeled Load and Save. - Page 49 transmissions in the Property window because it is unlikely that the IntelliJack will drop any Ethernet Packets. If you believe that the IntelliJack is dropping Ethernet packets, you may want to configure the Counter Mode to count received errors (Rx Errors) and transmission collisions (Tx Collisions).
-
Page 50: Priority & Vlan Configuration
4: U HAPTER SING THE ENTRAL Priority & VLAN Configuration 11 Click the Priority & VLAN Configuration tab along the top of the Device Configuration window to view these settings: Port Based Settings 12 To change the Port Based Settings, first select the Port’s tab you want to make the changes to. -
Page 51: Other Vlan Settings
14 The default setting for the Default Priority Level is 802.1p Priority 0 or 1. You can change this setting to Priority 2 or 3, Priority 4 or 5, or Priority 6 or 7. The IntelliJack has four traffic queues with two priorities per queue. The lowest numbers (0 and 1) have the lowest priority. - Page 52 4: U HAPTER SING THE ENTRAL In a strict priority scheme (the setting’s other option), all highest priority traffic will be removed from the buffer. After it is removed, the next priority traffic type would be removed, and so on. This ensures that the most important or time critical data is passed first, but it could potentially slow traffic from other ports.
-
Page 53: Security Configuration
Make sure you remember the new password you set. If you forget the new password, you will not be able to perform any other configuration tasks unless you send the device back to 3Com. 802.1X 23 To change 802.1X settings for a specific port, select that port’s tab and make the changes by clicking the box and selecting an option from the drop list. - Page 54 802.1X with IP Phone is a special case of 802.1X secure mode. In this mode, when a 3Com IP phone is connected to the IntelliJack, the phone’s MAC address will be locked into the ATU automatically. Therefore, packets sent from the phone can pass through by default without further authentication.
- Page 55 Changing Device Configuration 26 To set advanced 802.1X security settings, click the Advanced Settings button in the Security Configuration window. Primary and secondary accounting servers are similar to the settings for RADIUS servers. The supplicant settings let you configure the IntelliJack as a supplicant to an 802.1X-enabled upstream switch.
-
Page 56: Snmp Configuration
4: U HAPTER SING THE ENTRAL SNMP Configuration 27 Click the SNMP Configuration tab to change the SNMP settings of the NJ220. 28 You can either Enable or Disable the “Set” operation of the IntelliJack. 29 Configure the “Get” and “Set” Community Strings for SNMP management operations. -
Page 57: Advanced Configuration
• An Auth Fail Trap indicates a wrong Community name in the SNMP • Vendor Specific Traps indicate 802.1X User Login, 802.1X User Logout, and 31 You can Set Trap Destination by entering the IP address of your SNMP management console. This eliminates the need to build a Trap Destination Table via a Management Information Database (MIB) browser. - Page 58 4: U HAPTER SING THE ENTRAL You can change the Alert Level if you want to be notified of specific events happening with the IntelliJack. Each level above 0 provides different types of event alerts as described below: Alert Level Level 0: Disable all alert messages Level 1: Allow critical alerts Level 2: Allow standard alerts...
-
Page 59: Event Alerts
With Data Rate Control settings, you can reduce the network traffic speed on the IntelliJack to as little as 128 Kbps. This can be useful if the machine is in a public area where you only want to provide a minimum speed connection. Even though there are only eight rate limiting choices in the pull-down menu, you can actually increase the number of options you have by setting the Priority Levels on the Priority and VLAN Configuration tab. - Page 60 4: U HAPTER SING THE ENTRAL Global Setting 802.1X Supplicant Status 802.1X Supplicant User Name and Password Port Setting State Link Flow Control MDI[X] Multicast Limit Priority Lookup Port Priority VLAN ID 802.1Q VLAN Mode Data Rate Limit Maximum Data Rate The values that remain unchanged when you click Restore Base Configuration are: •...
- Page 61 41 When you are finished entering the configuration changes to your NJ220 IntelliJack, click the OK button and a Configuration Progress dialog box will appear. If you don’t want to apply the changes you made, click Exit to discard those changes and exit the window. 42 If you click Configuration Summary, you will see a summary of all the changes you have made.
- Page 62 4: U HAPTER SING THE ENTRAL ONFIGURATION ANAGER The Restore operation lets you recover configurations you saved with Backup. When you initiate a Restore, you will be asked for the Secret Key you established with the Backup operation.
-
Page 63: Finding Computers Connected To Intellijacks
Finding Computers Occasionally you may need to find out which IntelliJack a networked device, such Connected to NJ220 as a PC, is connected to. This is one of the many situations where the Location Devices Information field of the NJ220 can be very useful. If you know the IP address or MAC address of the computer or networked device, you can use the Central Configuration Manager to find the right IntelliJack. -
Page 64: Upgrading The Nj220 Firmware
4: U HAPTER SING THE ENTRAL Upgrading the NJ220 You can upgrade the firmware on your NJ220s over the network from the Central Firmware Configuration Manager. To do so, follow these steps: 1 Select one or more IntelliJacks you want to upgrade. You can select groups of IntelliJacks using one of the grouping options available to you in the drop-down list at the top left corner of the main window. - Page 65 5 Select the time to perform the upgrade. You can either send the update file immediately or select a specific time and date to send the file. You may, for example, want to perform an upgrade during off hours such as a weekend. 6 Click Next and a window like this will appear: 7 Review the list of IntelliJacks you want to upgrade.
- Page 66 4: U HAPTER SING THE ENTRAL ONFIGURATION ANAGER 8 Type your password in the Password field, then click Finish. The Upgrade Progress dialog box will appear.
-
Page 67: Viewing Log Files
Upgrading the NJ220 Firmware Viewing Log Files The Central Configuration Manager creates a log file with details of the firmware upgrades, configuration operations, and alert messages from the IntelliJack. This file is in the Central Configurator\Log subdirectory under the directory where you installed the IntelliJack configuration software. -
Page 68: Viewing And Canceling Scheduled Firmware Upgrades
4: U HAPTER SING THE ENTRAL Viewing and Canceling You can select a time and date to send an upgraded firmware image to the Scheduled Firmware IntelliJacks in your network. To view and make changes to the firmware upgrades Upgrades you have scheduled, follow these steps: 1 Select Manage Schedule from the Tools menu. -
Page 69: Troubleshooting The Nj220
Troubleshooting the NJ220 If you encounter problems with the IntelliJack: Verify the IntelliJack is receiving power by viewing the Power LED (it should be on). If the Power LED is not on, make sure that: If using power over Ethernet, the other end of the network cable is plugged into a switch on the network that has Power Over Ethernet integrated into it, or one that feeds into an external midspan power supply that supports Power Over Ethernet. - Page 70 7 watts. The IntelliJack can only forward up to 7 watts. Unit has detected a problem. Contact 3Com Technical Support. Traffic can pass through, but management will not work. Wrong password has been Confirm correct password and re- entered type.
-
Page 71: Where To Go For Help
To take advantage of warranty and other service benefits, you must first Product to Gain register your product at: Service Benefits http://eSupport.3com.com/ 3Com eSupport services are based on accounts that are created or that you are authorized to access. Solve Problems 3Com offers the following support tool: Online ■... -
Page 72: Contact Us
3Com as a separately ordered product. Separately orderable software releases and licenses are listed in the 3Com Price List and are available for purchase from your 3Com reseller. - Page 73 ■ ■ ■ To send a product directly to 3Com for repair, you must first obtain a return materials authorization number (RMA). Products sent to 3Com without authorization numbers clearly marked on the outside of the package will be returned to the sender unopened, at the sender’s expense.
- Page 74 Return material authorization: warranty_repair@3com.com Contract requests: emea_contract@3com.com Latin America — Telephone Technical Support and Repair Antigua 1 800 988 2112 Argentina 0 810 444 3COM Aruba 1 800 998 2112 Bahamas 1 800 998 2112 Barbados 1 800 998 2112 Belize...
-
Page 75: Product Specifications
Product Specifications Hardware Power consumption Network Interface 10 Mbps Ethernet 10BASE-T 100 Mbps Ethernet 100BASE-TX Performance Auto-negotiation <5 watts without power forwarding Maximum 13 watts with power forwarding (depending on the device drawing power) Ethernet IEEE 802.3 industry standard for a 10 Mbps baseband CSMA/CD local area network Ethernet IEEE 802.3u industry standard for a 100 Mbps baseband CSMA/CD local area network... - Page 76 Product Specifications MIB Support 3Com Proprietary MIBs Standard Traps Proprietary Traps Environment Operating temperature Storage temperature Operating humidity Storage humidity Operating Altitude Storage Altitude Standards Conformance IEEE802.3 10BASE-T, 100BASE-TX and auto-negotiation Power Over Ethernet (Capacitive Power Discovery Process and IEEE 802.3af) Power forwarding (IEEE802.3af;...
- Page 77 Power forwarding Power forwarding Port number 1 can be used with any standard networking device as well as to power a device such as a VoIP telephone on a network that uses IEEE 802.3af-compatible Power Over Ethernet. RMON Counters InUnicasts Total valid frames received with a unicast Destination Address.
- Page 78 Product Specifications InDiscards InFiltered OutUnicasts OutBroadcasts OutPause OutMulticasts OutFCSErr OutGoodOctets Out64Octets Out127Octets Out255Octets Out511Octets Out1023Octets OutMaxOctets Collisions Late Excessive Multiple Total valid frames received that are discarded due to lack of buffer space. This includes frames discarded at ingress as well as those dropped due to priority and congestion considerations at the output queues.
- Page 79 Single Total number of successfully transmitted frames that experienced exactly one collision. Deferred Total number of successfully transmitted frames that are delayed because the medium is busy during the first attempt.
- Page 80 Product Specifications...
- Page 81 Changes or modifications not expressly approved by 3Com could void the user’s authority to operate this equipment. (IC)
- Page 82 VCCI C APAN OMPLIANCE Translation: This is a Class A product based upon the standard of the Voluntary Control Council for Interference by Information Technology Equipment (VCCI). If this equipment is used in a domestic environment, radio disturbance may occur, in which case, the user may be required to take corrective actions.