
Related Manuals for Emotiva RMC-1

Summary of Contents for Emotiva RMC-1
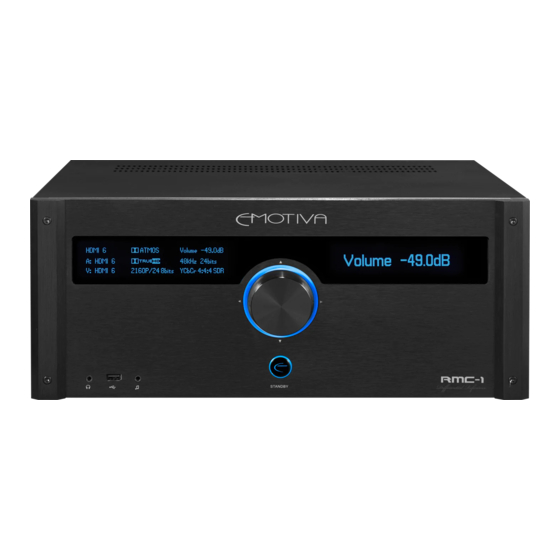
- Page 3 Dirac Live for Emotiva Processors Dirac Live for Emotiva Processors Automatic Room on HDMI 1 Reference Stereo Volume -35.0dB Volume -35.0 A: HDMI 1 PCM 2.1 44kHz 20bits V: HDMI 1 1080P/60 8bits 4:2:2 SDR RMC-1 STANDBY Differential Reference Page 1...
- Page 4 OUR CURRENT PROCESSORS, WILL NOT WORK WITH OUR LEGACY XMC-1 PROCESSOR. (If you have an XMC-1 you must download or purchase the correct version of Dirac Live LE for Emotiva or Dirac Live FULL for Emotiva that will work with your XMC-1.) NOTE: THE DIRAC LIVE SOFTWARE IS UPDATED PERIODICALLY.
- Page 5 Dirac Live for Emotiva Processors Automatic Room Correction Audio recordings themselves, and modern audio playback and amplification equipment, both achieve very high levels of accuracy; the weakest links in a modern audio system are the speakers and the room. The limitations of speakers themselves, and the complex ways in which they...
- Page 6 The current version of Dirac Live, which works with our current processors, consists of three main components: The Dirac Live filter engine is an integral part of the firmware in our RMC-1, RMC-1L, and XMC-2 processors. This is the part of the room correction system that actually applies the precision digital corrections to your music and movie sound tracks.
-
Page 7: Your Listening Room
Dirac Live for Emotiva Processors Your Listening Room Even though Dirac Live is the most powerful automatic room correction system available today, and it will produce a dramatic improvement in your listening experience in virtually every room, you will still get the best results if you optimize your room and system configuration before you run Dirac Live. -
Page 8: Target Curves
Dirac Live to take the full set of measurements is suggests. The Dirac accessories that you received with your Emotiva processor include a convenient tabletop microphone stand which will allow you to position the microphone in many locations. - Page 9 • A USB digitizer cable - for connecting the microphone to your computer. • The Emotiva Dirac Network Interface - which connects to your network to facilitate the network connection between the Dirac Live software and your processor. • A small 5-port Ethernet switch and some Ethernet cables.
- Page 10 The following page shows three different ways in which you can connect your computer, processor, and the Emotiva Dirac Network Interface box. The first - fully wired - connection will work consistently for most users, and so is the recommended option.
- Page 11 Connecting Everything To Your Network Suggested network connection options: All connections shown are To network Ethernet Switch Ethernet and Internet except (cable modem microphone or main router) RMC-1 Emotiva Desktop RMC-1L Dirac XMC-2 Network Laptop (USB) Interface Computer Simplest Wired Network Connections...
- Page 12 Installing The Dirac Live Software On Your Computer The Dirac Live software which performs all of the measurements, calculates the correction filters, and downloads the correction filters to your Emotiva processor, can be installed on any reasonably current Microsoft Windows or Apple computer.
- Page 13 Your microphone should be plugged into your computer via the included USB digitizer cable. • The Emotiva Dirac Network Interface box must be connected to your network and running. Note: The Emotiva Dirac Network Interface box is actually a fully functional Raspberry Pi computer, running its own custom software, which facilitates communications between the Dirac Live software on your computer and your processor.
- Page 14 Using Speaker Presets And Dirac Filters Using The Speaker Presets On The RMC-1, RMC-L, and XMC-2 PLEASE READ THIS SECTION CAREFULLY AND MAKE SURE YOU UNDERSTAND IT. Failure to do so may cause you to end up with unexpected and unsatisfactory results.
- Page 15 Using Speaker Presets And Dirac Filters Your processor includes two separate Speaker Presets which are independent and can be configured differently. For each Speaker Preset, you can configure the following: • The Name of the preset itself (the default names are Preset 1 and Preset 2). •...
- Page 16 In the Speaker Preset check the box to Enable Dirac. • Note: If the Dirac Enable box displays UNAVAILABLE it means that the Emotiva Dirac Network Interface box is not responding. This could be because the Network Interface box is not connected to your network, has been shut down and has not since been restarted, or has stopped running and will need to be rebooted.
- Page 17 Performing A Dirac Live Room Calibration Starting The Dirac Live Software On Your Computer At this point we have finished all of the preparations necessary to perform a Dirac Live automatic room calibration. Click on the appropriate icon or select the program from the Start Menu on your computer to run The Dirac Live software program.
- Page 18 On the next screen you will be prompted to select the calibrated measurement microphone you wish to use. The calibrated microphone and digitizer set provided by Emotiva will identify itself as “Microphone (USB PnP Sound Device)”. If you have purchased a different third-party calibrated microphone then you should select it instead.
- Page 19 Performing A Dirac Live Room Calibration Volume Calibration - Microphone Gain On the next screen you will set the Microphone Gain and Master Output levels. The object of this setting is to set the Microphone Gain as high as possible while being careful to avoid allowing the background noise in the room to interfere with the accuracy of our measurements.
- Page 20 If the test stones seem EXCEPTIONALLY loud, or you hear no test tones, stop the test, and call Emotiva Technical Support. Start by sliding the Master Output level tab all the way down. Now click on the small triangle under the speaker you’ve chosen (it looks like a “Play”...
- Page 21 Performing A Dirac Live Room Calibration Volume Calibration - Individual Channel Levels Now we are going to set the levels for each individual channel. Now, leaving the individual channel slider tab set to 0 dB for the first channel we chose, we are going to set the channel levels for all the remaining channels.
- Page 22 Performing A Dirac Live Room Calibration Select Arrangement The Dirac Live calibration software offers three choices between Correction Filters that are more precisely optimized for a single listening position and Correction Filters that are optimized for a somewhat wider range of listening positions. A more focused choice will deliver the most accurate listening experience at the central seating position;...
- Page 23 Performing A Dirac Live Room Calibration Measure The Dirac Live software will now play several test tones through our processor, amplifier, and speakers, and measure the response of your speakers and room using your calibrated microphone. For the central “sweet spot” measurement, which is the most critical, you should be sure that the microphone is located exactly at your preferred listening position.
- Page 24 Performing A Dirac Live Room Calibration For each measurement position Dirac Live will play a series of test tones through each of your speakers in turn. Avoid moving around or making any noise while the test tones are playing. You will see a screen like the one below while the test tones are playing. After each set of test tones is completed you will see the screen below, where you will be shown the results of the measurement that has just been completed, and you will have the opportunity to perform more measurements, clear or repeat previous measurements, or...
- Page 25 Performing A Dirac Live Room Calibration Filter Design The following illustration shows the important parts of the Filter Design screen. Dirac Live room correction works by using a series of test tones to measure the frequency response of your system and room, analyzing the results, comparing them to a desired frequency response Target Curve, and calculating a set of Correction Filters that will adjust the frequency response of your system and room so that it matches the Target Curve.
- Page 26 Performing A Dirac Live Room Calibration Note: Frequencies that lie outside of the Curtains will NOT be filtered out or otherwise altered. Dirac Live will simply NOT attempt to adjust them. Note: For various technical reasons it is impossible to adjust the frequency response curve to bend sharply or exhibit a very sharp step in response.
- Page 27 Performing A Dirac Live Room Calibration Filter Export On th Filter Export screen you will be offered the opportunity to download a new set of Correction Filters to your processor which have been created using the current set of measurements and Target Curves.
- Page 28 You may shut down the Emotiva Dirac Network Interface by checking the Shutdown Remote check box in EITHER Speaker Preset. Note: If you fail to SHUT DOWN and unplug your Emotiva Dirac Network Interface box and there is an abrupt power fluctuation or power surge, the firmware on the Network Interface box MAY become corrupted, and may fail to start up properly the next time you wish to use it.
- Page 29 Dirac Live for Emotiva Processors Congratulations! You have successfully calibrated your listening room and speakers using Dirac Live for Emotiva. The Dirac Live Room Correction filters you have created are activated by configuring one or both Speaker Presets to use one of the Dirac Correction Filters and then selecting that Speaker Preset.
- Page 30 Dirac™, Dirac Live™, and Audyssey™ are all trademarked. They and any other trademarks mentioned in this manual are the property of their respective owners. Dirac Live For Emotiva Processors Manual Revision 1.3 July, 2020 Page 28...
- Page 32 Emotiva Audio Corporation 135 Southeast Parkway Court Franklin, TN 37064 emotiva.com...