
Related Manuals for VTech Disney Toot-Toot Drivers Minnie’s Ice Cream Parlour


Summary of Contents for VTech Disney Toot-Toot Drivers Minnie’s Ice Cream Parlour
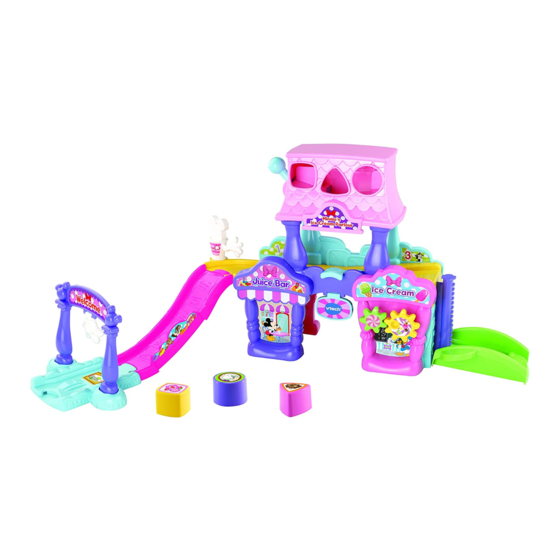
- Page 1 Parent’s Guide Minnie’s Ice Cream Parlour © Disney www.disney.com 91-003539-001...
- Page 3 INTRODUCTION Toot-Toot Drivers Thank you for purchasing the VTech Minnie’s ® ® Ice Cream Parlour! Take a ride with Minnie and her Ice Cream Truck down the tracks and through the gate to deliver ice cream and treats. Shape Sorter...
-
Page 4: Included In This Package
INCLUDED IN THIS PACKAGE One SmartPoint One shape sorter Shape sorter support A Minnie Ice Cream Truck One gate Shape sorter One delivery support B launcher One lift One lift wall One lift guide rail One second Base wall B Base wall A level track... - Page 5 Base wall C Base wall D Two gears Three shape One ramp exit One ramp exit sorter blocks sign One exit track One ramp track One parlour sign One label sheet - One parent’s guide...
-
Page 6: Getting Started
WARNING: All packing materials such as tape, plastic sheets, packaging locks, removable tags, cable ties and packaging screws are not part of this toy, and should be discarded for your child’s safety. NOTE: Please keep this parent’s guide as it contains important information. - Page 7 (carbon-zinc) or rechargeable, or new and used batteries. • Do not use damaged batteries. • Insert batteries with the correct polarity. • Do not short-circuit the battery terminals. • Remove exhausted batteries from the toy. • Remove batteries during long periods of non-use. • Do not dispose of batteries in fire. • Do not charge non-rechargeable batteries. • Remove rechargeable batteries from the toy before charging (if removable). • Rechargeable batteries are only to be charged under adult supervision. Disposal of batteries and product The crossed-out wheelie bin symbols on products and batteries, or on their respective packaging, indicates they must not be disposed of in domestic waste as they contain substances that can be damaging to the environment and...
-
Page 8: Label Application
LABEL APPLICATION Please adhere the labels to the play set securely as indicated on the following pages:... - Page 10 ASSEMBLY INSTRUCTIONS Minnie’s Ice Cream Parlour Toot-Toot Drivers With the VTech Minnie’s Ice Cream Parlour, ® ® safety comes first. To ensure your child’s safety, adult assembly is required. 1. Insert the two Gears into Base Wall B, as shown below. You will hear a “click”...
- Page 11 4. Attach the Lift Guide Rail to the Lift Wall. Then, insert the Lift Guide Rail into the Lift, as shown below. 5. Insert the Lift Support Wall into the Second Level Track, Base Wall B and Base Wall C, as shown below. You will hear a “click” sound to indicate the pieces are secure.
- Page 12 7. Insert the Delivery Launcher into the Second Level Track, as shown below. 8. Insert the Shape Sorter into the Shape Sorter Supports, as shown below. You will hear a “click” sound to indicate the pieces are secure. 9. Attach the Ramp Track to the Second Level Track, as shown below.
- Page 13 10. Attach the Ramp Exit Sign to the Ramp Exit. Then, insert the Ramp Exit to the Exit Track, as shown below. You will hear a “click” sound to indicate the pieces are secure. Once you’ve completed the above steps, connect the tracks and you’re ready to play! You can connect this play set to other Toot-Toot Drivers tracks and play sets (each sold separately).
-
Page 14: Product Features
PRODUCT FEATURES Ice Cream Truck 1. ON/OFF SWITCH To turn the unit ON, slide the On/Off Switch to the ON ( ) position. To turn the unit OFF, slide the On/Off Switch to the OFF ( ) position. 2. AUTOMATIC SHUT-OFF To preserve battery life, the Ice Cream Truck will automatically power down after approximately 50 seconds without input. - Page 15 3. Push the Ice Cream Truck to hear fun sounds and melodies. While the melody is playing, push the vehicle again to add in fun sounds on top of the melody. The lights will flash with the sounds. 4. For added fun, the Ice Cream Truck interacts with the Toot- Toot Drivers Minnie’s Ice Cream Parlour.
-
Page 16: Melody List
3. With the vehicle in the Delivery Launcher, place the Shape Sorter Blocks in the Shape Sorter. Then, pull the lever to drop a Shape Sorter Block into the back of the Ice Cream Truck. SONGS 1. Delivering here, Delivering there, Delivering ice cream everywhere! 2. -
Page 17: Care And Maintenance
CARE & MAINTENANCE 1. Keep the unit clean by wiping it with a slightly damp cloth. 2. Keep the unit out of direct sunlight and away from any direct heat source. 3. Remove the batteries when the unit will not be in use for an extended period of time. - Page 18 IMPORTANT NOTE: Creating and developing VTech products is accompanied by ® a responsibility that we take very seriously. We make every effort to ensure the accuracy of the information, which forms the value of our products. However, errors sometimes can occur. It...
- Page 19 YEAR...
- Page 20 Visit our website for more information about our products, downloads, resources and more. www.vtech.co.uk TM & © 2018 VTech Holdings Limited. All rights reserved. Printed in China. 91-003539-001...