Table of Contents
Advertisement
Advertisement
Table of Contents

Related Manuals for Toshiba U202-BK


Summary of Contents for Toshiba U202-BK
- Page 1 Toshiba Portable Media Player ® gigabeat User’s Guide U Series GMAD00135010 06/07...
- Page 2 Only peripherals complying with the FCC rules class B limits may be attached to this equipment. Operation with non-compliant peripherals or peripherals not recommended by TOSHIBA is likely to result in interference to radio and TV reception.Shielded cables must be used between the external devices and USB connector. Changes or modifications made to this equipment, not expressly approved by TOSHIBA or parties authorized by TOSHIBA could void the user’s...
- Page 3 This device may not cause harmful interference. This device must accept any interference received, including interference that may cause undesired operation. Contact Address: TOSHIBA America Information Systems, Inc. 9740 Irvine Boulevard Irvine, California 92618-1697 (949) 583-3000 Industry Canada Requirement This Class B digital apparatus complies with Canadian ICES-003.
-
Page 4: Safety Instructions
Safety Instructions ❖ Should you notice any abnormality such as odor, smoke, or overheating, disconnect the USB cable and turn off the power. Continuing to use the product may result in fire or burn, possibly resulting in serious injury. ❖ If water or other foreign objects should enter the equipment, disconnect the USB cable and turn off the power. - Page 5 Turn off the power and refrain from using the product on an airplane, in a hospital or other place where use of the product is prohibited. Using the product in these places may affect systems of operation, the functioning of medical equipment, resulting in an accident and possibly serious injury.
- Page 6 ❖ Do not use the product in a humid or steamy environment, nor use it in a place that is dusty or subject to lamp soot. Doing so may result in fire, possibly resulting in serious injury. ❖ Disconnect the USB cable before moving the product. Failure to do so may damage the cables, resulting in fire, possibly resulting in serious injury.
- Page 7 You must obtain any required permission from copyright owners to download or use copyrighted content. Toshiba cannot and does not grant such permission, nor does Toshiba authorize the use or reproduction of copyright material without the relevant permissions...
-
Page 8: Table Of Contents
Important Information on Use ...14 General ...14 Location of use ...15 Condensation ...15 Caring for your gigabeat Music CD’s...16 Built-in battery ...16 Precautions Concerning Data Deletion at Protection of Stored Data...17 Toshiba’s online resources ...17 the Time of Disposal or Transfer...16 ® ...15... - Page 9 Chapter 1: Getting Started... 18 Using the gigabeat Computer System Requirements Turning the gigabeat Functions of the Up/Down/Left/Right Installing Windows Media Charging the Built-in Battery/Connecting to a computer ...22 Disconnecting the gigabeat Turning the gigabeat Chapter 2: Transferring and listening to audio files... 26 Downloading Audio CD Tracks to your computer ...26 Downloading steps for Windows Downloading steps for Windows...
- Page 10 Contents Fast Forward/Reverse ...44 Displaying the main menu ...44 Listening to a playlist ...44 Transferring playlists stored in Windows Repeat/Shuffle ...47 Listening using A-B Repeat...50 Canceling A-B Repeat ...52 Selecting the sound quality (using the equalizer)...52 User mode ...55 Setting Favorites (Bookmarks)...56 Removing favorites ...57 Displaying Album Artworks...60 Deleting music files...62...
- Page 11 Chapter 4: Listening to FM Radio... 74 Automatically presetting channels (Auto Preset) ...74 Selecting a preset channel to listen to...77 Method 1 for converting to preset mode...78 Method 2 for converting to preset mode...78 Tuning the radio manually ...79 Method 1 for converting to manual mode...80 Method 2 for converting to manual mode...80 Presetting channels manually ...81 Chapter 5: Recording...
- Page 12 Error Messages...120 Troubleshooting...123 Resetting the gigabeat Other problems ...125 If you need further assistance...126 Before you contact Toshiba ...126 Contacting Toshiba ...126 Other Toshiba Internet Web sites...127 Toshiba’s worldwide offices...127 Appendix A: Specifications...129 Sampling frequency and bit rate combinations ...131 Glossary...132...
-
Page 13: Introduction
Introduction Welcome to the world of portable entertainment. With your Toshiba ® gigabeat portable media player, your entertainment can accompany you wherever you go. Safety icons This manual contains safety instructions that must be observed in order to avoid potential hazards that could result in personal injuries, damage to your equipment, or loss of data. -
Page 14: About This Product
Introduction About This Product About This Product This product is protected by certain intellectual property rights of Microsoft Corporation. Use or distribution of such technology outside of this product is prohibited without a license from ® Microsoft or an authorized Microsoft Package Contents ®... -
Page 15: Location Of Use
Do not spray volatile or caustic chemicals on or around the product. Also, avoid keeping a rubber or PVC product in contact with the product for a long period. It may damage or discolor the exterior coating. Do not place the product in a trouser pocket, and so on. When you sit down, the product may receive strong impact and sustain damage. -
Page 16: Music Cd's
Please contact TOSHIBA Product Support by calling 1-877-250-8595, or 1-949-583-3212. NOTE TOSHIBA shall not be liable whatsoever for any corruption or loss of stored data due to the complete discharge of the built-in battery. Precautions Concerning Data Deletion at the Time of Disposal or... -
Page 17: Protection Of Stored Data
When copying, or transferring data, please be sure to confirm whether the data has been successfully copied or transferred. Toshiba disclaims any liability for the failure to copy or transfer the data correctly. Before returning any product for service, be sure to back up data and remove any confidential, proprietary, or personal information. -
Page 18: Chapter 1: Getting Started
Chapter 1 Getting Started This chapter summarizes how to connect components and how to turn on and start using your gigabeat Using the gigabeat Windows Media Player Music CD ❖ Transfer music tracks from your computer to the gigabeat using Windows Media on the gigabeat ❖... -
Page 19: Computer System Requirements
❖ Use the gigabeat ❖ Record tracks directly from a CD or MD player and listen to them on the gigabeat Computer System Requirements You will need a computer system that meets the requirements listed below. ® Operating Microsoft ® system Microsoft Center Edition (pre-installed as standard) (Windows... -
Page 20: Turning The Gigabeat On And Off
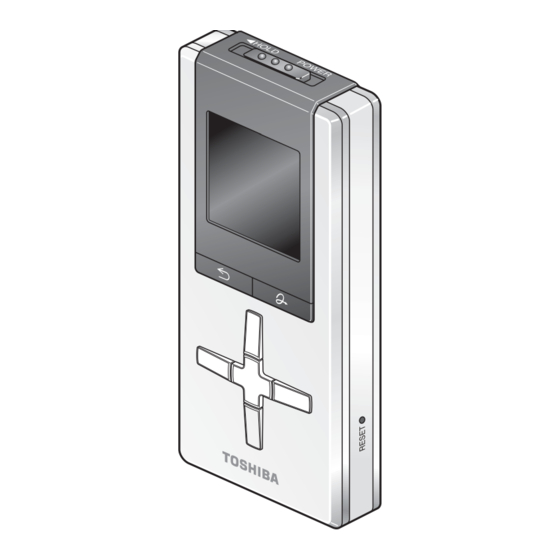
Getting Started Turning the gigabeat® On and Off Turning the gigabeat ® The gigabeat illustration and their functions described below. (Sample Illustration) POWER/HOLD switch To turn on the gigabeat You can also disable the controls on the gigabeat them from working, if they are pressed unintentionally, by sliding the switch towards HOLD. -
Page 21: Functions Of The Up/Down/Left/Right Button And Enter Button
Strap holder Earbud/REC jack To record sound from another audio device, plug its audio output into this jack. NOTE The gigabeat purposes.The actual product may differ slightly. Functions of the Up/Down/Left/Right button and Enter button ® The gigabeat Up/down button Adjusts the volume of the track currently playing. -
Page 22: Installing Windows Media Player
Getting Started Installing Windows Media® Player Installing Windows Media Use Windows Media ® gigabeat . If Windows Media computer, please install it from the supplied CD-ROM by following these instructions: Insert the supplied CD-ROM into your computer. Click the Install Windows Media Player 11 button. If you are using Windows Media will install the required patch (modification program). - Page 23 Charging the Built-in Battery/Connecting to a computer ® The gigabeat “charging icon” will appear on the gigabeat charging is completed, the charging icon is green. (Sample Illustration) Charging icon, charge complete, and not charging icons It takes approximately 2 hours to fully charge the gigabeat NOTE ❖...
-
Page 24: Disconnecting The Gigabeat From The Computer
Getting Started Disconnecting the gigabeat® from the computer NOTE You cannot use the gigabeat NOTE ❖ ❖ ❖ After connection (Sample Illustration) Battery level display on the gigabeat while charging Disconnecting the gigabeat To disconnect the gigabeat computer. (Sample Illustration) Unplugging the USB cable from the computer NOTE When the gigabeat the gigabeat... -
Page 25: Turning The Gigabeat On And Off
DO NOT DISCONNECT CHARGING Do not disconnect when this is displayed (Sample Illustration) gigabeat disconnecting “USB Connected” may continue to be displayed on the gigabeat screen even after you disconnect the gigabeat If this happens, reset the gigabeat the side of the gigabeat Turning the gigabeat To turn the gigabeat [POWER] and release. -
Page 26: Chapter 2: Transferring And Listening To Audio Files
Chapter 2 Transferring and listening to audio files This chapter provides information on how to transfer (download) audio files and listen to them on your gigabeat Downloading Audio CD Tracks to your computer Using Windows Media to your computer. You can then transfer (download) those tracks from the computer to your gigabeat NOTE Gigabeat... -
Page 27: Downloading Steps For Windows Media ® Player 10
Downloading Audio CD Tracks to your computer Uncheck the tracks you don’t want to download. Initially, all the tracks are checked.You can check or uncheck all the tracks at once by checking or unchecking the box at the top of the list. Click the Start Rip button. - Page 28 Transferring and listening to audio files Downloading Audio CD Tracks to your computer Click the Rip Music button. Downloading of the selected tracks begins. (Sample Illustration) Click the Rip Music button ❖ NOTE ❖ ❖ ❖ ❖ The selected tracks are downloaded to your My Music folder and can be viewed in the Windows Media ®...
-
Page 29: Transferring Audio Files On Your Computer To The Gigabeat
Transferring audio files on your computer to the gigabeat® Transferring audio files on your computer to the gigabeat Using Windows Media (Windows Media your computer to the gigabeat Transferring audio files using Windows Media To transfer audio files from the computer to the gigabeat Windows Media Use the USB cable to connect the gigabeat has Windows Media... - Page 30 (transfer) the files manually. You can select automatic synchronization later by clicking at the bottom of the Sync tab in Windows Media TOSHIBA gigabeat U. Click the Sync tab in Windows Media files you want to transfer (synchronize). Click the Select a category button and then select Music.
- Page 31 Transferring audio files on your computer to the gigabeat® Right-click one of the selected files and select Add to Sync List in the shortcut menu that appears. The file is added to the synchronization list on the right side of the window.You can also add files to the synchronization list by dragging and dropping them into the synchronization list area on the right.
-
Page 32: Player 10
Transferring and listening to audio files Transferring audio files on your computer to the gigabeat® NOTE ❖ ❖ ❖ ❖ ❖ Transferring audio files using Windows Media To transfer audio files from the computer to the gigabeat Windows Media Use the USB cable to connect the gigabeat Windows Media A window opens in which you choose the operation performed when the gigabeat... - Page 33 Transferring audio files on your computer to the gigabeat® Windows Media window opens. (Sample Illustration) Device Settings Window Select Manual and then click Finish. This user guide describes how to synchronize (transfer) files manually. You can select automatic synchronization later by clicking the Set up Sync button in the Sync tab in Windows ®...
- Page 34 Transferring and listening to audio files Transferring audio files on your computer to the gigabeat® Select the files you want to transfer (synchronize) in the Windows Media Select All Music from the folder tree on the left. Right-click on the selected file and select Add to Sync List in the shortcut menu that appears.
- Page 35 Transferring audio files on your computer to the gigabeat® (Sample Illustration) Click the Start Sync button NOTE ❖ For additional details, see the Windows Media file. ❖ Do not disconnect the USB cable while transferring data from the computer. Data stored on the gigabeat ❖...
-
Page 36: Transferring Album Artwork
Transferring and listening to audio files Transferring album artwork Transferring album artwork To transfer Album Artwork, you must first download the album information, including the Album Artwork, with Windows Media Player 11 or 10. If you download the album information with the Album Artwork and then transfer music files, the Album Artwork is also transferred. -
Page 37: Selecting Tracks By Artist
Transfer the audio file with the added Album Artwork to the ® gigabeat NOTE In Windows Media stored images to the gigabeat Selecting tracks by artist You can use the track information for the music transferred to the ® gigabeat to select the desired tracks by “Artist”... - Page 38 Transferring and listening to audio files Selecting tracks by artist Press the Right or Enter button. Library FM Radio Line-in Recorder Photos Timer Settings * (Sample Illustration) Selecting Library from the main menu Use the Up or Down button to select Artist. Press the Right or Enter button to display the Artist menu.
- Page 39 Transferring and listening to audio files Press the Right or Enter button to display a list of albums by the selected artist. Artist Artist1 Artist2 Artist3 FM recording Ext recording (Sample Illustration) Selecting a particular artist Use the Up or Down button to select the album you want to listen to.
- Page 40 Transferring and listening to audio files Selecting tracks by artist Use the Up or Down button to select the track you want to listen to. Album1 Play All Song1 Song2 Song3 Song4 (Sample Illustration) Selecting a track to listen to If you select Play All instead of a particular track at this point, the gigabeat sequentially.
-
Page 41: Selecting Tracks By Album
Selecting tracks by album In addition to selecting tracks by artist, you can also select tracks by album. To select a track by album: Plug the earbuds into the earbud jack and turn the gigabeat (Sample Illustration) Plugging earbuds into the earbud jack To display the main menu, press the Back button if the ®... -
Page 42: Additional Information
Transferring and listening to audio files Selecting tracks by album Press the Right or Enter button. A menu with a list of albums (e.g., Album 1, Album 2, and so on) is displayed. Use the Up or Down button to select the album of your choice. Press the Right or Enter button. -
Page 43: Playback Controls
Playback controls After selecting the track to be played by artist or album (see Selecting tracks by artist screen will be displayed. The following subsections present how to control the playback. The following screen is the playback screen displayed for Selecting tracks from artist. -
Page 44: Pausing Playback
Transferring and listening to audio files Listening to a playlist Pausing playback To pause the track currently playing in the Playback screen, press the Enter button. To resume, press the Enter button. Skipping to the start of current track, previous track, or next track To skip to the start of current, previous, or next track, press the Left or Right button while the Playback screen is displayed. - Page 45 Transferring and listening to audio files In the main menu, press the Up or Down button to select Library. Press the Right or Enter button. Library FM Radio Line-in Recorder Photos Timer Settings * (Sample Illustration) Selecting Library from the main menu Use the Up or Down button to select Playlist.
-
Page 46: Transferring Playlists Stored In Windows Media Player 10 To The Gigabeat
Transferring and listening to audio files Listening to a playlist Press the Right or Enter button. Playlist Playlist1 Playlist2 Playlist3 Playlist4 Playlist5 (Sample Illustration) Selecting Playlist 1 Use the Up or Down button to select the track you want to listen to. -
Page 47: Repeat/Shuffle
In the Windows Media and then click the Set up Sync button. The device settings window appears. Select Auto, click the Specify playlist to sync check box and then click Next. Click the check boxes for the playlists you want to synchronize and then click Finish. - Page 48 Transferring and listening to audio files Repeat/Shuffle Use the Up or Down button to select Playback Settings. Press the Right or Enter button. Library Artist Album Playlist Bookmark Play All Playback Settings (Sample Illustration) Selecting Playback Settings Use the Up or Down button to select Play Mode. Press the Right or Enter button.
- Page 49 Use the Up or Down button to select your preferred mode. The table below presents a description of your playback mode options. Playback Playback screen icon Mode None Normal Repeat One Repeat All Shuffle Shuffle & Repeat Press the Right or Enter button. Your selected mode is set and the screen from step 5 above reappears.
-
Page 50: Listening Using A-B Repeat
Transferring and listening to audio files Repeat/Shuffle Listening using A-B Repeat The A-B Repeat feature lets you set two points (A and B) and then repeatedly listen to the music between those points. To select this feature: Display the Playback screen by following the steps in tracks by artist Press the Quick button while the Playback screen is displayed. - Page 51 Press the Enter button where you want to set point B (the ending point). Point B is set. The Set Point B screen closes and A-B repeat playback begins. Repeat Set Point B (Sample Illustration) Selecting the ending point (point B) ❖...
-
Page 52: Canceling A-B Repeat
Transferring and listening to audio files Selecting the sound quality (using the equalizer) Canceling A-B Repeat To cancel the A-B repeat feature: Display the Playback screen by following the steps in tracks by artist Press the Quick button while the Playback screen is displayed. The Quick menu appears. - Page 53 Transferring and listening to audio files Selecting the sound quality (using the equalizer) Press the Right or Enter button. Library FM Radio Line-in Recorder Photos Timer Settings * (Sample Illustration) Selecting Library from the main menu Use the Up or Down button to select Playback Settings. Press the Right or Enter button.
- Page 54 Transferring and listening to audio files Selecting the sound quality (using the equalizer) Use the Up or Down button to select Flat, Rock, Jazz, Classic, Pop, or User as your desired mode. The following table presents Equalizer mode options. Playback screen Equalizer icon Mode...
-
Page 55: User Mode
Selecting the sound quality (using the equalizer) User mode Selecting User in the Equalizer Mode screen allows you to adjust the frequency characteristics. Follow steps 1 through 6 in the previous section to select the Equalizer mode. Play Settings Equalizer Play Mode Album Art (Sample Illustration) Selecting Equalizer Mode... -
Page 56: Setting Favorites (Bookmarks)
Transferring and listening to audio files Setting Favorites (Bookmarks) Setting Favorites (Bookmarks) Bookmarking selected tracks allows you to play only those tracks. You can select up to 30 tracks in 5 sets of bookmarks. Follow the steps in by album below is an example from Album1 Play All... -
Page 57: Removing Favorites
Press the Right or Enter button. The selected track is added as a bookmark to the selected favorites number. Bookmarks Favorites1 Favorites2 Favorites3 Favorites4 Favorites5 (Sample Illustration) Adding a selected track to the favorites list ❖ NOTE ❖ Removing favorites To remove favorites: Press and hold the Back button until the main menu is displayed (about 1 second). - Page 58 Transferring and listening to audio files Setting Favorites (Bookmarks) Press the Right or Enter button. Library FM Radio Line-in Recorder Photos Timer Settings * (Sample Illustration) Selecting Library from the main menu Use the Up or Down button to select Bookmark. Press the Right or Enter button.
- Page 59 Transferring and listening to audio files Press the Right or Enter button. Bookmarks Favorites1 Favorites2 Favorites3 Favorites4 Favorites5 (Sample Illustration) Selecting the Favorites list for removal Use the Up or Down button to select the track you want to remove as a bookmark. Playlist1 Play All Song1...
-
Page 60: Displaying Album Artworks
Transferring and listening to audio files Displaying Album Artworks Press the Right or Enter button. A removal confirmation menu is displayed. Use the Up or Down button to select Yes in the removal confirmation menu. Press the Right or Enter button. The track is removed from your bookmarked favorites. - Page 61 Transferring and listening to audio files Use the Up or Down button to select Playback Settings. Press the Right or Enter button. Library Artist Album Playlist Bookmark Play All Playback Settings (Sample Illustration) Selecting Playback Settings Use the Up or Down button to select Album Art. Press the Right or Enter button.
-
Page 62: Deleting Music Files
Launch Windows Media Click the Sync tab, Select a category button, and then select Music. In the folder tree on the left, click the TOSHIBA gigabeat U library. The library on the gigabeat Right-click the music file you want to delete and select Delete in the shortcut menu that appears. -
Page 63: Deleting Music Files Using Windows Media ® Player 10
Connect the gigabeat Launch Windows Media Click the Sync tab. Open Music in TOSHIBA gigabeat U on the right of the window and select the music file you want to delete. Right-click the file and select Delete from device in the shortcut menu that appears. -
Page 64: Chapter 3: Transferring And Viewing Photos
Chapter 3 Transferring and Viewing Photos This chapter presents how to transfer photos to the gigabeat photos, and delete photos on the gigabeat Transferring photos to the gigabeat NOTE gigabeat playback of authorized content and any other lawful use. Transferring photos using Windows Media To transfer photos to the gigabeat Use the USB cable to connect the gigabeat Windows Media... - Page 65 (transfer) the files manually. You can select automatic synchronization later by clicking at the bottom of the Sync tab in Windows Media Player 11 and clicking Set up Sync for TOSHIBA gigabeat U. Transferring and Viewing Photos ® Player 11 starts up and the device...
- Page 66 Transferring and Viewing Photos Transferring photos to the gigabeat® (Sample Illustration) Specifying a device Click the Sync tab in Windows Media Player 11. Click the Select a category button and select Pictures. Right-click one of the selected files and select Add to Sync List in the shortcut menu that appears.
-
Page 67: Transferring Photos Using Windows Media ® Player 10
Click the Start Sync button at the bottom right of the window. Synchronization begins. While synchronization is in progress, the Start Sync button changes to Stop Sync. It then reverts to Start Sync when synchronization is completed. (Sample Illustration) Click the Start Sync button ❖... - Page 68 Transferring and Viewing Photos Transferring photos to the gigabeat® Windows Media window opens. (Sample Illustration) Synchronizing media files NOTE If you have already set automatic synchronization, the window below is not displayed. This user guide describes how to synchronize (transfer) files manually. You can select automatic synchronization later by clicking the Set up Sync button in the Sync tab in Windows Media Select Manual and then click Finish.
- Page 69 Transferring photos to the gigabeat® Right-click on a file and select Add to Sync List in the shortcut menu that appears. You can also right-click files to be transferred from the list in the center of window and select Add to and then select Sync List.
- Page 70 Transferring and Viewing Photos Transferring photos to the gigabeat® (Sample Illustration) Click the Start Sync button ❖ NOTE ❖ ❖ ❖ Sync tab Start/Stop Sync Button For details, see the Windows Media To display All Pictures in the folder tree go to Tools, Options, and then Player and check the Enable picture support for devices check box.
-
Page 71: Viewing Photos
Viewing photos To view photos on the gigabeat Press and hold the Back button until the main menu is displayed (about 1 second). In the main menu, press the Up or Down button to select Photos. Library FM Radio Line-in Recorder Photos Timer Settings *... -
Page 72: Deleting Photos
Launch Windows Media Click the Sync tab, Select a category button, and then select Pictures. In the folder tree on the left, click the TOSHIBA gigabeat U library. The library on the gigabeat Right-click the photo file you want to delete and select Delete in the shortcut menu that appears. -
Page 73: Deleting Photos Using Windows Media
Launch Windows Media Click the Sync tab. Open Pictures in TOSHIBA gigabeat U library on the right side of the window and select the photo file you want to delete. Right-click the photo file you want to delete and select Delete from device in the shortcut menu that appears. -
Page 74: Chapter 4: Listening To Fm Radio
Chapter 4 Listening to FM Radio You can listen to your favorite FM radio stations on the gigabeat Since the earbud cable works as the antenna, be sure to plug the earbuds into the gigabeat Automatically presetting channels (Auto Preset) To preset your favorite FM channels for listening: Press and hold the Back button until the main menu is displayed (about 1 second). - Page 75 Automatically presetting channels (Auto Preset) Press the Right or Enter button. The first time you use the FM radio, the preset mode tuning screen is displayed. From that point on, the mode last used will be displayed. Library FM Radio Line-in Recorder Photos Timer...
- Page 76 Listening to FM Radio Automatically presetting channels (Auto Preset) Press the Right or Enter button. Auto Preset begins. The gigabeat can receive. Auto Preset ends when the gigabeat full cycle of the frequency band or when it has found 10 receivable channels.
-
Page 77: Selecting A Preset Channel To Listen To
Selecting a preset channel to listen to To listen to one of the preset channels: Press and hold the Back button until the main menu is displayed (about 1 second). In the main menu, press the Up or Down button to select FM Radio. -
Page 78: Method 1 For Converting To Preset Mode
Listening to FM Radio Selecting a preset channel to listen to Method 1 for converting to preset mode To convert from manual to preset mode: Press the Enter button from the Manual mode screen shown above. Use the Left or Right button to select the preset channel you want to listen to. -
Page 79: Tuning The Radio Manually
Tuning the radio manually To tune the radio manually: Press and hold the Back button until the main menu is displayed (about 1 second). In the main menu, press the Up or Down button to select FM Radio. Library FM Radio Line-in Recorder Photos Timer... -
Page 80: Method 1 For Converting To Manual Mode
Listening to FM Radio Tuning the radio manually If the manual mode was not the most recently used mode, follow the steps in either “Method 1 for changing to manual mode”, or “Method 2 for changing to manual mode” presented in the following two sections. -
Page 81: Presetting Channels Manually
Press the Right or Enter button. Use the Left or Right button to select the channel you want to listen to. Hold down the button to scan forward to the next receivable frequency (channel). To interrupt scanning, press the Back button. Use the Up or Down button to adjust the volume. - Page 82 Listening to FM Radio Presetting channels manually Press the Right or Enter button. The Add Channel settings screen is displayed. 101.6 Preset 76.0MHz (Sample Illustration) Selecting a preset Channel Use the Left or Right button to select the preset channel you want to add.
-
Page 83: Chapter 5: Recording
Chapter 5 Recording You can use the gigabeat other audio equipment. Recording FM radio Press and hold the Back button until the main menu is displayed (about 1 second). Use the Up or Down button to select FM Radio. Press the Right or Enter button. Library FM Radio Line-in Recorder... - Page 84 Recording Recording FM radio Use the Up or Down button to select Record. Press the Right or Enter button. Menu Tuning Mode Record Auto Preset (Sample Illustration) Quick menu with Record selected Press the Enter button. Recording starts and will show the following displays. 83.0 Start Before recording...
-
Page 85: Recording Music From Other Audio Equipment
Recording music from other audio equipment ❖ NOTE ❖ ❖ ❖ Recording music from other audio equipment You can use the gigabeat equipment such as CD or MD players. Recording split tracks automatically using Auto-Sync ® The gigabeat Auto-Sync is a feature that starts recording when the gigabeat detects sound from the audio equipment and pauses recording when sound is no longer detected, or starts recording the next detected sound as a new track. - Page 86 Recording Recording music from other audio equipment To record using Auto-Sync: Connect the audio output from the CD/MD player, or other device to the gigabeat Be sure to connect to the headphone jack on the CD/MD or other player being used. Connecting to a line-out terminal will produce crackling noises.
- Page 87 Recording music from other audio equipment After adjusting the recording level, stop playback on the other player. A.SYNC Start (Sample Illustration) Adjusting the recording level Press the Enter button. Begin playback on the other player. Recording starts. A.SYNC E070401_1715 Ext01.mp3 PAUSE 00:00:01 Stop...
- Page 88 Recording Recording music from other audio equipment ❖ Track name: ExtXX (XX: 01-99) If tracks are split, track names with numbers of 100 or higher can be created. One album can consist of up to 255 files. ❖ NOTE ❖ ❖...
-
Page 89: Recording Without Auto-Sync
Recording music from other audio equipment Recording without Auto-Sync If you do not want the files (tracks) to be automatically recorded as separate files (split), then record without using the Auto-Sync option. To record without using Auto-Sync: Connect the audio output from the CD/MD player, or other device to the gigabeat Be sure to connect to the headphone jack on the CD/MD or other player being used. - Page 90 Recording Recording music from other audio equipment Press the Quick button. A.SYNC Menu Auto-Sync Start (Sample Illustration) Displaying the Quick menu Press the Right or Enter button. The Auto-Sync menu is displayed. Use the Up or Down button to select OFF. Press the Right or Enter button.
-
Page 91: Playing Recorded Tracks
Begin playback on the other player. Press the Enter button again to end recording. The Back button can also be pressed to end recording. ❖ NOTE ❖ ❖ Playing recorded tracks To play previously recorded tracks: Press and hold the Back button until the main menu is displayed (about 1 second). - Page 92 Recording Playing recorded tracks Press the Right or Enter button. Library Artist Album Playlist Bookmark Play All Playback Settings (Sample Illustration) Selecting Artist from the Library menu Use the Up or Down button to select the type of recording you want to listen to: ❖...
- Page 93 Use the Up or Down button to select the recording you want to listen to. Press the Right or Enter button. Playback begins. Press the Enter button again to pause playback. Ext recording Play All E070401_1715 E070401_1815 E070402_1700 E070403_0801 (Sample Illustration) Selecting a particular recording ❖...
-
Page 94: Splitting Files Recorded With The Line-In Recorder
Recording Splitting files recorded with the Line-in Recorder Splitting files recorded with the Line-in Recorder You can split recorded album files into separate tracks using the Line-in Recorder. To split previously recorded files: Follow the steps in the section select an album file you want to split. Stop the playback where you want to split the file and press the Quick button. - Page 95 Splitting files recorded with the Line-in Recorder Press the Right or Enter button. Menu A-B Repeat ON Add Bookmark Playback Settings Start Track Splitting (Sample Illustration) Selecting Start Track Splitting from the Quick menu In the confirmation screen use the Up or Down button to select Yes.
-
Page 96: Editing The Names Of Recorded Tracks
Recording Editing the names of recorded tracks ❖ NOTE ❖ ❖ Editing the names of recorded tracks You can edit the names of files (tracks) recorded from FM Radio or other recordings using the Line-in Recorder. To edit the name of recorded tracks: Follow steps 1-8 in album file you want to rename. - Page 97 Editing the names of recorded tracks Press the Right or Enter button. The Edit Title menu appears. Edit Title Ext01 Cursor Char. Delete Confirm (Sample Illustration) Edit Title menu Edit the text using the Up, Down, Left, Right, and Quick buttons: Left: Moves the selection location to the left.
-
Page 98: Deleting Recorded Tracks
Recording Deleting recorded tracks ❖ NOTE ❖ ❖ ❖ ❖ Deleting recorded tracks You can delete the names of files (tracks) recorded from FM Radio or other recordings using the Line-in Recorder. To delete the name of recorded tracks: Follow steps 1-8 in album file you want to delete. -
Page 99: Using A Computer To Delete Recordings
Connect the gigabeat In Explorer, select FM Recording or Ext Recording folder on the gigabeat Windows Media ❖ Inside “TOSHIBA gigabeat U” - “Storage” Windows Media ❖ Inside “TOSHIBA gigabeat U” - “Media” ❖ FM Recording folder: FM radio recordings ❖... - Page 100 Recording Using a computer to delete recordings Select Delete from the shortcut menu. Click Yes in the delete confirmation window. The selected track is deleted. NOTE You can also delete tracks using Windows Media In the synchronization display, right-click the file that you want to delete in the gigabeat device.
-
Page 101: Chapter 6: Using The Timer
Chapter 6 Using the Timer The gigabeat ® gigabeat off after a specified period of time. Using the timer to sound an alarm (count down timer) The alarm sounds after the specified time (max. 99 minutes and 59 seconds) has elapsed. Press and hold the Back button until the main menu is displayed (about 1 second). - Page 102 Using the Timer Using the timer to sound an alarm (count down timer) Use the Up or Down button to select Countdown Timer. Press the Right or Enter button. The Countdown timer menu is displayed. Timer Countdown Timer Sleep (Sample Illustration) Selecting Countdown Timer Set the time using the Up, Down, Left, Right and Quick buttons.
-
Page 103: Shutting Down The Gigabeat
Shutting down the gigabeat® after a set time (sleep) The countdown timer is set and the countdown begins. To stop the countdown, press the Enter button again. To restart the countdown, press the Enter button again. When the countdown reaches 0 (zero), the timeout notification screen is displayed. The gigabeat the alarm. - Page 104 Using the Timer Shutting down the gigabeat® after a set time (sleep) Press the Right or Enter button. Timer Countdown Timer Sleep (Sample Illustration) Selecting Sleep Use the Up or Down button to select the number of minutes before the gigabeat minutes, 90 minutes, and 120 minutes).
-
Page 105: Chapter 7: Other Settings
Chapter 7 Other Settings In addition to the timer, other gigabeat display, clock and other features can be changed. Display (screen off) This setting automatically turns the screen off when the gigabeat not used for a set period of time. Press and hold the Back button until the main menu is displayed (about 1 second). - Page 106 Other Settings Display (screen off) Use the Up or Down button to select Display. Press the Right or Enter button. Settings Display Clock Auto Off Date & Time Language * Reset All Settings (Sample Illustration) Selecting Display from the Settings menu Use the Up or Down button to select the number of minutes before the screen turns off.
-
Page 107: Clock
Clock This setting can be used to switch to a clock screen when the ® gigabeat is not used for a set period of time. Press and hold the Back button until the main menu is displayed (about 1 second). Use the Up or Down button to select Settings. - Page 108 Other Settings Clock Press the Right or Enter button. Clock Clock Display Clock Design (Sample Illustration) Selecting Clock Design Use the Up or Down button to select one of the clock design options. Press the Right or Enter button. Clock Design Festival Pure Groove...
- Page 109 Use the Up or Down button to select the number of seconds before the clock is displayed. Press the Right or Enter button. Clock Display Clock Display OFF 3 sec. 10 sec. 30 sec. (Sample Illustration) Selecting the number of seconds before the clock is displayed ❖...
-
Page 110: Auto Power Off
Other Settings Auto Power off Auto Power off This setting automatically turns the gigabeat for 5 minutes. (This does not apply during operations such as music playback, photo display, FM radio reception, or recording.) Press and hold the Back button until the main menu is displayed (about 1 second). -
Page 111: Date And Time
Press the Right or Enter button. Off: The gigabeat 5 min (OFF): the gigabeat used for 5 minutes. Auto Off 5 min. (OFF) (Sample Illustration) Selecting the time for automatic power off NOTE Auto Power Off does not function during a countdown, or when the gigabeat gigabeat Date and time... - Page 112 Other Settings Date and time Use the Up or Down button to select Date & Time. Press the Right or Enter button. Settings Display Clock Auto Off Date & Time Language * Reset All Settings (Sample Illustration) Selecting Date & Time from the Settings menu Use the Left of Right button to select the setting you want to change.
-
Page 113: Language
Language This setting allows you to choose the language used in the ® gigabeat displays. Press and hold the Back button until the main menu is displayed (about 1 second). Use the Up or Down button to select Settings. Press the Right or Enter button. Library FM Radio Line-in Recorder... -
Page 114: Reset All Settings
Other Settings Reset all Settings Reset all Settings This function returns the gigabeat Press and hold the Back button until the main menu is displayed (about 1 second). Use the Up or Down button to select Settings. Press the Right or Enter button. Library FM Radio Line-in Recorder... -
Page 115: Formatting Memory
In the confirmation screen, use the Up or Down button to select Yes. Press the Right or Enter button. Settings Reset? (Sample Illustration) Selecting Yes to confirm the reset settings NOTE Using the Reset All Settings function also removes the Countdown Timer and Sleep settings. - Page 116 Other Settings Formatting memory Press the Right or Enter button. Library FM Radio Line-in Recorder Photos Timer Settings * (Sample Illustration) Selecting Settings from the main menu Use the Up or Down button to select Format. Press the Right or Enter button. Settings Auto Off Date &...
-
Page 117: Important Formatting Information
Then save any other important files that you have transferred into folders on the gigabeat Formatting memory ® to the computer using the USB cable. ® , select TOSHIBA gigabeat U in My Computer. ® Other Settings ® , or if you ®... -
Page 118: Displaying System Information
Other Settings Displaying system information Displaying system information This setting displays the gigabeat Press and hold the Back button until the main menu is displayed (about 1 second). Use the Up or Down button to select Settings. Press the Right or Enter button. Library FM Radio Line-in Recorder... - Page 119 Press the Right or Enter button. ® The gigabeat version information is displayed. Press the Back or Left button to return to the Settings menu. System Version XXXXX (Sample Illustration) Displaying the System version information Other Settings Displaying system information...
-
Page 120: Chapter 8: If You Have Problems
This chapter aims to help you solve many problems by yourself. It covers the problems you are most likely to encounter. If all else fails, contact Toshiba. You will find information on Toshiba’s support services at the end of this chapter. - Page 121 Error Message License Has Expired Synchronize with PC License Could Not Be Obtained So The Song Cannot Be Played Cannot Split Track because Data is Full Cannot Record Because Data is Full Cannot Edit This Song You can record up to 99 songs using Auto-Sync Cannot Record Anymore Files of the Same Time...
- Page 122 ® Turn the gigabeat off and then on again. Or reset ® the gigabeat and then turn it on again. Contact Toshiba Customer Service. ® Connect the gigabeat to a computer running a compatible operating system. ® Turn the gigabeat off and then on again.
-
Page 123: Troubleshooting
® Reset the HOLD switch to cancel HOLD mode. ® You cannot use ® the gigabeat controls while it is connected to a computer. Contact Toshiba Customer Service. Transfer some music files to the ® ® gigabeat using Windows ®... -
Page 124: Resetting The Gigabeat
If you have problems Troubleshooting Problem Cause The charging The gigabeat screen does not not connected appear when the properly. ® gigabeat connected to the computer. The ambient temperature is outside the specified operating temperature range. The computer does The gigabeat not recognize the not properly ®... -
Page 125: Other Problems
❖ NOTE ❖ (Sample Illustration) Pressing the Reset button Other problems If you have a problem with changing the language feature back to its original setting: Hold down the Back button for at least 1 second to display the main menu screen. Press the Up button once and select the item marked with an asterisk (*). -
Page 126: If You Need Further Assistance
Go to the Tech Support Center, select your particular model from the list and go to the Detailed Specifications for that model. For the number of a Toshiba dealer near you in the United States, call: (800) 457-7777. Contacting Toshiba If you still need help and suspect that the problem is hardware- related, Toshiba offers a variety of resources to help you. -
Page 127: Other Toshiba Internet Web Sites
Information about what you were doing when the problem occurred ❖ Exact error messages and when they occurred For technical support, call the Toshiba Support Center for Portable Media Players: Within the United States at (877) 250-8595 Outside the United States at (949) 583-3212 Other Toshiba Internet Web sites toshiba.com... - Page 128 Toshiba America Information Systems, Inc. 9740 Irvine Boulevard Irvine, California 92618 United States For more information on additional Toshiba worldwide locations, please visit: www.toshiba.co.jp/index.htm. Mexico Toshiba de México S.A. de C.V. Sierra Candela No.111, 6to. Piso Col. Lomas de Chapultepec.
-
Page 129: Appendix A: Specifications
Appendix A Specifications The product specifications for the gigabeat Playback audio format Playable still image format JPEG Sampling frequency Bit rate Recording media Maximum recording time Approximately 32 hours (bit rate: 128 kbps) Continuous playback Display screen FM radio recording Line-in recording Windows Media Audio (WMA) MPEG-1 Audio Layer 3 (MP3) - Page 130 Specifications FM radio reception USB port Earbud/REC jack Dimensions (excluding projections) Weight Power Sound-to-noise ratio Operating conditions ® 1. gigabeat is intended for recording, downloading, storage, and/or playback of authorized content and any other lawful use. 2. This represents the capacity of the flash memory in your gigabeat Flash memory devices as well as the PC’s operating system calculate the storage capacity as 1 GB (gigabyte) = 2 storage capacity will be less as some listed capacity is used for formatting...
-
Page 131: Sampling Frequency And Bit Rate Combinations
Sampling frequency and bit rate combinations Sampling frequency and bit rate combinations ® The gigabeat sampling frequency and bit rate listed below. Music files with another combinations may not play properly. MP3 (stereo) Sampling frequency: 22.05, 44.1, 48 kHz Bit rate: 32 to 320 kbps MP3 (mono) Sampling frequency: 22.05, 44.1, 48 kHz Bit rate: 16 to 192 kbps... -
Page 132: Glossary
Glossary Terms Equalizer — A sound quality control device or function that uses tools such as sliding scales to raise or lower levels in each of a number of frequency bands. MP3 (MPEG-1 Audio Layer 3) — An international standard established by MPEG, a working group under the International Organization for Standardization (ISO). -
Page 133: Index
Index AC power connecting adapter 22 adjusting settings 105 auto power off 110 clock 107 date and time 111 display 105 language 113 resetting 114 alarm 101 album artwork displaying 60 transferring with album 36 audio file downloading to the computer 26 selecting tracks by album 41 selecting tracks by artist 37 transferring to the portable media... - Page 134 120 battery problems 120 bookmarks 120 button problems 123 connecting to other devices 122 connecting with a computer 124 contacting Toshiba 126 database errors 121 disc is full 120 editing songs 121 file errors 122 licenses for song tracks 121...
- Page 135 120 button problems 123 connecting to other devices 122 connecting with a computer 124 contacting Toshiba 126 database errors 121 disc is full 120 editing songs 121 file errors 122 licenses for song tracks 121 memory problems 122 playing music 123...