Advertisement
Quick Links
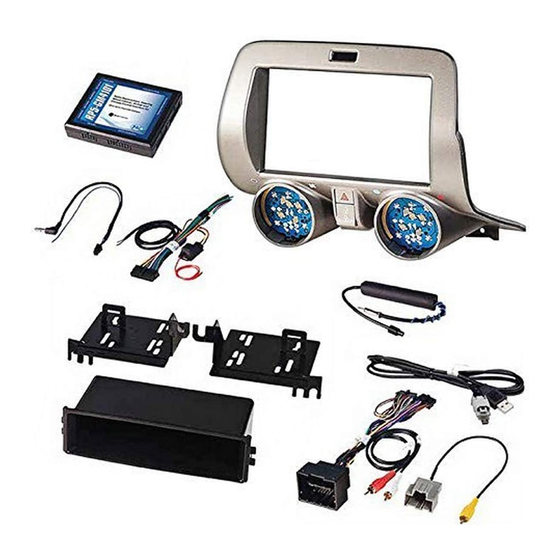
Parts List
The RPK5-GM4101 includes everything you need for a professional installation of an aftermarket radio in your Camaro.
This kit contains:
1. Dash Kit
•
(x1) PAC HVAC Control Panel (Transfer of the factory HVAC knobs is required. See instructions below)
•
(x2) Radio Mounting Brackets (One left and one right)
•
(x1) Pocket (For single din applications)
•
(x8) Radio Mounting Screws
2. RP5-GM4101 (Camaro specific radio replacement module)
3. Camaro specific antenna adapter (BAA-DIN22).
4. Rear camera retention cable for vehicles equipped with the MyLink system.
5. USB retention cable. This cable is compatible with vehicles equipped with the MyLink radios and vehicles equipped with the
standard non-touchscreen radios. It will require that the cable be ran to the back of the center console.
6. AUX retention cable for 2010-2012 vehicles equipped with the standard non-touchscreen radios also equipped with a USB port.
Overview
The RPK5-GM4101 is a complete radio replacement kit with integrated climate control retention for the 2010-2015 Chevrolet
Camaro. This kit utilizes the factory HVAC control knobs for a more factory look and experience. To add to the factory look
and experience the exterior temperature display is retained by a small OLED display at the top of the kit retaining this valuable
vehicle feature. This kit also includes all of the modules and cables needed to retain all of the important features of the factory
system such as OnStar, factory warning chimes, factory Bluetooth, steering wheel mounted radio controls, factory reverse
camera, factory amplifier (if equipped), AM/FM reception, factory AUX jack (if equipped) and the factory USB port (if equipped).
Removing the factory radio from the vehicle
1.1 - Apply the parking brake. Move the transmission shift
assembly to the most rearward position possible. Use a
flat bladed plastic trim tool and release the retainer tabs
securing the front floor console front cover to the console
assembly. Lift the cover (1) up and rearward making sure that
the accessory power receptacle and the electronic traction
control switch clears the transmission shift assembly. It may be
necessary to pop them loose from the underside to achieve
clearance. Disconnect the electrical connections.
Pacific Accessory Corporation
Table of Contents:
1. Factory Radio Removal ------------------------------------------------------ 1-2
2. Disassembly of the factory HVAC control module --------------------- 2-3
3. Assembly of the PAC HVAC control module ---------------------------- 3-4
4. RP5-GM4101 Instructions --------------------------------------------------- 4-6
5. AUX & USB Cable Installation ------------------------------------------------ 7
6. Temperature Display Settings ------------------------------------------------- 7
7. Sub-Dash Preparation ----------------------------------------------------------- 7
8. Kit Assembly Instructions ------------------------------------------------------- 8
9. Installation of the PAC HVAC control module --------------------------- 8-9
PAC
| 866-931-8021 | support@pac-audio.com
®
©2016 Pacific Accessory Corporation
1.2 - Remove the 2 x 7mm bolts (1) securing the radio
control assembly (2) into the dash. Then use a flat-
bladed plastic trim tool in order to release the retainer
clips securing the radio control assembly (2) to the
instrument panel. Disconnect the electrical connections.
www.pac-audio.com
RPK5-GM4101
Complete Radio Replacement Kit with
Integrated Climate Control Retention for
2010-2015 Chevrolet Camaro
Page:
PAC is an AAMP power brand
Rev. 113016
Page 1
Advertisement

Summary of Contents for PAC RPK5-GM4101
- Page 1 Complete Radio Replacement Kit with Integrated Climate Control Retention for 2010-2015 Chevrolet Camaro Parts List The RPK5-GM4101 includes everything you need for a professional installation of an aftermarket radio in your Camaro. This kit contains: 1. Dash Kit • (x1) PAC HVAC Control Panel (Transfer of the factory HVAC knobs is required. See instructions below) •...
- Page 2 The following steps will aide you in the disassembly of the HVAC control panel so that the factory HVAC control knobs and supports can be reused in the PAC RPK5-GM4101 Integrated Kit. 2.3 - Once the plastic trim is removed, locate 2.2 - Pry outwards on the clips on either side...
- Page 3 3.1 - Secure the 2 support brackets to the so that the buttons are straight and insert the circuit board using the same screws PAC HVAC control assembly using 4 of the them into the opening. With VERY LITTLE removed from Disassembly step # 9. The...
- Page 4 3. The Answer/Voice & End/Mute buttons can be set to do the factory OnStar functions or given the ability to control the aftermarket radio. This option can be found in the PAC Vehicle Settings program mentioned above in note one. The default setting for these buttons is to control the factory OnStar.
- Page 5 Mute/Factory Mute/Factory Mute/End Bluetooth End Bluetooth End Bluetooth End Bluetooth End Bluetooth End Bluetooth End Bluetooth End | 866-931-8021 | support@pac-audio.com ® ©2016 Pacific Accessory Corporation PAC is an AAMP power brand www.pac-audio.com Rev. 113016 Pacific Accessory Corporation Page 5...
- Page 6 6. The Accessory LED and radio will turn off when RAP turns off or the driver’s door is opened. RP5-GM4101 Product Updates (Firmware) The RP5-GM4101 can be updated with new firmware as it becomes available using the PAC-UP interface updater (sold separately). Please visit www.pac-audio.com/firmware for available updates.
- Page 7 5. Remove the electrical connections from the back of the AUX and USB panel located inside the center console. 6. Connect the RPK5-GM4101-AUX-HAR and the RPK5-GM4101- USB-HAR (if the vehicle is equipped with factory AUX). 7. Route the new AUX and USB cables down the driver side and using a fish tape, route the cables up into the radio cavity.
- Page 8 1. Connect the RPK5-GM4101-KIT-HAR to the vehicles white 20 pin connector that was originally connected to the factory HVAC control panel. 2. Connect the 8 pin Black Micro-fit Molex connector to the circuit board mounted to the back side of the PAC HVAC control module.
- Page 9 Fahrenheit upon first power up or upon a power cycle (remove and apply power to kit). Displaying the Firmware Version of the PAC HVAC Control Panel: Press and hold the recirculation button for 5 seconds to display the firmware version of the PAC HVAC control panel. Changing the Splash Screen: Press and hold the rear defrost button for 5 seconds to change the splash screen that is shown when the kit powers up.