
Related Manuals for Samsung SGH-S425G


Summary of Contents for Samsung SGH-S425G
- Page 1 SGH-S425G M O B I L E P H O N E User Manual Please read this manual before operating your phone, and keep it for future reference.
-
Page 2: Intellectual Property
(patentable or unpatentable), patents, trade secrets, copyrights, software, computer programs, and related documentation and other works of authorship. You may not infringe or otherwise violate the rights secured by the Intellectual Property. Moreover, you agree that you will not (and will not attempt to) modify, prepare derivative works of, reverse engineer, decompile, disassemble, or otherwise attempt to create source code from the software. - Page 3 Do you have questions about your Samsung Mobile Phone? For 24 hour information and assistance, we offer a new FAQ/ARS System (Automated Response System) at: http://www.samsung.com/us/support GH68-36165A Printed in China Nuance, the Nuance logo, and XT9 are trademarks and/or registered trademarks of Nuance communications, Inc., and/or its affiliates in the Unitied States and/or...
- Page 4 OF ANY KIND WHATSOEVER WITH RESPECT TO THE PRODUCT. IN ADDITION, SAMSUNG SHALL NOT BE LIABLE FOR ANY DAMAGES OF ANY KIND RESULTING FROM THE PURCHASE OR USE OF THE PRODUCT OR ARISING FROM THE BREACH OF THE EXPRESS WARRANTY, INCLUDING INCIDENTAL, SPECIAL OR CONSEQUENTIAL DAMAGES, OR LOSS OF ANTICIPATED PROFITS OR BENEFITS.
-
Page 5: Table Of Contents
Understanding this User Manual ........5... - Page 6 Finding My Own Phone Number ........52...
- Page 7 Memory Management ........
- Page 8 FCC Part 15 Information to User ....... . . 132...
-
Page 9: Section 1: Getting Started
Before using your phone, see “Health and Safety Information” on page 125. Special Text This manual includes notes, tips and warnings, in special text that is set apart to point out important information, share quick methods for activating features, and to define terms. -
Page 10: Installing The Battery
Installing the Battery Align the gold contacts of the battery with the contacts in the battery compartment in the phone. Press the battery down until it clicks into place. Make sure that the battery is properly installed before switching on the phone. - Page 11 Replace the battery cover onto the back of the phone in the direction shown by the arrow. Press down along the bottom of the phone until you hear a light click. Press down firmly along the edges to ensure that the cover is flush with the phone.
-
Page 12: Charging A Battery
You can use the phone while the battery is charging, although doing so requires additional charging time. Note: You must fully charge the battery before using your phone for the first time. A discharged battery recharges fully in approximately 4 hours. - Page 13 When the battery is fully charged, the phone displays a message telling you the battery is full. Remove the connector from the phone. Note: Failure to unplug the wall charger before you remove the battery, can cause damage to the phone.
-
Page 14: Switching The Phone On Or Off
The phone launches the activation splash screen and searches for the network. Once the network has been found, you can make or receive calls. To turn the phone off, press and hold Note: The display language is preset to English at the factory. To change the language, press Menu Settings... -
Page 15: Locking And Unlocking The Screen
To unlock the phone screen, press the Unlock soft key and then press the OK soft key. Note: The Auto Key Lock feature automatically locks the screen when the screen times out. To change the default setting, press Menu Setting Up Your Voice Mail In Idle mode, press and hold a password. -
Page 16: Section 2: Understanding Your Phone
Section 2: Understanding Your Phone This section outlines some key features of your phone. It also displays the screen and the icons that display when the phone is in use. Features Your phone is lightweight, easy-to-use and offers many significant features. The following list outlines a few of the features included in your phone. -
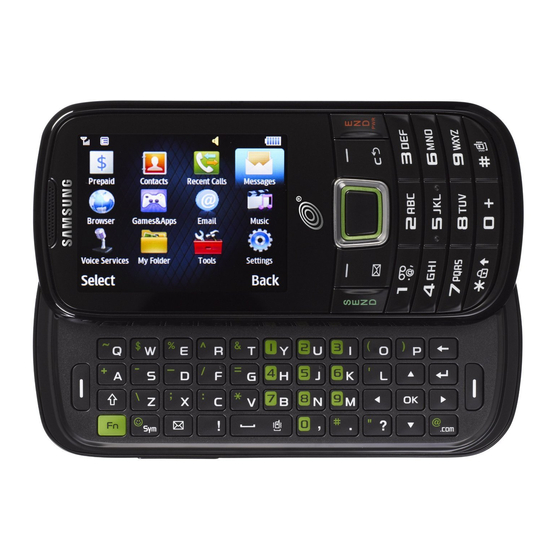
Page 17: Front View
Left Soft key: Press to select the option displayed above the Left Soft Key. Send key: Press to make or answer a call. In Idle mode, press and hold to recall the last number dialed or received. - Page 18 Calendar in Month view. Power On/Off (Exit) key: Press to end a call. Press and hold for two seconds to turn phone on or off. While in the Menu mode, returns phone to Idle mode, then cancels input. Right Soft key: Press to select the option displayed on the screen above the Right Soft Key.
-
Page 19: Qwerty View
Go to key: allows you to access applications from the idle screen without navigating through the main menu icons and sub menus. Numeric keys: allows you to enter numbers when you press the FN key first. Navigation keys: allow you to scroll through phone menu options and provide shortcuts to phone functions from standby mode. - Page 20 Enter key: allows you to start a new line when typing a message. Back key: allows you to return to the previous menu. In text mode, deletes the last character entered. Allows you to return to the previous page in the...
-
Page 21: Side Views
The following illustration shows the side details of your phone. Volume keys : From the Home screen, press to adjust volume. During calls or music playback, press to adjust volume. Press to mute the ringtone of an incoming call. Press and hold to send an incoming call directly to voicemail. -
Page 22: Back View
USB/data cable or a hands-free headset. Back View The following illustration shows the back view of the phone with the camera lens. External Speaker: Allows you to hear music. Camera Lens: Used to take pictures and shoot videos. -
Page 23: Display Layout
The icons on your phone display are described as follows: Shows the received signal strength. The greater the number of bars, the stronger the signal. Shows the level of your battery. The more bars you see, the more power remains. Displays when a call is in progress. -
Page 24: Backlight
A backlight illuminates the internal display and the keypad. When you press any key, the backlight comes on. It goes off when no keys are pressed within a given period of time, depending on the setting in the Backlight Time menu. The display turns off after one minute to conserve battery power. -
Page 25: Menu Navigation
Navigation keys or by using the shortcut keys. Accessing a Menu In Idle mode, press the Menu soft key and scroll using the Navigation keys to reach a main menu item. Press the Select soft key or the the menu. - Page 26 Numbered menu items, such as menus, sub-menus, and options can be quickly accessed by using their shortcut numbers. In Menu mode, Main Menus can be accessed by pressing the number keys (1 to 0, * and #) corresponding to their location on the screen.
-
Page 27: Go To Menu
Bluetooth, Alarms, Recent Calls, and Airplane Mode), and three empty shortcuts you can assign (10, 11, and 12). Note: To enter 10 for My Menu, enter a 0. To enter 11, enter an asterisk (*). To enter 12, enter the pound sign (#). -
Page 28: Section 3: Call Functions
Section 3: Call Functions This section describes how to make or answer a call. Note: Keys shown in this section represent keys shown on the front of the phone. If you have the phone open in landscape mode, then press the corresponding key. -
Page 29: Ending A Call
Press the key. Using the Volume Keys During a call, use the Volume keys on the left side of the phone to increase or decrease the earpiece volume. In Idle mode, use the Volume keys to adjust the ringer volume. -
Page 30: Answering A Call
Call Answer), you can press any key to answer a call except Press to end the call. Note: You can answer a call while using Contacts or other menu feature. After ending the call, the phone returns to the previously active screen. Contacts Speed Dial List. - Page 31 While on a call, you can place the call on hold to answer an incoming call or place a new call, if your network supports this service. You can place the current call on hold. To place a call on hold: While on a call, press Options Press Resume to continue the conversation.
- Page 32 Select or In-Call Options While on a call, you can press the Mute soft key to mute the microphone, or press Spkr on to put the call on speakerphone, and press the Options soft key to access the following options: Hold: places the current call on hold.
-
Page 33: Recent Calls
Dial the number and press Press to activate the speakerphone. Press the Volume keys (located on the left side of your phone) to adjust the volume. Switching off the Microphone (Mute) You can temporarily switch your phone microphone off, so that the other person cannot hear you. -
Page 34: Viewing Missed Calls
Highlight a call and press the Options soft key to view the following options: • Details: allows you to view the caller’s name, phone number, time and date called as well as the length of the call. - Page 35 Missed calls screen. Highlight the desired missed call. Press Options From the Create Message screen, highlight the empty text field and use the keypad to type a message. Deleting a Missed Call From the Idle Screen, briefly press scroll to the Missed calls screen.
-
Page 36: Call Waiting
Call Waiting The Call Waiting feature allows you to answer an incoming call while you have a call in progress, if this service is supported by the network. You must activate Call Waiting in the settings menu. Press Menu Select Activated. You are notified of an incoming call by a call waiting tone. -
Page 37: Section 4: Entering Text
Using the QWERTY Keypad Your phone has a QWERTY ( easy and quick text input. You can enter text as you would when using a computer’s keyboard. To access the QWERTY keypad, slide your phone open in the landscape position to expose the keypad. - Page 38 Press twice to select Function lock. Press once more to remove Function lock. Short press inserts a space. Double press inserts a period and a space. Press and hold in Idle mode to set phone to Silent mode. Press to display the symbols grid.
-
Page 39: Changing The Text Input Mode
The available Text Input modes are: T9 Predictive Text, Fn (123 numeric), Abc, and Symbols (Sym). Refer to the Text Input mode in the upper right corner of the screen to identify the mode. T9 Predictive Text: allows your keystrokes to be interpreted, according to a built-in •... - Page 40 Continue until you are finished composing your message. Using T9 Predictive Text in Portrait Mode The T9 Predictive Text input method is based on a built-in dictionary. A series of keystrokes is interpreted by the phone using this dictionary to determine the likely word.
- Page 41 Begin entering a word by pressing the 2 to 9 keys. Press each key only once for each letter. The built-in dictionary lists words that match the entered keystrokes. Example: To enter “Hello”, press The word that you are typing displays on the screen. The word changes as you press additional keys.
- Page 42 To shift case in T9 mode, short press the • Capital lock, Lower case, and Numeric. You can move the cursor by using the Left and Right Navigation keys. To delete letters, • press the key. Press and hold the key to toggle between, Initial capital, key to clear the display.
-
Page 43: Section 5: Messages
To use this feature, you may need to subscribe to your service provider’s multimedia message service. Important!: When creating a message, adding an image, a sound file, or a video clip to a text message changes the message from a text message to a multimedia message. - Page 44 Bluetooth Visibility , or view Properties . • Favorites URL: allows you to attach a web URL from your Favorites list. • Contact Info: allows you to tap on an existing Address Book entry, then add it to your message by pressing Select.
-
Page 45: Viewing New Received Messages
Attaching Business Card to a Message To attach your Business Card to an outgoing message, follow these steps: Create a contract entry (the information stored in the entry is used as a business card). Press Menu Contacts Highlight the contact (the business card) in which you are sending and press key. -
Page 46: Using Message Options
• More: provides the following options: – Move to Phone/Move to SIM Card: If a message is stored in the SIM card, it is saved to the phone’s memory. If a message is stored in the phone’s memory, it is then saved to the SIM card. -
Page 47: Deleting Messages
When your phone’s memory is full, an notification message displays and you cannot receive any new messages. Use the Delete option to erase obsolete messages, freeing memory for new messages. You can delete the messages either individually or all at one time. - Page 48 Get Read Report : when this option is enabled, your phone sends a request for a reply along – with your message to the recipient. Keep a Copy : you specify whether you want to keep a copy of the sent messages on your – phone.
-
Page 49: Using Email
– No Resize – 100 KB – 300 KB – 600 KB Creation Mode: you can specify that the users creating new media content be given the • following options: – Free: create a multimedia message with no restrictions. – Warning: sends a warning when unsupported content is included in a message. -
Page 50: Section 6: Managing Your Contacts
Contacts Press any of the following options to activate a function: • My Business Card: creates and attaches a virtual business card as an attachment to outgoing messages. For more information, see “Attaching Business Card to a Message” on page 41. - Page 51 Highlight the Notes field and use the QWERTY keypad to enter a note. For more information, refer to “Entering Text” on page 33. Press Options Note: By default, Contacts are saved on the phone. To copy them to a SIM card, see “Copying an Entry to the SIM Card” on page 57. Save Select a group name and press Select.
- Page 52 Press Options Highlight the field to delete and press Options Note: Only certain new fields may be deleted. If you have not added any new fields to the contact, the Delete Field button does not display. Press Options Contacts, highlight a contact name and Edit.
- Page 53 During the call press Options At the prompt, select New. • Select Update if this was a previously created entry and your are adding the current number to the previous entry. Select the type of phone number and press Select or Enter the desired information, see “Saving a Number from the Idle screen”...
- Page 54 Adding Pauses to Contact Numbers When you call automated systems, you are often required to enter a password or account number. Instead of manually entering the numbers each time, you can store the numbers in your Contacts along with special characters called pauses.
-
Page 55: Using Contacts
In Idle mode, press Menu Use the Up or Down Navigation key to locate a contact. Tip: The Groups tab allows you to locate contacts by group. Use the Left or Right Navigation key to move between Contacts and Groups. -
Page 56: Contacts Entry Options
• Send Message selected entry. • Delete: delete the current Contacts entry from a target location such as the Phone and/or SIM card. • Send Business Card via: allows you to send a business card to the selected contact via Message, Email, Exchange Email, or Bluetooth. -
Page 57: Fdn Mode
Select On (to enable fixed dialing) or Off to disable the option and press Save. Enter the PIN2 code if you selected On. Important!: With Fixed Dial Mode enabled, you are NOT able to dial any number other than those created as FDN numbers. - Page 58 Enter your PIN2 password and press the Note: The PIN2 code is provided by your Service Provider. Press Name and use the QWERTY keypad to enter a name for this FDN contact. Press Phone Number and use the QWERTY keypad to enter a contact phone number for this FDN contact.
-
Page 59: Group Settings
Creating a New Group In Idle mode, press Menu Press Options Enter a name for this group in the New Group field and press Save. Press Options Highlight the Picture field and press the Select an image and press Options image displays in the Picture field and displays the name of the image to the right. -
Page 60: Adding Speed Dial Entries
In Idle mode, press Menu Highlight the group that you want to rename. Press Options Backspace over the original name and use the keypad to enter a new name for this group, then press Save. Adding Speed Dial Entries In Idle mode, press Menu... -
Page 61: Managing Contacts Entries
Copying an Entry to the SIM Card Note: When storing a Contacts entry into the SIM card, note that only the name, phone number, group, and slot location are initially offered as fields (some SIM cards may allow an address as well). -
Page 62: Copying An Entry To The Phone
SIM. The phone displays a list of your current contacts stored on the SIM card. Note: If the entry’s associated Group image has a SIM location icon on it, then the entry exists on the SIM card. This is the type you can duplicate. If the entry’s associated Group image does not have a SIM location icon, then this entry currently exists on the phone. - Page 63 In Idle mode, press Menu from SIM. Highlight a member from the list or highlight All and press checkmark. Press Delete. At the prompt, press Yes to delete the contact, or No to cancel. Press to return to Idle mode. Contacts SIM Management...
-
Page 64: Section 7: Browser
The Browser menu displays the following options: Home: go to Mobile Web homepage. • Enter URL: allows you to enter a URL, the option to add it to your favorites and create a title. • Favorites: view your favorites list. -
Page 65: Exiting The Browser
Add to Favorites: add to your favorites list. • Enter URL: allows you to enter a URL, the option to add it to your favorites and create a title. • Advanced: choose to view a history of the sites you visited, to save a site to your history, •... -
Page 66: Favorites
In Idle mode, press Menu or the key. Enter URL This menu allows you to manually enter the URL address of a web site that you wish to access and to add it to your Favorites. In Idle mode, press Menu key or the key. -
Page 67: Section 8: My Folder
Select from one of the following functions: Audio, Games&Apps, Pictures, Video, Other Files, or Used Space. Highlight the On phone tab or On card tab by moving left or right with the navigation keys to filter the entries based on their current location (Phone, or Memory Card). -
Page 68: Audio
• Caller Ringtone: allows you to assign a ringtone to someone in your Contacts list. Select Search contact to find an existing contact or Create contact to create a new one. -
Page 69: Games&Apps
Press Menu My Folder Recorded Audio This menu shows a list of saved voice memos. When a voice memo is recorded and saved, it is stored in the Recorded Audio folder. To access this menu use the following steps: Press Menu Select a pre-recorded audio to begin playback. -
Page 70: Pictures
Depending on the type of picture or file the following options may display: • View: allows you to view the selected picture. • Set as: allows you to set the selected picture as Wallpaper or as a Caller ID. • Take Photo: launches the camera to allow you to take a photo. - Page 71 Press Options. Depending on the image type, the following options may be displayed: • Zoom: activates Zoom mode so you can use the Left or Right soft keys to Zoom in or Zoom out. • Send via: allows you to send a picture via Message, Email, Exchange Email, or Bluetooth.
-
Page 72: Editing Images
• Transform: allows you to Resize, Rotate, or Flip the image. • Crop: allows you to crop the image. Use the Navigation keys to place the red box around the image until you center a portion in the box, then press Options •... -
Page 73: Video
• Portrait/Landscape: to switch from Portrait to Landscape mode. • Transfer to Bluetooth stereo headset: to transfer to a Bluetooth stereo headset. • Send via: allows you to send your video in a Message, Email, Exchange Email, or Bluetooth. • Jump to track time: allows you to view the video duration in digital time. -
Page 74: Other Files
The memory usage for the different items displays. Highlight Audio, Games&Apps, Pictures, Video, or Other Files. Highlight the item you want to delete (to free up memory) and press Select or press the key. Highlight an item in the list and press Check to place a checkmark next to the item. -
Page 75: Section 9: Applications
Section 9: Applications Your phone includes applications that allow you to use your handset for a variety of activities. The Music application can organize and play music files stored on your phone and memory card. Create playlists, add, rearrange and remove files, and launch the browser to shop for more music. - Page 76 Select Off, 1, or All. • Shuffle on /off: allows you to turn shuffle On or Off. When turned on, the current list of songs are randomly shuffled for playback.
-
Page 77: Playing Music Through A Stereo Bluetooth Device
In Idle mode, press Menu Use the Up or Down Navigation key to select the song you want to listen to and press the Playing Music through a Stereo Bluetooth Device Your device supports the Stereo Bluetooth profile that when synchronized to a stereo Bluetooth headset plays music in stereo. - Page 78 The Music application allows you to play music in the background while performing other tasks on your phone. The music pauses when an incoming call is accepted, and the music resumes when the call ends. Music continues to play when you receive a Text Message, Multimedia Message, or an Instant Message.
-
Page 79: Using Playlists
Using Playlists Playlists are used to assign songs to a list of preferred media which can then be grouped into a list for later playback. These Playlists can be created via either the handset’s Music player options menu or from within a 3rd party music application (such as Windows Media Player) and then downloaded to the handset. -
Page 80: Voice Recognition
Highlight the track to delete, press the Options soft key, scroll to Remove and press the Select soft key or the At the Remove ? prompt press the Yes soft key to remove the song from the playlist, or press the No soft key to cancel. - Page 81 Call <Name or #>: dials a name or number listed in your contact list. If multiple numbers • exist (i.e. home, work, or other) say the name and the number type (location). Send Message <Name or #>: displays the Create Text Message screen.
-
Page 82: Tools
• Speak clearly and at a normal volume. • There is no need to use paused speech. The voice recognition software has been trained to • recognize natural speech, and performs best when you speak naturally. In very noise environments, it may be helpful to use a headset or a Bluetooth headset. - Page 83 • Send via: allows you to send your voice clip to other people using a message, an email, exchange email, or a Bluetooth enabled device. • Set as: allows you to set the current memo as a Call Ringtone, a Caller Ringtone for a specific entry or an Alarm tone.
- Page 84 Press Options Set the following options: • Name: allows you to use a specific name for the alarm. The name you enter will display on the screen when the alarm activates. • Alarm activation: use the Left or Right Navigation key to select On or Off.
- Page 85 Tools Highlight Auto power and press the Select On and press Save. Note: If the menu option is set to Off, and the phone is switched off at the specified time, the alarm does not ring. Turning Off an Alarm To stop the alarm when it rings press Volume key, Camera key, Back key, Soft key, or Send key.
- Page 86 • Create: allows you to select an event category: Appointments, Anniversaries, Holidays, Important or Private event. • Go to: allows you to go to your today’s calendar or that of a specified date. • Event List: allows you to refer to your scheduled events stored on your calendar according to the type of event: Appointment, Anniversary, Holiday, Important or Private event.
- Page 87 • Delete: allows you to delete a calendar event. This option only appears if you have added events to your calendar. • Settings: this option allows you to configure the Calendar’s Starting Day and View by (Month, Week, or Day).
- Page 88 Select the Every field and enter the number of times you want this alarm to repeat. Highlight the Except weekends checkbox and press Check to exempt non- work days (weekends) from the event notification. Select the Until field and assign an expiration date for this event.
- Page 89 • Alarm date: enter a date for this alarm (format is MM/DD/YYYY). • Alarm time: enter a time for this alarm to sound. Press Save to assign the new time. • Alarm tone: allows you to choose an alarm tone. Once selected, navigate to Tones, select a file, and press Select to assign the audio file as the current alarm tone.
-
Page 90: Tip Calculator
Press Menu Tools Highlight the Bill field and use the keypad to enter the total amount of the bill. Select the Tip (%) field and use the keypad to change the tip percentage. Enter the number of people splitting the bill in the # paying field. - Page 91 The Eco Calculator calculates your automobile efficiency in dollars per mile and miles per gallon. It also calculates the emission of carbon dioxide assuming a gas- powered medium sized vehicle. In the Distance (mile) field, enter the distance you have driven.
- Page 92 Select the specific converter function and press the • Each converter function has a field for the type of unit to convert, and the type of unit to convert to. An additional field allows you to input the unit amount to convert.
-
Page 93: World Clock
World Clock World Clock allows you to view the time of day or night in other parts of the world. World displays time in the 100 different cities, within all 24 time zones around the world. The time in your time zone is automatically displayed. - Page 94 Timer You can use this menu to set a countdown timer. Use a timer to count down to an event based on a preset time length (hours, minutes, and seconds). Press Menu Tools Press Set and use the keypad to enter a countdown time length for the alert by setting the Hours, Minutes, and Seconds value then press the OK soft key.
-
Page 95: Section 10: Changing Your Settings
• Normal: default sound profile where the incoming Alert Type is set to melody. You can modify Normal settings for Call, Message and Phone. • Silent: allows you to select mute or vibrate alerts that stop the phone from making noise, in a theater for example. You can modify Silent settings for Call, Message and Phone. - Page 96 Highlight Call Alert Type and press Select one of the following and press OK: • Melody: the phone rings using the ring melody selected in the Call Ringtone menu. • Vibration: the phone vibrates. • Vibration then Melody: the phone vibrates then plays a melody.
- Page 97 Highlight Message Alert Type and press Select one of the following: • Melody: the phone rings using the ring melody selected in the Message Alert Tone menu. • Vibration: the phone vibrates. • Vibration & Melody: the phone vibrates and plays a melody simultaneously.
- Page 98 • Mute: the phone is silent and does not play a melody or vibrate. Highlight Phone Sound Volume and press Use the Left or Right navigation key to adjust the volume level (range is 0-7) and press OK. Press Save to return to the Sound Profile menu.
-
Page 99: Display
Save soft key or the – Backlight Time : allows you to select the amount of time for the keypad backlight to remain on and the length of time for the display backlight to remain dim after the keypad times out. - Page 100 – Font Size : allows you to select a size for the selected font to make your selection. Choose from Large , Medium , or Small . Press the Save soft key or key to confirm your selection.
-
Page 101: Time And Date
In Idle mode, select Menu and press the Left or Right Navigation key to select from one of the following: • Manual only : you need to manually set the time and date according to the current time zone using the Time field. -
Page 102: Phone Settings
You can customize various phone settings. In Idle mode, select Menu Language This menu allows you to select a display language for Text language and Text Input mode. Choose from Automatic, English, Français, and Español. In Idle mode, select Menu... - Page 103 In Idle mode, select Menu Select one of the following options: • Off: when you slide the phone open, there will be no change in what is displayed in Landscape mode. • Create New Message: when you slide the phone open, the Create message screen is displayed.
-
Page 104: Own Number
Your phone number is displayed. Security The Security feature enables you to restrict the use of your phone by the others and to restrict the types of calls. Various codes and passwords are used to protect the features of your phone. -
Page 105: Lock Phone
The following options are available: – Off: you are not asked to enter the phone password when you switch on the phone. – On: you are required to enter the phone password when you switch on the phone. -
Page 106: Lock Applications
• A full length number with a specific contact name can be entered into the FDN list. • Wildcard entries allow you to dial a range of number with a single entry: ex. 555 – All dialed numbers that begin with 555 are allowed. Numbers that do not match the conditions in the FDN list are restricted. -
Page 107: Reset Phone
This option allows you to change your current PIN, provided that the PIN Check feature is enabled. You must enter the current PIN before you can specify a new one. Once you enter a new PIN, you are asked to confirm it by entering it again. Change PIN2 Code The Change PIN2 option allows you to change your current PIN2 to a new one. -
Page 108: Airplane Mode
Airplane Mode allows you to use many of your phone’s features, such as Games, Voice notes, and more, when you are in an airplane or in any other area where making or receiving calls or data transmission is prohibited. When your phone is in Airplane Mode, it cannot send or receive any calls or access online information. -
Page 109: Calls Settings
Adjusting the General Call Settings Press General and select from the following options: • Show My Number: allows you to show or hide your number on the caller display of the phones you call. Select Set by network, Show number, or Hide number. - Page 110 – Press Options and select one of the following options: Activate, Deactivate, or Check status (checks the status of this service on your account). • Auto Redial: the phone automatically redials the last active number if the call was either cut off or you were unable to connect.
-
Page 111: Connectivity
If the first item in the Bluetooth menu is Bluetooth:Off, highlight the Bluetooth:Off option press the Select soft key or the The Bluetooth activated confirmation prompt displays on your phone. Note: If the first item in the Bluetooth menu is Bluetooth:On, then Bluetooth is already activated. Settings Connectivity. - Page 112 Discoverable:Off option and press the Select soft key or the The confirmation prompt displays: Bluetooth is currently switched off. Switch on: Yes or No. Make your selection. Note: If the second item in the Bluetooth menu is Discoverable:On, then Bluetooth is already discoverable. My Devices The My Devices option provides a list of Bluetooth wireless technology devices discovered by your handset.
- Page 113 Pair soft key. Note: The first time you try to pair with a handset, you and the owner of the other handset must enter the same Passkey. Once the handsets are paired, you do not need to use the Passkey again.
- Page 114 In Idle mode, press Menu Bluetooth Press the Note: The default input entry method is Abc, where the initial character is Uppercase and each consecutive character in that same word is left as lowercase text. When finished, press Search for New Device This option allows you to search for new Bluetooth devices.
-
Page 115: Configuring Your Phone's Usb Settings
Note: Disable the Bluetooth feature before initiating a USB connection with the phone. Prior to connecting the USB cable to the phone, install the latest version of the PC Studio application. This application installs the necessary USB drivers onto your machine. For a free download of PC Studio, go to www.samsung.com/us/support... -
Page 116: Applications Settings
– Empty Cookies: deletes cookies. Cookies are pieces of personal information sent to a web server while navigating the web. – Cookie Options: sets whether cookies are stored on your phone (Accept All or Reject All). If you select Prompt, the phone will ask you to save the cookies on every page requiring cookies. - Page 117 In Idle mode, select Menu Audio Settings. Use the Left or Right navigation keys to choose the maximum limit allowed for the recorded audio file (1 min, 2 min, 3 min, 4 min, 5 min, 60, min, or Limit for MMS). Press Save.
-
Page 118: Memory Management
Settings. Press either of the following fields and edit the information: • Starting Day : allows you choose which day marks the first day in your calendar week (Sunday or Monday). • View By : allows you to choose the default view for appointments used by the Calendar application when launched (Month, Week, or Day). - Page 119 From this menu you can clear the memory for Messages, Email, Exchange Email, My Folder, Calendar entries, Tasks, Memos, or Contacts. You can all select All to clear everything listed. In Idle mode, select Menu Memory. Press Check to place a checkmark alongside those applications you wish to clear.
- Page 120 Check the Used Space In Idle mode, select Menu Space. Select one of the following storage categories to view the contents of a category’s memory: • Shared Memory • Messaging • My Folder • Calendar • Tasks • Memo • Contacts Press to return to the Idle screen.
-
Page 121: Section 11: Camera
Taking pictures with your device’s built-in camera is as simple as choosing a subject, pointing the camera, then pressing the camera key. Note: When taking a photo in direct sunlight or in bright conditions, shadows may display on the photo. -
Page 122: Camera Options
If you move the camera icon to the center of the box on the display, the box turns orange and the picture is automatically taken. Repeat this step for up to 6 segments. When you are done, press the Camera key. - Page 123 – Quality: allows you to set the image quality to: Economy, Fine, or Superfine. – GPS: allows you to turn GPS On or Off (also known as Geotagging). The location of where the picture is taken is attached to the picture. This option is only available in Camera mode. The...
-
Page 124: Editing A Photo
Camera). • Delete: allows you to delete the picture or video. • Set as: allows you to set the photo as Wallpaper or Caller ID (this option only appears in Camera). • Edit: allows you to edit the picture (this option only appears in Camera). - Page 125 Press Search contact, highlight an entry and press – or – Press Create contact to create a new Address Book entry with the image already assigned to the new contact. For more information, refer to “Contacts Settings” on page 46.
-
Page 126: Using The Camcorder
Shooting Video Tip: When shooting video in direct sunlight or in bright conditions, it is recommended that you provide your subject with sufficient light by having the light source behind you. In Idle mode, press the Camera key Press Options, then Highlight Camcorder and press Using the phone’s main display screen as a viewfinder, adjust the image by... -
Page 127: Camcorder Options
Recording Mode: select a video recording mode. Select Normal to record a video within the • limit of the currently available memory. Select Limit for MMS to record a video suitable for an MMS message. Camcorder Resolution: allows you to set the video size to 176x144 or 320x240 (if •... - Page 128 – Bluetooth Visibility – Sort by: allows you to sort your videos by Date, Type, Name, or Size. – Properties: allows you to see the details of your video including Name, Format, Resolution, Size, Forwarding capability, Date created, and physical Location.
-
Page 129: Section 12: Health And Safety Information
The low levels of RF cell phones emit while in use are in the microwave frequency range. They also emit RF at substantially reduced time intervals when in the stand- by mode. - Page 130 While RF energy does not ionize particles, large amounts can increase body temperatures and cause tissue damage. Two areas of the body, the eyes and the testes, are particularly vulnerable to RF heating because there is relatively little blood flow in them to carry away excess heat.
- Page 131 For people with the heaviest use of cell phones (an average of more than ½ hour per day, every day, for over 10 years) the study suggested a slight increase in brain cancer.
- Page 132 If there is a risk from being exposed to radio frequency energy (RF) from cell phones - and at this point we do not know that there is - it is probably very small. But, if you are concerned about avoiding even potential risks, you can take a few simple steps to minimize your RF exposure.
- Page 133 RF absorption. Children and Cell Phones The scientific evidence does not show a danger to any users of cell phones from RF exposure, including children and teenagers. The steps adults can take to reduce RF exposure apply to children and teenagers as well.
- Page 134 Some groups sponsored by other national governments have advised that children be discouraged from using cell phones at all. For example, The Stewart Report from the United Kingdom made such a recommendation in December 2000. In this report, a group of independent experts noted that no evidence exists that using a cell phone causes brain tumors or other ill effects.
-
Page 135: Specific Absorption Rate (Sar) Certification Information
Before a new model phone is available for sale to the public, it must be tested and certified to the FCC that it does not exceed the SAR limit established by the FCC. -
Page 136: Fcc Part 15 Information To User
FCC SAR guidelines when used with an accessory that contains no metal and that positions the mobile device a minimum of 1.5 cm from the body. Use of other accessories may not ensure compliance with FCC RF exposure guidelines. - Page 137 Reorient or relocate the receiving antenna. • Increase the separation between the equipment and receiver. • Connect the equipment into an outlet on a circuit different from that to which the receiver • is connected. Consult the dealer or an experienced radio/TV technician for help.
-
Page 138: Smart Practices While Driving
• Do not engage in stressful or emotional conversations; • Let the person with whom you are speaking know that you are driving and will suspend the • call if necessary; Do not take notes or look up phone numbers while driving;... -
Page 139: Battery Use And Safety
Do not disassemble, crush, puncture, shred, or otherwise attempt to change the form • of your battery. Do not put a high degree of pressure on the battery. This can cause leakage or an internal short-circuit, resulting in overheating. Do not let the phone or battery come in contact with liquids. Liquids can get into the •... - Page 140 Do not place your battery in or near a heat source. Excessive heating can damage the • phone or the battery and could cause the phone or the battery to explode. Do not dry a wet or damp battery with an appliance or heat source such as a microwave oven, hair dryer, iron, or radiator.
-
Page 141: Samsung Mobile Products And Recycling
Misuse or use of incompatible phones, batteries, and charging devices could result in • damage to the equipment and a possible risk of fire, explosion, or leakage, leading to serious injuries, damages to your phone, or other serious hazard. Samsung Mobile Products and Recycling Samsung cares for the environment and encourages its customers to recycle Samsung mobile devices and genuine Samsung accessories. - Page 142 U.S. Mail, for recycling. Dispose of unwanted electronics through an approved recycler.
-
Page 143: Ul Certified Travel Charger
If your mobile device has a touch-screen display, please note that a touch- screen responds best to a light touch from the pad of your finger or a non- metallic stylus. Using excessive force or a metallic object when pressing on the touch-screen may damage the tempered glass surface and void the warranty. -
Page 144: Gps & Agps
AGPS has limitations and might not work in your area. Therefore: Always tell the emergency responder your location to the best of your ability; and • Remain on the mobile device for as long as the emergency responder instructs you. -
Page 145: Emergency Calls
In some areas, complete information may not be available. Therefore, you should always visually confirm that the navigational instructions are consistent with what you see before following them. All users should pay attention to road conditions, closures, traffic, and all other factors that may impact safe driving or walking. -
Page 146: Care And Maintenance
Extreme heat or cold Avoid temperatures below 0°C / 32°F or above 45°C / 113°F. Microwaves Do not try to dry your mobile device in a microwave oven. Doing so may cause a fire or explosion. Dust and dirt Do not expose your mobile device to dust, dirt, or sand. -
Page 147: Responsible Listening
Responsible Listening Caution!: Avoid potential hearing loss. Damage to hearing occurs when a person is exposed to loud sounds over time. The risk of hearing loss increases as sound is played louder and for longer durations. Prolonged exposure to loud sounds (including music) is the most common cause of preventable hearing loss. - Page 148 • near you or if the person sitting next to you can hear what you are listening to. Do not turn the volume up to block out noisy surroundings. If you choose to listen to your • portable device in a noisy environment, use noise-cancelling headphones to block out background environmental noise.
- Page 149 You can obtain additional information on this subject from the following sources: American Academy of Audiology 11730 Plaza American Drive, Suite 300 Reston, VA 20190 Voice: (800) 222-2336 Email: info@audiology.org Internet: http://www.audiology.org/Pages/default.aspx National Institute on Deafness and Other Communication Disorders...
-
Page 150: Operating Environment
Remember to follow any special regulations in force in any area, and always switch your mobile device off whenever it is forbidden to use it, or when it may cause interference or danger. When connecting the mobile device or any accessory to another device, read its user's guide for detailed safety instructions. -
Page 151: Other Medical Devices
Should use the ear opposite the implantable medical device to minimize the potential for • interference; Should turn the mobile device OFF immediately if there is any reason to suspect that • interference is taking place; Should read and follow the directions from the manufacturer of your implantable •... -
Page 152: Posted Facilities
When your Device is Wet Do not turn on your device if it is wet. If your device is already on, turn it off and remove the battery immediately (if the device will not turn off or you cannot remove the battery, leave it as-is). -
Page 153: Restricting Children's Access To Your Mobile Device
Mobile Device Your mobile device is not a toy. Do not allow children to play with it because they could hurt themselves and others, damage the mobile device, or make calls that increase your mobile device bill. Keep the mobile device and all its parts and accessories out of the reach of small children. -
Page 154: Other Important Safety Information
Failure to observe these instructions may lead to the suspension or denial of cell phone • services to the offender, or legal action, or both. While using your device, leave some lights on in the room and do not hold the screen too • close to your eyes. - Page 155 If you continue to have discomfort during or after such use, stop use and see a physician. If your device has a camera flash or light, do not use the flash or light close to the eyes of •...