Table of Contents
Advertisement
Advertisement
Table of Contents

Related Manuals for Night Owl WDB-20

Summary of Contents for Night Owl WDB-20
- Page 1 USER’S MANUAL Smart Doorbell www.NightOwlSP.com...
- Page 2 Thank you for choosing Night Owl Security Products! By purchasing a Night Owl product, you receive a one (1) year warranty covering manufacturing defects in material and workmanship. In addition to warranty and technical support benefits, you will have access to our multitude of free instructional “How to Videos”.
- Page 3 TABLE OF CONTENTS...
-
Page 4: Table Of Contents
6.2.4 (b) Notification Pressed - Live View ............43 6.2.4 (c) Doorbell Connected to Wi-Fi - Settings Menu .......... 44 6.2.5 Doorbell Live View - Paired to Night Owl Gateway ........... 45 6.2.5 (a) Doorbell Individual Channel Screen – Live View ........45 6.2.5 (b) Notification Pressed Live View - Connected to Gateway ...... -
Page 5: Chapter 1 Fcc Warnings
CHAPTER 1 FCC WARNINGS... - Page 6 Chapter 1: FCC Warnings This device complies with Part 15 of the FCC Rules. Operation is subject to the following two conditions: (1) this device may not cause harmful interference and (2) this device must accept any interference received, including interference that may cause undesired operation. FCC Compliance Statement These limits are designed to provide reasonable protection against frequency interference in residential installation.
-
Page 7: Chapter 2 Safety Instructions
CHAPTER 2 SAFETY INSTRUCTIONS... - Page 8 Chapter 2: Safety Instructions The working temperature of the device is from -4 °F to 122 °F. The Doorbell works using [AC 12 ~ 24V] supply. Do not connect the device directly to AC mains while wiring the device, otherwise this may cause electric shock and permanent damage to the device. For the Doorbell setup, plug in the device ONLY using the included USB 5V power adapter (Amperage must not be less than 1A or it may cause damage to the device).
-
Page 9: Chapter 3: Specifications
CHAPTER 3 SPECIFICATIONS... -
Page 10: System Requirements
1 x Screwdriver Handle Storage size may vary. (Pre-installed) NOTE: 3 x Mounting Hardware 1 x Night Owl Security Sticker (includes extra screw) 2 x Security Screws 1 x Doorbell Mounting Template (includes extra screw) THIS DEVICE WILL REPLACE YOUR EXISTING DOORBELL. YOU MUST HAVE AN EXISTING DOORBELL TO USE THIS PRODUCT. -
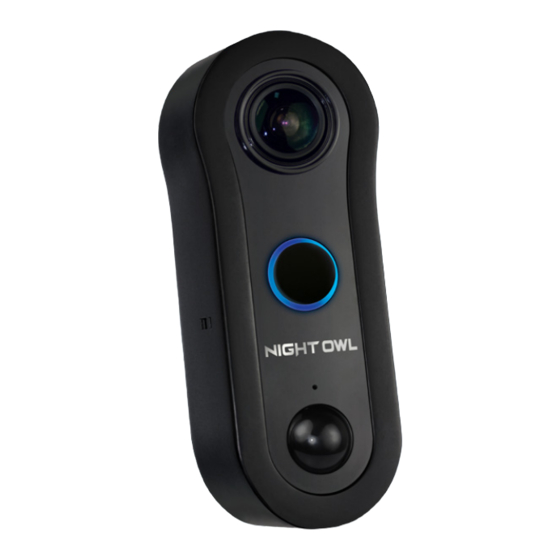
Page 11: Smart Doorbell Diagram
3.2.1 Smart Doorbell Diagram FRONT VIEW Doorbell Lens LEDs for Night Vision Ring Button: Press to ring the Night Owl Doorbell. The LED Status light turns blue and spins clock-wise for up to approximately 30 seconds. A notification is sent to the mobile device running the Night Owl Connect App. - Page 12 LEFT SIDE VIEW The faceplate must be removed in order to access the sides of the Doorbell. NOTE: microSD Card Slot: The maximum microSD card size is 128 GB. The microSD card can be formatted from the Night Owl Connect App.
- Page 13 Reset Button: Press and hold the “Reset” button for approximately 3 seconds to return the Night Owl Doorbell to FACTORY SETTINGS. This process reboots the Doorbell, cuts the connection with Night Owl Connect (Doorbell may still appear in the app), returns the device to FACTORY SETTINGS, and places it in PAIRING MODE.
- Page 14 REAR VIEW Check out my rear! Wiring Connectors: Connect the wires from your existing Doorbell to the Night Owl Doorbell. Make sure the wires are properly fastened. The voltage range is 12-24 Volts (Recommend 16-24 Volts).
-
Page 15: Chapter 4 Getting Started
CHAPTER 4 GETTING STARTED... - Page 16 Wi-Fi signal strength at the Doorbell’s location. STEP 2: Preparing The Doorbell For Setup Remove all the contents from the box. For the best results, perform the setup process close to your router or Night Owl Gateway. RESET LAN1 LAN2...
- Page 17 Remove the faceplate from the Night Owl Doorbell. Insert the small end of the provided USB cable into the micro USB port on the Doorbell. NOTE: Use a flat tool to carefully remove the cover from the micro USB input. You must replace the cover before mounting the Doorbell.
- Page 18 Meet Night Owl Connect STEP 3: Download the Night Owl Connect App and Add the Doorbell Download the Night Owl Connect Application from ® the “App Store” for iOS devices or “Play Store” ™ for Android devices. Create a new account or login if you already have an existing account.
- Page 19 Doorbell Installation Guide STEP 4: Doorbell Installation TURN OFF THE POWER AT THE BREAKER BEFORE TOUCHING ANY WIRES! Remove the old doorbell. Place the Doorbell on the wall or use the provided mounting template to mark the positioning for the new holes.
- Page 20 Connect your Night Owl Doorbell to the existing doorbell wiring. Feed the excess wiring back into the wall. NOTE: It does not matter which wire connects to which screw. Use the provided mounting screws to secure the Doorbell to the wall.
- Page 21 To use the Night Owl Doorbell with a Digital Chime STEP 5: Digital Chime Power Amp Installation TURN OFF THE POWER AT THE BREAKER BEFORE TOUCHING ANY WIRES! Remove the cover from your internal doorbell. Loosen the “Front” and “Trans” terminal screws on your internal doorbell.
- Page 22 Replace the cover on the internal doorbell. Turn on the power at the breaker. YOU MUST RETURN TO THE NIGHT OWL CONNECT APP AND CHANGE THE DOORBELL SETTINGS TO “DIGITAL CHIME”. DO NOT FORGET! THIS IS IMPORTANT!!
-
Page 23: Chapter 5 Know Your Doorbell
CHAPTER 5 KNOW YOUR DOORBELL... -
Page 24: Booting Process
Chapter 5: Know Your Doorbell 5.1 Booting Process Doorbell plays the voice prompt “Doorbell is ready for use”. Doorbell is ready for use. Doorbell’s LED Status Light turns white and spins clockwise (if in Factory Settings or if no Wi-Fi credentials exist) and plays the voice prompt “Doorbell is in Pairing Mode.”... - Page 25 Doorbell checks for available firmware upgrades to download once it is connected to a Wi-Fi network (this does not occur during the initial boot). Doorbell MUST be connected to a Wi-Fi network to receive firmware upgrades. NOTE: If new firmware is available, it will be downloaded. If no new firmware is available, the voice prompt says, “Thanks for checking, but my firmware is up to date.”...
-
Page 26: Smart Doorbell Functionality
The Doorbell can also be set to “Pairing Mode” by resetting it to “Factory Settings.” The Doorbell can be paired to either a Wi-Fi network or a Night Owl Gateway using the Night Owl Connect App. Refer to the Software Description section or the Night Owl Connect Manual for more information. -
Page 27: Resetting Doorbell To Factory Settings
The Doorbell restarts and initiates the “Booting Process.” Once reset to factory setting, the Doorbell loses the connection with the Night Owl Connect App (user will see the Night Owl Doorbell in the app, but it will be in DISCONNECTED/OFFLINE status). To... -
Page 28: Status Check Process
5.2.3 Status Check Process Once the Doorbell connects to a Wi-Fi network, it continuously checks for the following statuses: No Wi-Fi Connection Weak Signal If the Doorbell’s Wi-Fi signal strength is weak, If Wi-Fi connectivity is lost, the Status Light’s top half turns white and flashes. the Status Light’s top half turns blue and flashes, and the bottom half turns white and flashes. -
Page 29: Firmware Upgrade Process
5.2.4 Firmware Upgrade Process After the Doorbell boots up and connects to a Wi-Fi network, it checks for a firmware upgrade. The Doorbell does not check for a firmware upgrade during the initial boot. NOTE: If a new firmware upgrade is available for download, the Firmware Upgrade Process begins. If there isn’t a new firmware upgrade available, the Doorbell says, “Thanks for checking, but my firmware is up to date.”... - Page 30 If the upgrade is successful, the Doorbell says, “Woohoo! Firmware Upgrade is complete,” and it will reboot. Woohoo! Firmware Upgrade is complete. If the download was unsuccessful, the Doorbell says, “Oops, Doorbell firmware upgrade failed. Try again later,” and the Status Light alternates between a pulsing blue and white. The Doorbell returns to ON/Standby status, and the Status Light turns to solid white (as long as no other status issues are found during “Status Check Process”).
-
Page 31: Ringing Process
5.2.5 Ringing Process After the Doorbell is pressed, the Status Light turns blue and spins clockwise. The Doorbell rings and sends a Push Notification that if pressed, allows the user to communicate with the person who rang the Doorbell. NOTE: Answering the Doorbell changes the Status Light to solid blue. -
Page 32: Chapter 6 Software Description
CHAPTER 6 SOFTWARE DESCRIPTION... -
Page 33: Apps
6.1 Apps Download and Install Application Download the app from the App Store or Google Play Store and install the application on your device. 6.2 Night Owl Connect 6.2.1 Add Doorbell to Home Wi-Fi Android™ Press the “+” icon. Select “Doorbell” from the device list and follow the on-screen instructions. - Page 34 Select the setup method for the Doorbell When in pairing mode, the Status Light is (Wi-Fi network or Night Owl Gateway). white and spinning clockwise. Press play to watch the Wi-Fi setup video. Do Not Skip. Seriously, watch it! NOTE: This video explains the Wi-Fi setup steps for iOS users.
- Page 35 Follow the instructions on the Doorbell’s Setup process. This step applies to iOS ® and Android™ versions of Night Owl Connect to connect to Home Wi-Fi. Android™ ® Go to your devices Wi-Fi settings. Select your Doorbell hotspot to start the pairing process.
- Page 36 Android™ ® Enter the Wi-Fi password. Enter the Wi-Fi password. NOTE: If you do not know your password contact NOTE: If you do not know your password contact your ISP (internet service provider). your ISP (internet service provider). Wait patiently (you can do it) for the Doorbell to pair or to repeat the process.
- Page 37 If the pairing process is successful, you will be asked to name the Doorbell. Once named, select “Done” to add to the Device List in the Night Owl App. If the Doorbell fails to pair, you MUST repeat the “Pairing Process”. Select “Repeat the Setup Process”...
-
Page 38: Add The Doorbell To A Night Owl Gateway
6.2.2 Add the Doorbell to a Night Owl Gateway Press the individual channel “+” icon to go directly to the instructions to add Night Owl devices to the Gateway. - Page 39 Android™ Select Doorbell to begin the “Adding to When in pairing mode, the Status Light is Night Owl Gateway Process”. white and spinning clockwise. NOTE: Android™ users follow the onscreen instructions to turn your mobile data off before continuing the setup process.
- Page 40 Follow the instructions and press “Continue”. Follow the instructions and press “Continue”. All the Night Owl devices that are in “Pairing Mode,” and close enough to the Gateway, will start the pairing process. No more than 4 devices will be added.
-
Page 41: Live View - Home Wi-Fi Connection
Other Options: Settings: Goes to Settings Menu. Share: The user is able to share the Doorbell with another user of Night Owl Connect. Delete: Delete the Doorbell. Play Live View Button: After pressing the Live View button, the app will show the Doorbell’s Live View. -
Page 42: Doorbell Live View - Connected To Home Wi-Fi
Sound: Enables ONE-WAY sound by only activating it, the user will hear the audio transmitted by the Night Owl device. If the user presses the TALK button that appears on the screen when Audio is activated they will be heard thru the device. -
Page 43: B) Notification Pressed - Live View
6.2.4 (b) Notification Pressed - Live View You will be able to perform the following actions: End: End the video streaming. Mute/Unmute Speaker: The speaker is enabled by default. Disable/Enable Microphone: The microphone is disabled by default. Zoom In/Out: Tap to zoom in or zoom out of the live stream. -
Page 44: C) Doorbell Connected To Wi-Fi - Settings Menu
Doorbell Options: By default, the option is ON and it is designed to work with a Mechanical Chime. NOTE: You MUST select your “Bell Type” (Mechanical or Digital) in the Doorbell Settings menu in the Night Owl Connect App. Failure to do so affects the Doorbell’s ability to emit sound. -
Page 45: Doorbell Live View - Paired To Night Owl Gateway
Sound: Enables ONE-WAY sound by only activating it, the user will hear the audio transmitted by the Night Owl device. If the user presses the TALK button that appears on the screen when Audio is activated they will be heard thru the device. -
Page 46: B) Notification Pressed Live View - Connected To Gateway
6.2.5 (b) Notification Pressed Live View - Connected to Gateway You will be able to perform the following actions: End: End the video streaming. Mute/Unmute Speaker: The speaker is enabled by default when the call is answered. Disable/Enable Microphone: The microphone is disabled by default. Zoom In/Out: Tap to zoom in or zoom out of the live stream. -
Page 47: C) Doorbell Individual Channel Settings - Connected To Gateway
Doorbell Options: By default, the option is ON and it is designed to work with a Mechanical Chime. NOTE: You MUST select your “Bell Type” (Mechanical or Digital) in the Doorbell Settings menu in the Night Owl Connect App. Failure to do so affects the Doorbell’s ability to emit sound. -
Page 48: Night Owl Doorbell App's Status
6.2.6 Night Owl Doorbell App’s Status Online Connecting There is communication between the app and the The app is trying to establish the communication Doorbell. The user can access the live stream and with the Doorbell. use all of the Doorbell’s features and the devices associated with it. -
Page 49: Doorbell Interaction With Chime
6.2.7 Doorbell Interaction with Chime By default, the interaction between the Doorbell and the Chime is ON and set to work with a Mechanical Chime as shown below: MECHANICAL CHIME Connected to Home Wi-Fi Connected to Gateway If the user has a Digital Chime, select the Digital option for the Bell Type. DIGITAL CHIME Connected to Home Wi-Fi Connected to Gateway... - Page 50 BELL DURATION Tap “Bell Duration (Seconds)” option to change the amount of time that your chime will be working after someone presses the Doorbell button. Connected to Home Wi-Fi / Gateway The numbers listed in the app represent the approximate amount of time in seconds that the Digital Chime produces a sound when the Doorbell is pressed.
-
Page 51: Chapter 7 Doorbell & Chime Compatibility
CHAPTER 7 DOORBELL & CHIME COMPATIBILITY... -
Page 52: Mechanical Chime Hardware Example
Chapter 7: Doorbell & Chime Compatibility 7.1 Mechanical Chime Hardware Example NOTE: The image above is an example of a Mechanical Chime. Doorbell chime designs may vary. 7.2 Digital Chime Hardware Example NOTE: The image above is an example of a Digital Chime. Doorbell chime designs may vary. -
Page 53: Chapter 8 Troubleshooting Tips
CHAPTER 8 TROUBLESHOOTING TIPS... -
Page 54: Firmware Upgrade
8.1 Firmware Upgrade When the Doorbell is turned on for the first time, it will be in pairing mode. Once the Wi-Fi connection has been made (Home Wi-Fi or the Night Owl Gateway), the Doorbell does NOT run a Firmware Upgrade check. -
Page 55: Factory Reset
The Wi-Fi network password has changed. The router has been reset. If you decide to switch the Doorbell from a Wi-Fi network connection to the Night Owl Gateway Setup (or vice versa). If the Doorbell is not working properly or has glitches. -
Page 56: Status Light Key
8.4 Status Light Key Normal Light Notifications Solid Spinning Blue Spinning White/Blue Blue (Clockwise) (Counter Clockwise) The Doorbell The Doorbell Updating has been Answered is Ringing Firmware Solid Spinning White White (Clockwise) On / Pairing Stand-By Mode Error Light Notifications Top Half Top Flashing Blue / Alternating Pulse... -
Page 57: Chapter 9 Warranty
CHAPTER 9 WARRANTY... - Page 58 Night Owl is not responsible for any personal damage, loss or theft related to the Product or to its use for any harm, whether physical or mental related thereto. Any and all claims or statements, whether written or verbal, by salespeople, retailers, dealers or distributors to the contrary are not authorized by Night Owl and do not affect this provision of this warranty.
- Page 59 Returns Under This Warranty In order to obtain service, please make sure that you have registered your product on-line no later than thirty (30) days after purchase at www.NightOwlSP.com in the warranty registration section or in any other manner described in the instructions. Disclaimer Certain uses, publication and/or distribution of video/audio recordings from security cameras and/or audio devices are prohibited or restricted by federal, state and local laws.
- Page 60 Need Help? For system manuals, troubleshooting guides, FAQs, video tutorials and more: Please visit www.NightOwlSP.com. Click the Support tab. In the search bar, type “WDB20”. Access the support material needed. Contact Us PHONE EMAIL WEBSITE (English, Spanish & French) Sales/Technical Support Sales Support 24/7 Product Support Sales@NightOwlSP.com...