
Related Manuals for NAVAC NTW1

Summary of Contents for NAVAC NTW1
-
Page 1: Table Of Contents
OWNER’S MANUAL Digital Torque Wrench NTW1 Contents 1. Main Features 2. Names and Functions of Parts 3. Specification 4. Before Using the Wrench 5. Setup 6.Track Mode Operation 7.Peak Hode Mode Operation 8. Maintenance and Storage... -
Page 2: Main Features
Dear Customers, Thank you for purchasing our digital torque wrench. This manual will help you to use the many features of your new digital torque wrench. Before operating the torque wrench, please read this manual completely, and keep it nearby for future reference. -
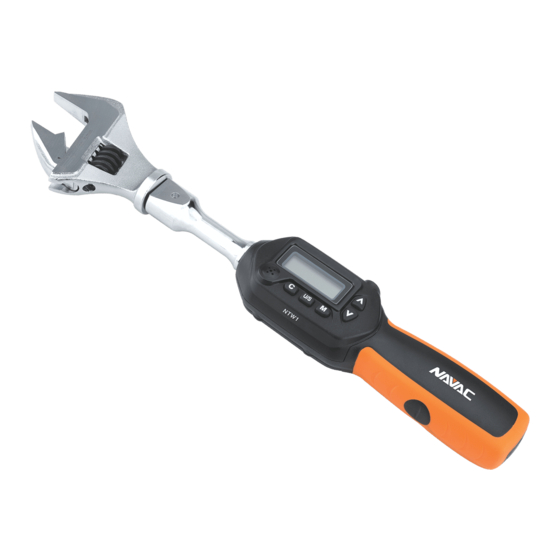
Page 3: Specification
SPECIFICATIONS Torque Model Measuring Jaw Size Length Range 12.8 in NTW1 4.2~85 N-m 5-30mm 325 mm CW:± 2% Accuracy *1 CCW:± 3% Data memory size Pre-Sets 6 LEDs Bright LED (1 Red+5 Green) Operation Mode Peak hold/Track Unit Selection N-m, in-lb, ft-lb, kg-cm... -
Page 4: Before Using The Wrench
BEFORE USING THE WRENCH BATTERY INSTALLATION ◼ Remove the battery cap. ◼ Insert two AAA batteries matching the -/+ polarities of the battery to the battery compartment. ◼ Put on the battery cap and fasten it tightly. ATTENTION: When opening the battery cover of wrench, you can see a viewing window for the water contact indicator. - Page 5 D : The set torque D1: The actual torque applied to the nut. L1: The normal length L2: The extended length L3: The length from the fitting pin to the calibration point. ◼ Reference dimension for each model: Model L1(mm) L3(mm) NTW1 85.9...
-
Page 6: Setup
SETUP Power On/Clear Unit Selection/Setting Pre-setting No. Up/Down Button STEP 1: PRE-SETTING NO. Pre-setting No.: M1 Press Pre-setting No.: M2 Press Pre-setting No.: M2 ‧ ‧ ‧ *Note1, 2, 3 Pre-setting No.: M9 Note: 1. If is displayed, that means this wrench has ever been applied more than 110% of torque of the spec. - Page 7 STEP 2: UNIT SELECTION Pre-setting Unit: N-m Press Unit Selection: in-lb Press Unit Selection: ft-lb Press Unit Selection: kg-cm STEP 3: SET TORQUE VALUE Pre-setting Torque Value Press Increase Target Torque Value Press Decrease Target Torque Value Note: 1. The “Unit Selection” is cyclic.
- Page 8 STEP 4: PEAK HOLD /TRACK MODE SELECTION Track Mode Long Press Set Peak/Track mode Press for Selection Set Peak/Track mode Press *Note 1 Record No. Press *Note 1 Clear Record Press Peak Hold Mode Note: Please skip this procedure and continue to the next step.
-
Page 9: Track Mode Operation
TRACK MODE OPERATION START (System initial) *Note 1 Setting Target Torque Apply Torque Current Torque Value Reach 80% of Target Torque Current Torque Value *Note 2 …))…)) ((…((… …)) …)) ((…((… Buzzer Green LED Reach 80% of Target Torque Reach Target Torque *Note 3 (((((((( )))))))) -
Page 10: Peak Hode Mode Operation
PEAK HOLD MODE OPERATION START (System initial) *Note 1 Setting Target Torque *Note 2 Recording Apply Torque Released Apply Torque Flashing Current Torque Value (Peak Hold) Reach 80% of Target Torque *Note 3 …))…)) ((…((… …)) …)) ((…((… Buzzer Green LED Reach 80% of Target Torque Reach Target Torque *Note 4... - Page 11 3. If the record is empty, it will show 4. This function is not supported on all models. 5. Communication mode is for uploading record data to PC. 6. Communication mode is also for calibration of torque wrench. Please contact NAVAC technical support for more information.
-
Page 12: Maintenance And Storage
MAINTENANCE AND STORAGE ATTENTION: 1. A one-year periodic recalibration is recommended to maintain accuracy. 2. Please contact NAVAC technical support for calibration details. CAUTION: Over-torque (110% of Max. torque range) could cause breakage or lose accuracy. Do not shake violently or drop wrench.