Table of Contents
Advertisement
HT-C350-ELS_ENG-0503.indd Sec1:1
HT-C350-ELS_ENG-0503.indd Sec1:1
Digital Home
Cinema System
user manual
Imagine
the possibilities
Thank you for purchasing this Samsung product.
To receive more complete service,
please register your product at
www.samsung.com/register
HT-C350
2010-05-03
2010-05-03
4:55:10
4:55:10
Advertisement
Table of Contents

Related Manuals for Samsung HT-C350


Summary of Contents for Samsung HT-C350
- Page 1 Digital Home Cinema System Thank you for purchasing this Samsung product. HT-C350-ELS_ENG-0503.indd Sec1:1 HT-C350-ELS_ENG-0503.indd Sec1:1 user manual Imagine the possibilities To receive more complete service, please register your product at www.samsung.com/register HT-C350 2010-05-03 2010-05-03 4:55:10 4:55:10...
- Page 2 Safety Information TO REDUCE THE RISK OF ELECTRIC SHOCK, DO NOT REMOVE THE COVER(OR BACK). NO USER-SERVICEABLE PARTS ARE INSIDE. REFER SERVICING TO QUALIFIED SERVICE PERSONNEL. This symbol indicates “dangerous voltage” inside the product that presents a risk of electric shock or personal injury. WARNING •...
-
Page 3: Safety Information 2
TV SOURCE TITLE TUNER MEMORY DSP / EQ MO / ST REPEAT CD RIPPING DIMMER INFO TV CH V MUTE TUNING V DVD RECEIVER SELECT SAMSUNG Remote Control/Batteries User's Manual (AAA size) Scart Adapter (Europe only) English 2010-05-27 2010-05-27 4:29:37 4:29:37... -
Page 4: Cautions On Handling And Storing Discs
Dolby and the double-D symbol are registered trademarks of Dolby Laboratories. • “Pat. 7,295,673; 7,460,688; 7,519,274” Copyright © 2010 Samsung Electronics Co., Ltd. All rights reserved. Copy Protection • Many DVD discs are encoded with copy protection. Because of this, you should only connect your product directly to your TV, not to a VCR. -
Page 5: Table Of Contents
Contents SAFETY INFORMATION GETTING STARTED CONNECTIONS HT-C350-ELS_ENG-0527.indd 5 HT-C350-ELS_ENG-0527.indd 5 Safety Warnings Precautions Accessories Cautions on Handling and Storing Discs Licence Copyright Copy Protection Icons that will be used in manual Disc Types and Characteristics Description Front Panel Rear Panel Remote control Connecting the Speakers Connecting the Video Out to your TV... -
Page 6: Ht-C350-Els_Eng-1025.Indd 6 Ht-C350-Els_Eng-1025.Indd
Contents BASIC FUNCTIONS ADVANCED FUNCTIONS OTHER INFORMATION • Figures and illustrations in this User Manual are provided for reference only and may differ from actual product appearance. • An administration fee may be charged if either an engineer is called out at your request and there is no defect in the product (i.e. -
Page 7: Icons That Will Be Used In Manual
Getting Started Icons that will be used in manual Make sure to check the following terms before reading the user manual. Icon Term This involves a function available with DVD-Video or DVD±R/±RW discs that have been recorded and fi nalised in Video Mode. This involves a function available with a data CD (CD DA, CD-R/-RW). - Page 8 Getting Started Disc types that can be played Disc Types & Recorded Disc Mark (Logo) Signals Size 12 cm AUDIO VIDEO DVD-VIDEO 8 cm 12 cm AUDIO 8 cm AUDIO-CD AUDIO 12 cm 8 cm DivX VIDEO Do not use the following type of discs! •...
- Page 9 DVD±R/±RW, CD-R/RW Discs • Software updates for incompatible formats are not supported. (Example : QPEL, GMC, resolutions higher than 800 x 600 pixels, etc.) • If a DVD-R/-RW disc has not been recorded properly in DVD Video format, it will not be playable.
-
Page 10: Notes On Usb Connection
Getting Started Notes on USB connection Supported devices: USB storage media, MP3 player, digital camera, USB card reader If a folder or fi le name is longer than 10 characters, it may not properly display or operate. A subtitle fi le bigger than 148KB may not be properly displayed. -
Page 11: Description
Front Panel DISC TRAY DISPLAY REMOTE CONTROL SENSOR OPEN/CLOSE BUTTON ( FUNCTION BUTTON ( TUNING DOWN & SKIP BUTTON ( STOP BUTTON ( PLAY/PAUSE BUTTON ( TUNING UP & SKIP BUTTON ( VOLUME CONTROL BUTTON ( POWER BUTTON ( USB PORT HT-C350-ELS_ENG-0527.indd 11 HT-C350-ELS_ENG-0527.indd 11 Description... -
Page 12: Rear Panel
Getting Started Rear Panel 5.1 CHANNEL SPEAKER OUTPUT CONNECTORS EXTERNAL DIGITAL OPTICAL IN JACK (DIGITAL AUDIO IN) HDMI OUT JACK AUX IN JACKS VIDEO OUT JACK COMPONENT VIDEO OUTPUT JACKS FM ANTENA JACK English HT-C350-ELS_ENG-0527.indd 12 HT-C350-ELS_ENG-0527.indd 12 VIDEO DIGITAL HDMI OUT AUDIO IN OPTICAL... -
Page 13: Remote Control
DIMMER INFO TV CH V MUTE TUNING V DVD RECEIVER SELECT SAMSUNG ✎ NOTE Place batteries in the remote control so they match the polarity : (+) to (+) and (–) to (–). Always replace both batteries at the same time. -
Page 14: Setting The Remote Control
NOTE The remote control may not work or some operations may not be possible with some brands of TVs. The remote control will work on a Samsung TV by default. English HT-C350-ELS_ENG-0527.indd 14 HT-C350-ELS_ENG-0527.indd 14 TV Brand Code List... -
Page 15: Connections
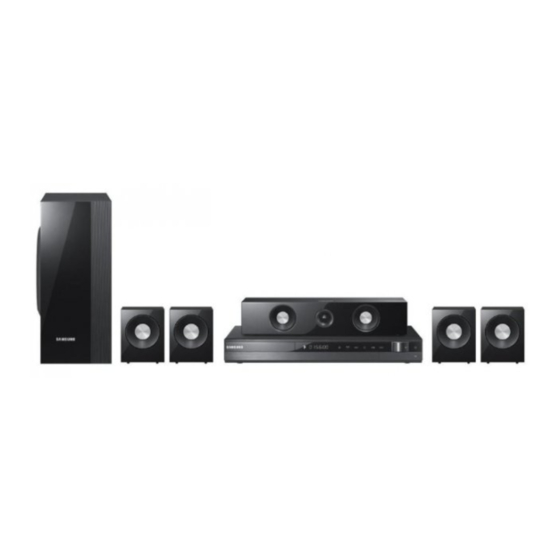
Connections This section involves various methods of connecting the product to other external components. Before moving or installing the product, be sure to turn off the power and disconnect the power cord. Front Speakers Centre Speaker Rear Speakers Subwoofer CAUTION ... -
Page 16: Speaker Components
Connections Speaker Components FRONT REAR Connecting The Speakers Press down the terminal tab on the back of the speaker. Insert the black wire into the black terminal (–) and the red wire into the red terminal (+), and then release the tab. Connect the connecting plugs to the back of the product by matching the colours of the speaker plugs to the speaker jacks. -
Page 17: Connecting The Video Out To Your Tv
Choose one of the four methods for connecting to a TV. METHOD 4 (supplied) VIDEO HDMI OUT AUX IN AUX IN METHOD 1 : HDMI Connect an HDMI cable (not supplied) from the HDMI OUT jack on the back of the product to the HDMI IN jack on your TV. - Page 18 Anynet+ is a function that enables you to control other Samsung Devices with your Samsung TV's remote control. Anynet + can be used by connecting this product to a SAMSUNG TV using a HDMI Cable. This is only available with SAMSUNG TV's that support Anynet+.
-
Page 19: Connecting The Fm Antenna
VIDEO VIDEO HDMI OUT HDMI OUT COMPONENT COMPONENT AUX IN AUX IN Connect the FM antenna supplied to the FM Antenna jack. Slowly move the antenna wire around until you fi nd a location where reception is good, then fasten it to a wall or other rigid surface. -
Page 20: Connecting Audio From External Components
Connections Connecting Audio from External Components DIGITAL AUDIO IN OPTICAL Optical Cable (not supplied) Set-Top Box OPTICAL AUX : Connecting an External Analogue Component Analogue signal components such as a VCR. Connect AUX IN (Audio) on the back of the product to the Audio Out of the external Analogue component. -
Page 21: Setup
Setup Before Starting (Initial Setting) Press the POWER button when it is plugged in TV for the fi rst time. Initial Setting screen will be displayed. Initial setting > On-Screen Language Select a language for the on-screen displays. English Korean Dutch French German... -
Page 22: Display
Setup Display You can confi gure various display options such as the TV Aspect, Resolution, etc. TV Aspect Depending on the type of television you have, you may want to adjust the screen setting. • 4:3 Pan-Scan Select when you want to see the 16:9 video supplied by the DVD without the black bars on top and bottom, even though you have a TV with a 4:3 ratio... - Page 23 Adjusting Front/Rear Speaker Balance You can select between 0 and -6. The volume decreases as you move closer to –6. Adjusting Centre/Rear/Subwoofer Speaker Level The volume level can be adjusted in steps from +6dB to –6dB. The sound gets louder as you move closer to +6dB and quieter as you get closer to -6dB.
-
Page 24: Drc (Dynamic Range Compression)
Setup Test Tone Settings Speaker Setting Speaker Size Sound Edit Delay Time Test Tone Select Move Use the Test Tone feature to check the speaker connections. • Press the ◄► buttons to select On. The test tone will be sent to Front Left ➞ Center •... -
Page 25: Language
Language You can select the language you prefer for on- screen menu, disc menu, etc. Select the language for the on- Language screen displays. Select the language for the disc Disc Menu menu displays. Audio Select the language for disc audio. Subtitle Select the language for disc subtitles. -
Page 26: Basic Functions
Basic Functions Disc Playback Press the OPEN/CLOSE () button. Place a disc gently into the tray with the disc's label facing up. Press the OPEN/CLOSE () button to close the disc tray. ✎ NOTE Resume function: When you stop disc play, the product remembers where you stopped, so when you press PLAY button again, it will pick up where you left off. -
Page 27: Jpeg File Playback
JPEG File Playback Images captured with a digital camera or camcorder, or JPEG fi les on a PC can be stored on a CD and then played back with this product. Insert a JPEG disc on the disc tray. Press the ◄► buttons to select Photo, and then press the ENTER button. -
Page 28: Using The Title Menu
Basic Functions Step Motion Play Press the PAUSE button repeatedly. • The picture moves forward one frame each time the button is pressed during playback. ✎ NOTE No sound is heard during step motion playback. 5 Minute Skip function During playback, press the ◄,►... -
Page 29: Repeat Playback
Repeat Playback dBAD DVD/DivX Repeat You can repeat the title, chapter or the section(A-B Repeat) of the DVD/DivX. Repeat During DVD/DivX playback, press the REPEAT button on the remote control. Press the ▲▼ buttons to select a desired repeat mode, then press the ENTER button. -
Page 30: Displaying Disc Information
Basic Functions Displaying Disc Information 03/04 001/001 0:00:21 KO 1/2 EN 02/02 Change During playback, press the TOOLS button on the remote control. Press the ▲▼ buttons to select the desired item. Press the ◄► buttons to make the desired setup change and then press the ENTER button. -
Page 31: Selecting The Subtitle Language
Selecting the Subtitle Language Press the TOOLS button. Press the ▲▼ buttons to select SUBTITLE ( display. Press the ◄► buttons or numeric buttons to select the desired subtitle language. • Depending on the number of languages on a DVD disc, a different subtitle language is selected each time the button is pressed. -
Page 32: Sound Mode
Basic Functions Sound Mode DSP (Digital Signal Processor)/EQ • DSP (Digital Signal Processor) : DSP modes have been designed to simulate different acoustic environments. • EQ : You can select ROCK, POP, or CLASSIC etc. to optimize the sound for the genre of music you are playing. -
Page 33: Listening To Radio
Listening to Radio Using buttons on the Remote Control Press the FUNCTION button to select FM. Tune in to the desired station. • Automatic Tuning 1 : When the # $ buttons is pressed, a preset broadcast station is selected •... -
Page 34: Advanced Functions
Advanced Functions USB Function Playing Media Files using the USB Host Feature You can enjoy media fi les such as pictures, movies and music saved on an MP3 player, USB memory stick or digital camera in high quality video with 5.1 channel sound by connecting the storage device to the USB port of the product. -
Page 35: Troubleshooting
Refer to the chart below when this product does not function properly. If the problem you are experiencing is not listed below or if the instruction below does not help, turn off the product, disconnect the power cord, and contact the nearest authorized dealer or Samsung Electronics Service Centre. Symptom I cannot eject the disc. -
Page 36: Other Information 35
Other Information Symptom • The product is not working. (Example: The power goes out or the front panel key doesn't work or a strange noise is heard.) • The product is not working normally. The rating level password has been forgotten. -
Page 37: Specifi Cations
Dimensions (W x H x D) Weights - Samsung Electronics Co., Ltd reserves the right to change the specifi cations without notice. - Weight and dimensions are approximate. - Design and specifi cations are subject to change without prior notice. - Page 38 Contact SAMSUNG WORLD WIDE If you have any questions or comments relating to Samsung products, please contact the SAMSUNG customer care center. Area Contact Center ` North America Canada 1-800-SAMSUNG (726-7864) www.samsung.com Mexico 01-800-SAMSUNG (726-7864) www.samsung.com U.S.A 1-800-SAMSUNG (726-7864) www.samsung.com...
- Page 39 Correct disposal of batteries in this product (Applicable in the European Union and other European countries with separate battery return systems.) This marking on the battery, manual or packaging indicates that the batteries in this product should not be disposed of with other household waste at the end of their working life. Where marked, the chemical symbols Hg, Cd or Pb indicate that the battery contains mercury, cadmium or lead above the reference levels in EC Directive 2006/66.