Advertisement
Table of Contents
- 1 Table of Contents
- 2 Warnings
- 3 Thunder Weekender Specifications
- 4 Installing Your Battery
- 5 Operating the LED Display
- 6 Charging Your Battery in the Thunder Weekender
- 7 Using the Accessory Ports
- 8 Using the 240 Volt Power Inverter
- 9 Transporting the Thunder Weekender
- 10 Faqs and Trouble Shooting
- Download this manual
Advertisement
Table of Contents

Summary of Contents for Thunder WEEKENDER
- Page 1 Congratulations on your purChase of your thunder Weekender! For your personal safety, please ensure you read and fully understand these warnings and instructions before operating the Weekender, supplied battery charger and optional accessories.
-
Page 2: Table Of Contents
Warnings Thunder Weekender specifications Installing your battery Operating the LED display Charging your battery in the Thunder Weekender 12. Using the accessory ports 13. Using the 240 Volt power inverter 14. Transporting the Thunder Weekender 15. FAQs and trouble shooting... -
Page 3: Warnings
• Ensure there is adequate ventilation when charging your battery and do not play or tamper with the Weekender. within the Weekender. Do not blanket or cover the top of your battery • For your safety and to prevent possible electric shock, never dismantle inside the Weekender. -
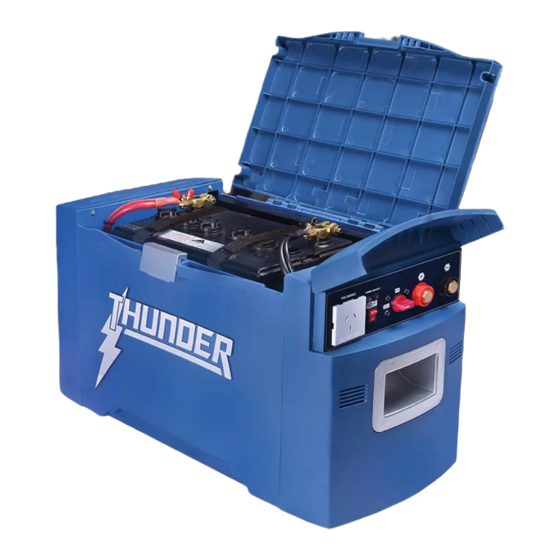
Page 4: Thunder Weekender Specifications
Weekender speCifiCations usb socket earth terminal point positive Connection usb Control switch Jumper leads (Sold Separately) 240 Volt battery Charger input negative Connection Jumper leads (Sold Separately) Master switch 50 amp anderson plug 240 Volt inverter Connection Control switch... - Page 5 12 Volt with 50 Amp automatic reset circuit breaker. Can be used as an auxiliary output or a 50 amp anderson plug Connection charge input (refer to the “Charging your battery in the Thunder Weekender” section of this manual). standard accessory socket x 2 12 Volt, with 15 Amp automatic reset circuit breaker per socket.
-
Page 6: Installing Your Battery
• Ensure the Weekender is on a flat, level surface and the master switch (4) is in the OFF position. • The front locking tab can be released and the lid lifted. • Inside the battery box are three nylon Velcro straps that will assist in securing your battery in place. -
Page 7: Operating The Led Display
• With the battery connected, and the master switch (4) turned ON, the Weekender display will be activated once the ON/OFF button (18) is pressed. battery Voltage • To save power the LED screen will turn off after 60 seconds. Pressing the output Current ON/OFF button (18) again will turn the screen back on for another 60 seconds. - Page 8 Weekender displays when the on/off (19) button is pressed. battery Voltage output Current battery Voltage Displayed during battery charging and discharge. output Current Will only read current draw on connected appliances (not when charging) and does not include the power draw the 240 Volt inverter will consume from your battery.
-
Page 9: Charging Your Battery In The Thunder Weekender
Charging your battery in the thunder Weekender There are two ways to charge your battery inside the Weekender. • Switching the Weekender master switch (4) to the OFF position will ensure i) By using the 240 Volt battery charger (supplied) with the Weekender; or appliances that are connected will not drain your battery inside the Weekender. - Page 10 • Over temperature • Short circuiting • When the Thunder Weekender 240 Volt battery charger has been connected to the battery in reversed polarity (when using alligator clamps), the FAULTY BATTERY LED indicator will be flashing and the charger will not supply an output charge voltage.
- Page 11 In the initial startup stage, a high frequency voltage pulse assists in “waking up” selected battery LED will begin to flash, and if connected to the Weekender, the red a deeply discharged battery. This method of pulse charging can also help reduce and grey terminals in the LED display will also begin flashing.
-
Page 12: Using The Accessory Ports
• For the Weekender battery to accept an external charge, the master switch (4) must be in the ON position. • The Anderson connection is protected by an automatic 50 Amp reset circuit breaker. Your maximum input charge current will need to be under this rating. -
Page 13: Using The 240 Volt Power Inverter
(1.) As the Thunder Weekender is a portable power pack with a built in 240 Volt inVerter speCifiCations inverter, a suitable connection needs to be made from the Weekender’s earth... -
Page 14: Transporting The Thunder Weekender
Weekender Note: The Thunder Weekender is designed to hold the largest possible battery so power output can be sustained as long as possible without needing to recharge your battery. Extreme driving conditions may cause the battery to slide inside the Weekender. -
Page 15: Faqs And Trouble Shooting
For example, a 100 Ah battery at 60% capacity with a 6 Amp charge input before checking the LED display again. will take roughly 6.6 hours to be charged (40 / 6 = 6.6 hours). The Thunder Weekender 240 Volt battery charger, along with all smart battery chargers will how do i know that my battery is fully charged inside the Weekender? only charge their rated amperage for a period of time before regulating. - Page 16 Can i charge the Weekender using solar panels? When i charge my battery in the Weekender, the led display does not show Yes, you can use solar to charge the battery (once the panel output a current output? has been regulated) via the 50 Amp Anderson plug connection (10).