Advertisement
Available languages
Available languages
Quick Links
COMMERCIAL SERVICE
INSTRUCTION MANUAL
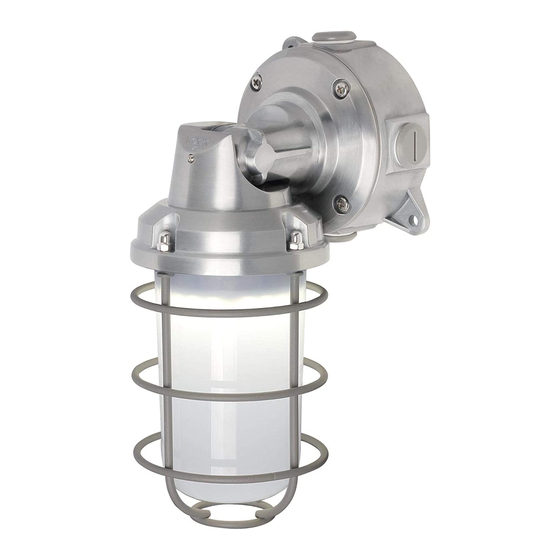
LED Vapor Proof Fixture
Installation Instruction
WARNINGS:
•
Operating temperature: -22°F to 113°F (-30°C to 45°C).
•
Suitable for dry and wet locations.
•
This device can not be intended for use with emergency exits.
•
Turn off the power before installation.
•
Installation requires knowledge of electrical systems. Installation to be performed by a
qualified electrician. Don't attempt installation if not qualified.
WIRE DIAGRAM:
Replacing HPS/HID lamp
Ignitor
Connect directly
Black
White
Green
Black
White
HPS/HID
LED
1
ESF-WH-071
Preparation for installation
Remove fixture from the mounting base.
Ceiling mount:
Type 1: Wires through the center hole
Step 1: Remove the pipe cap from the center
Step 2: Insert the circuit wires through the
hole.
center hole in the mounting base.
Step 4: Connect the circuit wires to the fixture
Step 5: Tighten the screws, insert end caps,
wires using wire nuts and electrical tape for a
and adjust fixture body to the mounting base.
more secure connection.
Step 3: Drill two holes and install the mounting
base.
2
ESF-WH-071
Advertisement

Related Manuals for Westinghouse 6564100


Summary of Contents for Westinghouse 6564100
- Page 1 COMMERCIAL SERVICE Preparation for installation INSTRUCTION MANUAL Remove fixture from the mounting base. LED Vapor Proof Fixture Installation Instruction Ceiling mount: Type 1: Wires through the center hole WARNINGS: Step 1: Remove the pipe cap from the center Step 2: Insert the circuit wires through the Step 3: Drill two holes and install the mounting hole.
-
Page 2: Ceiling Mount
Ceiling mount: Wall mount: Type 2 : Wires from Conduit Type 2: Wires from Pipe Step 1: Drill two holes and install the Step 2: I nsert the wire conduit into the Step 1: Tighten the bottom hole mounting Step 2: I nsert the wire conduit into the mounting base. -
Page 3: Diagrama Del Cableado
COMMERCIAL SERVICE Preparaciones para Instalacion INSTRUCTION MANUAL Quita el accesorio de la base de montaje. Artefacto LED a Prueba de Vapor Instrucciones de Instalacion Montaje al Techo: Tipo 1: Cables por el agujero central. ADVERTENCIAS: Paso 1: Retire la tapa del conducto del Paso 2: Inserte los cables del circuito a través Paso 3: Taladre dos agujeros e instale la base agujero central. -
Page 4: Montaje A La Pared
Montaje a la pared: Montaje al Techo Tipo 2: Cabled del conducto. Tipo 2: Cables del Conducto. Paso 1: Taladre dos agujeros e instale la Paso 2: Inserte el conducto de alambre en la Paso 1: Apriete el agujero de abajo y Paso 2: Inserte el conducto de alambre en la base de montaje. -
Page 5: Montage Au Plafond
COMMERCIAL SERVICE Préparation pour l’installation INSTRUCTION MANUAL Retirer le luminaire du socle de montage. Luminaire LED étanche à la vapeur Consignes d’installation Montage au plafond: Type 1: Câbles du trou centrr AVERTISSEMENTS: Étape 1: Retirer le capuchon de tuyau du trou Étape 2: Le câble est d’abord enfilé... -
Page 6: Montage Mural
Montage au plafond: Montage mural: Type 2: Câbles de conduite Type 2: Câbles de tuyau Étape 1: Percer deux trous et installer le Étape 2: Insérer la conduite de câbles dans le Étape 1: Serrer le socle de montage avec le Étape 2: Insérer la conduite de câbles dans socle de montage trou inférieur et l’aligner avec le trou supérieur.