Table of Contents
Advertisement
Quick Links
Advertisement
Table of Contents

Related Manuals for Datavideo PTR-10 MARK II

Summary of Contents for Datavideo PTR-10 MARK II
- Page 1 ROBOTIC PAN TILT HEAD PTR-10 MARK II Instruction Manual...
-
Page 2: Table Of Contents
Table of Contents FCC COMPLIANCE STATEMENT ...................... 4 WARNINGS AND PRECAUTIONS ..................... 4 WARRANTY ........................... 5 ..........................5 TANDARD ARRANTY ..........................5 HREE ARRANTY DISPOSAL ............................6 PRODUCT OVERVIEW ......................7 1.1 F ............................7 EATURES 1.2 S ..........................7 YSTEM IAGRAM SYSTEM OVERVIEW ........................ - Page 3 Disclaimer of Product & Services The information offered in this instruction manual is intended as a guide only. At all times, Datavideo Technologies will try to give correct, complete and suitable information. However, Datavideo Technologies cannot exclude that some information in this manual, from time to time, may not be correct or may be incomplete.
-
Page 4: Fcc Compliance Statement
7. This product should only be operated from the type of power source indicated on the marking label of the AC adapter. If you are not sure of the type of power available, consult your Datavideo dealer or your local power company. -
Page 5: Warranty
The product warranty period beings on the purchase date. If the purchase date is unknown, the product warranty period begins on the thirtieth day after shipment from a Datavideo office. All non-Datavideo manufactured products (product without Datavideo logo) have only one year warranty from the date of purchase. -
Page 6: Disposal
The three-year warranty must be registered on Datavideo's official website or with your local Datavideo office or one of its authorized distributors within 30 days of purchase. Disposal For EU Customers only - WEEE Marking This symbol on the product or on its packaging indicates that this product must not be disposed of with your other household waste. -
Page 7: Product Overview
1. Product Overview Datavideo’s brand new PTR-10 MARK II is a robotic pan-tilt head that is designed to turn any small size video cameras or block cameras into a PTZ camera. A sleek design fits seamlessly in your studio. With its weight of 3.4 Kg, it can be placed on the heavy- duty tripod or mounted on the wall and ceiling which bring up a lot of flexibilities for your video production. -
Page 9: System Overview
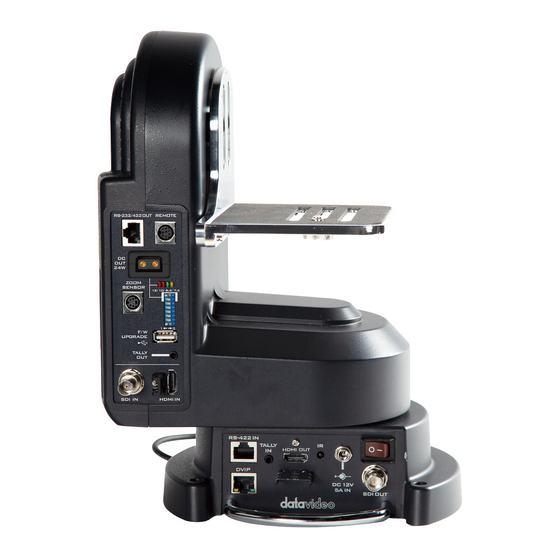
2. System Overview... - Page 10 Device power ON/OFF D-tap DC OUT 24W The D-tap connector supplies DC power to the camera. Note: A D-tap-to-DC5.5 cable accompanying the PTR-10 MARK II is designed for supplying power to Datavideo’s block cameras. LED Indicators The LED indicators represent different output voltages that the DC 8.4V...
- Page 11 RS-232 or RS-422 interface, which is selectable through the menu. DVIP DVIP port connects the PTR-10 MARK II to an Ethernet switcher or router for remote control. An example of the controller utilizing DVIP port is RMC-300A. See the section on...
- Page 12 IR Receiver Operate the PTR-10 MARK II by an IR remote control. Firmware Upgrade / Device Configuration F/W Upgrade For upgrading to the latest firmware Firmware Update DIP Switch For configuring the PTR-10 MARK II. DIP Switch...
-
Page 13: Connections
3. Connections Before starting to use your robotic pan tilt head, make sure you have connected the power and camera video. 3.1 Power DC 12V/5A IN DC in socket connects the supplied 12V/5A PSU. The connection can be secured by screwing the outer fastening ring of the DC In plug to the socket. -
Page 14: Control Functions
To control the camera mounted on PTR-10 MARK II using the camera controller, first connect one of the RJ-45 ports provided on the controller rear to PTR-10 MARK II’s RS-422 IN port via an RJ-45 cable. Then depending on the protocol used, either connect PTR-10 MARK II to the camera via the Remote... - Page 15 White/Brown White/Brown Brown Brown Please note that bit 4 of the DIP switch on PTR-10 MARK II devices must be set to OFF prior to establishing physical connection. See the DIP Switch section for detailed information. For operations of specific controller, see the relevant user manual.
-
Page 16: Dvip
In the second diagram, the Showcast 100 4K ShowCast Streaming Studio communicates with the PTR-10 MARK II devices through a switch hub. PTR series device usually has a default static IP address of 192.168.100.XXX. Using an RJ-45 Ethernet cable, the unit can be directly connected to a Windows-based computer assigned of an IP address... -
Page 17: Remote Out
In the OSD menu, there are four connection modes available in the Remote OUT Mode option for the user to select in order to connect your PTR-10 MARK II device to the camera mounted. The four modes of connection are BX Lens, LANC, RS-232C and RS-422. -
Page 18: Remote Port
LanC or BX-Lens LANC If the LANC mode is enabled, connect the Remote port of PTR-10 MARK II to the camera’s 2.5 mm earphone jack via a remote cable. The remote cable is an 8pin mini-din to 2.5mm phone jack cable as depicted below. - Page 19 20.8 W 24V* XF405 Canon 8.4 W 8.4V XF305 Canon 8.5 – 8.9 W 8.4V XLH1 Canon 7.8 W 7.4V XHG1 Canon 7.1 – 7.3 W 7.4V *Use the camera’s power supply instead of the power supplied by PTR-10 MARK II.
-
Page 20: Bx-Lens
If either of the RS-422 and RS-232 modes of connection is selected in Remote Out Mode, you may mount Datavideo’s BC-80 or BC-200 on the PTR-10 MARK II and use a custom made RJ-45 cable to establish physical connection. See below for pinout information. -
Page 21: Tally
4.4 Tally Two tally sockets can be found on your PTR series device. Tally IN receives tally information from external devices such as a video switcher. Tally OUT delivers tally information to the mounted camera. Tally Light Definitions Message On Air/Live Standby/Cued Free/Safe Light... -
Page 22: Ir Remote Control
4.5 IR Remote Control Operates PTR-10 MARK II by an IR remote control. -
Page 23: Function Descriptions
Recalling Group The PTR-10 MARK II is equipped with 8 groups. To recall a group, first press the number keys to select a group number (1-8) then press the GROUP button to enable it. - Page 24 Buttons Descriptions Press CAMERA SELECT (CAM 1~ CAM4) buttons to navigate between four cameras assigned of the CAM ID previously. Various combinations of settings (position, zoom, focus, gain control and iris control) can be saved to presets using the number keypad.
- Page 25 Buttons Descriptions Adjust Pan/ Tilt Speed P/T Speed Press SPEED + / - button to switch to adjust Pan/Tilt speed (up/down). Make the subject appear brighter Adjust the iris opening (aperture), to control the amount of light Auto Iris Control coming through the lens (i.e.
-
Page 26: Osd Menu
Press button 1/2/3/4 to switch between different speeds with 1 being the highest and 4 being the lowest. Standby Button Press to enter PTR-10 MARK II into standby mode and press again to wake the device from standby mode. OSD Menu The OSD menu allows you to modify various device settings such as pan and tilt and control protocols. - Page 27 Main Options Set Motor Memory Video Mode Remote Control System Reset P/T Escape 4. Tilt 4. Reset 4. Group-3 4. Escape 4. Set DVIP Torque 5. Pan 5. Update 5. Group-4 5. Set IR Offset Software 6. Set Remote 6. Tilt Offset 6. Group-5 6.
- Page 28 First Level Second Level Third Level Fourth Level Sub-Option Main Options Sub-Options Parameters Parameters Description +3.6 +2.7 +1.8 +0.9 -0.9 -1.8 -2.7 -3.6 -4.5 -5.4 -6.3 7. PAN Min Limit -170 – -1 8. PAN Max Limit +1 – +170 9.
- Page 29 First Level Second Level Third Level Fourth Level Sub-Option Main Options Sub-Options Parameters Parameters Description GROUP – 5 GROUP – 6 GROUP – 7 GROUP – 8 ESCAPE 17. ESCAPE PRESET NO. 1~50 ITEM ON/OFF ON/OFF SPEED LIMIT 1~18 WAITING TIME 0~180 NEXT ITEM RETURN...
- Page 30 First Level Second Level Third Level Fourth Level Sub-Option Main Options Sub-Options Parameters Parameters Description GROUP – 3 GROUP – 4 GROUP – 5 GROUP – 6 GROUP – 7 GROUP – 8 ESCAPE 17. ESCAPE PRESET NO. 1~50 ITEM ON/OFF ON/OFF SPEED LIMIT 1~18...
- Page 31 First Level Second Level Third Level Fourth Level Sub-Option Main Options Sub-Options Parameters Parameters Description GROUP – 1 GROUP – 2 GROUP – 3 GROUP – 4 GROUP – 5 GROUP – 6 GROUP – 7 GROUP – 8 ESCAPE 17.
- Page 32 First Level Second Level Third Level Fourth Level Sub-Option Main Options Sub-Options Parameters Parameters Description RS-232C RS-422 9600 19200 Remote Out Baud Rate 38400 115200 Remote Out ID 1–7 ESCAPE 7. PTZ INFO. Output ON/OFF 8. Escape PAN OSD ON/OFF TILT OSD ON/OFF P/T OSD...
-
Page 33: Dip Switch
5. DIP Switch The DIP Switch can be found on one of the system panels and allows the user to set the device’s VISCA ID, enable remote control (DVIP or RS-422), configure the OSD menu size, and select the DC output. -
Page 34: Firmware Update
6. Firmware Update Datavideo usually releases new firmware containing new features or reported bug fixes from time to time. Customers can either download the firmware as they wish or contact their local dealer or reseller for assistance. This section outlines the firmware upgrade process which should take approximately few minutes to complete. -
Page 35: Frequently-Asked Questions
7. Frequently-Asked Questions This section describes problems that you may encounter while using PTR-10 MARK II. If you have any questions, please refer to related sections and follow all suggested solutions. If problem still exists, please contact your distributor or the service center. -
Page 36: Dimensions
8. Dimensions PTR-10 MARK II All measurements in millimeters (mm) -
Page 37: Specifications
9. Specifications Product Name Robotic Pan Tilt Head Model Number PTR-10 MARK II HDMI x 1 Video I/O Interface SDI x 1 2160p 29.97/25 1080p 59.94/50 Video Output Format 1080i 59.94/50 720p 59.94/50 RMC-180 / RMC-300A RMC-300C ShowCast 100 Supported Controller... - Page 38 Storage Humidity 5 – 80% Weight 3.4 Kg Dimensions (LxWxH) 230 x 190 x 300 mm ZEK-1 WM-10 Optional Accessories WM-11 CM-10...
- Page 39 Notes...
-
Page 40: Service And Support
Jan-10.2021 Datavideo Technologies Co., Ltd. All rights reserved 2020 Version E1...