Advertisement
Quick Links
RPK5-GM4102
Overview
The RPK5-GM4102 is a complete radio replacement kit with integrated climate control retention for the 2010-2015 Chevrolet Camaro. This
kit comes equipped with factory style HVAC control knobs for a factory look and experience. To add to the factory look and experience, the
exterior temperature display is retained by a small OLED display at the top of the kit retaining this valuable vehicle feature. This kit also
includes all of the modules and cables needed to retain all of the important features of the factory system such as OnStar, factory warning
chimes, factory Bluetooth, steering wheel mounted radio controls, factory reverse camera, factory amplifier (if equipped), factory AUX jack
(if equipped) and the factory USB port (if equipped). The RPK5-GM4102 also provides data bus driven outputs such as retained accessory
power (RAP), vehicle speed sensor (VSS), illumination, reverse trigger and parking brake. Use of this interface also allows you to program
two radio functions to each SWC button by using short press long press dual command functionality.
Important Notes
1. These instructions only apply to R.2.5.6.3 or later revisions of the RP5 interface. The revision info can be found on a small white sticker on the
interface.
2. The center inserts on the control knobs are made to install once! They are not easily removable / swappable. Please ensure you have selected
the correct inserts for your installation before snapping the inserts into the control knobs.In the event that the center inserts need to be removed,
see the troubleshooting section on page 9.
3. For vehicles with heated seats: When installing the center caps, you need to first install the light pipes. They are keyed so they will only fit one
way. Pay close attention to the shape and orientation of the light pipes to ensure correct lighting.
4. When discussing the control knobs, we will refer to "Left" indicating the driver side, and "Right" indicating the passenger side.
5. It is recommended that the user's phone(s) be "Unpaired" from the factory Bluetooth. This will ensure the user's phone will always pair to the
aftermarket radio's bluetooth.
6. Once the radio has been removed, the vehicle settings which are normally selected through the factory radio can be accessed using the
PAC-UP along with the PAC Vehicle Settings program (for windows PC), which can be downloaded here: http://www.pac-audio.com/
firmware.
7. The Answer/Voice and End/Mute buttons can be set to control the factory OnStar functions, or to control the aftermarket radio. This option can
be found in the PAC Vehicle Settings program mentioned above in note one. The default setting for these buttons is to control the factory OnStar.
If these buttons are set to control the aftermarket radio, OnStar can still be accessed by using the mirror controls.
8. The radio replacement interface comes pre-programmed for all of the vehicle's factory SWC functions and does not require programming unless
you wish to re-assign the SWC functions or utilize the short press long press dual command functionality. The SWC can always be restored to
default settings by pressing and releasing the program button on the side of the interface once and waiting 7 seconds for the LED to flash 4 times.
9. The radio select rotary switch on the side of the interface must be adjusted to the proper radio setting before plugging the interface into the
vehicle (see page 4 for setting chart).
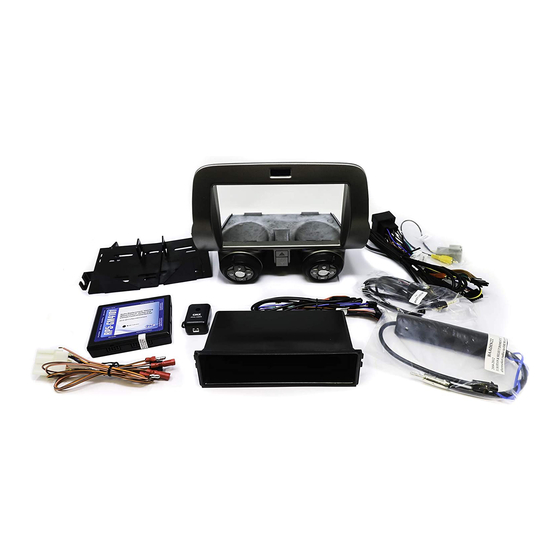
Parts List
The RPK5-GM4102 includes everything you need for a professional installation of an aftermarket radio in your Camaro.
This kit contains:
1. Dash Kit
•
(x1) PAC HVAC Control Panel (including factory style HVAC knobs)
•
(x2) Radio Mounting Brackets (One left and one right)
•
(x1) Pocket (For single DIN applications)
•
(x8) Radio Mounting Screws
2. RP5-GM4101 (Camaro specific radio replacement module)
3. Camaro specific antenna adapter (BAA-DIN22).
4. Reverse camera retention harness for vehicles equipped with the MyLink system.
5. USB retention cable. This cable is compatible with vehicles equipped with the MyLink radios and vehicles equipped with the standard
non-touchscreen radios. It will require that the cable be ran to the back of the center console.
6. AUX retention cable for 2010-2012 vehicles equipped with the standard non-touchscreen radios and a USB port.
Pacific Accessory Corporation
© 2019 AAMP Global. All rights reserved. PAC is a Power Brand of AAMP Global.
Email - support@pac-audio.com - Phone: 727-592-5991
Complete Radio Replacement Kit with Integrated Climate
Control Retention for 2010-2015 Chevrolet Camaro
PAC-audio.com
Rev: R6
Page 1
Date: 010419
Advertisement

Related Manuals for PAC RPK5-GM4102


Summary of Contents for PAC RPK5-GM4102
- Page 1 7. The Answer/Voice and End/Mute buttons can be set to control the factory OnStar functions, or to control the aftermarket radio. This option can be found in the PAC Vehicle Settings program mentioned above in note one. The default setting for these buttons is to control the factory OnStar.
- Page 2 Proceed to the next section to transfer the retention clips from the factory radio control assembly to the PAC HVAC control assembly. © 2019 AAMP Global. All rights reserved. PAC is a Power Brand of AAMP Global. Rev: R6 Page 2 PAC-audio.com...
- Page 3 Dash Panel Assembly To secure the top of the PAC HVAC control assembly into the dash, remove two of the retention clips located on the back side at the top of the factory radio control assembly, and reuse them on the PAC HVAC control assembly.
-
Page 4: Antenna Adapter
PLEASE NOTE: In order to get the best possible sound out of the CMX please mount it in a place free and clear of any obstructions, preferably as close as possible to the bottom of the dash pointing down toward the floor of the vehicle. © 2019 AAMP Global. All rights reserved. PAC is a Power Brand of AAMP Global. Rev: R6 Page 4 PAC-audio.com... - Page 5 Mute button do not have a long press command programmed by default. If you wish to assign dual command functionality to the SWC please follow the programming steps on the next page. © 2019 AAMP Global. All rights reserved. PAC is a Power Brand of AAMP Global. Rev: R6 Page 5 PAC-audio.com...
- Page 6 When finished, the tabs should look like side needs to be trimmed for clearance of the alignment tab. the one below. new HVAC panel © 2019 AAMP Global. All rights reserved. PAC is a Power Brand of AAMP Global. Rev: R6 Page 6 PAC-audio.com Date: 010419 Email - support@pac-audio.com - Phone: 727-592-5991...
- Page 7 1. Connect the RPK5-GM4101-KIT-HAR to the vehicles white 20-pin connector that was originally connected to the factory HVAC control panel. 2. Connect the 8-pin Black Micro-fit Molex connector to the circuit board mounted to the back side of the PAC HVAC control module.
- Page 8 1. Connect the RPK5-GM4101-KIT-HAR to the vehicles white 20-pin connector that was originally connected to the factory Radio control panel. 2. Connect the 8-pin Black Micro-fit Molex connector to the circuit board mounted to the back side of the PAC HVAC control module.
- Page 9 (remove and apply power to kit). Displaying the Firmware Version of the PAC HVAC Control Panel: Press and hold the recirculation button for 5 seconds to display the firmware version of the PAC HVAC control panel. Changing the Splash Screen: Press and hold the rear defrost button for 5 seconds to change the splash screen that is shown when the kit powers up.