Advertisement
Quick Links
QUICK START GUIDE
1. Install 4 AAA Batteries
2. To turn the radio on, press and hold the MENU/POWER
Button for 3 seconds
3. To select a channel, press and release the MENU button
once, then press the
UP/CALL or DOWN/LOCK buttons to select 1 of the 22
FRS channels
* Press the PTT button to exit the MENU
4. Press and hold the PTT button to talk
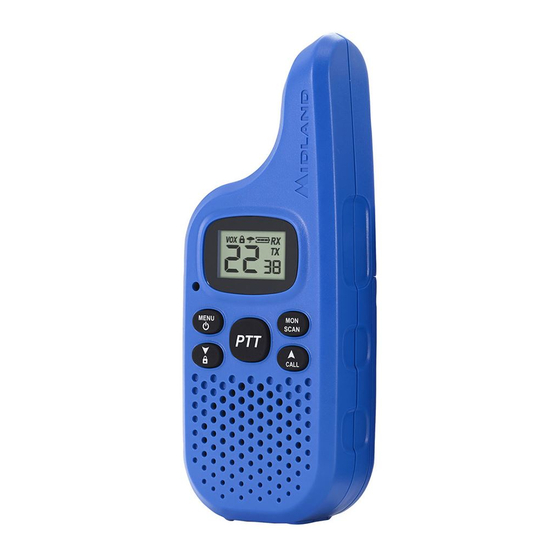
LCD DISPLAY
1. CHANNEL NUMBER – Changes from
1~22 on FRS band (1~10 on Weather
Band).
2
3 4
5
2. VOX ICON – Indicates when VOX mode
is active.
3. KEY LOCK ICON – Indicates KEY LOCK
6
mode is on.
4. NOAA WEATHER (WX) BAND ICON –
7
1
Indicates when the radio is in Weather
Band mode.
8
5. BATTERY METER – Indicates the battery
level.
6. RECEIVE (RX) ICON – Indicates radio is
receiving a transmission.
7. TRANSMIT (TX) ICON – Indicates radio
is transmitting a signal.
8. PRIVACY CODE – Indicates Privacy
Code selected by user (oF~38).
9. MIC – Built-in microphone.
16
10. MENU/Power Button – Press to enter
the Menu mode. Press and hold to turn
the radio on/off.
11. PTT Button – Press and hold to transmit
voice communication.
12. DOWN/LOCK Button – Press to adjust
9
the volume, or to scroll through the menu.
MENU
MON
15
10
Press and hold to lock the keypad
SCAN
11
PTT
13. SPEAKER – Built-in speaker.
12
14
CALL
14. UP/CALL Button – Press to adjust the
volume, or to scroll through the menu.
Press and hold to send a call tone
13
15. MONITOR/SCAN Button – Press to
enter SCAN mode. Press and hold to
enter MONITOR mode.
16. ANTENNA
ABOUT RANGE
Your radios are designed to give you maximum range under optimum
conditions.
Optimum Conditions are:
* Over water
* Open rural areas without obstructions
* Flat areas where you can see the other person
To ensure you get maximum range:
* Be sure to use fresh batteries - low batteries will cause reduced range.
MONITOR
Pressing and holding the MONITOR/SCAN button for 3 seconds will let you hear
noise so you can adjust the volume level of the radio when not receiving a signal.
This could also be used to check any activity on your current channel before
transmitting. Press and hold the MONITOR/SCAN button for 3 seconds again to
get out of MONITOR mode.
CALL ALERT
Your radio can transmit a call alert. To send a call alert, press the
UP/CALL button for 3 seconds. The TX icon will appear while transmitting a call
alert and a tone can be heard on the speaker for confirmation.
KEYPAD LOCK
To avoid accidentally changing the radio setting, press the DOWN/LOCK button for
3 seconds. The icon will appear on the display. The PTT and CALL buttons will still
be active. Repeat the same procedure to unlock the keypad.
SCAN
Your radio can scan all 22 channels for activity. To enter scan mode press and
release the MONITOR/SCAN button. Repeat the same procedure to exit. Your ra-
dio will rapidly scan each of the 22 channels and stop on any active channel for 6
seconds before resuming scan. When you press the PTT button to transmit on an
active channel, the scanning function will stop and remain on the active channel.
To resume scanning, press and release the MONITOR/SCAN button.
* If the UP/CALL button or the DOWN/LOCK button are pressed while the radio
is scanning, the scan direction will change to increasing or decreasing
depending on which button was pressed.
* If a CTCSS code is currently set for a channel, that specific channel will be
scanned with the CTCSS code that was set
T20 SERIES MENU Quick Reference Chart
MENU
Channel
VOX
CTCSS
oF/1/2/3
1~22
oF~38
WX Channel
Press and hold the down
and up buttons for 3
seconds
1~10
CHANNEL SELECTION (FRS BAND)
Press the MENU button once, and then press the UP/CALL or
DOWN/LOCK buttons to select one of the 22 FRS channels. To confirm the
selection, press the PTT button or press the MENU button again to move to the
next feature setting.
SETTING PRIVACY CODES
Your radio has 38 Privacy Codes available. The selected Privacy Code may be
different for each channel. To select a Privacy Code for the current channel press
the MENU button twice, and then press the UP/CALL or DOWN/LOCK buttons to
select one of the 38 CTCSS Codes. The Privacy
Code icon on the display will indicate the CTCSS code that was selected. To con-
firm the selection, press the PTT button or press the MENU button again to move
to the next feature setting.
Note: Selecting a Privacy Code of "oF" will disable the Privacy feature. To
communicate between two radios, all radios in your group must be set to the
same channel and/or Privacy Code selections.
VOX
To set VOX, press the MENU button until the display shows "VOX." A flashing icon
will appear to the right of the CHANNEL NUMBER. Select "oF/1~3" by pressing
the UP/CALL or DOWN/LOCK buttons, with 1 being the most sensitive. Push the
PTT key, or press the MENU button again to move to the next feature setting.
ROGER BEEP (end of transmission) TONE
When the PTT button is released, the radio will beep to confirm to other users that
your transmission has finished. To set the ROGER BEEP tone, press the MENU
button until the display shows an "rb" icon. Select "on" or "oF" by pressing the UP/
CALL or DOWN/LOCK buttons. Push the PTT key to exit, or press the MENU
button to move to the next feature setting.
SILENT OPERATION
Your radio has a SILENT OPERATION mode. In this mode, all "beeps" and "tones"
are disabled. To set SILENT OPERATION, press the MENU button until the
display shows a "bP" icon. Select "on" or "oF" by pressing the UP/CALL or DOWN/
LOCK buttons. Push the PTT key to exit, or press the MENU button to move to
the next feature setting.
NOAA WEATHER RADIO
Your radio has a NOAA WEATHER RADIO function to enable the user to receive
weather reports from designated NOAA stations. To turn the NOAA WEATHER
RADIO on, press and hold the DOWN/LOCK and the UP/CALL buttons for 3
seconds while in FRS mode. The radio will go to the Weather Band mode. To set
the channel in Weather Mode, press the MENU button, the display will show the
current WX Band channel. While in WX Band mode press the UP/CALL or DOWN/
LOCK buttons to select one of the 10 NOAA WEATHER (WX) BAND channels.
To confirm, press the PTT button or press the MENU button to move to the next
feature setting. To turn the NOAA WEATHER RADIO off, press the PTT button.
The current FRS radio setting will be displayed and the Weather icon will go off,
unless alert is set.
NOAA WEATHER ALERT
Your radio has a NOAA WEATHER ALERT function, to enable you to automati-
cally receive weather alerts from designated NOAA stations. To turn the NOAA
WEATHER (WX) ALERT on while in Weather Radio mode, press the MENU button
twice while in Weather Radio mode. The display shows "AL," while on the right
an "oF" icon appears blinking. Select "on" by pressing the UP/CALL or DOWN/
LOCK buttons. To confirm, press the PTT button or press MENU button. The radio
will return to Weather Radio mode and the icon will continue blinking. If the radio
receives a WX ALERT signal from a designated NOAA station while in FRS Radio
mode, the radio will beep for 20 seconds while the display will automatically switch
to Weather Radio mode. To turn the NOAA WEATHER (WX) ALERT off, press the
MENU button twice while in Weather Radio mode. The display shows "AL," while
on the right an "on" icon appears blinking. Select "oF" by pressing the UP/CALL
or DOWN/LOCK buttons. To confirm, press the PTT button or press the MENU
button.
Roger Beep
Silent Operation
BATTERY LEVEL INDICATOR
Your radio has a BATTERY LEVEL METER that shows the battery power level.
On/O
On/O
The greater the number of bars visible, the stronger the battery level. When the
battery level is low, the Battery Shell icon will flash in the display indicating your
WX Alert
batteries should be replaced.
o 3 Bars = Full Ba�ery
On/Off
o 2 Bars = 2/3 Ba�ery
o 1 Bar = 1/3 Ba�ery
o No bar = ba�ery low
POWER ON/OFF AND VOLUME
Press the POWER/MENU button for at least 3 seconds to turn the radio on/off.
During Power On, the radio will beep once, the LCD will display all icons for 1
second and then the LCD display will indicate the last channel selected.
To increase/decrease the volume level, press the up or down arrow buttons during
RX or STANDBY mode
RESTORING YOUR RADIO TO THE ORIGINAL SETTING
To reset your radio to the original (default) setting, turn on the radio while pressing
and holding the PTT button. The LCD display will reset to standby mode on chan-
nel 1 with no Privacy Code, VOX Off, Roger Beep On, and Key Beep On.
TRANSMITTING AND RECEIVING A CALL
To communicate, all radios in your group must be set to the same channel and/or
Privacy Code.
1. For maximum clarity, hold the radio at least 1 inch (2.5 cm) from your mouth.
2. Press and hold the PTT button and speak in a normal voice into the
microphone. The TX icon will appear continuously on the LCD display while
transmitting.
3. To receive a call, release the PTT button. The RX icon will appear on the
display when your radio is receiving a transmission.
This device complies with Part 15 of the FCC Rules. Operation is subject to the
following two conditions: (1) this device does not cause harmful interference, and
(2) this radio must accept any interference that may cause undesired operation.
To maintain compliance with FCC's RF exposure guidelines, for body-worn
operation, this radio has been tested and meets the FCC RF exposure guidelines
when used with Midland Radio Corp. accessories supplied or designated for
this product. Use of other accessories may not ensure compliance with FCC RF
exposure guidelines.
T20 Series
(Flashing)
Advertisement

Related Manuals for Midland T20 Series


Summary of Contents for Midland T20 Series
- Page 1 LOCK buttons. Push the PTT key to exit, or press the MENU button to move to transmitting. Press and hold the MONITOR/SCAN button for 3 seconds again to when used with Midland Radio Corp. accessories supplied or designated for the next feature setting.
- Page 2 - 22 FRS Channels PROBLEM SOLUTION option without charge, any Midland FRS transceiver which fails due to a defect in material or work- - 38 Privacy Codes (CTCSS) manship within One Year following the initial consumer purchase. This warranty does not apply to...