Table of Contents
Advertisement
Quick Links
Advertisement
Table of Contents

Related Manuals for ACRONIS Cyber Appliance 15031

Summary of Contents for ACRONIS Cyber Appliance 15031
- Page 1 Acronis Cyber Appliance Quick Start Guide October 6, 2020...
- Page 2 Copyright ©Acronis International GmbH, 2003-2020. All rights reserved. ”Acronis” and ”Acronis Secure Zone” are registered trademarks of Acronis International GmbH. ”Acronis Compute with Confidence”, ”Acronis Startup Recovery Manager”, ”Acronis Instant Restore”, and the Acronis logo are trademarks of Acronis International GmbH.
-
Page 3: Table Of Contents
..........23 6. Configuring Acronis Cyber Infrastructure and Acronis Cyber Backup . - Page 4 7. Getting technical support ..........34 8.
-
Page 5: About Acronis Cyber Appliance
file storage, including a local repository for cloud backups. You can also deploy Acronis Cyber Backup in the Acronis Cyber Infrastructure compute cluster, and have both the storage and the backup server running on Acronis Cyber Appliance. -
Page 6: Acronis Cyber Appliance Exterior
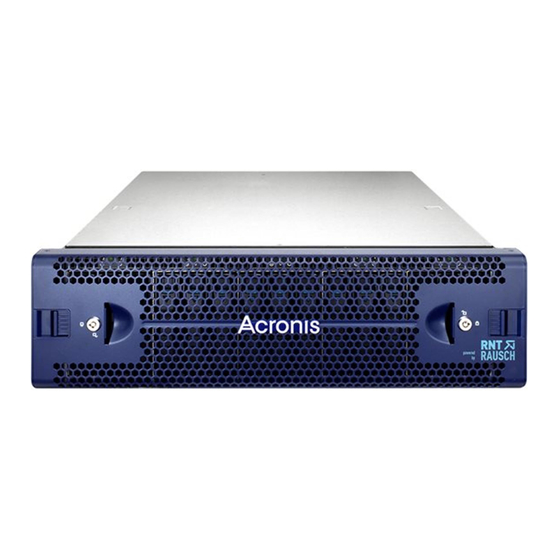
1.1 Acronis Cyber Appliance exterior Acronis Cyber Appliance consists of five identical nodes. On the front of the appliance, under the front bezel are the power/reset buttons, a power LED of each node, as well as the main power switch. The front panel also provides access to the disks for each node: three per node, ordered left to right, that is, the leftmost three disks are for node #1, the next three are for node #2, etc. - Page 7 The USB and VGA ports allow you to connect a keyboard and a monitor to a node if the network is unavailable. Day-to-day management of Acronis Cyber Appliance is done over the network through the admin panel, as described later in the guide.
-
Page 8: Safety Instructions
CHAPTER 2 Safety instructions Warning: Acronis Cyber Appliance may only be repaired by a certified service technician. You may only perform troubleshooting as authorized by the support team. Damage due to unauthorized repairs is not covered by the warranty. If you need to reset a node to the factory default settings, contact the support, as described in... -
Page 9: Installing Acronis Cyber Appliance
Installing Acronis Cyber Appliance Before installing Acronis Cyber Appliance, make sure you have the following: • 3U of server rack space in a standard 19-inch cabinet • At least five free 1/10 GbE ports in a network switch (10 GbE recommended) •... -
Page 10: Unpacking Acronis Cyber Appliance
3.2 Mounting Acronis Cyber Appliance into rack The appliance comes with a set of server rails. Follow the steps below to install the rail and mount Acronis Cyber Appliance into the rack. 1. Separate the inner and outer rails. - Page 11 Chapter 3. Installing Acronis Cyber Appliance 2. Attach the inner rail to the appliance. Align the rectangular cutouts on the inner rail to the pre-formed bayonets on the side of the chassis. Secure the inner rail with a screw from the standard screw kit after all the bayonets go through the cutouts and properly engage.
- Page 12 Chapter 3. Installing Acronis Cyber Appliance Release safety lock before mounting Push the safety lock forward to secure Uninstall the bracket 4. Mount the chassis into the cabinet. Important: Two people are required to perform this step. Insert the inner rail into the outer rail as shown in the figure.
-
Page 13: Connecting Cables To Acronis Cyber Appliance
3.3 Connecting cables to Acronis Cyber Appliance Note: For more details on configuring the network infrastructure, refer to the Installation Guide. To prepare Acronis Cyber Appliance for configuration, do the following: 1. Connect the appliance to the electrical outlets by using the supplied power cables. - Page 14 Chapter 3. Installing Acronis Cyber Appliance 2. On every node, connect any SFP+ or RJ45 network port (1 on the diagram) to a switch (2 on the diagram) with access to a dedicated subnet for your infrastructure. Then, connect the admin laptop (3 on the diagram) to the same switch.
-
Page 15: Configuring Acronis Cyber Appliance
3. On this computer, open a web browser and visit the default primary node IP address 10.20.20.11. The configuration wizard has been tested to work in the latest Firefox, Chrome, and Safari web browsers. In the wizard, you can create a new cluster or connect the appliance to a cluster already created with Acronis Cyber Infrastructure. -
Page 16: Creating A New Cluster
Chapter 3. Installing Acronis Cyber Appliance 3.4.1 Creating a new cluster 1. Once the configuration wizard is displayed, click Configure. Do not disconnect the appliance until the end of the configuration. 2. Review and accept the license agreement. Then, click Next. - Page 17 Chapter 3. Installing Acronis Cyber Appliance • A virtual IP address at which you will access the admin panel. You can read more about its high availability in the Enabling Management Node High Availability. • New host names for all nodes (or leave the default names). Each node must have a unique name.
- Page 18 8. Click Submit. The configuration will begin, as indicated on the progress bar. 9. Wait until the progress bar reaches the end. If you changed the nodes’ default IP addresses, assign a static IP address from the nodes’ new subnet to the admin laptop from which you can access Acronis Cyber Appliance.
-
Page 19: Joining The Existing Cluster
Chapter 3. Installing Acronis Cyber Appliance 3.4.2 Joining the existing cluster You can connect the appliance to the existing Acronis Cyber Infrastructure cluster. For this, you will need the private IP address of the management node and the administrator credentials for the existing cluster. After the appliance is configured, all five nodes will be added to and managed from the admin panel of the existing... - Page 20 Chapter 3. Installing Acronis Cyber Appliance 4. Under Configure network parameters, enter the following: • A network mask. Consult your network administrator for the proper network/subnet mask. • New host names for all nodes (or leave the default names). You can rename the nodes to fit your organization’s naming policies.
- Page 21 5. Under Join existing cluster, enter the private IP address of the management node and the administrator password of the existing cluster. 6. During the deployment, the Acronis Cyber Infrastructure versions are compared in the existing cluster and in the appliance. If there are major discrepancies, you will be asked to specify a network configuration for access to the Internet.
-
Page 22: Configuring The Cluster By Using The Admin Panel
Configuring node network interfaces). If you do not have a license, contact your sales representative. 4. Then, you can configure the cluster for using Acronis Cyber Backup (refer to Configuring Acronis Cyber Infrastructure and Acronis Cyber Backup (page 26)), or another desired workload, as described in the Administrator Guide. -
Page 23: Managing Licenses
If no reports have been received for two weeks, the license expires. For reports to reach their destination, the cluster must be able to access the Acronis datacenter that has been used to enable the SPLA. Make sure that TCP port 443 is open. -
Page 24: Installing License Keys
Gateway to these products, you will need to use license keys. Furthermore, Acronis Backup Gateway usage is not counted in the SPLA in Acronis Cyber Infrastructure. The SPLA only counts universal usage that is not related to backup. Backup usage is shown in the Acronis Cyber Backup Cloud section of Acronis Cyber Cloud. - Page 25 Chapter 4. Managing licenses 3. In the Register license key window, paste the license key, and then click Register. 4. Back on the Licenses screen, click Activate if you are activating from a trial, or select one of the following: •...
-
Page 26: Installing Spla Licenses
4. In the Register cluster window, accept the license agreement. 5. In the registration confirmation window, click Done. The registered cluster will show up in Acronis Cyber Cloud. You will be able to monitor its resource usage and download reports. -
Page 27: Managing Updates
CHAPTER 5 Managing updates Acronis Cyber Infrastructure supports non-disruptive rolling updates. Cluster nodes are updated one by one, with the data availability unaffected. During the update, the node enters maintenance mode and its workloads and VMs are migrated to other nodes. After the update, the node returns to operation. For more... - Page 28 Chapter 5. Managing updates 2. Click Download in the upper right corner to get the updates. When the updates are downloaded to a node, its update status changes to Ready to install. After the updates have been downloaded for all of the nodes, the button will change to Install.
- Page 29 Chapter 5. Managing updates downtime. Or you can force the update on the listed nodes at once. In the latter case, the nodes in question will be rebooted, potentially causing a downtime of services running on them. After the update is complete, the node statuses will change to Up to date. To update the kernel with ReadyKernel, refer to Updating kernel with ReadyKernel.
-
Page 30: Configuring Acronis Cyber Infrastructure And Acronis Cyber Backup
Appliance” virtual machine in Acronis Cyber Infrastructure. You can then connect your Acronis Cyber Appliance cluster to Acronis Cyber Backup as a storage backend. As a result, you will have both the storage and the backup server running on Acronis Cyber Appliance. -
Page 31: Deploying The Acronis Cyber Backup "All-In-One" Appliance Virtual Machine
2. Register your Acronis products, if not done before. For more information, see https://kb.acronis.com/productwebreg. 3. In the Products section, locate the Acronis Cyber Backup download links. For more information, refer to https://kb.acronis.com/latest. 4. Download AcronisBackup_All-in-One_Appliance.zip. 5. Extract AcronisBackupAppliance.iso. -
Page 32: Deploying The Acronis Cyber Backup "All-In-One" Appliance
Chapter 6. Configuring Acronis Cyber Infrastructure and Acronis Cyber Backup 6.2.2 Deploying the Acronis Cyber Backup “All-in-One” Appliance The Acronis Cyber Backup “All-in-One” Appliance is a pre-configured virtual machine that you deploy in Acronis Cyber Infrastructure. For more information about the appliance, refer to Acronis Backup appliance. - Page 33 9. On the Compute > Virtual machines > Virtual machines tab, select the created virtual machine. Then, click Console and install the Acronis Backup OS by using the built-in VNC console. 9.1. On the initial installer screen, select Install or update Acronis Backup and press Enter.
-
Page 34: Creating Backup Gateway
To install the full Acronis Cyber Backup license, refer to https://kb.acronis.com/content/59467. 6.3 Creating Backup Gateway 1. In the Acronis Cyber Infrastructure admin panel, navigate to Storage Services, and then to Backup Storage. Here, you can see all of the nodes in the storage cluster that can be used as backup destinations. -
Page 35: Performing Backup Operations
Before you can back up a machine, you must install a backup agent. Agents are applications that perform data backup, recovery, and other operations on the machines managed by Acronis Cyber Backup. Choose an agent, depending on what you are going to back up. For more information, see the full list of... -
Page 36: Configuring A Backup Plan
Chapter 6. Configuring Acronis Cyber Infrastructure and Acronis Cyber Backup 6.4.2 Configuring a backup plan A backup plan is a set of rules that specify how data will be protected on a given machine. To create a backup plan, follow the steps: 1. - Page 37 Chapter 6. Configuring Acronis Cyber Infrastructure and Acronis Cyber Backup 5. Click Done. 6. Click Create to create a new plan. To run an existing backup plan, click Run now. For detailed information on how to configure and use Acronis Cyber Backup, see the product documentation.
-
Page 38: Getting Technical Support
4. Choose how you would like to contact the support team: via e-mail or phone. Please be ready to provide support engineers with remote access to your Acronis Cyber Appliance, per your Service Level Agreement. To maintain security, it is recommended to whitelist only specific IP addresses communicated to you by support engineers and to block external access from any other addresses. - Page 39 Chapter 7. Getting technical support For information on Acronis Cyber Appliance warranty, see the Support section at https://www.acronis.com/en-us/support/hwappliancesupport.
-
Page 40: Appendix: Specifications
CHAPTER 8 Appendix: Specifications This chapter lists the technical and environmental specifications of Acronis Cyber Appliance. 8.1 Technical specifications The following table lists Acronis Cyber Appliance hardware parts. Chassis 3U, 435x130x600 mm (WxHxD), 34.5 kg Intel Atom C3958 @ 2.00GHz, 16 cores, 31W TDP, VT-d support, w/o... -
Page 41: Power Supply Specifications
* Tested at 230 Vac, 50 Hz and 115 Vac, 60 Hz. The input power factor is greater than values in the table at power supply’s rated output and meets Energy Star® requirements. 8.2 Environmental specifications Acronis Cyber Appliance environmental specifications are listed in the following tables. Store temperature -40°C to 85°C (-40°F to 185°F) Store temperature gradient 20°C (68°F) per hour... -
Page 42: Air Quality Requirements
Chapter 8. Appendix: Specifications Table 8.2.1 – continued from previous page Relative humidity percentage range for storage 10% ~ 95% (non-condensing) Relative humidity percentage range for operating 10% ~ 85% (non-condensing) Vibration for storage 1.87 Grms (10-500 Hz) Vibration for operating 0.26 Grms (5-350 Hz) Shock for storage 65G for 2ms...