
Related Manuals for Rollei Studioblitz 400


Summary of Contents for Rollei Studioblitz 400
- Page 1 Studioblitz 400 Professioneller Studioblitz Pro Studio Flash Unit Anleitung | Instructions in German | English | French | Spanish | Italian | Dutch www.rollei.de...
-
Page 2: Table Of Contents
Conformité . . . . . . . . . . . . . . . . . . . . . . . . . . . . . . . . . . . . 33 www.rollei.com... - Page 3 Studio Flash 400 Contenido Notas de seguridad . . . . . . . . . . . . . . . . . . . . . . . . . . . . . . 34 Vista general .
-
Page 4: Sicherheitshinweise
Sicherheitshinweise Danke, dass Sie sich für den Rollei Studioblitz 400 entschieden haben . Bitte lesen Sie die Anleitung sorgfältig . Bewahren Sie sie gut auf und stellen Sie die Anleitung anderen Nutzern zur Verfügung, sofern nötig . Bitte stellen Sie diesen Blitz niemals in einer Umgebung auf, in der dieses Produkt mit brennbaren Flüssigkeiten in Berührung kommen kann . - Page 5 Nehmen Sie selbst keine Reparaturen an dem Blitzgerät vor . Sollte ein Problem auftreten, wenden Sie sich bitte an den Händler, wo Sie das Gerät gekauft haben oder an das Rollei Service Center . Bevor Sie den Blitz nutzen, stellen Sie sicher, dass Sie den Handgriff fest ange- zogen haben um den Blitz auf einem Lampenstativ sicher zu montieren .
-
Page 6: Übersicht
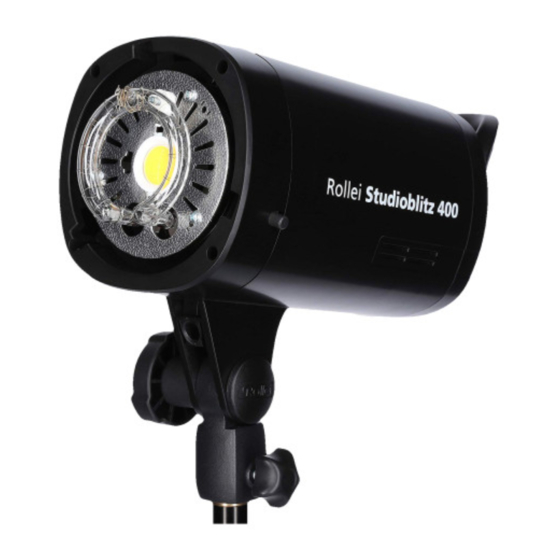
Übersicht DEUTSCH... - Page 7 Übersicht Blitzröhre Einstelllicht / Hinweistöne LED-Einstelllicht Testblitz-Taste Einschub für Reflektorschirm Sync-Anschluss Entriegelungstaste für Zubehör Set Taste / Mask Pattern Modus / Befestigungsschraube für Fotozelle Lampenstative Kabellose Steuerung Blitzleistung (+) Ein-/Ausschalter Blitzleistung (–) Feinsicherung Infrarotsensor Blitzkopfverriegelung Display Gruppe A/B/D/E/F/G/H/J Hinweistöne Kabellose Steuerung Fotozelle aktiv Blitzleistung M: 1 .0 –...
-
Page 8: Kabellose Steuerung
Kabellose Steuerung Dücken Sie die Taste „Kabellose Steuerung” (13) um verschiedene Funksender zu aktivieren, navigieren Sie mit der „+” (6) und „–” (7) Taste durch die verschiedenen Einstellungen . Kabellose Steuerung: C: Kabellose Canon* Steuerung (der Blitz kann über den optional erhältlichen Canon* Transmitter gesteuert werden) N: Kabellose Nikon* Steuerung (der Blitz kann über den optional erhältlichen Nikon* Transmitter gesteuert werden) - Page 9 Kabellose Steuerung Fotozelle Drücken Sie die „Set Taste” (12) und die Taste „Kabellose Steuerung” (13) gleichzeitig für 2 Sekunden, um die Fotozellen-Funktion zu aktivieren oder zu deaktivieren . Wenn die Funktion aktiv ist, wird das entsprechende Zeichen im Display angezeigt . Der Blitz ist dann in der Lage einen Blitz abzufeuern, sobald ein anderer Blitz einen Lichtim- puls abgibt .
- Page 10 Kabellose Steuerung Blitzleistung regulieren Dücken Sie die Taste „+”(6) und „–” (7), um die Blitzleistung einzustellen . Die Blitzleistung kann von 1,0 bis 7,0 eingestellt werden . Die minimale Ausgabeleistung beträgt 1 .0 und die maximale 7 .0 . Für Änderungen von jeweils 0 .1 F-Stop, drücken Sie einmal die „+”(6) oder „–”...
-
Page 11: Bedienung
Bedienung Freistellmodus Mask Pattern Der Mask Pattern Modus wird genutzt um das Hauptmotiv schnell und einfach freizus- tellen mithilfe einer entsprechenden Software (nicht im Lieferumfang enthalten) . Bitte beachten Sie, dass Sie mindestens zwei Blitze benötigen, um die Funktion korrekt und effektiv nutzen zu können . -
Page 12: Technische Daten
Technische Daten Blitzleistung 400 Ws Leistungsregelung 7 Blendenstufen (in 0,1F oder 1,0F Schritten) Leitzahl 66 (bei ISO 100) Einstelllicht 15 W LED Blitzladezeit Ca . 0,9 Sekunden Abbrennzeit Normal: 1/800s – 1/2200s Farbtemperatur 5500 ± 200K Blitzbetrieb M (manuell), Mask Pattern Kanäle | Gruppen 0 –... -
Page 13: Entsorgung
Staaten mit Systemen zur getrennten Samm- lung von Wertstoffen. Altgeräte dürfen nicht in den Hausmüll! Sollte der Rollei Studioblitz 400 einmal nicht mehr benutzt werden können, so ist jeder Verbraucher gesetzlich verpflichtet, Altgeräte getrennt vom Hausmüll, z .B . bei einer Sammelstelle seiner Gemeinde/seines Stadtteils, abzugeben . Damit wird gewährleistet, dass Altgeräte fachgerecht verwertet und negative Auswir-... -
Page 14: Safety Notes
Safety Notes Thank you for choosing the Rollei Studio Flash Unit 400 . Please read the manual carefully . Store it carefully and place it at the disposal of other users if necessary . Please never set up this flash unit in an environment where this product could come into contact with flammable liquids . - Page 15 Safety Notes Do not make repairs to the flash device yourself . If a problem should arise, please contact the dealer, from whom you bought the device, or the Rollei service centre . Before you use the flash unit, make sure that that you have tightened the handle firmly in order to mount the flash unit securely on a lamp stand .
-
Page 16: Overview
Overview ENGLISH... - Page 17 Overview Flash tube Modelling light / signal tones LED modelling light Test flash button Slot for reflector screen Sync connection Release button for accessories Set key / mask pattern mode / Attachment screw for lamp stands infrared slave mode Flash output (+) Wireless control Flash output (–) On/Off switch...
-
Page 18: Wireless Control
Wireless control Press the “Wireless Control” button (13) to activate different radio transmitters, navigate with “+” (6) and “–” (7) buttons to navigate through the different settings . Wireless control: C: Wireless Canon* control (the flash unit can be controlled by means of a Canon* transmitter, which is available as an option) N: Wireless Nikon* control (the flash unit can be controlled by means of a Nikon* transmitter, which is available as an option) - Page 19 Wireless control Infrared Slave Mode Press the Set button (12) and the wireless control button (13) at the same time for 2 seconds to enable or disable the photo cell function . The function is active, the relevant symbol is shown on the display . The flash can then fire a burst as soon as another flash emits a light pulse .
-
Page 20: Operation
Wireless control Regulating the flash power Press the + (6) and – (7) buttons in order to adjust the flash output . The flash power can be set from 1 .0 to 7 .0 . The minimum output is 1 .0 and the maximum is 7 .0 . For changes of 0 .1 f-stops in each case, press the + (6) or –... - Page 21 Operation Mask Pattern Release Mode Mask pattern mode is used in order to release the main subject quickly and easily by means of an appropriate software programme (not included in the scope of delivery) . Please note that you need at least two flash devices in order to be able to use the function correctly and effectively .
-
Page 22: Technical Information
Technical Information Flash Power 400 Ws Flash Power Range 7 stops (in 0 .1F or 1 .0F increments) Guide Number 66 (with ISO 100) Modeling Light 15 W LED Recycle Time Approx . 0 .9 seconds Flash Duration Normal: 1/800s – 1/2200s Temperature 5500 ±... -
Page 23: Disposal
European states with systems for the separate collection of recyclable materials. Old appliances must not be put into the domestic refuse! If the Rollei Studioblitz 400 can no longer be used, then each consumer is legally obliged to dispose of old devices separately from the domes- tic refuse, e .g . -
Page 24: Consignes De Sécurité
Consignes de sécurité Merci d’avoir choisi le flash de studio 400 de Rollei . Merci de lire soigneusement la notice . Conservez-la bien et mettez la notice à disposition des autres utilisateurs, le cas échéant . Ne jamais placer ce flash dans un environnement dans lequel ce produit peut entrer en contact avec des liquides inflammables . - Page 25 N’effectuez vous-même aucune réparation sur le système de flash . Si un pro- blème devait apparaitre, merci de vous adresser au revendeur auprès duquel vous avez acheté l’appareil ou au service après-vente Rollei . Avant d’utiliser le flash, assurez-vous que vous avez fermement resserré la poignée afin d’installer le flash en toute sécurité...
-
Page 26: Aperçu
Aperçu FRENCH... - Page 27 Aperçu Tube-éclair Bouton du flash de test Lumière de mise au point LED Port sync Logement pour parapluie-réflecteur Touche Set / Mode Mask Touche de déverrouillage pour accessoires Pattern / Photocellule Vis de fixation du trépied d‘éclairage Commande sans fil Puissance de flash (+) Interrupteur marche/arrêt Puissance de flash (–)
-
Page 28: Commande Sans Fil
Commande sans fil Appuyez sur la touche « Commande sans fil » (13) pour activer le paramètre, naviguez avec la touche « + » (6) et « – » (7) dans les différents paramètres . Commande sans fil: C: Commande sans fil Canon* (le flash peut être commandé via le transmetteur Canon* disponible en option) N: Commande sans fil Nikon* (le flash peut être commandé... - Page 29 Commande sans fil Photocellule Appuyez simultanément pendant 2 secondes sur la touche « Set » (12) et la touche « Commande sans fil » (13) pour activer ou dés- activer la fonction Photocellule . Si la fonction est activée, le symbole correspondant est affiché...
-
Page 30: Utilisation
Commande sans fil Régulation de la puissance du flash Appuyez sur la touche « + » (6) et « - » (7) pour régler la puissance du flash . La puissance de flash peut être réglée entre 1,0 et 7,0 . La puissance utile minimale s‘élève à... - Page 31 Utilisation Le mode rognage Mask Pattern Le mode Mask Pattern est utilisé pour rogner rapidement et simplement le sujet principal à l’aide d‘un logiciel correspondant (non fourni) . Notez que vous avez besoin au minimum de deux flashs pour utiliser correctement et efficacement la fonction .
-
Page 32: Données Techniques
Données techniques Puissance du flash 400 Ws Réglage de la puissance 7 unités de diaphragme (en pas de 0,1F ou 1,0F) Nombre de guides 66 (ISO 100) Lumière de mise au point 15 W LED Temps de rechargement du flash Environ 0,9 secondes Durée de flash Normal: 1/800s –... -
Page 33: Mise Au Rebut
états européens disposant de système de collecte séparée de déchets recyclables. Les appareils usagers ne font pas partie des déchets ménagers ! Si le Rollei Studioblitz 400 ne devait plus pouvoir être utilisé, chaque consommateur est alors légalement tenu de remettre les appareils usagés séparément des déchets ménagers, par ex . -
Page 34: Notas De Seguridad
Notas de seguridad Gracias por haber decidido la compra del flash de estudio 400 Rollei . Por favor lea las instrucciones cuidadosamente . Guárdelas bien y ponga a disposición el manual a otros usuarios si es necesario . Por favor no coloque este flash en un entorno en el que pueda entrar en contacto con líquidos inflamables . - Page 35 No haga ninguna reparación en la unidad de flash usted mismo . Si se produce un problema, por favor, póngase en contacto con el distribuidor donde compró el equipo o con el Centro de Servicio Rollei . Antes de utilizar el flash, asegúrese de haber apretado bien el mango para montar el flash de forma segura en un trípode de lámpara .
-
Page 36: Vista General
Vista general SPANISH... - Page 37 Vista general Tubo de flash Lámpara de modelado / tonos de Lámpara de modelado LED advertencia Ranura para paraguas de reflector Tecla de flash de prueba Botón de desbloqueo para accesorios Conector de sincronización Tornillo de fijación para trípodes de Tecla de configuración / modo de lámparas patrón de máscara / fotocélula...
-
Page 38: Control Inalámbrico
Control inalámbrico Presione el botón „Control inalámbrico“ (13) para activar la configuración, use los botones „+“ (6) y „–“ (7) para navegar por las diversas configuraciones . Control inalámbrico: C: Control inalámbrico Canon* (el flash se puede controlar a través del transmisor Canon* de compra opcional) N: Control inalámbrico Nikon (el flash se puede controlar a través del transmisor Nikon* de compra opcional) - Page 39 Control inalámbrico Fotocélula Presione el „Botón de configuración“ (12) y el botón „Control inalámbrico“ (13) simultáneamente durante 2 segundos para activar o desactivar la función de fotocélula . Si la función está activada, se muestra el símbolo correspondiente . El flash entonces puede disparar un flash en cuando otro flash emite un pulso de luz .
-
Page 40: Operación
Control inalámbrico Regulación de potencia de flash Presione el botón „+“ (6) y „–“ (7) para ajustar la potencia del flash . La potencia del flash se puede ajustar entre 1 .0 y 7 .0 . La potencia de salida mínimo es de 1 .0 y la máxima de 7 .0 . Para cambios de 0 .1 F-Stop, presione el botón „+“... - Page 41 Operación Modo de liberación de patrón de máscara El modo patrón de máscara se utiliza para liberar el motivo principal rápida y fácilmente usando el software apropiado (no suministrado) . Tenga en cuenta que necesitará por lo menos dos flash para poder utilizar la función correctamente . 1 .
-
Page 42: Especificaciones Técnicas
Especificaciones técnicas Potencia del flash 400 Ws Control de potencia 7 escalones de diafragma (en 0 .1F o 1,0F pasos) Número de guía 66 (con ISO 100) Lámpara de modelado 15 W LED Tiempo de recarga del flash Aprox . 0,9 segundos Duración del flash Normal: 1/800s –... -
Page 43: Eliminación
Por ello, los aparatos eléctricos están marcados con el símbolo adyacente . Conformidad Por la presente, el fabricante declara que el símbolo CE se ha adherido al Rollei Studioblitz 400 de acuerdo con los requisitos esenciales y otras disposiciones rele-... -
Page 44: Avvertenze Per La Sicurezza
Avvertenze per la sicurezza Grazie per aver scelto il flash da studio Rollei 400 . Leggere le istruzioni con attenzione . Conservarle con cura e fornirle ad altri utenti, se necessario . Non porre mai questo flash in un ambiente in cui questo prodotto può venire a contatto con liquidi infiammabili . - Page 45 Non effettuare riparazioni sull‘unità flash da soli . In caso di problemi, contattare il rivenditore presso il quale è stato acquistato il dispositivo o il centro di assistenza Rollei . Prima di utilizzare il flash, assicurarsi di aver serrato saldamente la maniglia per montare il flash su un treppiede .
-
Page 46: Panoramica
Panoramica ITALIAN... - Page 47 Panoramica Tubo flash Luce di modellazione/Tono di avviso Luce di modellazione luminosa Tasto flash di prova Inserto per schermo riflettore Connessione sincronizzazione Tasto di sblocco per accessorio Tasto Imposta / Modalità Modello Fissaggio a vite per treppiedi per Maschera / Fotocellula lampada Controllo wireless Potenza flash (+)
-
Page 48: Controllo Wireless
Controllo wireless Premere il tasto „Controllo wireless“ (13) per attivare l‘impostazione, navigare con il tasto „+“ (6) e „–“ (7) attraverso le diverse impostazioni . Controllo wireless: C: Controllo Canon* wireless (il flash può essere controllato tramite il trasmettitore Canon* disponibile) N: Controllo Nikon* wireless (il flash può... - Page 49 Controllo wireless Fotocellula Premere il „Tasto Imposta“ (12) e il tasto „Controllo wireless“(13) contemporaneamente per 2 secondi, per attivare o disattivarela fun- zione fotocellula . Quando la funzione è attiva, sarannovisualizzati i caratteri corrispondenti . Il flash è quindi in grado di azionare un flash non appena un altro flash emette un impulso luminoso .
-
Page 50: Funzionamento
Controllo wireless Regolazione potenza flash Premere il tasto „+“ (6) e „–“ (7), per impostare la potenza del flash . La potenza del flash può essere impostata tra 1,0 e 7,0 . La potenza di uscita minima è di 1 .0 e la massima di 7 .0 . Per modificaredi un 0 .1 F-Stop, premere una volta il tasto „+“... - Page 51 Funzionamento Modaltà posizione libera Mask Pattern La modalità pattern mask viene utilizzata per rilasciare rapidamente e facilmente il motivo principale utilizzando un software appropriato (non incluso) . Si noti che sono necessari almeno due flash per utilizzare la funzione in modo corretto ed efficace .
-
Page 52: Dati Tecnici
Dati tecnici Potenza di flash 400 Ws Regolazione potenza 7 livelli di regolazione (in passi da 0,1F o 1,0F) Codice di riferimento 66 (con ISO 100) Luce pilota LED 15 W Tempo di ricarica Ca . 0,9 secondi Durata del flash Normale: 1/800s –... -
Page 53: Smaltimento
. Pertanto, gli apparecchi elettrici sono contrassegnati con il simbolo adiacente . Conformità Con la presente il produttore dichiara che il Rollei Studioblitz 400 presenta marcatura CE in conformità con i requisiti essenziali e altre disposizioni pertinenti delle seguenti direttive europee:... -
Page 54: Veiligheidsinstructies
Veiligheidsinstructies Dank u voor het kiezen van de Rollei studioflits 400 . Lees de handleiding aandachtig door . Bewaar deze op een veilige plaats en geef indien nodig de handleiding door aan andere gebruikers . Plaats deze flitser nooit in een omgeving waar dit product in contact kan komen met brandbare vloeistoffen . - Page 55 Voer zelf geen reparaties aan de flitser uit . Als er zich een probleem voordoet, neem dan contact op met de dealer waar u het apparaat heeft gekocht of met het Rollei servicecentrum . Controleer voordat u de flitser gebruikt of u de handgreep stevig heeft vastge- draaid om de flitser op een lampstatief te monteren .
-
Page 56: Overzicht
Overzicht DUTCH... - Page 57 Overzicht Flitsbuis Instellicht/waarschuwingstonen Led-instellicht Testflits-toets Insteekbare eenheid voor Sync-aansluiting reflectorscherm Instellingsknop / modus Mask Ontgrendelknop voor accessoires Pattern / fotocel Bevestigingsschroef voor lampstatieven Draadloze bediening Flitssterkte (+) Aan/uit-schakelaar Flitssterkte (–) Microzekering Infraroodsensor Flitskopvergrendeling Display Groep A/B/D/E/F/G/H/J Waarschuwingstonen Draadloze bediening Fotocel actief Flitssterkte M: 1 .0 –...
-
Page 58: Draadloze Bediening
Draadloze bediening Druk op de knop „Draadloze bediening” (13) om de instelling te activeren, navigeer met de „+” (6) en „-“ (7) knoppen door de verschillende instellingen . Draadloze bediening: C: Draadloze Canon* bediening (de flitser kan via de optioneel verkrijgbare Canon* zender worden bediend) N: Draadloze Nikon* bediening (de flitser kan via de optioneel verkrijgbare Nikon* zender worden bediend) - Page 59 Draadloze bediening Fotocel Druk de „Instellingsknop” (12) en de knop „Draadloze bediening (13) tegelijkertijd voor 2 seconden in, om de fotocelfunctie in of uit te schakelen . Als de functie actief is, wordt het bijbehorende teken in het display weergegeven . De flitser kan dan een flits afgeven, zodra een andere flitser een lichtpuls geeft .
-
Page 60: Bediening
Draadloze bediening Flitssterkte reguleren Druk op de knop „+”(6) en „–” (7), om het flitssterkte in te stellen . Het flitssterkte kan van 1,0 tot 7,0 worden ingesteld . Het minimale uitgangsvermogen is 1 .0 en het maximale 7 .0 . Druk voor wijzigingen van elk 0 .1 F-Stop, één keer op de „+”... - Page 61 Bediening Vrijstelmodus Mask Pattern De Mask Pattern Modus wordt gebruikt om het hoofdonderwerp snel en eenvoudig vrij te maken met behulp van de juiste software (niet inbegrepen) . Houd er rekening mee dat u ten minste twee flitsen nodig heeft om de functie correct en effectief te kunnen gebruiken .
-
Page 62: Technische Gegevens
Technische gegevens Flitsvermogen 400 Ws Aanpassingsvermogen 7 stops (in 0,1F of 1,0 F stappen) Richtgetal 66 (bij 100 ISO) Modelleerlicht 15 W LED Recycletijd Ca . 0,9 seconden Flitsduur Normaal: 1/800s – 1/2200s Kleurtemperatuur 5500 ± 200K Flitsgebruik M (handmatig), Mask Pattern Kanalen | Groepen 0 –... -
Page 63: Verwijderen
Unie en andere Europese landen met systemen voor gescheiden inzameling van recycleerbare materialen. Oude apparaten horen niet bij het huishoudelijke afval! Als de Rollei Studioblitz 400 niet meer kan worden gebruikt, is elke consument wettelijk verplicht oude apparaten gescheiden te houden van het huishoudelijk afval, bijvoorbeeld bij een verzamelpunt van zijn gemeente/district . - Page 64 Rollei GmbH & Co. KG In de Tarpen 42 D-22848 Norderstedt Service Hotline: +49 40 270750270 www.rollei.de/social www.rollei.com/social www.rollei.com...