Table of Contents
Advertisement
Available languages
Available languages
Advertisement
Chapters
Table of Contents

Related Manuals for Keystone KSTAP12B


Summary of Contents for Keystone KSTAP12B
- Page 1 Portable Air Conditioner Instruction Manual Model: KSTAP12B KSTAP14B KSTHP14D Thank you for purchasing our Portable Air Conditioner. Before using your air conditioner, please read this instruction manual carefully and keep it for future reference. READ AND SAVE THESE INSTRUCTIONS!
- Page 3 Producto...
- Page 4 1 866 646 4332 1 866 646 4332...
- Page 5 Read This Manual Inside you will find many helpful hints on how to use and maintain your air conditioner properly. Just a little preventive care on your part can save you a great deal of time and money over the life of your air conditioner. You'll find many answers to common problems in the chart of troubleshooting tips.
-
Page 6: Table Of Contents
Contents P r e p a r a t i o n - - - - - - - - - - - - - - - - - - - - - - S a f e t y P r e c a u t i o n s - - - - - - - - - - - - - - - - C a u t i o n s - - - - - - - - - - - - - - - - - - - - - - - -... -
Page 7: Preparation
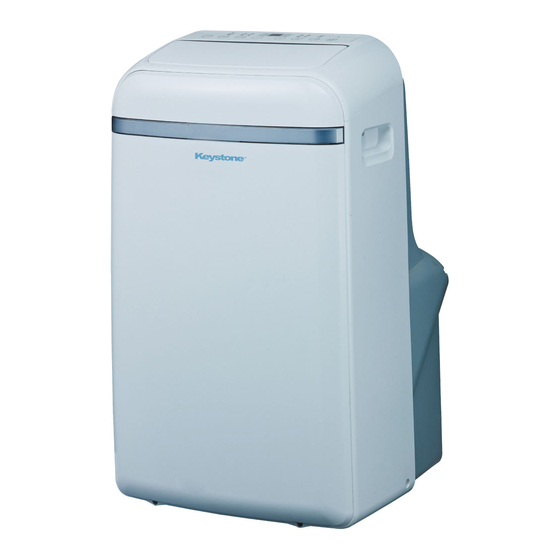
Preparation control panel horizontal louver blade (swing automatically) handle (both sides) Caster upper air filter (behind the grille) f r o n t upper air intake drain outlet air outlet lower air filter lower air intake drain outlet (only for pump heating mode) power cord buckle power cord outlet... -
Page 8: Safety Precautions
Safety Precautions Please read through these instructions before you start the installation process. Improper installation can cause damage to the unit, your personal property, and also poses a personal safety hazard. -Installation must be performed according to the installation instructions. Improper installation can cause water leakage, electrical shock, or fire. -
Page 9: Cautions
Cautions -This appliance can be used by children aged from 8 years and above and person with reduced physical, sensory or mental capabilities or lack of experience and knowledge if they have been given supervision or instruction concerning use of the appliance in a safe way and understand the hazards involved. -
Page 10: Installation
Installation Choosing The Right Location Your installation location should meet the following requirements: -Make sure that you install your unit on an even surface to minimize noise and vibration. -The unit must be installed near a grounded plug, and the Collection Tray Drain (found on the back of the unit) must be accessible. - Page 11 Installation Tools Needed -Medium Philips screwdriver; -Tape measure or ruler; -Knife or scissors; -Saw (optional, to shorten window adaptor for narrow windows) Accessories Your Window Installation Kit fits windows 67.5-123cm(26.5-48”) and can be shortened for smaller windows. Part Description Quantity 1 pc Unit Adaptor Exhaust Hose...
- Page 12 Installation Note: Once the Exhaust Hose assembly and Adjustable Window Slider are prepared, choose from one of the following two installation methods. Type 1: Hung Window Installation Foam seal B (Adhesive type-shorter) Window slider B Window slider A (if required) Foam seal A (Adhesive type) Cut the adhesive foam seal A...
- Page 13 Installation Type 2: Sliding Window Installation Foam seal B (Adhesive type-shorter) Window slider B (if required) Foam seal A (Adhesive type) Window slider A Cut the adhesive foam seal A Insert the window slider and B strips to the proper assembly into the window lengths, and attach them to opening.
-
Page 14: Operation
Operation Swing button(optional) Mode button Selects the appropriate operating mode. Each time Used to initiate the Auto swing feature. you press the button, a mode is selected in a sequence When the operation is ON, press the that goes from AUTO, COOL, DRY, FAN and HEAT SWING button can stop the louver at (cooling only models without).The mode indicator light the desired angle. - Page 15 Operation LED display Shows the set temperature in °C or °F and the Auto-timer settings. While on DRY and FAN modes, it shows the room temperature. Shows Error codes and protection code: E1-Room temperature sensor error. E2-Evaporator temperature sensor error. E3-Condenser temperature sensor error (on some models).
- Page 16 SLEEP/ECO operation -Press this button, the selected temperature will increase(cooling) or decrease(heating) by 1°C/1°F 30 minutes.The temperature will then increase (cooling) or decrease (heating) by another 1°C/1°F after an additional 30 minutes. This new temperature will be maintained for 7 hours before it returns to the originally selected temperature. This ends the Sleep/Eco mode and the unit will continue to operate as originally programmed.
- Page 17 Operation Other features FOLLOW ME/TEMP SENSING feature(optional) NOTE:This feature can be activated from the remote control ONLY. The remote control serve- sas a remote thermostat allowing for the precise temperature control at its location. To activate the Follow Me/Temp Sensing feature, point the remote control towards the unit and press the Follow Me/Temp Sensing button.
- Page 18 -During heating pump mode, remove the lower drain plug from the back of the unit, install the drain connector(5/8" universal female mender) with 3/4" hose(locally purchased). For the models without drain connector, just attach the drain hose to the hole. Place the open end of the Hose adaptor directly over the drain area in your basement floor.
- Page 19 Maintenance Safety Precautions -Always unplug the unit before cleaning or servicing. -DO NOT use flammable liquids or chemicals to clean the unit. -DO NOT wash the unit under running water. Doing so causes electrical danger. -DO NOT operate the machine if the power supply was damaged during cleaning. A dam- aged power cord must be replaced with a new cord from the manufacturer.
- Page 20 Faults Diagnosis Please check the machine according to the following form before asking for maintenance: Pr oblem Pos sible Cause Troubleshooting The Water Collection Tray is full. Turn off the unit, drain the water P1 Error Code from the Water Collection Tray Unit does not turn and restart the unit.
- Page 21 Design and Compliance Notes Design Notice In order to ensure the optimal performance of our products, the design specifications of the unit and remote control are subject to change without prior notice. Energy Rating Information The Energy Rating for this unit is based on an installation using an un-extended exhaust duct without adapters A or B (as shown in the Installation section of this manual).
- Page 22 Sociable Remark When using this dehumidifier in the European countries, the following information must be followed: DISPOSAL: Do not dispose this product as unsorted municipal waste. Collection of such waste separately for special treatment is necessary. It is prohibited to dispose of this appliance in domestic household waste. For disposal, there are several possibilities: A) The municipality has established collection systems, where electronic waste can be disposed of at least free of charge to the user.
- Page 24 CP025IU-PD(US)XB...
- Page 25 Aire Acondicionado Portátil Manual de Instrucciones Model: KSTAP12B KSTAP14B KSTHP14D Gracias por comprar nuestro acondicionador de aire portátil. Antes de usar el aire acondicionado, lea atentamente este manual de instrucciones y consérvelo para futuras consultas. ¡LEA Y GUARDE ESTAS INSTRUCCIONES!
- Page 28 Contenidos ……………………… …………………… ……………………………………………… …… Preparació n ..…………… ……………… …………………………………………………… …… Precauciones de seguridad ……………………… ………………………………………… ………………………… …… Precauciones ..…………………………… ………………………………………………… ………………… …… Instalació n ..……………………… ………………………………………………………… ………… …… Funcionamiento ………………… ………………………………………………………………………… M a n t e n i m i e n t o .
-
Page 29: Preparación
Preparación Panel de control Lámina horizontal de la compuerta Filtro de aire superior (oscilación automática) (Detrás de la rejilla) Mango Entrada aire (Ambos lados) superior Salida de drenaje Salida de aire Filtro de aire inferior Entrada de aire inferior Salida de drenaje (solo para el modo de calentamiento con bomba) -
Page 30: Precauciones De Seguridad
Precauciones de seguridad Lea estas instrucciones antes de iniciar el proceso -NO instale su aire acondicionado en una de instalación. Una instalación inadecuada puede habitación húmeda, como un cuarto de baño o causar daños a la unidad, a su propiedad personal lavadero. -
Page 31: Precauciones
Precauciones -Este aparato puede ser utilizado por niños de 8 años o más y personas con capacidades físicas, sensoriales o mentales reducidas o sin experiencia y conocimiento si se les ha dado supervisión o instrucciones sobre el uso del aparato de manera segura y a condición de que entiendan los peligros involucrados. -
Page 32: Instalación
Instalación Elija la ubicación correcta Recomendar la instalación 50cm 19.7inch Su ubicación de instalación debe cumplir con los NOTA: siguientes requisitos: Todas las ilustraciones del manual solo sirven para -Asegúrese de instalar su unidad en una superficie fines explicativos. Su aparato puede ser uniforme para minimizar el ruido y las ligeramente diferente. - Page 33 Instalación Herramientas necesarias -Destornillador Phillips medio; -Cinta métrica o regla; - Cuchillo o tijeras; - Sierra (opcional, para acortar el adaptador de ventana para ventanas estrechas) Accesorios Su Kit de instalación de ventanas se ajusta a ventanas de 67,5-123cm (26,5-48 ") y se puede acortar para las ventanas más pequeñas.
- Page 34 Kit de instalación de ventanas Primer paso: Prepare el conjunto de la manguera de escape Presione la manguera de escape en el adaptador de la corredera de ventana y el adaptador de la unidad, sujete automáticamente usando las hebillas elásticas de los adaptadores. Manguera Conjunto de la manguera escape...
- Page 35 Instalación Nota: Una vez que se han preparado el conjunto de la manguera de escape y la corredera ajustable de la ventana, elija uno de los siguientes dos métodos de instalación. Tipo 1: Instalación de ventana colgante Sello de espuma B (Tipo adhesivo - más Corredera corto)
- Page 36 Inserte el adaptador de la corredera de ventana en el agujero en la corredera de la ventana. Tipo 2: Instalación de ventana deslizante Sello de espuma B (Tipo adhesivo - más corto) Corredera de ventana B Sello de espuma (si se requiere) Corredera (Tipo adhesivo) ventana A...
- Page 37 Instalación Sello de espuma C Soporte de (Tipo sin adhesivo) seguridad 2 tornillos Corte la tira de sellado de espuma sin Si lo desea, instale el soporte de adhesivo C para que coincida con la altura seguridad con 2 tornillos como se de la ventana.
-
Page 38: Funcionamiento
Funcionamiento Botón Modo Botón Oscilación (opcional) Selecciona el modo de Botón Ventilador/Ionizado Se utiliza para iniciar la función funcionamiento apropiado. Ionizado es opcional) de Oscilación automática. Cada vez que pulse el botón, Controla la velocidad del se selecciona un modo en una Mientras que la unidad funciona, ventilador. - Page 39 Funcionamiento Pantalla LED Muestra la temperatura programada en °C o °F y las configuraciones del temporizador automático. Mientras la unidad está funcionando en el modo SECADO o el modo VENTILADOR, muestra la temperatura ambiente. Muestra códigos de error y de protección: E1-Error del sensor de temperatura ambiente.
- Page 40 Función SUTO -Cuando ajusta el aire acondicionado en el modo AUTO, este seleccionará automáticamente el enfriamiento, el calentamiento (los modelos de enfriamiento no la tienen) o la la función de solo ventilador, dependiendo de la temperatura que haya seleccionado y de la temperatura ambiente. - El aire acondicionado automáticamente controlará...
- Page 41 Funcionamiento Otras características Caracterí stica SÍ GUEME/DETECCIÓN DE TEMPERATURA (opcional) NOTA: Esta función se puede activar SOLAMENTE desde el mando a distancia. El mando a distancia sirve como un termostato remoto que permite mantener un control preciso de la temperatura en su ubicación.
- Page 42 -Durante el modo de calentamiento con bomba, retire el tapón de drenaje de la parte posterior de la unidad, instale el conector de drenaje (mandril hembra universal de 5/8 ") con manguera de 3/4" (adquirida localmente). Para los modelos sin conector de drenaje, simplemente conecte la manguera de drenaje al orificio.
-
Page 43: M A N T E N I M I E N T
Mantenimiento Precauciones de seguridad -Siempre desconecte la unidad antes de los procedimientos de mantenimiento y reparación. -NO utilice líquidos inflamables o productos químicos para limpiar la unidad. -NO lave la unidad bajo agua corriente. De lo contrario puede provocar un peligro eléctrico. -NO utilice la máquina si la fuente de alimentación se ha dañado durante la limpieza. - Page 44 Limpie la unidad Limpie la unidad con un paño húmedo y sin pelusa y un detergente suave. Seque la unidad con un paño seco sin pelusa. Almacene la unidad cuando no esté en uso -Drene la bandeja de recogida de agua de la unidad de acuerdo con las instrucciones de la siguiente sección.
-
Page 45: Diagnóstico De Fallas
Diagnóstico de fallas Compruebe la máquina según el siguiente formulario antes de solicitar mantenimiento: Problema Posible causa Resolución de problemas La bandeja de recogida de agua está llena. unidad Código de error P1 Apague la unidad, drene el agua de enciende la bandeja de recogida de agua y reinicie la unidad. -
Page 46: Notas De Diseño Y Cumplimiento
Notas de diseño y cumplimiento Aviso de diseño Información sobre calificación energética Con el fin de garantizar el rendimiento óptimo de nuestros productos, las especificaciones de diseño de la unidad y del mando a distancia están sujetos a cambios sin previo aviso. El valor energético de esta unidad se basa en una instalación que utiliza un conducto de escape no extendido sin los adaptadores A o B (como se muestra en la sección Instalación de este manual). -
Page 47: Observación Sociable
Observación sociable Al utilizar este deshumidificador en los países europeos, se debe seguir la siguiente información: DESECHO: No deseche este producto como desechos municipales no clasificados. Se necesita la recogida de estos residuos por separado para un tratamiento especial. Está prohibido desechar este aparato jutno con los desechos domésticos. Para la eliminación, existen varias posibilidades: El municipio ha establecido sistemas de recolección, donde los residuos electrónicos pueden ser eliminados al menos de forma gratuita para el usuario. - Page 48 CP025IU-PD(US)XB...