Miele ProLine CS 1411 Operating And Installation Instructions
Deep fat fryer
Hide thumbs
Also See for ProLine CS 1411:
- Operating and installation instructions (48 pages) ,
- Operating and installation manual (44 pages) ,
- Operating and installation instructions (36 pages)
Table of Contents

Related Manuals for Miele ProLine CS 1411


Summary of Contents for Miele ProLine CS 1411
- Page 1 Operating and installation instructions ProLine deep fat fryer To avoid the risk of accidents or damage to the appliance it is essential to read these instructions before it is installed and used for the first time. en-GB M.-Nr. 07 180 430...
-
Page 2: Table Of Contents
Contents Warning and Safety instructions................ 4 Caring for the environment ................ 13 Guide to the appliance .................. 14 Deep fat fryer......................14 Indicators....................... 15 Accessories supplied .................... 15 Before using for the first time ................ 16 Cleaning the ProLine element for the first time ............. 16 Switching on the ProLine element for the first time .......... - Page 3 Contents Building-in dimensions ..................36 Installing several ProLine elements ............... 37 Installation ......................39 Electrical connection ..................... 43...
-
Page 4: Warning And Safety Instructions
They contain important notes on in- stallation, safety, use and maintenance. Miele cannot be held liable for damage caused by non-compliance with these instructions. Keep these instructions in a safe place and ensure that new users... - Page 5 Warning and Safety instructions Correct application This deep fat fryer is intended for use in domestic households and similar environments including, for example: – in kitchens used by employees in shops, offices and other com- mercial settings – by customers in hotels, motels and other residential settings –...
- Page 6 Warning and Safety instructions Safety with children Children between the ages of 0 and 8 years old are not permitted to use this deep fat fryer. Children 8 years and older are permitted to use this deep fat fryer but must be supervised at all times. This deep fat fryer can be used by people with reduced physical, sensory or mental capabilities or lack of experience and knowledge if they are supervised at all times or if they have been shown how to use it in a...
- Page 7 Unauthorised installation, maintenance and repairs can cause considerable danger for the user. Installation, maintenance and re- pairs must only be carried out by a Miele authorised technician. A damaged deep fat fryer can be dangerous. Check it for visible signs of damage.
- Page 8 Miele authorised service technician. Otherwise the warranty is invalidated. Miele can only guarantee the safety of the appliance when genu- ine original Miele replacement parts are used. Faulty components must only be replaced by Miele spare parts.
- Page 9 Warning and Safety instructions Risk of electric shock. Do not use the deep fat fryer if it is damaged. If you detect a fault during use switch it off immediately. Disconnect it from the mains electricity supply. Contact Miele Service.
- Page 10 Warning and Safety instructions Correct use The deep fat fryer gets hot when in use and remains hot for some time after being switched off. The risk of burning is present until the residual heat indicators have gone out. ...
- Page 11 Warning and Safety instructions Do not pour hot fat from frying into plastic containers. These will melt at high temperatures. Only use heat-resistant containers for hot fat. The deep fat fryer must only be used when it has been filled with oil and without the cover on it.
- Page 12 Warning and Safety instructions Cleaning and care Do not use a steam cleaning appliance to clean this deep fat fryer. The steam could reach electrical components and cause a short cir- cuit.
-
Page 13: Caring For The Environment
/ recycling centre for electrical and electronic ap- pliances, or contact your dealer or Miele for advice. You are also respons- ible (by law, depending on country) for deleting any personal data that may be stored on the appliance being disposed of. -
Page 14: Guide To The Appliance
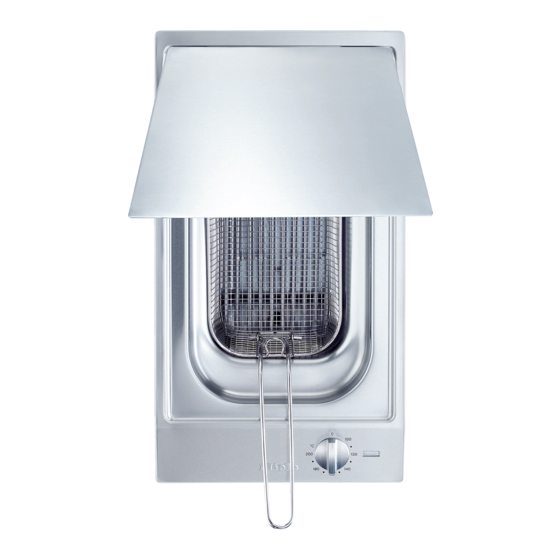
Guide to the appliance Deep fat fryer a Frying basket f Drain tap b Handle (folds away, removable) g Indicators c Hanging facility h Control knob d Bracket for hanging the frying basket i Oil reservoir e Heating element (can be raised up) -
Page 15: Indicators
Guide to the appliance Indicators Accessories supplied The accessories supplied with your ap- pliance as well as a range of optional ones are available to order from Miele (see “Optional accessories”). j In-operation indicator k Temperature indicator light Frying basket... -
Page 16: Before Using For The First Time
Before using for the first time Please stick the extra data plate for Switching on the ProLine ele- the appliance supplied with this doc- ment for the first time umentation in the space provided in The metal components have a protect- the “After sales service”... -
Page 17: Operation
Operation Fryer lid Switching on Risk of fire with overheated food. Unattended food can overheat and catch alight. Do not leave the deep fat fryer unat- tended when you are using it. Do not switch the deep fat fryer on when it is empty or with the heating element raised up. -
Page 18: Residual Heat Indicator
Operation Residual heat indicator Before frying If the deep fat fryer is still hot, the resid- Do not use the fryer lid when deep ual heat indicator will light up after it fat frying. has been switched off. Only use oil and fat that has a high flash point. -
Page 19: Deep/Shallow Frying
Operation Deep/shallow frying Set the temperature required (see chart) and wait until the temperature indicator goes out for the first time. The oil has now reached the set tem- perature. Carefully lower the frying basket con- taining the food to be fried into the hot oil. - Page 20 Operation [°C] [min]* Food, fresh Quantity Doughnuts Qty 4 6–8 Camembert 4 x 1/2 pieces 2–3 Raw battered vegetables 400 g 7–9 Chicken quarters, breaded 2 pieces, each 8–10 250 g Croquette potatoes 400 g pre-fry 2–4 fry 3–5 Apple turnovers Qty 5 6–8 Parsley 1–2...
- Page 21 Operation [°C] [min]* Food, frozen Quantity Fish fingers 300 g 4–6 Croquette potatoes 400 g pre-fry 1–2 fry 3–4 Chips 250 g 2–3 400 g 3–4 Plaice fillet, unbreaded 300 g 3–5 Squid rings, unbreaded 250 g 2–3 Temperature / Frying times in min. * The frying times given in the chart are only a guide.
-
Page 22: Tips For Frying
Operation – Heating the oil for too long will speed Tips for frying up its deterioration rate. Handling and cooking food correctly – Food should be as dry as possible for is essential for maintaining good frying, as moisture can cause froth- health. -
Page 23: After Frying
Operation Filter the oil by pouring it through kit- After frying chen paper or a metal sieve lined with Switch the fryer off and filter the oil. kitchen paper or filter paper and store This not only removes impurities which it in a closed, heat-resistant container can affect the taste of the food, but will until it is needed again. -
Page 24: Safety Features
Safety features Turn the control to 0 and wait until the Safety switch-off heating element has cooled down. Your deep fat fryer is fitted with a safety switch-off. It will switch the heating off automatically if: – The oil reservoir is not filled to at least the lower level marker. -
Page 25: Cleaning And Care
Cleaning and care Allow the ProLine element to cool Danger of burning due to hot down before cleaning. surfaces. The surfaces will be hot after cook- Clean the ProLine element and ac- ing. cessories after each use. Switch the grill off. ... -
Page 26: Stainless Steel Frame/Control Panel And Lid
Cleaning and care Stainless steel frame/control Rotary controls panel and lid Clean the rotary control(s) using a solution of warm water and a little Clean the frame, the control panel washing-up liquid applied with a soft and the lid with a solution of warm sponge. -
Page 27: Oil Reservoir
Cleaning and care Oil reservoir Drain the oil or water (if the fryer has been used for cooking pasta) out of the reservoir before cleaning (see “After frying” in the “Operation” chapter). Then raise the heating element. Use paper towel to remove any coarse soiling. -
Page 28: Problem Solving Guide
The safety switch-off has been activated (see “Safety switch-off” in the “Safety features” chapter). Check whether the fuse has tripped. Contact an electrician or Miele Service (for the minimum fuse rating, see data plate). The oil has an unpleas- The oil is not suitable. -
Page 29: Optional Accessories
250 ml Miele appliances. These products can be ordered through the Miele Webshop. They can also be ordered from Miele Removes heavy soiling, limescale de- (see end of this booklet for contact de- posits and aluminium residues tails) or from your Miele dealer. -
Page 30: After Sales Service
In the event of any faults which you cannot remedy yourself, please contact your Miele Dealer or Miele Service. Contact information for Miele Service can be found at the end of this document. Please note that telephone calls may be monitored and recorded for training pur- poses and that a call-out charge will be applied to service visits where the problem could have been resolved as described in this booklet. -
Page 31: Installation
Installation Safety instructions for installation Risk of damage from incorrect connection. Incorrect installation can cause damage to the ProLine element. The ProLine element must only be installed by a qualified person. Damage from falling objects. Take care not to damage the ProLine element when fitting wall units or a cooker hood above it. -
Page 32: Safety Distances
Installation Safety distances Safety distance above the ProLine element The safety distance specified by the manufacturer of the cooker hood must be maintained between the ProLine ele- ment and the cooker hood above it. If the cooker hood manufacturer's in- structions are not available or if com- bustible objects are installed above the ProLine element (e.g., cabinets, utensil... - Page 33 Installation Safety distances to the sides and back of the hob The ProLine elements may be installed with a wall at the rear and a tall unit or wall to one side (right or left) (see illus- trations). Minimum distance between the back of the worktop cut-out and the rear edge of the worktop: Not allowed...
- Page 34 Installation Safety distance when installing the appliance near a wall with additional niche cladding A minimum safety distance must be maintained between the worktop cut-out and any niche cladding to protect it from heat damage. If the niche cladding is made from a combustible material (e.g. wood) a minimum safety distance ...
-
Page 35: Installation Notes
Installation Tiled worktop Installation notes Sealing between the ProLine Element and the worktop Grout lines and the hatched area un- derneath the ProLine element frame must be smooth and even. If they are not, the ProLine element will not sit flush with the worktop and the sealing The ProLine element and worktop strip underneath the top part of the ap-... -
Page 36: Building-In Dimensions
Installation Building-in dimensions a Spring clamps b Front c Installation height d Casing depth including mains connection box with mains connection cable, L = 2000 mm e Drain tap... -
Page 37: Installing Several Proline Elements
Installation Installing several ProLine elements Example: 3 ProLine elements a Spring clamps b Spacer bars c Gap between spacer bars and worktop d Cover e ProLine element width less 8 mm f ProLine element width g ProLine element width less 8 mm h Worktop cut-out... - Page 38 Installation Calculating the worktop cut-out The frames of the ProLine elements overlap the worktop at the outside right and left by 8 mm on each side. Add up the widths of the ProLine elements and subtract 16 mm from this figure. Example: 288 mm + 288 mm + 380 mm = 956 mm - 16 mm = 940 mm The ProLine elements are 288 mm, 380 mm or 576 mm wide depending on the...
-
Page 39: Installation
Installation Installation Preparing the worktop Make the worktop cut-out as shown in “Building-in dimensions” or as cal- culated (see “Installing several Pro- Line appliances” in the “Installation” chapter). Remember to maintain the minimum safety distances (see “Safety distances” in the “Installa- tion”... - Page 40 Installation Natural stone worktops You will need heavy duty double-sided tape (not supplied) to secure the spring clamps and spacer bars. Apply silicone to the side and lower edges of the spring clamps and the spacer bars . Then fill gap between spacer bar ...
- Page 41 Installation Fitting the ProLine element Installing several ProLine elements Feed the mains connection cable Push the built-in ProLine element to down through the cut-out. the side until the holes in the spacer bar can be seen. Starting at the front, position the Pro- Line appliance in the worktop cut- out.
- Page 42 Installation Connecting the ProLine element Connect the ProLine element(s) to the mains electricity supply. Check that each ProLine element is working. Removing a ProLine element If the ProLine element cannot be ac- cessed from below, you will need a special tool to remove it.
-
Page 43: Electrical Connection
Miele cannot be held liable for unauthorised work. Miele cannot be held liable for dam- age or injury caused by the lack of or inadequacy of an on-site earthing system (e.g. electric shock). - Page 44 A suitable connec- tion cable is available to order from Safety fuses Miele. Completely remove fuses. Automatic circuit breakers Press the (red) test button until the middle (black) button springs out.
- Page 47 Tel: +65 6735 1191 Fax. +971 4 3418 852 Fax: 011-46 900 001 Fax: +65 6735 1161 800-MIELE (64353) E-mail: customercare@miele.in E-Mail: info@miele.com.sg E-Mail: info@miele.ae Internet: www.miele.in Internet: www.miele.sg Website: www.miele.ae Manufacturer: Miele & Cie. KG, Carl-Miele-Straße 29, 33332 Gütersloh, Germany...
- Page 48 CS 1411 en-GB M.-Nr. 07 180 430 / 08...