Advertisement
Advertisement

Related Manuals for Sharper Image SI-160


Summary of Contents for Sharper Image SI-160
- Page 1 2-IN-1 STEAM MOP OWNER’S GUIDE MODEL SI-160...
-
Page 3: Table Of Contents
CONTENTS Important Safety Instructions ................................4 Product Information .....................................6 Assembly ..........................................9 Filling Water Tank ......................................11 How to Use .........................................12 Storage & Care ......................................15 Troubleshooting ......................................16 Warranty..........................................17... -
Page 4: Important Safety Instructions
IMPORTANT SAFETY INSTRUCTIONS This owner’s guide and any additional inserts are considered part of the product. They contain important information about safety, use and disposal. Before using the product, please familiarize yourself with all operating and safety instructions. Please keep all documents for future reference and pass these documents on, together with the product, to any future owner. - Page 5 does not fit, contact a qualified electrician. Do not modify the plug in any way. - Before plugging power cord into electrical outlet, be sure that all electrical information on rating label agrees with your power supply. - To reduce the likelihood of circuit overload, DO NOT operate another high wattage appliance on the same circuit.
-
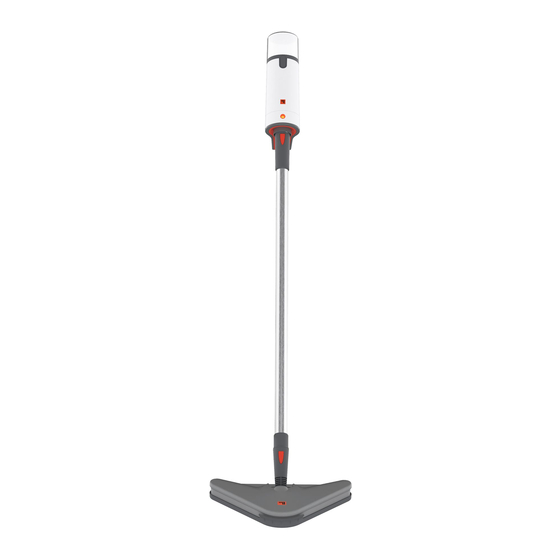
Page 6: Product Information
PRODUCT INFORMATION The following features are included with your product. Carefully inspect the packing material for all parts listed below. To obtain possible missing parts, contact (833.800.8669) or (help@sihomecomfort.com). UNIT FEATURES & ACCESORIES Water Tank Water Tank Release Button Main Body Steam Indicator Light Accessory Release Button A Accessory Release Button B... - Page 7 The Water Tank is the reservoir where water is held before being transferred to the heat exchange and converted to steam. The Water Tank holds 8.45 ounces (250ml). To fill the Water Tank, push the Water Tank Release Button and pull upwards. The Main Body can be used as an individual handheld unit with attachable and interchangeable accessories for cleaning and sanitizing.
- Page 8 that you test a small inconspicuous spot before proceeding. The Jet Nozzle connects to the Steam Nozzle or the Extension Pole and is designed to focus the flow of steam for concentrated cleaning. The Carpet Glider attachment attaches to the Mop Head to steam and freshen carpets, area rugs and other soft surfaces.
-
Page 9: Assembly
4. Refer to “How to Use” on page 12 for instructions on how to use the Steam Mop function of your SI-160 2-in-1 Steam Mop 5. To use the Carpet Glider, first attach Microfiber Pad following steps listed above. Then, lay Carpet Glider on flat surface, with clasps facing up. - Page 10 STEAM CLEANER SETUP To use your SI-160 2-in-1 Steam Mop as the handheld steam cleaner, follow the setup instructions below: CAUTION: Always allow unit to cool before connecting/disconnecting any accessories. 1. Attach the Jet Nozzle to the Steam Nozzle by interlocking the Accessory Release Button on the Steam Nozzle with the triangle-shaped cutout on the Jet Nozzle.
-
Page 11: Filling Water Tank
FILLING WATER TANK 1. Release the Water Tank from the Main Body (if needed) by pressing the Water Tank Release Button and pulling Water Tank away from the Main Body. 2. Locate the rubber Water Tank Cap and lift up to expose the Water Tank Fill Hole. 3. -
Page 12: How To Use
HOW TO USE GENERAL OPERATION NOTE: Be sure that Water Tank has been filled and that all desired accessories are connected before following these steps. 1. For first time use, remove protective plastic cover from electrical plug. Plug power cord into a 120V electrical outlet. - Page 13 STEAM CLEANING CAUTION: When steaming any surface for the first time, it is recommended that you test on a small inconspicuous area before proceeding. Do not use on leather, wax, polished furniture and floors, or other delicate, steam-sensitive surfaces. • Make sure desired cleaning accessories are properly connected.
- Page 14 • The brass Utility Brush is useful for heavy-duty jobs and durable surfaces such as BBQ grills, oven racks, etc. DO NOT use this Brush on anything that the hard bristles might scratch or damage. • The Extension Pole should be attached for mopping floors, but is also useful for reaching overhead or otherwise hard-to-reach places.
-
Page 15: Storage & Care
STORAGE & CARE PROPER STORAGE Preparing your 2-In-1 Steam Mop for storage is quick and simple. When you have finished your steaming tasks, follow the steps listed below. 1. Unplug power cord. 2. Allow unit to completely cool (at least 30 minutes). 3. -
Page 16: Troubleshooting
TROUBLESHOOTING PROBLEM POSSIBLE CAUSE AND SOLUTION Unit fails to heat up. Unit is not plugged in. Plug power cord into electrical outlet. Note, unit will immedi- Steam Indicator ately begin heating up. Light DOES NOT Household circuit breaker / ground fault interrupter has tripped or blown a fuse. Re- illuminate. -
Page 17: Warranty
G U A R A N T E E Vornado Air, LLC warrants to the original consumer or purchaser this Sharper Image® Steam Product (“Product”) is free from defects in material or workmanship for a period of one (1) year from the date of purchase. - Page 18 SHARPER IMAGE 833.800.8669 | sihomecomfort.com | help@sihomecomfort.com T160-001 R-, V00...